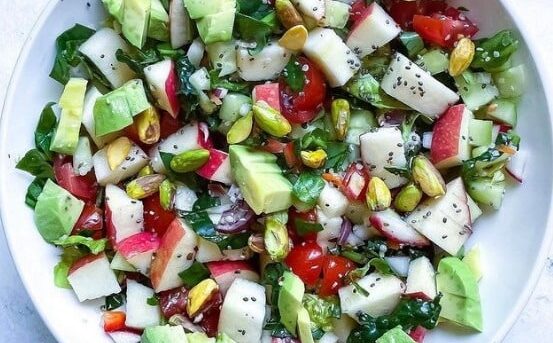
1 lb asparagus 7 each sweet baby bell peppers 5 cups greens of choice 1 pint cherry tomatoes 4 each persian cucumbers 1/2 bunch fresh dill 2 each sliced avocado 1/2 cup pumpkin seeds 2 each lemons squeezed 2 tsp extra virgin olive oil 1 ea salt and pepper to taste
Method:
1. Roast 1 lb asparagus toss in a couple drops of oil and place on a sheet pan for 15-20 minutes at 400 with 7 small sweet baby peppers whole.
2. Once cooked season with a squeezed half a lemon and a sprinkle of salt. Wash and chop greens and red cabbage for the base of the salad.
3. Chop tomatoes, cucumbers and herbs to top the greens.
4. De stem the roasted peppers and chop. Cut asparagus in thirds and add to salad. Add ripe avocado and seeds.
5. Squeeze lemon on top, fresh ground pepper and a drizzle of olive oil or your fave dressing. Enjoy.
8 ounces dry pasta 1 medium head broccoli, cut into bite-size florets (about 2 ½ cups) ½ packet extra-firm tofu, pressed, cut into ¾-inch cubes ½ tbsp tamari 2 tbsp cornstarch 1 tsp garlic powder 1 tsp onion powder 1 tsp paprika Salt to taste ½ tsp sesame or neutral flavored oil
For the sauce: 3 tbsp olive oil 2 tbsp whole-wheat pastry or all-purpose flour 2 cups unsweetened nondairy milk 1 tbsp white miso, dissolved in 1 tablespoon water Dash of garlic powder Dash of onion powder Salt and freshly ground black pepper to taste
Method:
1. Cook the pasta according to packet directions until al dente.
2. Steam the broccoli florets with a tight fitting lid for about 3 minutes, or until just tender.
3. Transfer the tofu to a medium bowl. Add the tamari. Toss to combine. Add the cornstarch, garlic powder, onion powder, paprika, salt, and oil.
4. Toss until the tofu is evenly coated. Air fry in a single layer at 400ºF for 10 minutes. Toss and cook for about 2 minutes more, or until crispy.
5. Heat the olive oil in a large nonstick skillet over medium heat. Add the flour and whisk vigorously for 1 minute, or until fully incorporated. Add the nondairy milk and stir to combine.
6. Add the dissolved miso and cook over medium-low heat for about 5 minutes, or until the sauce is thickened to the desired consistency, stirring constantly. Mix in garlic powder, onion powder, salt, and pepper.
7. Mix in the tofu and broccoli. Add the desired amount of pasta. Serve immediately.
7. Mix in the tofu and broccoli. Add the desired amount of pasta. Serve immediately.
There are dinners you make because something needs to be on the table. And then there are dinners like this Tofu and Mushroom Cheezy Florentine — the kind that comes together in one pan, bubbling with a creamy, cheesy spinach sauce studded with golden mushrooms and tender tofu, deeply savory and satisfying enough to make anyone forget there is no dairy or eggs anywhere in the dish. This is that dinner. The one that turns a handful of simple ingredients into something that tastes genuinely indulgent. The one that gets requested again before the leftovers are even finished.
Florentine, in classical cooking, refers to dishes prepared with spinach, often bound in a rich, creamy sauce. This plant-based version combines that beloved spinach and cream pairing with seared mushrooms and pan-fried tofu, all brought together in a cashew-based cheese sauce that thickens beautifully and coats every component in deeply savory richness.
What makes this dish so outstanding is the layering of textures and flavors — crisp-edged tofu, deeply golden mushrooms, and silky wilted spinach all bound together in a sauce that tastes remarkably close to a classic cream and cheese florentine, without a trace of dairy.
This recipe is 100% vegan, naturally gluten-free, ready in about 35 minutes, and absolutely wonderful served over rice, pasta, or simply with crusty bread to soak up every bit of the sauce.
Recipe Information
Prep Time
Cook Time
Total Time
Servings
Calories
10 mins
25 mins
35 mins
4
~340 kcal
Ingredients
For the Tofu and Mushrooms
400g firm or extra firm tofu, pressed and cubed
250g mushrooms (cremini or button), sliced
2 tbsp olive oil, divided
1 tsp soy sauce
Salt and black pepper to taste
For the Cheezy Florentine Sauce
1 cup (130g) raw cashews, soaked in boiling water for 20 minutes then drained
1½ cups (360ml) vegetable broth
4 tbsp nutritional yeast
4 cloves garlic, minced
1 tbsp lemon juice
½ tsp onion powder
¼ tsp nutmeg
½ tsp salt
¼ tsp white pepper
For the Spinach
5 cups (150g) fresh spinach, roughly chopped
1 small onion, finely diced
Optional Add-ins
¼ tsp chili flakes for gentle heat
½ cup (60g) shredded vegan mozzarella stirred in at the end
Sun-dried tomatoes, chopped
To Serve
Crusty bread
Steamed rice or pasta
Fresh parsley, chopped
Instructions
Press and cube the tofu. Press the tofu for at least 10 minutes to remove excess water, then cut into 2cm cubes.
Sear the tofu. Heat 1 tablespoon of olive oil in a large skillet over medium-high heat. Add the tofu cubes and cook for 6–8 minutes, turning occasionally, until golden on most sides. Drizzle with soy sauce in the final minute of cooking. Remove and set aside.
Sear the mushrooms. In the same pan, heat the remaining oil and add the mushrooms in a single layer. Sear undisturbed for 2–3 minutes before stirring, then continue cooking for another 2–3 minutes until deeply golden. Season with salt and pepper and remove from the pan.
Cook the onion and spinach. Add the diced onion to the pan and cook for 3–4 minutes until softened. Add the spinach in batches, stirring until wilted, about 2–3 minutes total.
Make the cheese sauce. Blend the drained cashews, vegetable broth, nutritional yeast, garlic, lemon juice, onion powder, nutmeg, salt, and white pepper until completely smooth.
Combine everything. Pour the cashew sauce into the pan with the spinach and onion. Add the seared mushrooms and tofu back to the pan. Stir gently to combine and simmer for 4–5 minutes until the sauce has thickened slightly and everything is heated through.
Serve immediately. Garnish with fresh parsley and serve hot over rice, pasta, or with crusty bread.
Pro Tips
Press the tofu thoroughly before cooking to ensure it sears properly rather than steaming in the pan.
Sear the tofu and mushrooms separately to give each enough space to brown properly.
Blend the cashew sauce until completely smooth for the silkiest texture.
Taste and adjust seasoning generously, as the sauce needs to flavor the entire dish.
Why This Combination Works
Tofu provides protein and a satisfying bite once properly seared, mushrooms contribute deep umami richness, and spinach adds the classic florentine character along with color and nutrients. Bound together in a rich cashew cheese sauce, these components create a dish that is balanced in texture and deeply satisfying in flavor.
Flavor Variations
Florentine Pasta Bake: Toss the finished dish with cooked pasta and bake with a breadcrumb topping for a baked pasta version.
Spicy Florentine: Add chili flakes or a diced jalapeño for gentle heat throughout.
Mushroom Lovers Version: Double the mushrooms and use a mix of varieties for extra depth.
Nutritional Highlights (Per Serving)
Calories
Protein
Carbs
Fiber
Fat
~340 kcal
18g
18g
5g
22g
Storage
Refrigerator: Store in an airtight container for up to 4 days. Reheat gently on the stovetop, adding a splash of broth if the sauce has thickened too much.
Freezer: Freezes reasonably well for up to 2 months, though the tofu texture softens slightly after thawing.
Frequently Asked Questions
Can I use a different protein instead of tofu?
Yes — tempeh or chickpeas can be substituted for a different texture and flavor.
Can I make this without a blender?
Yes — use store-bought vegan cream cheese thinned with broth and seasoned with the same garlic and nutritional yeast as an alternative base.
Can I add pasta directly into this dish?
Yes — toss cooked pasta directly into the finished sauce for a complete one-pan meal.
Tried this recipe? Leave a comment below and let us know how it turned out! Tag us on Instagram and Facebook — we love seeing your plant-powered creations. Looking for more comforting vegan dinner recipes? Browse all recipes on Easy Vegan Recipes — new recipes posted every single week!
Sticky, savory, and deeply caramelized, these Vegan Glazed Mushrooms with Sesame Seeds are the kind of dish that disappears from the pan before it reaches the table. Meaty mushrooms are seared until golden and then tossed in a glossy garlic, ginger, and soy glaze that clings to every surface, finished with toasted sesame seeds and fresh spring onions for a bite that is salty, sweet, and full of umami.
Mushrooms are one of the most versatile ingredients in plant-based cooking. They have a naturally meaty texture and a deep, savory flavor that takes beautifully to bold sauces. When cooked properly, they brown, shrink, and concentrate, turning into tender, chewy morsels that soak up flavor like a sponge. This recipe is built around that idea: sear first for depth, then glaze for stickiness.
The glaze is simple but balanced. Soy sauce brings salt and umami, maple syrup adds sweetness and shine, rice vinegar gives a little brightness, and garlic and ginger provide aromatic punch. A touch of toasted sesame oil at the end adds a nutty fragrance. Cornstarch thickens the sauce just enough to cling in a lacquer-like coat rather than pooling at the bottom of the pan.
Serve these mushrooms as a main over steamed rice or noodles, tuck them into lettuce cups or buns, add them to grain bowls, or put them out as an appetizer with toothpicks. They work equally well for a quick weeknight dinner and for holiday entertaining.
This recipe is 100% vegan, easily gluten-free, and ready in just 20 minutes.
Recipe Information
Prep Time
Cook Time
Total Time
Servings
Calories
5 mins
15 mins
20 mins
4
~180 kcal
Ingredients
For the Mushrooms
1 lb (450g) cremini, shiitake, or king oyster mushrooms, cleaned and halved or quartered (king oyster sliced into thick rounds)
2 tbsp neutral oil (avocado or sunflower)
3 cloves garlic, minced
1 tbsp fresh ginger, grated
1 tbsp toasted sesame seeds, plus extra for garnish
2 spring onions, sliced
½ tsp salt
For the Sticky Glaze
3 tbsp soy sauce or tamari
2 tbsp maple syrup
1 tbsp rice vinegar
1 tbsp toasted sesame oil
1 tsp cornstarch mixed with 2 tbsp water
¼ tsp chili flakes (optional)
Black pepper to taste
To Serve
Steamed jasmine rice
Noodles or rice noodle bowls
Lettuce cups
Roasted broccoli or bok choy
Pickled cucumbers
Optional Additions
1 tsp sriracha or chili crisp
1 tbsp orange juice for brightness
Fresh cilantro
Crispy fried shallots
A squeeze of lime juice
Instructions
Prepare the mushrooms. Wipe the mushrooms clean with a damp paper towel rather than rinsing, which makes them waterlogged. Cut into evenly sized pieces so they cook uniformly.
Mix the glaze. In a small bowl combine the soy sauce, maple syrup, rice vinegar, sesame oil, chili flakes, and pepper. In another small bowl mix the cornstarch with cold water until smooth.
Sear the mushrooms. Heat the oil in a large skillet over medium-high heat until shimmering. Add the mushrooms in a single layer, working in batches if needed. Cook without stirring for 3–4 minutes until the undersides are deeply golden, then toss and cook for another 3–4 minutes until browned all over and their moisture has evaporated. Season with salt.
Add the aromatics. Reduce the heat to medium. Add the garlic and ginger and stir for 30–60 seconds until fragrant, taking care not to burn them.
Glaze. Pour in the glaze mixture and let it bubble for 1 minute. Give the cornstarch slurry a quick stir and pour it in, stirring constantly. Cook for 1–2 minutes until the sauce thickens and turns glossy, coating the mushrooms in a sticky lacquer.
Finish. Remove from the heat. Stir in the sesame seeds and half the spring onions.
Serve. Transfer to a serving dish. Top with the remaining spring onions and sesame seeds. Serve immediately while hot and glossy.
Pro Tips for the Best Glazed Mushrooms
Do not crowd the pan. Overcrowding steams the mushrooms instead of browning them. Cook in batches for the best color and flavor.
Do not salt too early. Salt draws out moisture. Add it once they have started browning.
Wait before stirring. Letting the mushrooms sit undisturbed gives them time to develop a deep golden crust.
Use a hot pan. A properly heated skillet evaporates moisture fast, concentrating flavor.
Add the glaze last. Adding sauce too early prevents browning and makes the mushrooms soggy.
Toast the sesame seeds. A minute in a dry pan deepens their nutty flavor. Watch carefully so they do not burn.
Choose firm, fresh mushrooms. They brown better and have a better texture.
Why Mushrooms Are Perfect for Glazing
Mushrooms contain natural glutamates, the compounds responsible for the savory taste known as umami. When seared, they undergo the Maillard reaction and caramelization, creating deeper, more complex flavors. This is why browned mushrooms taste so rich and almost meaty, even without any meat.
Their porous structure also helps them hold sauce. After searing, they release most of their water and become receptive to a glaze, absorbing flavor while keeping a satisfying chew. That is why this dish tastes so concentrated and savory.
Nutritionally, mushrooms are low in calories yet provide B vitamins, selenium, potassium, and copper. Sesame seeds add calcium, magnesium, and healthy fats, while garlic and ginger contribute compounds studied for their anti-inflammatory and immune-supporting properties.
Flavor Variations
Spicy Gochujang Mushrooms: Replace half the soy sauce with gochujang for a sweet, spicy Korean-inspired glaze.
Orange Glazed Mushrooms: Add orange juice and zest to the glaze for a citrusy, sticky finish.
Teriyaki Mushrooms: Use a little extra maple syrup and mirin for a classic teriyaki style.
Honey-Free Garlic Butter Version: Use vegan butter and extra garlic, with a splash of balsamic for a rich western-style side.
Nutritional Highlights (Per Serving)
Calories
Protein
Carbs
Fiber
Fat
~180 kcal
5g
16g
3g
10g
Storage
Refrigerator: Store in an airtight container for up to 4 days. The glaze will thicken as it cools.
Reheating: Warm in a skillet over medium heat with a splash of water or broth, stirring until glossy again.
Freezer: Freeze for up to 2 months. Texture will soften slightly after thawing, so they are best for rice bowls or stir-fries.
Meal prep: Pair with rice and steamed vegetables for easy grab-and-go lunches.
Frequently Asked Questions
What type of mushrooms work best?
Cremini and shiitake are excellent for their flavor and texture. King oyster mushrooms, sliced into rounds or scored, create a meaty bite. A mixture of mushrooms gives the most depth.
Why are my mushrooms soggy?
Soggy mushrooms usually come from a crowded pan, low heat, or adding sauce too early. Use high heat, work in batches, and glaze at the end.
Can I make this gluten-free?
Use tamari or coconut aminos instead of soy sauce, and check the label on your rice vinegar and chili flakes.
Can I roast the mushrooms instead?
Yes. Roast at 425°F (220°C) for 20–25 minutes until browned, then toss with the glaze in a hot pan for 1–2 minutes to thicken.
Can I make this oil-free?
Dry-sauté the mushrooms in a non-stick pan until they release and evaporate their water, then add the glaze. They will be less browned but still flavorful.
How can I serve glazed mushrooms as a main?
Spoon over rice, noodles, or quinoa, and add steamed greens and a protein such as edamame or crispy tofu for a complete meal.
Tried this recipe? Leave a comment below and let us know how it turned out! Tag us on Instagram and Facebook — we love seeing your plant-powered creations. Looking for more easy vegan sides and mains? Browse all recipes on Easy Vegan Recipes — new recipes posted every single week!
There are salads you make because something light is needed. And then there are salads like this Vegan Apple and Pistachio Salad — the kind that combines crisp, thinly sliced apple with crunchy toasted pistachios, peppery arugula, shaved fennel, and a bright lemon maple dressing into something so elegant and so perfectly balanced between sweet, crunchy, bitter, and bright that it feels genuinely special from the very first forkful. This is that salad. The one that looks effortlessly beautiful on the table. The one that is as appropriate at a weeknight dinner as it is at a dinner party. The one that proves a salad made with care and the right combination of ingredients is one of the most satisfying things you can eat.
This recipe builds the salad around the contrast between sweet, crisp apple and rich, buttery pistachios — two ingredients that complement each other so naturally that their combination has appeared in cuisines from the Middle East to Italy for centuries. Peppery arugula provides a bitter counterpoint that keeps the sweetness of the apple in check, shaved fennel adds anise-scented crunch and a beautiful visual texture, and a simple lemon maple dressing ties every element together with bright acidity and gentle sweetness.
What makes this salad so outstanding is its textural range — every single forkful delivers something different: the snap of fresh apple, the crunch of toasted pistachio, the tender bite of arugula, the thin crispness of shaved fennel — all dressed in a light, bright dressing that enhances rather than overwhelms.
This recipe is 100% vegan, naturally gluten-free, ready in just 15 minutes, and absolutely wonderful served as a starter, a side salad, or a light lunch alongside crusty bread.
Recipe Information
Prep Time
Cook Time
Total Time
Servings
Calories
15 mins
0 mins
15 mins
4
~220 kcal
Ingredients
For the Salad
2 medium crisp apples (Honeycrisp, Pink Lady, or Granny Smith), cored and thinly sliced
½ cup (65g) shelled pistachios, toasted
4 cups (80g) baby arugula or mixed greens
1 small fennel bulb, very thinly shaved (use a mandoline if available)
¼ small red onion, very thinly sliced
¼ cup (30g) vegan feta, crumbled (optional)
2 tbsp fresh mint leaves
For the Lemon Maple Dressing
3 tbsp extra virgin olive oil
2 tbsp fresh lemon juice
1 tsp maple syrup
1 tsp Dijon mustard
1 small clove garlic, very finely grated
Salt and black pepper to taste
Optional Add-ins
¼ cup (30g) dried cranberries for extra sweetness
2 tbsp toasted pumpkin seeds alongside the pistachios
Thinly sliced celery for extra crunch
A handful of fresh watercress in place of some of the arugula
Instructions
Toast the pistachios. Place the pistachios in a dry skillet over medium heat and toast for 2–3 minutes, stirring frequently, until lightly golden and fragrant. Watch carefully as they burn quickly. Transfer immediately to a plate to cool.
Make the dressing. In a small bowl whisk together the olive oil, lemon juice, maple syrup, Dijon mustard, and grated garlic until completely emulsified. Season generously with salt and pepper. Taste and adjust — it should be bright, slightly sweet, and well-rounded.
Prepare the apple. Core and slice the apple as thinly as possible — ideally 2–3mm slices. If preparing ahead, toss lightly with a teaspoon of extra lemon juice to prevent browning.
Assemble the salad. Spread the arugula across a large serving platter or in a wide bowl. Arrange the apple slices, shaved fennel, and red onion over the greens. Scatter the toasted pistachios, crumbled vegan feta if using, and fresh mint leaves over the top.
Dress and serve. Drizzle the lemon maple dressing over the salad just before serving. Toss gently at the table or serve undressed with the dressing alongside. Serve immediately.
Pro Tips
Slice the apple as thinly as possible — thin apple slices integrate beautifully with the greens and dressing while thick slices dominate and feel heavy.
Shave the fennel on a mandoline if available — paper-thin fennel shavings have a completely different, far more elegant texture than thicker hand-cut pieces.
Dress the salad immediately before serving — dressed arugula wilts quickly and loses its peppery freshness within minutes of being dressed.
Toast the pistachios even if they are already roasted — a brief dry toast in a hot pan dramatically intensifies their flavor and adds a warmth that raw pistachios lack.
Why Apple and Pistachio Work So Well Together
Apple and pistachio is one of the great natural flavor pairings — the clean, slightly tart sweetness of crisp apple and the rich, buttery, slightly sweet nuttiness of pistachio complement each other in a way that highlights the best qualities of both. Apple’s high acidity and water content provide freshness and lift against the richness of the nut, while pistachio’s fat content and complex flavor add depth and satisfaction to what might otherwise be an overly light combination. Together they create a pairing that feels simultaneously indulgent and refreshing — a quality that is rare and genuinely compelling in salad making.
Flavor Variations
Pear and Pistachio Salad: Replace the apple with thinly sliced ripe pear for a sweeter, more floral version that pairs particularly beautifully with vegan blue cheese.
Apple Walnut Salad: Replace the pistachios with toasted walnuts for a more classic autumn flavor combination.
Citrus Apple Pistachio Salad: Add segments of blood orange or navel orange alongside the apple for a citrus version with extraordinary color.
Nutritional Highlights (Per Serving)
Calories
Protein
Carbs
Fiber
Fat
~220 kcal
5g
22g
4g
14g
Storage
Best fresh: This salad is best assembled and dressed immediately before serving. The apple browns and the arugula wilts quickly once dressed.
Components: Store all components separately — greens, apple (tossed with lemon juice), toasted pistachios, and dressing — for up to 2 days and assemble fresh when ready to serve.
Dressing: The dressing keeps in a sealed jar in the refrigerator for up to 1 week. Shake well before using as it will separate during storage.
Frequently Asked Questions
What apple variety works best?
Crisp, firm apples with a balance of sweet and tart work best — Honeycrisp, Pink Lady, and Granny Smith are all excellent choices. Avoid soft, floury varieties like Red Delicious which lack the crunch that makes the salad so texturally interesting.
Can I make this salad ahead for a dinner party?
Yes — prepare all components in advance and store separately. Toast the pistachios, make the dressing, and slice the apple (tossed in lemon juice) up to a day ahead. Assemble and dress the salad at the table just before serving for the freshest result.
Can I use a different nut instead of pistachios?
Yes — toasted walnuts, pecans, or almonds all work well. Pistachios are specifically recommended for their distinctive green color and buttery flavor but any well-toasted nut produces a delicious result.
Tried this recipe? Leave a comment below and let us know how it turned out! Tag us on Instagram and Facebook — we love seeing your plant-powered creations. Looking for more addictive vegan snack and appetizer recipes? Browse all recipes on Easy Vegan Recipes — new recipes posted every single week!
Fluffy, golden rice tossed with crisp vegetables, crispy tofu, and a glossy, sweet-savory teriyaki sauce, this Vegan Teriyaki Fried Rice is the ultimate quick dinner. It is deeply flavorful, endlessly customizable, and ready in about 25 minutes, making it perfect for busy nights when you want something comforting without a lot of effort.
Fried rice was born from resourcefulness, a way to turn leftover rice and whatever vegetables are on hand into a satisfying meal. This version takes that idea and adds a homemade teriyaki sauce that coats every grain in a sticky, caramelized glaze. The sauce is made from soy sauce, maple syrup, garlic, ginger, and rice vinegar, with a little cornstarch to give it the thick, glossy finish that teriyaki is known for.
The secret to great fried rice is day-old rice. Cold, dry grains fry up separate and slightly chewy rather than mushy, and they absorb the sauce without clumping. If you do not have leftover rice, there is an easy trick below for drying freshly cooked rice quickly. Crispy tofu adds protein and texture, while peas, carrots, corn, and spring onions bring color, sweetness, and crunch.
Everything cooks in one large skillet or wok, and the high heat gives the rice that smoky, slightly toasted flavor associated with takeout-style fried rice. It is faster than ordering delivery and noticeably fresher.
This recipe is 100% vegan, easily gluten-free, high in plant-based protein, and a great way to use up leftovers.
Recipe Information
Prep Time
Cook Time
Total Time
Servings
Calories
10 mins
15 mins
25 mins
4
~480 kcal
Ingredients
For the Fried Rice
4 cups (700g) cooked and cooled jasmine or long-grain rice, preferably day-old
1 block (400g) extra-firm tofu, pressed and cubed
2 tbsp cornstarch (for coating the tofu)
3 tbsp neutral oil, divided
1 cup (150g) frozen peas and carrots, thawed
½ cup (75g) sweet corn kernels
1 red bell pepper, diced
4 cloves garlic, minced
1 tbsp fresh ginger, grated
4 spring onions, sliced, white and green parts separated
1 cup (90g) shredded cabbage or broccoli florets (optional)
1 tsp toasted sesame oil
1 tbsp sesame seeds
For the Teriyaki Sauce
¼ cup (60ml) soy sauce or tamari
3 tbsp maple syrup
2 tbsp rice vinegar
1 tbsp toasted sesame oil
2 cloves garlic, minced
1 tsp fresh ginger, grated
1 tsp cornstarch mixed with 2 tbsp water
¼ cup (60ml) water
To Garnish
Extra sesame seeds
Sliced spring onions
Chili crisp or sriracha
Fresh cilantro
Lime wedges
Optional Additions
1 cup edamame beans
Pineapple chunks for a sweet twist
Sliced mushrooms
A handful of baby spinach
Vegan egg alternative scramble
Instructions
Prepare the rice. If using freshly cooked rice, spread it on a baking sheet and refrigerate uncovered for 30 minutes, or freeze for 10 minutes, to dry it out. Break up any clumps with your fingers.
Mix the teriyaki sauce. Whisk together the soy sauce, maple syrup, rice vinegar, sesame oil, garlic, ginger, and water. Whisk the cornstarch with 2 tablespoons of cold water in a separate small bowl and set aside.
Crisp the tofu. Toss the pressed tofu cubes with 2 tablespoons of cornstarch and a pinch of salt until evenly coated. Heat 2 tablespoons of oil in a large non-stick skillet or wok over medium-high heat. Add the tofu in a single layer and cook for 8–10 minutes, turning every 2 minutes, until golden and crisp. Remove and set aside.
Thicken the sauce. Pour the teriyaki sauce into a small saucepan over medium heat. Bring to a simmer, add the cornstarch mixture, and stir for 1–2 minutes until the sauce is thick and glossy. Remove from the heat.
Cook the vegetables. Return the pan to high heat and add the remaining 1 tablespoon of oil. Add the bell pepper, cabbage, and the white parts of the spring onions and stir-fry for 2–3 minutes until just tender. Add the garlic and ginger and cook for 30 seconds until fragrant. Stir in the peas, carrots, and corn.
Fry the rice. Push the vegetables to the sides of the pan and add the cold rice to the center. Let it sit for 1 minute to develop color, then stir and toss for 3–4 minutes until the rice is hot and slightly toasted.
Add the sauce. Pour about two thirds of the teriyaki sauce over the rice and toss until every grain is coated and glossy. Return the tofu to the pan and gently fold it in.
Finish. Remove from heat. Stir in the sesame oil, sesame seeds, and green parts of the spring onions. Taste and add more sauce, soy sauce, or chili as desired.
Serve. Divide among bowls and top with extra sesame seeds, spring onions, and a drizzle of the remaining teriyaki sauce. Serve with lime wedges and chili crisp.
Pro Tips for the Best Fried Rice
Use cold, day-old rice. Moist, fresh rice turns mushy. Cold rice has firmed up and fries beautifully.
Cook over high heat. High heat gives the rice a lightly toasted, slightly smoky flavor.
Do not overcrowd the pan. Cook in two batches if your pan is small so everything fries rather than steams.
Press and coat the tofu. Dry tofu with a cornstarch coating crisps up much better than damp tofu.
Add the sauce gradually. Too much sauce makes the rice wet. Start with two thirds and add more as needed.
Prep everything first. Fried rice cooks fast, so have all your ingredients chopped and ready.
Finish with toasted sesame oil off the heat. Its aroma fades when cooked for too long.
Why Teriyaki Fried Rice Works So Well
Teriyaki sauce is based on the balance of sweet, salty, and savory, with a glossy finish that clings to food. When it meets hot, dry rice, the sugar caramelizes lightly and the rice absorbs the flavor without becoming soggy. The result tastes bold and rounded while keeping its distinct grains.
The tofu delivers protein and a pleasantly chewy contrast, and the vegetables add color, sweetness, and texture. Together they create a complete meal in one pan, with about 20 grams of plant-based protein per serving, plus fiber and vitamins from the vegetables.
Using day-old rice is not just a convenience. As cooked rice cools, its starches undergo a process called retrogradation, which firms the grains and reduces stickiness. This is why leftover rice makes the best fried rice.
Flavor Variations
Pineapple Teriyaki Fried Rice: Add pineapple chunks and cashews for a sweet, tropical twist.
Spicy Gochujang Fried Rice: Stir gochujang into the sauce for a spicy-sweet Korean-inspired version.
Mushroom Teriyaki Fried Rice: Use shiitake or cremini mushrooms in place of tofu for an earthy, meaty alternative.
Cauliflower Rice Version: Swap the rice for cauliflower rice for a lighter, lower-carb meal.
Nutritional Highlights (Per Serving)
Calories
Protein
Carbs
Fiber
Fat
~480 kcal
20g
66g
6g
15g
Storage
Refrigerator: Store in an airtight container for up to 4 days. Cool quickly after cooking to keep rice safe.
Reheating: Reheat in a hot skillet or microwave until steaming hot throughout. Add a splash of water if dry.
Freezer: Freeze in portions for up to 2 months. Reheat directly from frozen in a pan.
Meal prep: Divide into containers with extra sauce on the side for easy lunches.
Frequently Asked Questions
Can I use freshly cooked rice?
Yes, but spread it on a baking sheet and let it cool and dry out in the fridge or freezer for 10–30 minutes first. Otherwise it may turn mushy.
What rice is best for fried rice?
Jasmine and long-grain white rice work best. Brown rice also works, with a chewier, nuttier result.
Can I make this gluten-free?
Use tamari or coconut aminos instead of soy sauce and check labels on other ingredients.
How do I make the tofu crispy?
Press it well, coat in cornstarch, and cook in a hot pan without crowding. Air frying at 400°F (200°C) for 12–15 minutes also works well.
Can I make this without oil?
Use a good non-stick pan and a splash of vegetable broth for stir-frying. The rice will be less toasted but still tasty.
How can I add more protein?
Add edamame, a vegan egg scramble, or extra tofu. Serve with a side of edamame or crispy chickpeas.
Tried this recipe? Leave a comment below and let us know how it turned out! Tag us on Instagram and Facebook — we love seeing your plant-powered creations. Looking for more quick and easy vegan dinner recipes? Browse all recipes on Easy Vegan Recipes — new recipes posted every single week!
There are dinners that feel like a warm embrace at the end of a long day. And then there are dinners like this One Pot Vegan Mushroom Stroganoff — the kind that fills every corner of your kitchen with the most extraordinary aroma of caramelized mushrooms, garlic, and paprika as it simmers, that pours into the bowl a deep, burnished, mahogany-rich sauce so silky and so deeply flavored that people close their eyes on the first spoonful, and that delivers a warmth and comfort so profound and so genuine that the cold world outside becomes entirely irrelevant for as long as the bowl lasts. This is that dinner. The one that becomes a weekly non-negotiable. The one that converts people who thought plant-based cooking could never be truly satisfying into people who stop thinking about meat altogether. The one that is simultaneously the easiest and the most spectacularly delicious thing you will cook all month.
This is a stroganoff built on the most deeply satisfying flavor foundation imaginable — golden-seared mushrooms cooked low and slow until they are caramelized, concentrated, and almost meaty in their intensity, bathed in a rich sauce of vegetable broth, smoked paprika, Dijon mustard, and Worcestershire sauce thickened with a silky swirl of vegan sour cream that transforms everything in the pot into something that tastes like it spent hours on a professional stove rather than thirty minutes on yours. The pasta cooks directly in the sauce — absorbing every drop of flavor as it hydrates and thickens the liquid simultaneously into a glossy, coating, impossibly delicious one-pot masterpiece.
What makes this stroganoff so genuinely outstanding is the one-pot technique. The pasta cooks directly in the broth and sauce rather than separately — releasing its starch as it cooks and naturally thickening the sauce to a silky, glossy consistency that coats every strand of pasta and every piece of mushroom in a layer of deeply flavored richness that no separately cooked pasta can replicate. This technique also means one pot, one pan, minimal washing up, and maximum flavor — the trifecta of weeknight dinner perfection.
This recipe is 100% vegan, ready in just 35 minutes, made in a single pot, naturally adaptable to gluten-free, high in plant-based protein and umami-rich flavor, and absolutely magnificent served directly from the pot into deep, warm bowls with a scattering of fresh parsley and a generous crack of black pepper.
Recipe Information
Prep Time
Cook Time
Total Time
Servings
Calories
10 mins
25 mins
35 mins
4
~480 kcal
Ingredients
For the Stroganoff
500g mixed mushrooms (cremini, shiitake, and portobello work beautifully together)
1 large white or yellow onion, finely diced
6 cloves garlic, minced
300g pasta (pappardelle, egg-free tagliatelle, or wide egg-free noodles)
3 cups (720ml) vegetable broth
1 cup (240ml) unsweetened plant milk (oat or soy)
¾ cup (180g) vegan sour cream (store-bought or cashew-based)
3 tbsp olive oil or vegan butter
2 tbsp tomato paste
2 tbsp soy sauce or tamari
1 tbsp vegan Worcestershire sauce
1 tbsp Dijon mustard
2 tsp smoked paprika
1 tsp sweet paprika
1 tsp dried thyme
½ tsp onion powder
Salt and black pepper to taste
Juice of half a lemon (added at the very end)
Optional Add-ins
1 cup (150g) frozen peas (add in final 5 minutes)
2 cups (60g) fresh spinach (stir in at end)
1 medium zucchini, diced (add with mushrooms)
200g firm tofu, pressed and crumbled (adds extra protein)
½ cup (60g) walnuts, roughly chopped (adds meaty texture)
1 tbsp nutritional yeast (deepens the savory flavor)
1 tsp truffle oil (added at end for extraordinary luxury)
To Serve
Fresh parsley, generously chopped
Freshly cracked black pepper — very generous
Extra vegan sour cream dolloped on top
Chili flakes for warmth and color
Fresh dill (traditional and extraordinary)
A squeeze of fresh lemon
Crusty sourdough or garlic bread alongside
Instructions
Sear the mushrooms in batches. Heat 2 tablespoons of olive oil in a large, wide pot or Dutch oven over high heat until almost smoking. Add the mushrooms in a single layer — working in two batches if necessary to avoid crowding. Leave completely undisturbed for 2–3 minutes until deeply golden and caramelized on the bottom, then flip and cook for a further 2 minutes. Season generously with salt and pepper. Transfer the first batch to a plate and repeat with the remaining mushrooms. Properly seared mushrooms — deeply golden, slightly crispy at the edges, concentrated and nutty in flavor — are the single most important element of an extraordinary stroganoff. Never crowd the pan and never stir too soon.
Sauté the aromatics. Reduce the heat to medium and add the remaining tablespoon of olive oil to the pot. Add the finely diced onion and cook for 5–6 minutes, stirring regularly, until softened and beginning to turn golden at the edges. Add the minced garlic and cook for a further 60–90 seconds until incredibly fragrant. The combination of caramelized onion and garlic at this stage creates an aromatic foundation that carries through the entire dish.
Build the flavor base. Add the tomato paste to the softened onion and garlic and stir continuously for 1–2 minutes until the paste darkens slightly and begins to caramelize — this brief cooking concentrates the tomato flavor and removes any raw taste that would otherwise remain in the finished sauce. Add the smoked paprika, sweet paprika, dried thyme, and onion powder and stir for a further 30 seconds until the spices are fragrant and coating everything in the pot.
Add the liquids and pasta. Pour in the vegetable broth and plant milk and stir well to combine with the spiced base — scraping up any caramelized bits from the bottom of the pot as you stir. Add the soy sauce, vegan Worcestershire sauce, and Dijon mustard and stir to incorporate. Bring to a vigorous boil over high heat. Add the dry pasta directly to the boiling liquid and stir well to submerge. Return the seared mushrooms to the pot and stir to combine.
Cook the pasta in the sauce. Reduce the heat to a lively simmer and cook uncovered for 10–12 minutes, stirring frequently — every 2 minutes — to prevent the pasta from sticking to the bottom of the pot and to ensure even cooking throughout. The pasta will absorb the liquid as it cooks and the natural starch it releases will thicken the sauce simultaneously into a glossy, coating consistency. Add a splash of additional vegetable broth if the sauce becomes too thick before the pasta is fully cooked.
Add the vegan sour cream. Once the pasta is al dente and the sauce has thickened to a silky, glossy consistency reduce the heat to the lowest setting. Add the vegan sour cream and stir gently until completely incorporated throughout the sauce. Do not allow the sauce to boil after adding the sour cream — high heat causes vegan sour cream to split and curdle. A gentle heat and continuous stirring produces a perfectly smooth, uniformly creamy result.
Taste and finish. Squeeze in the lemon juice — this final addition of acid brightens and lifts the entire flavor profile of the stroganoff dramatically. Taste and adjust the seasoning with additional salt, black pepper, soy sauce, or smoked paprika as needed. The finished stroganoff should be deeply savory, warmly spiced, slightly tangy from the sour cream and lemon, and utterly harmonious in every element.
Serve immediately and generously. Divide the stroganoff between deep, warmed bowls and finish each serving with a very generous scattering of fresh parsley, an additional dollop of vegan sour cream, a generous crack of fresh black pepper, and a pinch of chili flakes for color and warmth. Serve immediately — stroganoff is at its absolute peak directly from the pot and loses some of its silky sauce consistency as it sits and the pasta continues to absorb liquid.
Pro Tips for the Most Extraordinary One Pot Stroganoff
Sear the mushrooms in a screaming hot dry pot before adding anything else. This single step — cooking the mushrooms at the highest possible heat in a single layer without stirring — is what creates the deep, caramelized, concentrated mushroom flavor that gives this stroganoff its extraordinary meaty depth. A mushroom that is steamed in a crowded pot contributes a fraction of the flavor of one that is properly seared. Use two batches if necessary — it takes an extra four minutes and makes an enormous difference.
Cook the tomato paste until it darkens. Raw tomato paste added directly to liquid produces a flat, slightly tinny flavor. Cooked briefly in the hot pot until it deepens to a brick-red color and begins to caramelize it contributes a rich, complex, slightly sweet depth that is one of the defining flavor notes of great stroganoff.
Stir the pasta frequently during cooking. Unlike pasta cooked in a large pot of boiling water pasta cooked in a smaller amount of liquid requires more attention — stir every 2 minutes to prevent sticking and ensure even cooking. The starch released by the pasta during this stirring process is exactly what creates the gloriously thick, glossy, coating sauce consistency that makes one-pot pasta so extraordinary.
Add sour cream off the heat or on the lowest possible heat. Vegan sour cream splits at high temperatures producing a grainy, separated sauce rather than a silky, uniformly creamy one. Always reduce to the very lowest heat setting before adding and stir continuously and gently as you incorporate it throughout the sauce.
Use a combination of mushroom varieties always. Cremini mushrooms provide earthy reliability. Shiitake mushrooms contribute extraordinary umami depth from their naturally occurring glutamates. Portobello mushrooms add meaty, substantial texture. Together they create a mushroom component of far greater complexity and depth than any single variety can produce alone.
Finish with lemon juice always. The lemon juice added at the very end of cooking is non-negotiable — it lifts and brightens the rich, heavy sauce in a way that is subtle but completely transformative. Without it the stroganoff can taste slightly flat and one-dimensional. With it every other flavor in the pot is amplified and brightened into perfect balance.
The Extraordinary Flavor Science of Stroganoff
Stroganoff is a dish of extraordinary flavor complexity — and understanding the science behind why it tastes so deeply satisfying helps explain why this vegan version is so remarkably successful at replicating and even surpassing the original.
The foundation of stroganoff flavor is umami — the fifth taste, produced by glutamic acid and ribonucleotides that trigger specific receptors on the tongue producing a savory, mouth-coating, deeply satisfying sensation that is distinct from sweet, sour, salty, and bitter. In traditional beef stroganoff this umami comes primarily from the beef itself and from the sour cream. In this vegan version it comes from multiple, carefully chosen plant-based sources that together create an umami intensity that rivals and in many tasters’ assessments surpasses the original.
Mushrooms — particularly shiitake and portobello varieties — are among the richest plant-based sources of both glutamic acid and the ribonucleotide guanosine monophosphate available. The combination of these two umami compounds creates a synergistic effect — when present together their umami impact is not merely additive but multiplicative, with each compound amplifying the impact of the other to produce a depth of savory flavor that is dramatically greater than either could produce alone.
Soy sauce and Worcestershire sauce contribute additional glutamic acid alongside complex fermentation-derived flavor compounds that add layers of aged, fermented depth to the sauce. Tomato paste provides further glutamic acid alongside lycopene and caramelized sugars from the brief cooking. Dijon mustard adds emulsifying compounds that help maintain the silky consistency of the sauce alongside its characteristic pungent depth.
The result is a sauce with an umami profile that is not merely satisfying — it is deeply, genuinely craveable in the specific neurological sense that umami-rich foods trigger reward pathways in the brain that make us want more of them. This is food that satisfies not just hunger but something deeper and more fundamental — and it achieves this entirely through plants.
Flavor Variations
Hungarian Inspired: Double the smoked paprika and add half a teaspoon of caraway seeds to the onion as it cooks. Replace the plant milk with additional vegetable broth and add a tablespoon of red wine vinegar at the end for a deeper, more intensely paprika-forward stroganoff inspired by Hungarian gulyas.
Truffle Mushroom Stroganoff: Use exclusively oyster and cremini mushrooms and add a tablespoon of truffle oil in the final minute of cooking. Replace the vegan sour cream with cashew cream for an extraordinarily luxurious version that is genuinely spectacular for special occasions.
Green Herb Stroganoff: Stir in two generous handfuls of fresh baby spinach and a quarter cup of fresh dill in the final minute of cooking for a brighter, more herb-forward version with a beautiful visual contrast between the dark, rich sauce and the vivid green herbs.
Spicy Stroganoff: Add half a teaspoon of cayenne pepper and a tablespoon of sriracha to the sauce for a version with genuine building heat that is particularly spectacular for anyone who loves intensely spiced comfort food.
Nutritional Highlights (Per Serving)
Calories
Protein
Carbs
Fiber
Fat
~480 kcal
16g
68g
6g
14g
At 480 calories per serving this stroganoff delivers a genuinely satisfying and nutritionally substantial meal — 16 grams of plant-based protein from the pasta, mushrooms, and vegan sour cream, 6 grams of dietary fiber, and an extraordinary concentration of B vitamins from the mushrooms including B2, B3, and B5 that support energy metabolism at the cellular level. The mushrooms contribute selenium — one of the most important antioxidant minerals — alongside ergothioneine, a unique antioxidant found almost exclusively in mushrooms that has been studied for extraordinary cellular protective properties. The smoked paprika contributes capsaicin compounds with anti-inflammatory properties and meaningful amounts of Vitamins A and E.
Storage
Refrigerator: Store cooled stroganoff in an airtight container in the refrigerator for up to 4 days. The pasta will continue absorbing the sauce during storage — add a generous splash of vegetable broth when reheating and stir well to restore the original silky, saucy consistency. The flavor actually deepens and improves overnight making this an outstanding next-day lunch.
Reheating: Reheat gently in a pot over medium-low heat with a splash of vegetable broth or plant milk, stirring continuously. Do not reheat at high heat as the vegan sour cream in the sauce can become grainy when reheated aggressively. Gentle heat and patient stirring produce a perfectly restored silky sauce every time.
Freezer: The sauce freezes beautifully for up to 2 months but the cooked pasta does not freeze well — it becomes mushy when thawed. For the finest freezer meal prep make and freeze only the mushroom sauce without the pasta and cook fresh pasta when serving. Thaw the sauce overnight in the refrigerator and reheat gently before tossing with freshly cooked pasta.
Make ahead: The seared mushrooms and flavor base can be made up to 2 days in advance and stored in the refrigerator. Add the broth, pasta, and remaining ingredients and complete the recipe on the day of serving for a make-ahead dinner that comes together in under 15 minutes on the night.
Frequently Asked Questions
Can I make this recipe gluten-free?
Yes — use your favorite gluten-free wide pasta shape and replace the soy sauce with tamari and the vegan Worcestershire sauce with a gluten-free version. Gluten-free pasta absorbs liquid slightly differently than regular pasta — monitor the sauce consistency more carefully during cooking and add additional broth if needed as gluten-free pasta can absorb liquid faster.
What is the best vegan sour cream for stroganoff?
Store-bought vegan sour cream brands vary considerably in their flavor and ability to withstand heat without splitting. Cashew-based vegan sour creams are the most heat-stable and produce the silkiest, most luxurious result. Alternatively make your own by blending one cup of soaked raw cashews with two tablespoons of lemon juice, one tablespoon of apple cider vinegar, half a teaspoon of salt, and enough water to reach a thick, pourable consistency.
Can I add protein to make this more filling?
Yes — this stroganoff is outstanding with additional plant-based protein. Sliced vegan sausage browned in the pot before the mushrooms, crumbled tempeh cooked alongside the mushrooms, or white beans stirred into the sauce in the final minutes all work beautifully. Lentil-based pasta used in place of regular pasta significantly increases the protein content without any change to the recipe or technique.
Why did my sauce become too thick?
One-pot pasta dishes thicken considerably as the pasta releases starch during cooking and continues absorbing liquid after cooking. Add additional vegetable broth — one quarter cup at a time — and stir well over gentle heat to restore the desired consistency. The sauce should coat the pasta generously but still flow and pool slightly at the bottom of the bowl when served.
Can I use regular pasta instead of wide noodles?
Yes — any pasta shape works in this recipe. Penne, rigatoni, fusilli, and farfalle all cook beautifully in the sauce. Wide, flat shapes like pappardelle and tagliatelle carry the rich sauce most effectively but shorter shapes are perfectly delicious and slightly more practical for stirring during the one-pot cooking process.
Can I make this in a slow cooker?
Yes with a modification — sear the mushrooms and sauté the aromatics and build the flavor base on the stovetop first then transfer everything to the slow cooker with the broth, sauces, and spices. Cook on low for 4–5 hours. Cook the pasta separately and stir into the slow cooker with the vegan sour cream in the final 30 minutes. This produces a deeper, more concentrated sauce flavor than the stovetop version.
Tried this recipe? Leave a comment below and let us know how it turned out! Tag us on Instagram and Facebook — we love seeing your plant-powered creations. Looking for more warming, deeply satisfying vegan one-pot dinner recipes? Browse all recipes on Easy Vegan Recipes — new recipes posted every single week!
Roasted poblano peppers, stuffed with a creamy, cheesy filling, coated in a light and fluffy golden batter, and served in a smoky roasted tomato sauce — these Vegan Chiles Rellenos are a showstopping Mexican classic reimagined without eggs or dairy. The peppers are tender and mildly smoky, the filling is gooey and savory, and the crisp batter gives way to a soft, pillowy bite that soaks up the warm tomato sauce beautifully.
Chiles rellenos, which means “stuffed chiles,” are a traditional Mexican dish usually made with poblano peppers filled with cheese, dipped in an egg batter, fried, and served in a tomato broth. This plant-based version keeps all the best parts, the roasted chile flavor, the melty center, the golden coating, and the rich sauce, using simple pantry ingredients instead.
The filling combines vegan melting cheese with black beans, corn, and a little cumin and garlic for a satisfying, protein-rich center. The batter is made without eggs, using aquafaba, the liquid from canned chickpeas, whipped to soft peaks and folded into a flour mixture. It puffs in the pan just like the traditional egg-white batter and fries to a beautiful golden crust.
It may look like a restaurant dish, but each step is straightforward. Roast the peppers, peel, stuff, coat, and pan-fry. Make the sauce while the peppers steam, and everything comes together in about an hour. It is an ideal dish for entertaining or a special weekend dinner.
This recipe is 100% vegan, can be made gluten-free, and serves 4 generously.
Recipe Information
Prep Time
Cook Time
Total Time
Servings
Calories
30 mins
30 mins
60 mins
4 (2 peppers each)
~450 kcal
Ingredients
For the Peppers
8 medium poblano peppers (fresh, firm, and straight)
For the Cheesy Black Bean Filling
1 can (400g) black beans, drained, rinsed, and lightly mashed
1½ cups (150g) shredded vegan melting cheese (Monterey Jack or cheddar style)
½ cup (80g) sweet corn kernels
3 spring onions, finely sliced
2 cloves garlic, minced
1 tsp ground cumin
½ tsp smoked paprika
½ tsp salt
2 tbsp chopped cilantro
1 tbsp lime juice
For the Fluffy Aquafaba Batter
½ cup (120ml) aquafaba (liquid from a can of chickpeas)
¼ tsp cream of tartar
⅔ cup (85g) all-purpose flour, plus extra for dusting
½ cup (120ml) cold sparkling water
1 tbsp cornstarch
½ tsp baking powder
½ tsp salt
Neutral oil for shallow frying (about 1 cup / 240ml)
For the Roasted Tomato Sauce
4 ripe Roma tomatoes, halved
½ white onion, cut into wedges
3 cloves garlic, unpeeled
1 chipotle in adobo (optional, for smoky heat)
1 cup (240ml) vegetable broth
1 tbsp olive oil
1 tsp dried oregano
½ tsp ground cumin
½ tsp salt, plus more to taste
Pinch of sugar
To Serve
Cilantro leaves
Vegan crema or cashew sour cream
Sliced avocado
Lime wedges
Mexican rice
Refried beans
Pickled red onions
Instructions
Roast the peppers. Place the poblanos directly over a gas flame, under the broiler, or on a hot grill. Turn frequently for 8–10 minutes until the skin is blistered and blackened on all sides. Transfer to a bowl, cover with a plate or plastic wrap, and let steam for 15 minutes.
Roast the sauce vegetables. On a baking sheet toss the tomatoes, onion wedges, garlic, and chipotle with olive oil. Broil or roast at 450°F (230°C) for 12–15 minutes until charred in spots. Squeeze the garlic from the skins.
Make the sauce. Blend the roasted vegetables with the broth, oregano, cumin, salt, and sugar until smooth. Pour into a saucepan and simmer for 10 minutes. Taste and adjust. Keep warm.
Peel and stuff the peppers. Gently rub off the blistered skin from the peppers. Make a small lengthwise slit in each, keeping the stem intact, and carefully remove the seeds. Pat dry with paper towels.
Make the filling. Mix the black beans, vegan cheese, corn, spring onions, garlic, cumin, paprika, salt, cilantro, and lime juice. Stuff each pepper with filling until just full, then close the slit and secure with a toothpick if needed.
Chill briefly. Place the stuffed peppers in the freezer for 10 minutes so they hold their shape during frying.
Whip the aquafaba. In a clean bowl whip the aquafaba and cream of tartar with a hand mixer for 4–6 minutes until it forms stiff, glossy peaks.
Make the batter. In a separate bowl whisk the flour, cornstarch, baking powder, salt, and sparkling water until just smooth. Gently fold in the whipped aquafaba in two additions, keeping as much air as possible.
Fry. Heat about 1 cm of oil in a large skillet over medium-high heat to 350°F (175°C). Dust each pepper lightly with flour, dip it into the batter to coat completely, and carefully lower it into the oil. Fry for 2–3 minutes per side until deep golden. Drain on a wire rack.
Serve. Remove toothpicks. Spoon warm tomato sauce into shallow bowls, nestle two peppers in each, and top with vegan crema, cilantro, and avocado. Serve with lime wedges and rice.
Pro Tips for Perfect Chiles Rellenos
Choose straight, wide poblanos. They are easier to stuff and hold their shape better.
Steam the peppers after roasting. This loosens the skin so it peels easily.
Dry the peppers well. Moisture prevents the flour and batter from sticking.
Do not overfill. Overstuffed peppers burst when frying.
Whip the aquafaba to stiff peaks. This provides the lift that gives the batter its light, fluffy texture.
Fold gently. Stirring knocks out air and makes the coating dense.
Keep the oil at 350°F (175°C). Too cool and they absorb oil, too hot and the batter browns before cooking through.
Bake instead of frying for a lighter option. Brush with oil and bake at 425°F (220°C) for 15–20 minutes. The coating will be less puffy.
Why Chiles Rellenos Are So Special
Poblanos are mild peppers with a rich, earthy flavor and a gentle warmth. Roasting transforms them, softening their flesh and adding smoky sweetness. They are the ideal vessel for fillings because they are large, thin-skinned, and sturdy when cooked.
Aquafaba is one of the most useful discoveries in vegan cooking. The proteins and starches in chickpea cooking water mimic egg whites, allowing them to whip into foam that gives batters, meringues, and mousses their lift. In this dish it produces the iconic light, puffy coating without any eggs.
The filling brings plant-based protein and fiber from black beans, while poblanos provide vitamin C and vitamin A. Tomatoes cooked with olive oil boost lycopene absorption. A single serving provides about 18 grams of protein.
Flavor Variations
Mushroom Chiles Rellenos: Fill with sautéed mushrooms, onions, and vegan cheese for an earthy, savory option.
Quinoa and Veggie Rellenos: Stuff with seasoned quinoa, corn, and peppers for a lighter filling.
Baked Chiles Rellenos: Skip the batter, top with vegan cheese, and bake for an easier, lower-fat version.
Spicy Jalapeño Rellenos: Use large jalapeños for a smaller, hotter appetizer version.
Nutritional Highlights (Per Serving)
Calories
Protein
Carbs
Fiber
Fat
~450 kcal
18g
46g
11g
22g
Storage
Refrigerator: Store peppers and sauce separately in airtight containers for up to 3 days.
Reheating: Warm peppers in a 375°F (190°C) oven for 10–12 minutes to restore crispness. Reheat the sauce on the stove.
Make ahead: Roast and stuff the peppers up to a day ahead. Coat in batter and fry just before serving.
Freezer: Freeze stuffed, un-battered peppers for up to 2 months. Thaw overnight, then batter and fry.
Frequently Asked Questions
What can I use instead of poblano peppers?
Anaheim or Hatch chiles work well. Large bell peppers are a milder option, though they have a different flavor.
Can I make the batter without aquafaba?
Use ¾ cup of cold sparkling water mixed with 1 cup of flour, 1 tablespoon of cornstarch, and ½ teaspoon of baking powder for a tempura-style coating. It will be crispier but less puffy.
Why is my batter falling off?
The peppers may be wet, or the batter too thin. Pat them completely dry, dust with flour, and make sure the batter is thick enough to coat.
Are poblano peppers spicy?
They are mild, with only a gentle heat. Occasionally one is hotter, so it can be a surprise. Removing the seeds and membranes lowers the heat.
Can I make this gluten-free?
Use a gluten-free flour blend in both the flour dusting and the batter. Check that the broth and seasonings are certified gluten-free.
What is the best vegan cheese for the filling?
Choose a shreddable vegan cheese that melts well, such as a mozzarella or Monterey Jack style. Homemade cashew cheese also works.
Tried this recipe? Leave a comment below and let us know how it turned out! Tag us on Instagram and Facebook — we love seeing your plant-powered creations. Looking for more bold plant-based Mexican-inspired dinners? Browse all recipes on Easy Vegan Recipes — new recipes posted every single week!
Thick, hearty, and gently spiced, this Vegan Red Lentil Stew Bowl is the kind of meal that warms you from the inside out. Red lentils simmer with sweet potato, tomatoes, garlic, and warming spices until they break down into a rich, silky stew, then everything is ladled over fluffy rice or quinoa and finished with wilted spinach, a swirl of lemon yogurt, and crunchy toasted seeds for a bowl that is as satisfying as it is nourishing.
Red lentils are the star here because they cook quickly and need no soaking. In about 25 minutes they soften and partially dissolve, naturally thickening the stew into a creamy texture without any cream or flour. They are also remarkably nutritious, delivering plant-based protein, fiber, iron, and folate in every spoonful.
The flavor is built in layers. Onion, garlic, and ginger are softened in olive oil, then spices like cumin, coriander, turmeric, and smoked paprika are toasted until fragrant. Crushed tomatoes add tang and body, sweet potato brings natural sweetness and substance, and a splash of lemon at the end lifts everything. The result is deeply comforting without being heavy.
Served as a bowl, the stew becomes a complete meal. A base of rice or quinoa, a ladle of stew, a handful of fresh greens, a dollop of cool yogurt, and a sprinkle of seeds add contrast in temperature, color, and texture. It is also one of the best meal prep dishes around, because the flavors improve overnight.
This recipe is 100% vegan, naturally gluten-free, budget-friendly, and ready in about 40 minutes.
Recipe Information
Prep Time
Cook Time
Total Time
Servings
Calories
10 mins
30 mins
40 mins
4
~440 kcal
Ingredients
For the Red Lentil Stew
1½ cups (300g) red lentils, rinsed until the water runs clear
1 large sweet potato (about 350g), peeled and cut into 1.5cm cubes
1 large onion, finely diced
4 cloves garlic, minced
1 tbsp fresh ginger, grated
3 tbsp olive oil
1 can (400g) crushed tomatoes
4 cups (950ml) vegetable broth
1 can (400ml) coconut milk (optional, for a creamier stew)
4 cups (120g) fresh baby spinach
1 tbsp lemon juice
Salt and black pepper to taste
The Spices
2 tsp ground cumin
2 tsp ground coriander
1 tsp ground turmeric
1 tsp smoked paprika
½ tsp ground cinnamon
¼ tsp chili flakes or cayenne
1 bay leaf
For the Lemon Yogurt
¾ cup (180g) plain unsweetened vegan yogurt
1 tbsp lemon juice
1 small garlic clove, grated
Pinch of salt
For the Bowls
3 cups (555g) cooked basmati rice, quinoa, or brown rice
2 tbsp toasted pumpkin seeds or sunflower seeds
Fresh cilantro or parsley
Chili flakes or harissa
Lemon wedges
Warm flatbread or pita
Instructions
Soften the aromatics. Heat the olive oil in a large pot or Dutch oven over medium heat. Add the diced onion with a pinch of salt and cook for 6–8 minutes, stirring often, until soft and golden. Add the garlic and ginger and cook for 1 minute until fragrant.
Toast the spices. Stir in the cumin, coriander, turmeric, paprika, cinnamon, and chili flakes. Cook for 60 seconds, stirring constantly, to bloom the spices and deepen their flavor.
Add the base. Add the crushed tomatoes and cook for 3–4 minutes until slightly darkened and thickened. Stir in the sweet potato and lentils.
Simmer. Pour in the vegetable broth and add the bay leaf. Bring to a boil, then reduce to a gentle simmer. Cook uncovered for 20–25 minutes, stirring occasionally, until the lentils are soft and the sweet potato is tender. Add more broth or water if the stew becomes too thick.
Make it creamy. Stir in the coconut milk if using and simmer for 3–4 minutes. For a thicker texture, mash a few of the sweet potato cubes against the side of the pot.
Wilt the greens. Remove the bay leaf. Stir in the spinach and cook for 1–2 minutes until just wilted. Stir in the lemon juice and season to taste with salt and pepper.
Make the lemon yogurt. Whisk together the yogurt, lemon juice, garlic, and salt until smooth.
Assemble the bowls. Divide the cooked rice among four bowls. Ladle the stew generously over the rice, then top with a dollop of lemon yogurt, toasted seeds, fresh herbs, and chili flakes. Serve with lemon wedges and warm flatbread.
Pro Tips for the Best Lentil Stew
Rinse the lentils well. This removes dust and surface starch, giving a cleaner flavor and less foam.
Bloom the spices in oil. Toasting them briefly releases their essential oils and builds depth.
Cut the sweet potato evenly. Uniform pieces cook at the same rate and keep a pleasant texture.
Add liquid as needed. Red lentils absorb a lot of liquid, especially when stored. Thin with broth or water.
Finish with acid. Lemon juice brightens the flavors and balances the sweetness of the potato.
Season at the end. Taste after the lentils are cooked, since they absorb salt as they simmer.
Do not skip the toppings. Cool yogurt, crunchy seeds, and fresh herbs make the bowl feel complete.
Why This Stew Is So Good for You
Red lentils are among the most nutritious pantry staples. A single serving of this bowl provides around 20 grams of plant-based protein, along with significant iron, folate, potassium, and magnesium. Their combination of soluble and insoluble fiber supports digestion and keeps you full for hours.
Sweet potato adds beta-carotene, which the body converts to vitamin A, as well as vitamin C and fiber. Spinach contributes iron, vitamin K, and antioxidants. Spices such as turmeric, cumin, and coriander have long been valued in traditional cooking, and turmeric’s curcumin is widely studied for its anti-inflammatory properties.
Squeezing lemon over the stew is more than a flavor choice. Vitamin C improves the absorption of non-heme iron from plant foods like lentils and spinach, helping you get more from every bowl.
Flavor Variations
Moroccan Lentil Stew: Add ras el hanout, dried apricots, and chickpeas for a sweet-spiced version.
Coconut Curry Lentil Stew: Add curry powder and extra coconut milk for a richer, curry-style stew.
Smoky Lentil Stew: Add chipotle in adobo and extra smoked paprika for a deep, smoky flavor.
Roasted Vegetable Lentil Bowl: Top with roasted cauliflower or carrots for extra texture.
Nutritional Highlights (Per Serving)
Calories
Protein
Carbs
Fiber
Fat
~440 kcal
20g
72g
14g
9g
Storage
Refrigerator: Store the stew in an airtight container for up to 5 days. It thickens as it sits, so add a splash of broth when reheating.
Freezer: Freeze the stew for up to 3 months. Thaw overnight and reheat gently, adding fresh spinach and lemon at the end.
Meal prep: Store rice, stew, and yogurt separately for easy grab-and-go lunches.
Yogurt: The lemon yogurt keeps for 3 days in the refrigerator.
Frequently Asked Questions
Do I need to soak red lentils?
No. Red lentils cook quickly and do not need soaking. Just rinse them well before using.
Can I use green or brown lentils?
Yes, but they hold their shape and take about 35–40 minutes to cook. The stew will be chunkier rather than creamy.
How can I make this stew thicker?
Simmer uncovered for a few more minutes, or mash some lentils and sweet potato with the back of a spoon.
Can I make this in a slow cooker or Instant Pot?
Yes. In a slow cooker cook on low for 6–7 hours, adding spinach at the end. In an Instant Pot, pressure cook for 8 minutes with natural release.
Is this stew spicy?
It is mildly spiced. Add more chili flakes, cayenne, or harissa for extra heat, or leave them out entirely for a gentler stew.
Can I use canned lentils?
You can, but they will not break down to create the creamy texture. Use dried red lentils for the best result.
Tried this recipe? Leave a comment below and let us know how it turned out! Tag us on Instagram and Facebook — we love seeing your plant-powered creations. Looking for more hearty vegan bowls and stews? Browse all recipes on Easy Vegan Recipes — new recipes posted every single week!
A great pizza lives or dies by its cheese, and this Vegan Mozzarella Pizza puts the cheese front and center. The mozzarella is made from scratch with cashews and tapioca starch, and it does what store-bought vegan cheese so often fails to do: it melts, bubbles, browns in spots, and stretches in long, satisfying strings when you pull a slice away. Paired with a simple crushed tomato sauce, a chewy crust with blistered edges, and fresh basil added at the end, it is a classic Margherita-style pizza that happens to be entirely plant-based.
Homemade vegan mozzarella sounds ambitious, but it is surprisingly easy. Soaked cashews are blended with water, tapioca starch, nutritional yeast, lemon juice, and salt, then cooked briefly on the stove, where the tapioca transforms the mixture into a glossy, stretchy, elastic mass. It takes about 10 minutes, can be shaped into a ball or torn into pieces for the pizza, and tastes mild, creamy, and slightly tangy, just like fresh mozzarella.
The crust is a simple, forgiving dough that uses just flour, water, yeast, salt, and olive oil, with a long, easy rest that develops flavor and chew. If you are short on time, a quick one-hour rise works too. A very hot oven and a preheated pizza stone or baking sheet deliver crisp bottoms and puffy, leopard-spotted edges.
Keep the toppings simple so the cheese can shine: a thin layer of tomato sauce, torn mozzarella, a drizzle of olive oil, and fresh basil. It is the kind of pizza that proves you do not need much when the basics are done well.
This recipe is 100% vegan, serves 4, and is ready in about 45 minutes of active time plus rising.
Recipe Information
Prep Time
Rise Time
Cook Time
Servings
Calories
30 mins
60 mins
12 mins
4 (two 10-inch pizzas)
~460 kcal per serving
Ingredients
For the Pizza Dough
3 cups (375g) bread flour or all-purpose flour, plus extra for dusting
2¼ tsp (7g) instant yeast
1½ tsp salt
1 tsp sugar
1 cup (240ml) warm water (about 105°F / 40°C)
2 tbsp olive oil
For the Homemade Stretchy Vegan Mozzarella
1 cup (140g) raw cashews, soaked in hot water for 30 minutes and drained
1 cup (240ml) water
¼ cup (30g) tapioca starch (or tapioca flour)
2 tbsp refined coconut oil, melted
2 tbsp nutritional yeast
1 tbsp lemon juice
1 tsp white miso paste (optional, for tang)
1 tsp salt
½ tsp garlic powder
For the Simple Pizza Sauce
1 can (400g) whole peeled or crushed tomatoes
1 clove garlic, grated
1 tbsp olive oil
½ tsp salt
½ tsp dried oregano
Pinch of sugar
For Assembly
Fresh basil leaves
1 tbsp olive oil, for brushing and drizzling
Cornmeal or semolina for dusting
Flaky sea salt
Chili flakes (optional)
Optional Toppings
Sliced cherry tomatoes
Thinly sliced red onion
Roasted garlic cloves
Vegan parmesan sprinkle
Balsamic glaze
Fresh arugula after baking
Instructions
Activate the yeast. Stir the sugar and yeast into the warm water and let sit for 5–8 minutes until foamy.
Make the dough. Combine the flour and salt in a large bowl. Add the foamy yeast mixture and olive oil and stir into a shaggy dough. Knead on a lightly floured surface for 6–8 minutes until smooth and elastic.
Let it rise. Place the dough in an oiled bowl, cover, and let rise in a warm place for 60 minutes until doubled. For deeper flavor, refrigerate overnight and bring to room temperature before shaping.
Make the mozzarella base. Drain the soaked cashews and add them to a high-speed blender with the water, tapioca starch, coconut oil, nutritional yeast, lemon juice, miso, salt, and garlic powder. Blend for 1–2 minutes until completely smooth.
Cook the mozzarella. Pour the mixture into a medium saucepan over medium heat. Whisk constantly for 4–6 minutes. The mixture will first look thin, then suddenly thicken and become stretchy, glossy, and elastic. Keep stirring for another minute until it pulls into strings when lifted with a spoon.
Shape and chill. Transfer the hot cheese to a lightly oiled bowl or a sheet of plastic wrap. Shape into a ball or tear into rough pieces. Chill in the refrigerator for 30 minutes, or ice water for 10 minutes, until firm. It will set to a soft, sliceable mozzarella.
Make the sauce. Crush the tomatoes by hand and stir in the garlic, olive oil, salt, oregano, and sugar. No cooking is necessary, as the sauce cooks in the oven.
Preheat the oven. Place a pizza stone or inverted baking sheet on the middle rack and preheat the oven to its highest setting, 475–500°F (245–260°C), for at least 30 minutes.
Shape the pizzas. Divide the dough into two balls. On a floured surface stretch each into a 10-inch round, leaving the edge slightly thicker. Transfer to parchment dusted with cornmeal.
Top the pizzas. Brush the crust edges with olive oil. Spread a thin layer of sauce, leaving a 1-inch border. Tear the mozzarella into pieces and scatter generously over the sauce.
Bake. Slide the pizza, parchment and all, onto the hot stone. Bake for 10–12 minutes until the crust is golden, the edges are blistered, and the cheese is bubbling and lightly browned in spots.
Finish. Top with fresh basil, a drizzle of olive oil, flaky salt, and chili flakes. Let rest for 2 minutes, then slice and serve hot.
Pro Tips for the Best Vegan Mozzarella Pizza
Use tapioca starch. This is what gives the cheese its stretch. Cornstarch will thicken but will not stretch the same way.
Whisk constantly while cooking. The mixture can go from thin to thick in seconds. Keep whisking so it cooks evenly and does not lump.
Chill the cheese before topping. Firm cheese tears into neat pieces and melts more evenly.
Do not overload the pizza. Too much cheese or sauce prevents the crust from crisping. Use less than you think you need.
Use a very hot oven. High heat gives you the crisp base, puffy crust, and melted cheese in a short bake.
Add basil after baking. Fresh basil turns dark in the oven, so add it at the end for the best flavor and color.
Use refined coconut oil. It has no coconut taste and helps the cheese brown and firm up as it cools.
Why Homemade Mozzarella Works So Well
Dairy mozzarella stretches because of its protein network, which is formed when the curds are heated and kneaded. Vegan mozzarella uses a different approach: tapioca starch. When it is heated in water, the starch granules swell and burst, releasing long chains that create a sticky, elastic, stretchy texture.
Cashews contribute creaminess and a mild, buttery flavor, and their natural fats help the cheese melt smoothly. Nutritional yeast adds a savory, cheesy note, lemon juice supplies the subtle tang found in fresh cheese, and a touch of miso adds fermented depth.
Cashews also bring protein, healthy fats, magnesium, and zinc, while the tomato sauce adds lycopene. A serving of this pizza provides around 14 grams of protein, and because the cheese is homemade, you control exactly what goes in.
Flavor Variations
Margherita Style: Use only sauce, mozzarella, basil, and olive oil for the classic.
Pesto Mozzarella Pizza: Replace the tomato sauce with vegan basil pesto and add cherry tomatoes.
Spicy Honey-Free Pizza: Add chili flakes and drizzle with chili-infused maple syrup after baking.
White Pizza: Use garlic olive oil as a base, top with mozzarella, arugula, and lemon zest.
Nutritional Highlights (Per Serving)
Calories
Protein
Carbs
Fiber
Fat
~460 kcal
14g
62g
4g
18g
Storage
Pizza: Store leftover slices in an airtight container for up to 4 days. Reheat in a skillet, covered, or in a 400°F (200°C) oven for 6–8 minutes.
Mozzarella: Store the cheese in an airtight container in the refrigerator for up to 5 days. It firms as it chills and softens again when heated.
Dough: Refrigerate for up to 3 days or freeze for 2 months. Thaw overnight in the refrigerator.
Freezer slices: Wrap tightly and freeze for up to 2 months. Reheat from frozen in a hot oven.
Frequently Asked Questions
Can I use store-bought vegan mozzarella instead?
Yes. Choose a shreddable vegan mozzarella that melts well. The homemade version is stretchier and fresher, but a good store-bought option is a fine shortcut.
Why did my mozzarella not stretch?
It was likely undercooked, or the wrong starch was used. Keep cooking and whisking until it forms a shiny, elastic mass, and use tapioca starch.
Can I make the cheese nut-free?
Use soaked sunflower seeds or a blend of white beans and coconut cream, though the flavor and creaminess will be slightly different.
Can I make the cheese ahead?
Yes. It keeps for 5 days in the refrigerator. Tear it into pieces just before topping the pizza.
How do I get a crispy crust?
Preheat the stone or baking sheet for 30 minutes, use a very hot oven, and keep the sauce thin. Brushing the edge with olive oil also helps.
Can I make this gluten-free?
Use a gluten-free pizza flour blend containing xanthan gum, and follow the package guidance for hydration and rise time. The mozzarella is naturally gluten-free.
Tried this recipe? Leave a comment below and let us know how it turned out! Tag us on Instagram and Facebook — we love seeing your plant-powered creations. Looking for more easy vegan dinner recipes? Browse all recipes on Easy Vegan Recipes — new recipes posted every single week!
We use cookies on our website to give you the most relevant experience by remembering your preferences and repeat visits. By clicking “Accept”, you consent to the use of ALL the cookies.
This website uses cookies to improve your experience while you navigate through the website. Out of these, the cookies that are categorized as necessary are stored on your browser as they are essential for the working of basic functionalities of the website. We also use third-party cookies that help us analyze and understand how you use this website. These cookies will be stored in your browser only with your consent. You also have the option to opt-out of these cookies. But opting out of some of these cookies may affect your browsing experience.
Necessary cookies are absolutely essential for the website to function properly. These cookies ensure basic functionalities and security features of the website, anonymously.
Cookie
Duration
Description
cookielawinfo-checkbox-analytics
11 months
This cookie is set by GDPR Cookie Consent plugin. The cookie is used to store the user consent for the cookies in the category "Analytics".
cookielawinfo-checkbox-functional
11 months
The cookie is set by GDPR cookie consent to record the user consent for the cookies in the category "Functional".
cookielawinfo-checkbox-necessary
11 months
This cookie is set by GDPR Cookie Consent plugin. The cookies is used to store the user consent for the cookies in the category "Necessary".
cookielawinfo-checkbox-others
11 months
This cookie is set by GDPR Cookie Consent plugin. The cookie is used to store the user consent for the cookies in the category "Other.
cookielawinfo-checkbox-performance
11 months
This cookie is set by GDPR Cookie Consent plugin. The cookie is used to store the user consent for the cookies in the category "Performance".
viewed_cookie_policy
11 months
The cookie is set by the GDPR Cookie Consent plugin and is used to store whether or not user has consented to the use of cookies. It does not store any personal data.
Functional cookies help to perform certain functionalities like sharing the content of the website on social media platforms, collect feedbacks, and other third-party features.
Performance cookies are used to understand and analyze the key performance indexes of the website which helps in delivering a better user experience for the visitors.
Analytical cookies are used to understand how visitors interact with the website. These cookies help provide information on metrics the number of visitors, bounce rate, traffic source, etc.
Advertisement cookies are used to provide visitors with relevant ads and marketing campaigns. These cookies track visitors across websites and collect information to provide customized ads.