All Recipes

Creamy Vegan Tuscan Pasta with Sun-Dried Tomatoes and Spinach — The Most Comforting Plant-Based Pasta You Will Make All Week

Unknown 306684865 824264728566611 2962685386403606298 N 1 610x343

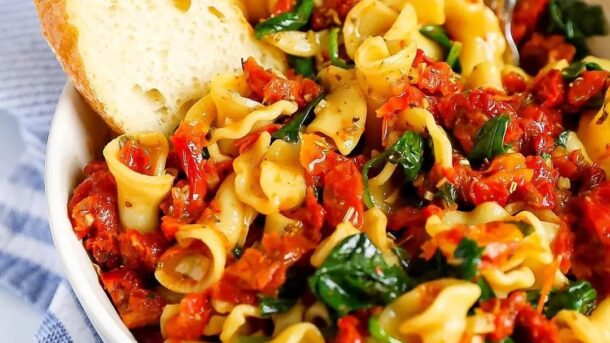
Creamy, garlicky, and packed with sun-dried tomatoes and tender spinach, this Vegan Tuscan Pasta is the kind of dinner that tastes like a restaurant special but comes together in a single pan in about 30 minutes. A silky, dairy-free cream sauce coats every strand of pasta, with bursts of tangy sun-dried tomato, wilted greens, and a hint of smoky paprika and Italian herbs that make each forkful rich and deeply satisfying.

Tuscan-style dishes are inspired by the rustic, flavorful cooking of Tuscany, where simple ingredients are treated with respect. Sun-dried tomatoes, garlic, olive oil, fresh herbs, and leafy greens appear again and again, and this pasta brings those flavors together in a creamy sauce that feels indulgent without being heavy.

The secret to the sauce is a blend of full-fat coconut milk and nutritional yeast, thickened with a little cornstarch and boosted by the oil from the sun-dried tomato jar. The result is velvety, cheesy, and tangy, with none of the coconut flavor you might expect. Fresh garlic, a splash of white wine or vegetable broth, and a squeeze of lemon add depth and brightness.

Mushrooms are optional but highly recommended. They add a meaty, savory dimension that makes the dish more filling and satisfying. Serve it with crusty bread and a simple green salad for a complete meal.

This recipe is 100% vegan, easy to make gluten-free, and ready in 30 minutes, making it perfect for busy weeknights and special dinners alike.


Recipe Information

Prep TimeCook TimeTotal TimeServingsCalories
10 mins20 mins30 mins4~520 kcal

Ingredients

For the Pasta

  • 12 oz (340g) penne, rigatoni, or fettuccine
  • 2 tbsp olive oil or oil from the sun-dried tomato jar
  • 8 oz (225g) cremini mushrooms, sliced (optional)
  • ½ cup (75g) sun-dried tomatoes in oil, drained and sliced
  • 5 cloves garlic, minced
  • 5 cups (150g) fresh baby spinach
  • Fresh basil or parsley to finish

For the Creamy Tuscan Sauce

  • 1 can (400ml) full-fat coconut milk
  • ½ cup (120ml) vegetable broth
  • ¼ cup (60ml) dry white wine (or extra vegetable broth)
  • 3 tbsp nutritional yeast
  • 1 tbsp cornstarch mixed with 2 tbsp cold water
  • 1 tbsp lemon juice
  • 1 tsp Italian seasoning
  • 1 tsp smoked paprika
  • ½ tsp onion powder
  • ½ tsp salt, plus more to taste
  • ¼ tsp black pepper
  • ¼ tsp chili flakes (optional)

To Serve

  • Vegan parmesan
  • Fresh basil leaves
  • Chili flakes
  • Toasted pine nuts
  • Lemon wedges
  • Crusty garlic bread

Instructions

  1. Boil the pasta. Cook the pasta in a large pot of well-salted water until al dente, according to package directions. Reserve 1 cup of the pasta water, then drain.
  2. Cook the mushrooms. Heat 1 tablespoon of oil in a large, deep skillet over medium-high heat. Add the mushrooms in a single layer and cook for 5–6 minutes without stirring too often, until deeply golden. Remove half for topping if desired.
  3. Build the flavor. Reduce the heat to medium. Add the remaining oil, sun-dried tomatoes, and garlic and cook for 1–2 minutes until fragrant. Stir in the Italian seasoning, paprika, and chili flakes.
  4. Deglaze. Pour in the white wine and scrape up any browned bits from the pan. Simmer for 1–2 minutes until reduced by half.
  5. Make the sauce. Add the coconut milk, vegetable broth, nutritional yeast, onion powder, salt, and pepper. Bring to a gentle simmer and cook for 4–5 minutes. Stir in the cornstarch slurry and cook for 1–2 minutes more until the sauce thickens enough to coat the back of a spoon.
  6. Wilt the spinach. Add the spinach in handfuls, stirring until wilted, about 1–2 minutes.
  7. Combine. Add the cooked pasta to the sauce and toss to coat. Add reserved pasta water, a splash at a time, until the sauce is silky and clings to the pasta. Stir in the lemon juice.
  8. Taste and adjust. Add more salt, pepper, lemon, or nutritional yeast as needed. The sauce should taste creamy, savory, tangy, and balanced.
  9. Serve. Divide among bowls and top with basil, vegan parmesan, chili flakes, and any reserved mushrooms. Serve right away while the sauce is at its creamiest.

Pro Tips for the Creamiest Tuscan Pasta

  • Use full-fat coconut milk. Light coconut milk makes a thin, watery sauce. Full-fat gives richness and body.
  • Use the oil from the sun-dried tomato jar. It is infused with tomato flavor and adds depth to the sauce.
  • Do not overcook the pasta. It continues to soften in the sauce, so pull it a minute early.
  • Save the pasta water. The starch helps the sauce cling and become silky.
  • Add the cornstarch slurry slowly. It thickens fast. Stop when the sauce coats a spoon.
  • Brown the mushrooms properly. Crowding the pan steams them. Cook in batches if needed.
  • Finish with lemon. A little acid cuts through the richness and wakes up all the flavors.

Why This Pasta Is So Satisfying

Creamy pasta works because of the balance between richness, acidity, and savory depth. Coconut milk gives body, nutritional yeast adds a cheesy, nutty umami, sun-dried tomatoes bring concentrated sweetness and tang, and garlic and herbs add aromatic warmth. Lemon and wine brighten everything so the sauce never feels heavy.

Sun-dried tomatoes are especially rich in lycopene, a powerful antioxidant, and the oil they are packed in helps your body absorb it. Spinach provides iron, folate, and vitamins A and K. Nutritional yeast is often fortified with B vitamins, including B12, and mushrooms contribute selenium and extra umami.

Together these ingredients make a pasta that feels indulgent but delivers meaningful nutrition, with about 15 grams of plant-based protein per serving.


Flavor Variations

  • Tuscan Pasta with White Beans: Stir in a can of drained cannellini beans for extra protein and a creamy texture.
  • Roasted Red Pepper Tuscan Pasta: Add chopped jarred roasted red peppers for sweetness and a smoky edge.
  • Tuscan Gnocchi: Swap the pasta for pan-fried potato gnocchi for a soft, pillowy version.
  • Spicy Tuscan Pasta: Add extra chili flakes and a spoonful of calabrian chili paste for a fiery version.

Nutritional Highlights (Per Serving)

CaloriesProteinCarbsFiberFat
~520 kcal15g68g6g20g

Storage

  • Refrigerator: Store in an airtight container for up to 4 days. The sauce thickens as it chills.
  • Reheating: Warm gently in a pan with a splash of plant milk or broth, stirring until creamy again.
  • Freezer: Cream-based pasta does not freeze perfectly, but the sauce alone freezes well for up to 2 months. Add freshly cooked pasta when reheating.
  • Meal prep: Cook the pasta slightly under al dente, since it will soften when reheated.

Frequently Asked Questions

Can I make this pasta without coconut milk?

Yes. Use unsweetened oat cream, soy cream, or a cashew cream made from soaked cashews blended with water. The flavor will be slightly milder and equally creamy.

Does this taste like coconut?

Not noticeably. The garlic, sun-dried tomatoes, herbs, and nutritional yeast overpower the coconut flavor, leaving a rich, savory cream sauce.

What can I use instead of white wine?

Use vegetable broth with a teaspoon of lemon juice or white wine vinegar to keep the acidity and depth.

Can I make this gluten-free?

Use gluten-free pasta and check that the broth and seasonings are certified gluten-free. Cook the pasta slightly less to avoid mushiness.

Can I add vegan sausage or chicken?

Yes. Sliced vegan Italian sausage or plant-based chicken strips work wonderfully. Brown them first and add them back with the pasta.

What pasta shape works best?

Short shapes like penne, rigatoni, and fusilli hold the sauce well. Long pasta like fettuccine or linguine is also excellent.


Tried this recipe? Leave a comment below and let us know how it turned out! Tag us on Instagram and Facebook — we love seeing your plant-powered creations. Looking for more easy vegan pasta and dinner recipes? Browse all recipes on Easy Vegan Recipes — new recipes posted every single week!
Vegan Arugula and Peach Pasta Salad with Lemon Basil Dressing — The Most Refreshing Plant-Based Summer Salad You Will Make All Week

Unknown 305091005 178973617970547 9066769686891593955 N 1 610x343

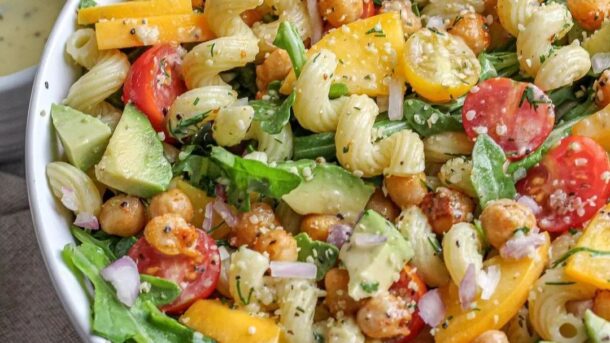
Sweet, juicy peaches, peppery arugula, tender pasta, and a bright lemon basil dressing come together in this Vegan Arugula and Peach Pasta Salad, a dish that tastes like summer in a bowl. It is fresh, colorful, and perfectly balanced, with every bite delivering sweetness from ripe peaches, a peppery bite from arugula, creamy richness from toasted nuts and vegan feta, and a zingy dressing that ties it all together.

Pasta salad has a reputation for being heavy, mayo-laden, and forgettable. This one is the opposite. It is light, vibrant, and built around seasonal produce, with an olive oil and lemon dressing that keeps everything fresh rather than weighed down. Peaches bring natural sweetness that pairs beautifully with the pepper of arugula, a classic contrast that works as well in a salad as it does on a pizza or a cheese board.

The dressing is made from fresh basil, lemon juice, garlic, olive oil, and a little maple syrup, blended until smooth and bright green. It coats the pasta without making it greasy and keeps the salad moist even after sitting in the fridge. A handful of toasted pistachios or almonds adds crunch, and crumbled vegan feta or marinated tofu adds a tangy, salty creaminess.

This salad is perfect for picnics, barbecues, potlucks, and light weeknight dinners. It can be served chilled or at room temperature, and it holds up well for hours, which makes it a favorite for make-ahead entertaining.

This recipe is 100% vegan, easy to make gluten-free, and ready in 25 minutes.


Recipe Information

Prep TimeCook TimeTotal TimeServingsCalories
15 mins10 mins25 mins6~380 kcal

Ingredients

For the Salad

  • 12 oz (340g) short pasta such as fusilli, farfalle, or orecchiette
  • 3 ripe peaches, pitted and sliced into thin wedges
  • 4 cups (80g) baby arugula
  • ½ cup (60g) toasted pistachios, almonds, or pine nuts
  • ½ cup (80g) vegan feta, crumbled
  • ¼ cup (30g) thinly sliced red onion
  • ¼ cup fresh basil leaves, torn
  • 1 cup (150g) cherry tomatoes, halved (optional)

For the Lemon Basil Dressing

  • ⅓ cup (80ml) extra virgin olive oil
  • ¼ cup (60ml) fresh lemon juice
  • 1 cup (25g) packed fresh basil leaves
  • 1 small garlic clove
  • 1 tbsp maple syrup
  • 1 tsp Dijon mustard
  • ½ tsp salt
  • ¼ tsp black pepper
  • 1 tsp lemon zest

To Finish

  • Flaky sea salt
  • Freshly cracked black pepper
  • Balsamic glaze for drizzling
  • Chili flakes
  • Extra lemon wedges

Optional Additions

  • 1 can (400g) white beans or chickpeas for extra protein
  • Sliced cucumber
  • Grilled corn kernels
  • Avocado slices
  • Fresh mint leaves

Instructions

  1. Cook the pasta. Boil the pasta in generously salted water until just al dente, according to package directions. Drain and rinse under cold water until completely cooled. Drain well and toss with a teaspoon of olive oil to prevent sticking.
  2. Toast the nuts. Place the nuts in a dry skillet over medium heat and toast for 3–4 minutes, stirring often, until golden and fragrant. Let cool.
  3. Make the dressing. Blend the olive oil, lemon juice, basil, garlic, maple syrup, mustard, salt, pepper, and lemon zest in a blender or small food processor until smooth and bright green. Taste and adjust acidity and salt.
  4. Prepare the peaches. Slice the peaches into thin wedges. If they are not perfectly ripe, grill or sear for 1–2 minutes per side to bring out sweetness.
  5. Toss the pasta. In a large bowl combine the cooled pasta with about two thirds of the dressing and toss until evenly coated.
  6. Add the salad components. Add the red onion, tomatoes, and half of the nuts. Gently fold in the peaches and basil.
  7. Add the arugula. Just before serving, add the arugula and toss gently so it does not wilt.
  8. Finish and serve. Transfer to a serving platter or bowl. Top with crumbled vegan feta, the remaining nuts, and a drizzle of the remaining dressing. Finish with flaky salt, pepper, and a little balsamic glaze.

Pro Tips for the Best Pasta Salad

  • Choose ripe but firm peaches. Soft peaches turn mushy when tossed. Look for fruit that smells sweet and gives slightly under gentle pressure.
  • Rinse the pasta in cold water. This stops the cooking and keeps the pasta from clumping or turning gummy.
  • Dress the pasta while it is still slightly cool, not cold. It absorbs more flavor this way.
  • Add the arugula last. It wilts quickly and is best when freshly tossed.
  • Toast the nuts. Toasting deepens their flavor and adds satisfying crunch.
  • Taste and re-season before serving. Pasta absorbs dressing as it sits, so you may need an extra squeeze of lemon or pinch of salt.
  • Keep extra dressing on the side. This lets you refresh leftovers.

Why Peaches and Arugula Make a Great Pair

Sweet and peppery is one of the most successful flavor pairings in salad making. Ripe peaches provide juicy sweetness and a gentle floral aroma, while arugula brings a peppery, slightly bitter edge that keeps the dish from becoming cloying. The lemon basil dressing adds acidity and freshness that connect the two.

Peaches provide vitamin C, vitamin A, and potassium along with fiber and antioxidants. Arugula is a cruciferous vegetable, rich in vitamin K and glucosinolates, plant compounds studied for their health benefits. Nuts add healthy fats and protein, and olive oil contributes monounsaturated fat that supports heart health.

The result is a salad that feels light and refreshing while still being substantial enough to serve as a meal, with about 11 grams of plant-based protein per serving.


Flavor Variations

  • Grilled Peach Pasta Salad: Grill the peaches for smoky caramelized flavor.
  • White Bean Pasta Salad: Add cannellini beans for a heartier main dish.
  • Balsamic Peach Pasta Salad: Replace the lemon dressing with a balsamic vinaigrette for a deeper, tangier flavor.
  • Mint and Pea Pasta Salad: Add fresh peas and mint for a spring-inspired variation.

Nutritional Highlights (Per Serving)

CaloriesProteinCarbsFiberFat
~380 kcal11g50g5g16g

Storage

  • Refrigerator: Store in an airtight container for up to 3 days. Add the arugula fresh to leftovers for the best texture.
  • Dressing: Keeps in a sealed jar in the refrigerator for up to 5 days. Shake before using. The color may darken slightly.
  • Make ahead: Cook the pasta and mix the dressing up to 2 days in advance. Add the peaches, arugula, and nuts just before serving.
  • Not suitable for freezing: Fresh peaches and arugula lose their texture once frozen.

Frequently Asked Questions

Can I use canned peaches?

Fresh peaches are best, but well-drained canned peaches packed in juice (not syrup) work in a pinch. Pat them dry first.

What can I use instead of arugula?

Baby spinach, spring mix, or watercress work well. Arugula gives the signature peppery flavor, so expect a milder salad with other greens.

What can I use instead of vegan feta?

Use marinated tofu cubes, crumbled firm tofu with lemon and salt, or toasted chickpeas for protein and savory flavor.

Can I make this gluten-free?

Use your favorite gluten-free pasta and rinse well after cooking. Gluten-free pastas can be more fragile, so toss gently.

Can I serve this warm?

Yes. Toss the warm pasta with the dressing and peaches, then add arugula at the last moment. It becomes a lightly wilted warm salad.

How do I stop the peaches from browning?

Slice them just before serving, or toss with a little lemon juice. The dressing also helps protect them.


Tried this recipe? Leave a comment below and let us know how it turned out! Tag us on Instagram and Facebook — we love seeing your plant-powered creations. Looking for more fresh and easy vegan salads and bowls? Browse all recipes on Easy Vegan Recipes — new recipes posted every single week!

Vegan Spicy Jalapeno Tofu Bowls

vegan spicy jalapeno tofu bowls

There are dinners you make because something quick and satisfying is needed. And then there are dinners like these Vegan Spicy Jalapeño Tofu Bowls — the kind that combine crispy golden tofu coated in a fiery, glossy jalapeño sauce with fluffy rice, crunchy fresh vegetables, and a cooling dollop of avocado or vegan crema, building one of the most genuinely exciting and balanced bowls you will make all week. This is that bowl. The one where every element pulls its own weight — heat, crunch, freshness, and richness all present simultaneously. The one that disappears the moment it is set on the table.

This recipe coats crispy pan-fried tofu in a vibrant sauce built on fresh jalapeño, garlic, lime, and a touch of honey-style maple syrup, served over rice with fresh vegetables and a cooling element to balance the heat. It is a build-your-own bowl that comes together in well under thirty minutes and delivers genuine restaurant-quality flavor.

What makes this dish so outstanding is the jalapeño sauce — blended fresh rather than cooked down, preserving the bright, grassy heat of the chili and the sharp freshness of lime in a way that a long-simmered sauce never achieves, producing a sauce that tastes alive and vibrant against the rich, crispy tofu.

This recipe is 100% vegan, naturally gluten-free when made with tamari, ready in just 30 minutes, and absolutely wonderful served over steamed rice or quinoa with extra lime wedges alongside.


Recipe Information

Prep TimeCook TimeTotal TimeServingsCalories
15 mins15 mins30 mins4~420 kcal

Ingredients

For the Crispy Tofu

  • 450g firm tofu, pressed and cubed
  • 2 tbsp cornstarch
  • 2 tbsp neutral oil
  • ½ tsp salt

For the Jalapeño Sauce

  • 3 jalapeños, roughly chopped (deseeded for less heat)
  • 4 cloves garlic
  • ¼ cup (15g) fresh cilantro
  • 3 tbsp fresh lime juice
  • 2 tbsp soy sauce or tamari
  • 2 tbsp maple syrup
  • 2 tbsp olive oil
  • 2 tbsp water, to thin

For the Bowls

  • 2 cups (370g) cooked rice
  • 1 cup (175g) corn kernels, fresh or grilled
  • 1 cup (175g) black beans, drained and rinsed
  • 1 avocado, sliced
  • ½ small red onion, thinly sliced
  • ¼ cup (15g) fresh cilantro, chopped
  • 1 lime, cut into wedges

Optional Add-ins

  • Vegan crema or vegan sour cream, drizzled over
  • Pickled jalapeños for extra heat
  • Shredded red cabbage for crunch
  • Crumbled vegan cotija or feta

To Serve

  • Extra lime wedges
  • Tortilla chips alongside
  • Hot sauce for those who want more heat

Instructions

  1. Press and prepare the tofu. Press the tofu for at least 10 minutes to remove excess water. Cut into 2cm cubes and toss with the cornstarch and salt until evenly coated.
  2. Crisp the tofu. Heat the oil in a large skillet over medium-high heat. Add the tofu in a single layer and cook for 3–4 minutes per side, turning occasionally, until golden and crispy on all sides. Remove and set aside.
  3. Make the jalapeño sauce. Place the jalapeños, garlic, cilantro, lime juice, soy sauce, maple syrup, and olive oil in a blender. Blend until mostly smooth, adding water a tablespoon at a time to reach a thick but pourable consistency.
  4. Coat the tofu. Toss the crispy tofu in the jalapeño sauce until evenly coated, reserving a small amount of sauce for drizzling over the finished bowls.
  5. Assemble the bowls. Divide the rice between four bowls. Top each with the jalapeño-coated tofu, corn, black beans, sliced avocado, and red onion.
  6. Finish and serve. Drizzle with the reserved jalapeño sauce, scatter fresh cilantro over the top, and serve with lime wedges alongside.

Pro Tips

  • Press the tofu thoroughly for the crispiest result — excess moisture prevents proper browning.
  • Deseed the jalapeños for a milder sauce, or leave the seeds and membranes in for significantly more heat.
  • Toss the tofu in the sauce just before serving to maintain maximum crispiness.
  • Taste the sauce before using and adjust the lime, maple syrup, or salt to balance the heat to your preference.

Why This Bowl Works So Well

This bowl balances heat, freshness, crunch, and richness in a single dish — the fiery jalapeño sauce is balanced by the cooling avocado, the crispy tofu is balanced by the soft rice and beans, and the bright lime cuts through the richness of everything else. This kind of deliberate balance across multiple sensory dimensions is what makes a bowl meal genuinely satisfying rather than simply a collection of ingredients in a dish.


Flavor Variations

  • Mango Jalapeño Bowls: Add diced fresh mango for a sweet contrast against the spicy tofu.
  • Cilantro Lime Rice Version: Toss the cooked rice with extra lime juice and chopped cilantro before assembling for a more vibrant base.
  • Extra Spicy Version: Leave the jalapeño seeds in and add a fresh serrano pepper to the sauce for serious heat.

Nutritional Highlights (Per Serving)

CaloriesProteinCarbsFiberFat
~420 kcal18g50g11g17g

Storage

  • Refrigerator: Store components separately for up to 4 days. The tofu is best reheated in a hot pan or air fryer to restore crispiness; assemble fresh with cold components like avocado added just before eating.
  • Sauce: The jalapeño sauce keeps in the refrigerator for up to 5 days and is excellent on tacos, grain bowls, or as a dip.
  • Freezer: The crispy tofu can be frozen for up to 1 month; reheat in an air fryer or oven before using.

Frequently Asked Questions

How spicy is this dish?

With seeds removed, the heat is moderate and approachable. Leaving seeds in or adding additional fresh chili significantly increases the heat for those who prefer it spicier.

Can I use a different protein instead of tofu?

Yes — tempeh or chickpeas work well with the same sauce and crisping technique.

Can I make this ahead for meal prep?

Yes — prepare all components and store separately, assembling fresh each day. The tofu reheats best in an air fryer to restore its crispy texture.


Tried this recipe? Leave a comment below and let us know how it turned out! Tag us on Instagram and Facebook — we love seeing your plant-powered creations. Looking for more vibrant vegan bowl and dinner recipes? Browse all recipes on Easy Vegan Recipes — new recipes posted every single week!

Air Fryer Falafel — The Crispiest Plant-Based Falafel You Will Make All Week

307956910 137742138969078 4945838948038305927 N 1 435x343

There are falafels that come out soft and pale and vaguely disappointing. And then there are falafels like this Air Fryer Falafel — the kind that come out of the air fryer shatteringly crispy on the outside, with a crust that genuinely shatters on the first bite, giving way to a vivid green, herb-packed, fluffy interior of such extraordinary freshness and depth that it rivals any falafel from any restaurant you have ever visited. This is that falafel. The one made from dried chickpeas rather than canned — the single most important decision in falafel making. The one that uses generous amounts of fresh herbs, garlic, and spices for a flavor so vivid and so aromatic that the kitchen smells extraordinary from the moment the mixture hits the processor.

This recipe uses the traditional method of soaking dried chickpeas overnight rather than using canned, which is non-negotiable for authentic falafel texture — canned chickpeas are too wet and produce a dense, heavy falafel that falls apart rather than the light, crispy exterior and airy, herb-flecked interior that defines a genuinely great falafel.

What makes this air fryer falafel so outstanding is how it delivers the authentic deep-fried falafel experience with a fraction of the oil — the circulating high heat of the air fryer produces an exterior crunch that is genuinely comparable to deep-frying, while the herb-loaded interior stays vivid green and perfectly textured.

This recipe is 100% vegan, naturally gluten-free, ready in about 30 minutes after soaking, and absolutely magnificent served in warm pita with tahini sauce, pickled vegetables, and fresh herbs.


Recipe Information

Soak TimePrep TimeCook TimeTotal TimeServingsCalories
Overnight15 mins15 mins~8 hours4~280 kcal

Ingredients

For the Falafel

  • 1½ cups (300g) dried chickpeas, soaked overnight in cold water (do NOT use canned)
  • 1 small onion, roughly chopped
  • 4 cloves garlic
  • 1 cup (30g) fresh parsley, packed
  • ½ cup (15g) fresh cilantro, packed
  • 1½ tsp ground cumin
  • 1 tsp ground coriander
  • ½ tsp smoked paprika
  • ¼ tsp cayenne pepper
  • 1 tsp salt
  • ½ tsp black pepper
  • 1 tsp baking powder
  • 2 tbsp chickpea flour or all-purpose flour (only if mixture is too wet)
  • 2 tbsp olive oil for brushing

For the Tahini Sauce

  • 4 tbsp tahini
  • 3 tbsp lemon juice
  • 1 clove garlic, finely grated
  • 4–5 tbsp cold water to thin
  • Salt to taste

To Serve

  • Warm pita bread or flatbread
  • Shredded lettuce or cabbage
  • Sliced tomato and cucumber
  • Pickled red onion or turnip
  • Fresh parsley leaves
  • Extra tahini sauce drizzled over

Instructions

  1. Soak the chickpeas. Place the dried chickpeas in a large bowl and cover with at least double their volume of cold water. Soak overnight or for a minimum of 12 hours. They will roughly double in size. Drain and rinse thoroughly before using.
  2. Make the falafel mixture. Place the drained soaked chickpeas, onion, garlic, parsley, cilantro, cumin, coriander, smoked paprika, cayenne, salt, and pepper in a food processor. Pulse repeatedly — do not blend continuously — until the mixture resembles coarse, slightly crumbly sand with no whole chickpeas remaining but not so fine that it becomes a smooth paste. The texture should hold together when pressed but still feel slightly grainy. Add the baking powder and pulse twice to incorporate. If the mixture seems very wet, add 1–2 tablespoons of flour and pulse again.
  3. Rest the mixture. Transfer to a bowl, cover, and refrigerate for 30 minutes if time allows — this resting period firms the mixture and makes shaping significantly easier.
  4. Shape the falafel. Scoop heaped tablespoons of the mixture and shape into balls or flat patties approximately 4cm in diameter. Press firmly — they should hold their shape cleanly when placed on a surface.
  5. Air fry until crispy. Preheat the air fryer to 375°F (190°C). Brush or spray the falafel generously with olive oil on all sides — this is essential for achieving the crispy exterior. Arrange in a single layer in the basket with space between each piece. Air fry for 12–15 minutes, flipping halfway, until deeply golden and shatteringly crispy on the outside.
  6. Make the tahini sauce. Whisk together the tahini, lemon juice, and grated garlic. Add cold water a tablespoon at a time until the sauce reaches a smooth, drizzleable consistency. Season with salt.
  7. Serve immediately. Serve the hot falafel in warm pita with tahini sauce, fresh vegetables, and herbs while the exterior is at its crispiest.

Pro Tips

  • Use dried soaked chickpeas only — this is the most important rule in falafel making and cannot be bypassed. Canned chickpeas contain too much moisture and produce falafel that is dense, gummy, and falls apart during cooking.
  • Pulse rather than blend — the food processor should produce a coarse, sandy mixture with visible texture rather than a smooth paste. Over-processing produces dense falafel; under-processing produces crumbly falafel that falls apart.
  • Brush generously with oil before air frying — without oil the exterior stays dry rather than crisping into the characteristic golden crust.
  • Do not overcrowd the basket — every piece needs direct exposure to circulating hot air. Work in batches if your air fryer is small.
  • Serve immediately — falafel softens as it cools and is at its peak crispiness within 10 minutes of cooking.

The History of Falafel

Falafel is one of the most ancient and most beloved street foods in the Middle East, with a history that stretches back centuries through the culinary traditions of Egypt, the Levant, and the broader Arab world. The precise origin is contested — Egypt, Israel, Lebanon, and Palestine all claim falafel as their own — but the preparation’s roots in the Coptic Christian tradition of Egypt, where it was made with fava beans as a meat substitute during Lent, are well-documented and widely accepted as the oldest form of the dish.

The word falafel is believed to derive from the Arabic word for pepper or spice, reflecting the generously seasoned nature of the preparation. As it spread through the Middle East and eventually the world, the fava bean original gave way to chickpeas as the primary ingredient in most regional traditions, and the preparation became one of the most widely eaten street foods on the planet — equally beloved in Jerusalem, Cairo, Beirut, Berlin, London, and New York.

This air fryer version honors every element of the traditional preparation — the dried chickpea base, the generous fresh herbs, the aromatics — while using modern technology to deliver the characteristic crispy exterior with significantly less oil than traditional deep frying.


Flavor Variations

  • Extra Herb Falafel: Double the parsley and add a handful of fresh mint for a more intensely green, herbaceous version.
  • Spicy Falafel: Increase the cayenne and add a diced fresh chili to the processor for a version with building heat throughout.
  • Beet Falafel: Add a small cooked beetroot to the processor for a dramatically pink falafel with a slightly sweeter, earthier flavor.

Nutritional Highlights (Per Serving — 4 falafel)

CaloriesProteinCarbsFiberFat
~280 kcal12g34g9g11g

Storage

  • Best fresh: Falafel is at its crispiest within 10 minutes of cooking. Serve immediately whenever possible.
  • Refrigerator: Store cooked falafel in an airtight container for up to 4 days. Reheat in the air fryer at 375°F (190°C) for 4–5 minutes to restore crispiness.
  • Freezer: Freeze uncooked shaped falafel on a tray until solid then transfer to a freezer bag for up to 2 months. Air fry directly from frozen, adding 3–4 extra minutes.
  • Mixture: The uncooked falafel mixture keeps in the refrigerator for up to 2 days before shaping and cooking — make a large batch and cook fresh portions daily.

Frequently Asked Questions

Can I bake these instead of air frying?

Yes — brush generously with oil and bake at 425°F (220°C) for 20–25 minutes, flipping halfway. The result is slightly less crispy than air fried but still excellent.

Why is my falafel falling apart?

Falafel that falls apart is almost always caused by using canned chickpeas instead of soaked dried chickpeas, or by over-processing to a paste rather than a coarse, sandy texture. The mixture should feel grainy and slightly crumbly but hold together firmly when pressed.

Can I make the mixture ahead?

Yes — the falafel mixture improves with overnight refrigeration as the flavors meld and the mixture firms. Make the mixture the night before and shape and cook fresh the next day for the best result.


Tried this recipe? Leave a comment below and let us know how it turned out! Tag us on Instagram and Facebook — we love seeing your plant-powered creations. Looking for more addictive vegan snack and appetizer recipes? Browse all recipes on Easy Vegan Recipes — new recipes posted every single week!
GRILLED CABBAGE WRAPS

307933482 137834428980134 1968378689026370054 N 1 543x343

Ingredients:⁣

3 cups cooked rice (used glutinous rice or sub with other rice)⁣
about 15-20 cabbage leaves
3/4 cup kale stems, finely chopped (or use broccoli stem)⁣
1/2 cup mushrooms, finely chopped – optional (used mini King Oyster mushrooms)⁣
1 small carrot, finely chopped⁣
1 tablespoon finely minced ginger⁣
oil for cooking, salt to taste⁣
Seasoning (see step): 1 tablespoon soy sauce/tamari, pepper, 2 teaspoons toasted sesame oil, salt & pepper to taste⁣
Sauce (optional, cabbage wraps can be served as is): Whisk together 1 1/2 tablespoons soy sauce/tamari,1 tablespoon maple syrup, 1 tablespoon mirin, 1 chopped Thai chilis (optional) salt & pepper in 1/2 cup water until well combined.

Method:

1. To make the filling, heat a non-stick pan with 1 teaspoon oil, sauté ginger until fragrant, add mushrooms, cook for 1-2mins. Add kale stems & continue to cook for about 30 secs, turn off the heat. ⁣

2. Transfer mixture to a bowl, then add carrots, cooked rice & mix well with seasoning ingredients. Taste test.

3. Bring a pot of water to boil, blanch cabbage leaves for about 45secs. Remove & quickly plunge them in icy water to stop the cooking.
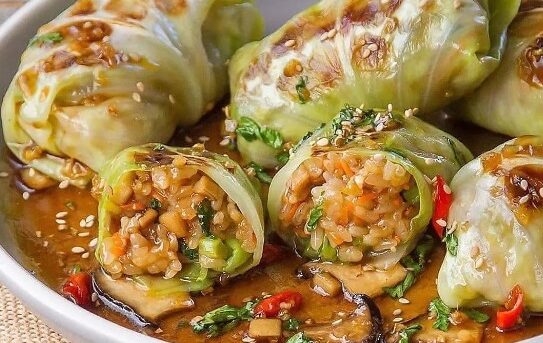
Place one cabbage leaf on a cleaned surface. Add a heaping spoon of filling in the middle, fold in the sides & wrap to seal. (Note: more filling for a larger leaf). Repeat with the remaining ingredients.⁣

4. In a heated non-stick pan with 1 teaspoon oil, place as many cabbage wraps as will fit in one layer in the pan. Cook until both sides are nicely browned, flipping in halfway.

5. Sauce: Add the sauce ingredients to a pan, then bring it to simmer & cook until slightly thickened.⁣

6. Drizzle sauce on the cabbage wraps & garnish with sesame seeds & chopped cilantro.

Vegan Omelette with Tamari Mushrooms, Mashed Avocado and Cashew cream Cheese!

308622632 416951023884522 1722647428264645131 N 1 526x343

Ingredient for the omelette:

5 ounces firm silken tofu (drained and gently patted dry / 5 ounces yields ~3/4 cup)⠀⠀
2 tablespoon hummus⠀⠀
2 large cloves garlic (minced)⠀⠀
2 tablespoon nutritional yeast⠀⠀
Salt and black pepper⠀⠀
1/4 teaspoon paprika⠀⠀
1 tsp cornstarch or arrowroot powder⠀⠀

For the filling: Tamari mushrooms, kale, mashed avocado and cashew cream cheese.⠀⠀
⠀

Method:

1. Preheat oven to 375 degrees F (190 C).

2. Prep veggies, drain and dry tofu, and mince garlic. Set aside. Heat a small-to-medium, oven-safe skillet over medium heat.

3. Once hot, add olive oil and minced garlic and cook for 1-2 minutes or until just lightly golden brown.⠀

4. Transfer garlic to food processor, along with remaining omelet ingredients (tofu – cornstarch) and mix to combine, scraping down sides as needed. Add just a touch of water to thin – 1-2 tablespoon at most. Set aside.

5. To the still-warm skillet over medium heat, add a bit more olive oil and the veggies. Season with salt and pepper and sauté to desired doneness. Set aside.

6. Remove skillet from heat and make sure it’s coated with enough oil so the omelet doesn’t stick. Spoon on the omelet batter, spreading it gently with a spoon or rubber spatula, being careful not to tear or cause gaps. The thinner and more evenly you can spread it the better. So you may not end up using it all.

7. Cook over medium heat on the stove top for 5 minutes until the edges start to dry. Then place in oven and bake until dry and deep golden brown – 10-15 minutes. The longer it bakes the less soft/wet it will be, so if you prefer a more “well done” omelet, cook closer to 15 or more.

8. Using an oven mitt, Carefully remove from oven with oven mitt and fold over gently with a spatula. If it doesn’t want to fold, you can serve it as a frittata or scramble! Enjoy!

UDON NOODLES WITH BROCCOLI AND BELL PEPPERS

307709697 164123242950169 6879652139469874374 N 1 505x343

Ingredients:

3/4 package udon noodles, cooked according to package
1 tsp avocado oil
1/2 onion finely chopped
1.5 bell peppers chopped
Whisk together the sauce in bowl:
1/4 cup tamari
1/4 tsp ground ginger
1 tsp garlic powder
1/2 tablespoon pure cane sugar
1 tablespoon sesame oil
1 tablespoon rice wine vinegar
1 tsp sriracha
Cornstarch slurry: 1 tsp cornstarch + 2 tsp water
Garnish: lots of cilantro, red chili flakes, lime juice

Method:

1. In a large pan, add oil over medium heat. Add onions, cook 5 minutes to soften.

2. Add bell peppers and cook another 3 to 5 minutes until crisp-tender.

3. Push vegetables to the side and add sauce to pan, and let gently bubble to thicken for 1 to 2 minutes.

4. Stir with vegetables and add in noodles, toss to coat noodles in sauce. Serve with garnishes

VEGAN TUNA SANDWICH

308464527 143142508424490 8202279268566937276 N 1 476x343

Ingredients.

15-ounce cans chickpeas, drained and rinsed
1-2 sheets nori, finely chopped or blended, optional, for a fishy flavor
4 tablespoons dill pickle relish
1/4 cup celery, chopped small
1/4 cup diced red onion, optional
1/2 cup Vegan Mayo
2 tablespoons soy sauce, or tamari for gluten-free
few shakes black pepper
salt, to taste

Method.

1. In a large bowl, mash the chickpeas with a potato masher (or fork) until they are mostly mashed.

2. If using nori for a fishy flavor: Finely chop 1-2 sheets of nori, or use a blender/food processor to chop it up into very small pieces. I found it easiest to simply chop it up with a sharp knife on a cutting board.

3. To the bowl with the chickpeas, add the nori, pickle relish, celery, onion, mayo, soy sauce and black pepper. Stir well to combine and add salt, to taste.

4. Cover and place in the refrigerator for at least 30 minutes if you can, to let it get cold and let the flavors come together. You can also enjoy it right away.

5. Serve on sandwiches, with crackers, on salads on make a tuna melt with some vegan cheese. Enjoy!

6. Leftovers: Keep chickpea tuna in a covered container in the refrigerator for 4 days.

NOTES

1. If you don’t want any fishy flavor, just leave out the nori. I like it both ways!

2. For gluten free, use tamari instead of soy sauce.

3. Nutritional information is for the vegan tuna only, not including bread or whatever you serve it with.

4. For vegan tuna melts, spread vegan butter on two slices of bread. Add some tuna and a slice of vegan cheese, then pan fry until warm.

FLAVOR-PACKED VEGAN MEATBALLS

307302203 159463310094751 7725072013635124737 N 1 526x343

Ingredients:

2 large (400 g) peeled potatoes or sweet potatoes
1 tablespoon of oil
2/3 cup (100 g) chopped onions
2 medium (100 g) celery stalks, chopped
3 cloves of minced garlic
1/2 tbsp of onion powder
3/4 tsp sea salt
1/2 tsp of cumin seeds
1/2 tsp ground cumin
1/2 tsp dried thyme
1/2 tsp smoked paprika
1/3 tsp red pepper flakes
black pepper to taste
1 tbsp soy sauce tamari or coconut aminos
1 tbsp of balsamic vinegar
2 (15-ounce) cans of black beans or kidney beans, about 500 g, drained and rinsed
1/2 cup (60 g) walnuts chopped or sunflower seeds for the nut-free version
1 cup (90 g) oats preferably instant oats (*see notes)
2 tbsp (60 g) tomato paste

Method:

1. Chop the potatoes, transfer them to the pot with the salted water and bring to a boil. Cook over medium heat for about 15 minutes or until tender, then strain. Transfer back to the pot and mash with a potato masher (do not use a food processor or blender).

2. Time to preheat the oven to 375 degrees F (190 degrees C).

3. Meanwhile, heat 1 tablespoon of oil in a pan or skillet over medium heat and add the chopped onion. Fry for about 3 minutes, then add the garlic, celery, all the spices, soy sauce and balsamic vinegar and fry for another 3-5 minutes. Stir occasionally. Add the beans and after a minute turn off the heat.

4. Transfer the bean/vegetable mixture to the pot with the mashed potatoes and add the tomato paste, oats and chopped walnuts. Then use a potato masher or your hands to put everything together.

5. Line an 8-inch or 9-inch loaf pan with parchment paper (including a ledge) and place the meatloaf mixture in the pan. Press firmly.

6. Bake the vegan loaf for 40-50 minutes, then remove it from the oven and let it rest for at least 15 minutes before removing it from the mold to prevent it from falling apart.

7. These meatless meatballs need time to harden. When you first remove it from the pan, it will still be soft to the touch. For best results, refrigerate for at least three hours (or even overnight) before serving. Read the recipe notes for more ways to get a firmer loaf.

8. Serve with mushroom sauce, maple tomato sauce, or gravy. I have included the mushroom sauce and glaze recipe in the recipe notes below.

NOTES:

Oats: You can use buckwheat flour, panko breadcrumbs or regular breadcrumbs (gluten-free if needed) instead of oats.

I recommend that you taste the prepared meatball mixture before cooking and adjust the seasonings if necessary.

Be sure to line the loaf tray with the parchment paper, including one tab. This will make it easier to remove the nut while it’s still hot and not too stiff.

VEGAN CAULIFLOWER GYROS

305307587 3320991628186054 9025345593876698385 N 1 459x343

Ingredients:

849 g frozen cauliflower florets
3 garlic cloves, minced
juice of large lemon
3 tbsp extra virgin olive oil
2 tbsp red wine vinegar
1 tbsp oregano
1 tsp onion powder
1 tsp ground cumin
1 tsp dried rosemary
1 tsp salt
1/2 tsp ground black pepper
1/2 tsp smoked paprika
1/2 tsp ground coriander
pinch cayenne pepper, optional

Gyro Fixings:
6 flatbreads
vegan tzatziki
cherry tomatoes, sliced
1/2 cucumber, sliced
1/2 small red onion, finely sliced
1/4 cup flat parsley or dill, roughly chopped
pitted olives

Method:

1. Defrost the cauliflower overnight in the fridge or a few hours at room temperature. Cut up any larger pieces so that the florets are all roughly the same size for even cooking. Drain the cauliflower and dry it as much as possible.

2. Place in a large bowl. In a small bowl, whisk together the ingredients for the marinade. Pour the marinade over the cauliflower and toss. Cover and marinate for a minimum of 30 minutes, but a few hours is best.

3. Preheat the oven to 425°F. Lightly oil a large baking sheet, or line it with parchment paper. Spread the cauliflower out on baking sheet, ensuring there’s space between each floret. Once the oven has preheated completely, place the cauliflower on a middle rack and roast for 25-35 minutes, tossing once half way through. Prep toppings and tzatziki.

4. Warm the flat-breads by wrapping them in foil and placing them in the oven during the last few minutes of roasting the cauliflower. Layer the cauliflower, tzatziki, veggies and olives down the middle of a warm flatbread. Fold the sides of the flatbread over the fillings. Serve immediately.