vegan comfort food

Vegan Potato Bake — The Creamiest Most Comforting Plant-Based Side Dish You Will Pull From the Oven All Year

vegan potato bake

There are side dishes that fill a role. And then there are side dishes like this Vegan Potato Bake — the kind that comes out of the oven bubbling at the edges, golden and crisp on top, with layers of thinly sliced potato so tender they offer no resistance to a spoon, all bound together in a creamy, garlicky cashew sauce that is so rich, so deeply savory, and so perfectly seasoned that it is genuinely difficult to stop eating it even after the plate has been cleared. This is that dish. The one that steals the show at every dinner table it appears on. The one that non-vegans request again before the meal is over. The one that proves, definitively, that the absence of dairy is no barrier whatsoever to a potato bake that is every bit as indulgent, as satisfying, and as impossibly creamy as any version made with heavy cream and gruyère.

This vegan potato bake is built on a foundation of thinly sliced Yukon Gold potatoes layered in a baking dish and bathed in a cashew cream sauce seasoned with garlic, nutritional yeast, white miso, Dijon mustard, and smoked paprika — a combination that delivers the rich, savory, slightly sharp flavor profile of a classic cream and cheese gratin without a single drop of dairy. Fresh thyme, rosemary, and a scatter of shredded vegan cheese on top complete the picture: when the dish comes out of the oven, that cheese is melted and golden, the sauce is bubbling, and the top layer of potato is crisp at the edges with a golden, deeply satisfying crust.

What makes this recipe so outstanding is the cashew cream — soaked, blended with vegetable broth and seasonings into a sauce that is as rich and coating as heavy cream but with an additional, subtle nuttiness that pairs beautifully with potato and gives the dish a depth that straight cream alone cannot always match.

This recipe is 100% vegan, naturally dairy-free and egg-free, ready in 70 minutes including baking time, and the kind of dish that belongs at every Sunday dinner, holiday table, and weeknight that deserves something genuinely special.


Recipe Information

Prep TimeCook TimeTotal TimeServingsCalories
20 mins50 mins70 mins6~390 kcal

Ingredients

For the Potatoes

  • 1.2kg (about 2.6 lbs) Yukon Gold potatoes, peeled and very thinly sliced (2–3mm)
  • 1 medium yellow onion, very thinly sliced
  • 3 cloves garlic, thinly sliced
  • 1 tsp salt
  • Fresh thyme and rosemary sprigs

For the Cashew Cream Sauce

  • 150g (1 cup) raw cashews, soaked in hot water for 30 minutes and drained
  • 480ml (2 cups) vegetable broth
  • 4 tbsp nutritional yeast
  • 1 tbsp white miso paste
  • 1 tbsp Dijon mustard
  • 1 tsp garlic powder
  • 1 tsp onion powder
  • 1 tsp smoked paprika
  • ½ tsp turmeric (for golden color)
  • 1 tsp salt
  • ½ tsp black pepper

For the Top

  • 100g (1 cup) vegan mozzarella or cheddar, shredded
  • 1 tbsp olive oil
  • Extra smoked paprika
  • Fresh thyme

Instructions

  1. Preheat and prepare. Preheat the oven to 375°F (190°C). Grease a 9×13 inch (23x33cm) baking dish generously with vegan butter or olive oil.
  2. Make the cashew cream sauce. Drain the soaked cashews and add to a high-speed blender with the vegetable broth, nutritional yeast, miso paste, Dijon mustard, garlic powder, onion powder, smoked paprika, turmeric, salt, and pepper. Blend for 60–90 seconds until completely smooth and silky. Taste and adjust seasoning — the sauce should be well-seasoned and deeply savory, as the potato layers are unseasoned.
  3. Layer the potatoes. Arrange one-third of the sliced potatoes in overlapping layers across the bottom of the prepared baking dish. Scatter over half the sliced onion and garlic. Pour over one-third of the cashew cream sauce. Repeat with another third of the potatoes, the remaining onion and garlic, and another third of the sauce. Finish with the final layer of potatoes, arranged as neatly as possible, and pour the remaining sauce over the top — it should just reach the top layer of potato.
  4. Add herbs and cover. Lay fresh thyme and rosemary sprigs across the top. Cover the dish tightly with foil.
  5. Bake covered. Bake covered at 375°F (190°C) for 35 minutes until the potatoes are beginning to soften — a knife inserted should meet some resistance but go through the top half easily.
  6. Add cheese and finish uncovered. Remove the foil. Scatter the shredded vegan cheese evenly over the top. Drizzle with olive oil and dust with extra smoked paprika. Return to the oven uncovered for 15–18 minutes until the cheese is melted and golden, the sauce is bubbling at the edges, and the top layer of potato is golden and slightly crisp.
  7. Rest before serving. Allow the potato bake to rest for 10 minutes before serving — this allows the sauce to thicken slightly and the layers to hold together when spooned out.

Pro Tips

  • Slice the potatoes very thin and evenly. A mandoline slicer set to 2–3mm is ideal — evenly thin slices cook through uniformly, while unevenly thick slices result in some layers that are overdone and others that are underdone.
  • Season the sauce generously. The potato layers themselves are not seasoned — all the salt and flavor comes from the sauce, so it needs to be well-seasoned. Taste before layering and adjust.
  • Cover for most of the baking time. Covering the dish creates a steam environment that cooks the potato layers through gently and evenly before the final uncovered phase develops the golden, cheesy top.
  • Rest before serving. The sauce thickens as the dish cools slightly — serving immediately produces a runny result. Ten minutes of resting makes each serving hold its shape and the sauce coat the potatoes properly.
  • Use Yukon Gold potatoes. Their naturally buttery, slightly creamy texture and moderate starch content make them ideal for a gratin-style bake — they hold their shape through cooking while becoming completely tender inside.

The Art of a Perfect Potato Gratin

The potato bake — known in France as gratin dauphinois — is one of the great dishes of European comfort cooking, and its principles translate beautifully to plant-based cooking. The essential elements are three: potatoes sliced thin enough to cook through in a reasonable oven time, a sauce rich enough in fat and flavor to coat every surface and infuse the layers as they bake, and enough time in the oven covered before the final uncovered phase so the interior is completely tender before the top begins to brown. The cashew cream used here behaves remarkably like heavy cream in this context — it coats the potato slices, absorbs their starch as it bakes, and gradually thickens through the combined effect of evaporation and starch release into something that is simultaneously a sauce and a binder, holding the layers together into a cohesive, sliceable dish. The nutritional yeast and miso provide the savory, cheese-like depth that dairy cream and gruyère would in the original, while the mustard and smoked paprika give the sauce the slight sharpness and complexity that prevents it from being simply rich without being interesting.


Flavor Variations

  • Vegan Potato Bake with Leek: Replace the sliced onion with thinly sliced leek for a sweeter, more delicate allium flavor that pairs beautifully with the cashew cream.
  • Herb-Crusted Potato Bake: Combine panko breadcrumbs, nutritional yeast, dried herbs, and olive oil and scatter over the cheese in the final uncovered phase for an extra-crispy, golden crust.
  • Sweet Potato and Regular Potato Bake: Alternate layers of sweet potato and Yukon Gold for a sweeter, more nutritionally complex version with beautiful color contrast.

Nutritional Highlights (Per Serving)

CaloriesProteinCarbsFiberFat
~390 kcal11g52g5g17g

Storage

  • Refrigerator: Store covered in the refrigerator for up to 5 days. The dish firms up as it cools and can be sliced cleanly when cold — reheat individual portions in the microwave or the whole dish covered in the oven at 350°F (175°C) for 20 minutes.
  • Freezer: Freeze individual portions wrapped tightly for up to 2 months. The texture changes slightly on thawing — the potatoes become softer — but the flavor is unaffected. Reheat from frozen in the oven covered with foil.
  • Make ahead: Assemble the entire dish the night before and refrigerate unbaked. Add 10–15 minutes to the covered baking time when cooking from cold.

Frequently Asked Questions

Can I use a different type of potato?

Yukon Gold is strongly recommended for its buttery texture. Russet potatoes can be used but absorb more liquid and can become slightly dry in the center layers. Waxy potatoes such as red-skinned varieties hold their shape very well but can take longer to become fully tender.

My sauce is not thick enough. What went wrong?

Blend the cashews for longer — a full 90 seconds in a high-speed blender is required for a truly smooth, thick sauce. Also ensure you are using raw cashews, not roasted, and that they were soaked for the full 30 minutes.

Can I make this without a high-speed blender?

Yes — soak the cashews for 2 hours in hot water for maximum softness, then blend in a regular blender for 2–3 minutes, stopping to scrape down the sides. The sauce may be slightly less silky but will still be very good.

Can I add more vegetables?

Yes — thinly sliced mushrooms, blanched and squeezed spinach, or finely diced bell pepper can all be scattered between layers for extra nutrition and flavor.


Tried this recipe? Leave a comment below and let us know how it turned out! Tag us on Instagram and Facebook — we love seeing your plant-powered creations. Looking for more comforting vegan side dish and dinner recipes? Browse all recipes on Easy Vegan Recipes — new recipes posted every single week!
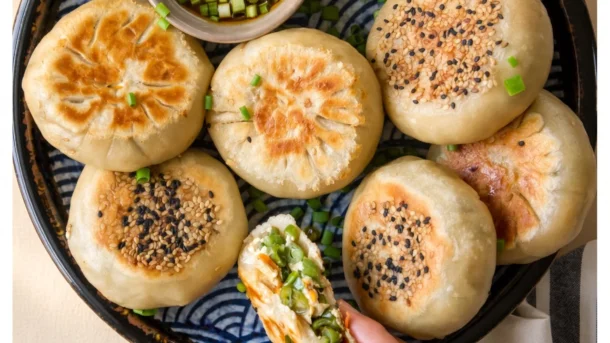
Crispy Bottom Vegan Veggie Buns with Mushroom and Cabbage Filling — The Most Addictive Plant-Based Dinner You Will Make All Week

crispy bottom veggie buns

Few things in the kitchen are as satisfying as lifting the lid off a pan and finding a row of plump, golden-bottomed buns still steaming. These Crispy Bottom Vegan Veggie Buns have a soft, fluffy, pillowy top, a deeply golden and shatteringly crisp base, and a juicy, savory filling of mushrooms, cabbage, carrot, and tofu that tastes like it simmered for hours.

They belong to the family of pan-fried filled buns found across Asia, where soft yeasted dough is seared in a skillet until crisp, then steamed with a splash of water until puffed and tender. The technique is simple but the result feels special: two textures in one bite, crunchy below and cloud-soft above, with a hot, savory center.

The filling is the star. Browned mushrooms provide meaty umami. Cabbage gives sweetness and juiciness. Crumbled firm tofu adds body and protein. Ginger, garlic, soy sauce, and toasted sesame oil bring the aromatic depth you expect from a great bun. A little cornstarch keeps the filling moist and cohesive so it does not dry out as it steams.

The dough is a basic soft yeast dough made with plant milk and a little oil, and it comes together with minimal kneading. Make a batch on the weekend and freeze the extras — they reheat beautifully in a hot pan.

This recipe is 100% vegan, makes 12 generous buns, and is perfect for family dinners, lunchboxes, and meal prep.


Recipe Information

Prep TimeRise TimeCook TimeServingsCalories
30 mins60 mins20 mins12 buns~210 kcal each

Ingredients

For the Dough

  • 3 cups (375g) all-purpose flour, plus extra for dusting
  • 2¼ tsp (1 packet / 7g) instant yeast
  • 1 tbsp sugar
  • ¾ tsp salt
  • 1 cup (240ml) warm unsweetened plant milk (about 105°F / 40°C)
  • 2 tbsp neutral oil

For the Filling

  • 8 oz (225g) cremini or shiitake mushrooms, finely diced
  • 2 cups (170g) green or napa cabbage, finely chopped
  • ½ tsp salt (for the cabbage)
  • 1 medium carrot, grated
  • 150g extra-firm tofu, pressed and crumbled
  • 4 spring onions, finely sliced
  • 3 cloves garlic, minced
  • 1 tbsp fresh ginger, grated
  • 2 tbsp soy sauce or tamari
  • 1 tbsp toasted sesame oil
  • 1 tbsp rice vinegar
  • 1 tbsp cornstarch
  • 1 tsp maple syrup
  • ½ tsp white pepper
  • 1 tbsp neutral oil for cooking

For Cooking

  • 2 tbsp neutral oil
  • ½ cup (120ml) water
  • 1 tbsp sesame seeds
  • 1 spring onion, thinly sliced for topping

For the Dipping Sauce

  • 3 tbsp soy sauce or tamari
  • 1 tbsp black or rice vinegar
  • 1 tsp toasted sesame oil
  • 1 tsp chili crisp (optional)
  • 1 clove garlic, grated

Instructions

  1. Activate the yeast. Stir the sugar and yeast into the warm plant milk and let sit for 5–8 minutes until foamy. If it does not foam, the yeast is old or the milk was too hot or cold — start again.
  2. Make the dough. In a large bowl mix the flour and salt. Add the foamy yeast mixture and oil. Stir until a shaggy dough forms, then knead on a floured surface for 6–8 minutes until smooth and elastic. The dough should feel soft and slightly tacky but not sticky.
  3. First rise. Place the dough in a lightly oiled bowl, cover, and let rise in a warm spot for 60 minutes until doubled in size.
  4. Prepare the cabbage. While the dough rises, toss the chopped cabbage with ½ teaspoon of salt and let sit for 10 minutes. Squeeze firmly in a clean towel to remove as much liquid as possible.
  5. Cook the mushrooms. Heat 1 tablespoon of oil in a skillet over medium-high heat. Add the diced mushrooms and cook 5–6 minutes until deeply browned and dry. Add the garlic and ginger for the final minute. Let cool completely.
  6. Mix the filling. Combine the squeezed cabbage, mushrooms, tofu, carrot, spring onions, soy sauce, sesame oil, rice vinegar, cornstarch, maple syrup, and white pepper. Mix well and taste. The filling should be well seasoned.
  7. Shape the buns. Punch down the risen dough and divide into 12 equal pieces. Roll each into a ball, then flatten into a round about 10cm wide, keeping the edges thinner than the center. Place a heaped tablespoon of filling in the middle. Gather and pleat the edges up and over the filling, pinching firmly to seal. Place seam-side down on a parchment-lined tray.
  8. Second rise. Cover loosely and let rest for 20 minutes until slightly puffy.
  9. Sear the bottoms. Heat 2 tablespoons of oil in a large lidded non-stick skillet over medium heat. Place the buns seam-side up or down (see tips) in a single layer, leaving a little space. Cook for 3–4 minutes until the bottoms are deeply golden.
  10. Steam. Pour in ½ cup of water, cover immediately, and reduce heat to medium-low. Steam for 10–12 minutes until the buns are puffed, firm, and the water has evaporated.
  11. Re-crisp. Remove the lid and cook for another 1–2 minutes so the bottoms regain their crunch. Sprinkle with sesame seeds and spring onion.
  12. Serve. Serve hot with the dipping sauce. Let sit for 1–2 minutes first, since the filling is very hot.

Pro Tips for Perfect Crispy Bottom Buns

  • Brown the mushrooms well. Browning drives off moisture and builds deep umami, preventing a watery filling.
  • Squeeze the cabbage dry. Excess liquid makes the dough soggy from the inside.
  • Cool the filling fully. Warm filling can melt the dough and make sealing harder.
  • Do not overfill. A heaped tablespoon is enough. Overfilled buns split during steaming.
  • Pinch tightly. A strong seal keeps juices inside while the buns steam.
  • Use a non-stick skillet with a tight-fitting lid. Steam is essential for the fluffy top.
  • Cook on medium, not high. High heat burns the bottoms before the interiors are cooked through.

Why Veggie Buns Are So Satisfying

A great bun is about contrast. Seared dough develops a thin, crisp, caramelized crust through the Maillard reaction, while the steamed top stays tender and soft. Inside, a savory, juicy filling brings umami and fragrance.

Mushrooms are rich in glutamates, the same compounds that make slow-cooked meats taste so savory, and they bring B vitamins, selenium, and fiber. Cabbage adds vitamin C and vitamin K, and tofu provides complete plant protein and calcium. Together they create a filling that is nourishing and deeply flavorful without relying on meat substitutes.

Because the dough is yeasted, the buns are light and airy rather than dense. Two servings of these buns make a filling meal with around 12 grams of plant-based protein.


Flavor Variations

  • Kimchi and Tofu Buns: Replace half the cabbage with chopped vegan kimchi for a spicy, tangy filling.
  • Curried Potato Buns: Fill with spiced mashed potato, peas, and curry powder for an Indian-inspired bun.
  • BBQ Jackfruit Buns: Use shredded jackfruit tossed in smoky barbecue sauce for a sticky, tangy filling.
  • Sweet Red Bean Buns: Fill with sweetened red bean paste for a dessert-style version.

Nutritional Highlights (Per Bun)

CaloriesProteinCarbsFiberFat
~210 kcal6g33g3g6g

Storage

  • Refrigerator: Store cooked buns in an airtight container for up to 4 days. Reheat in a skillet with a splash of water, covered, for 4–5 minutes.
  • Freezer (cooked): Freeze cooled buns for up to 3 months. Reheat from frozen in a covered skillet or steamer.
  • Freezer (uncooked): Freeze shaped, unproofed buns on a tray, then bag. Thaw, proof for 30 minutes, and cook as directed.
  • Filling: Keeps refrigerated for 2 days before assembly.

Frequently Asked Questions

Can I use instant yeast instead of active dry?

Yes — the recipe uses instant yeast. If you only have active dry, use the same amount and proof it in the warm milk for 10 minutes first.

Why did my buns turn out dense?

Dense buns usually mean the dough was under-risen, the yeast was inactive, or too much flour was added. Let the dough double and keep it slightly tacky.

Can I bake these instead?

You can bake at 375°F (190°C) for 20–25 minutes, but you lose the signature crispy bottom. For best results, pan-sear first, then finish in the oven.

How do I keep the bottoms from burning?

Use medium heat, a non-stick pan, and enough oil. If browning too quickly, lower the heat and add the water earlier.

Can I make the dough ahead?

Yes. After kneading, refrigerate the dough overnight in a covered, oiled bowl. Bring to room temperature for 30 minutes before shaping.

Can I make them gluten-free?

Gluten-free yeast dough behaves very differently. Use a dedicated gluten-free bun flour blend and expect a denser, more cake-like bun.


Tried this recipe? Leave a comment below and let us know how it turned out! Tag us on Instagram and Facebook — we love seeing your plant-powered creations. Looking for more comforting vegan dinner recipes? Browse all recipes on Easy Vegan Recipes — new recipes posted every single week!

Vegan Tomato Mozzarella Garlic Mushroom Pizza with Homemade Crust — The Most Crave-Worthy Plant-Based Pizza You Will Make All Week

tomato mozzarella garlic mushroom pizza

There is a reason pizza night is a weekly tradition in so many homes. This Vegan Tomato Mozzarella Garlic Mushroom Pizza has everything that makes a great pizza great: a chewy, golden crust with crisp edges, a bright and garlicky tomato sauce, pools of stretchy melted vegan mozzarella, and a generous scattering of deeply browned garlic mushrooms that bring a savory, almost meaty depth to every slice.

The topping combination is a classic for a reason. Sweet, ripe tomatoes balance the rich, melty cheese. Garlic-butter mushrooms add earthy umami. Fresh basil, added right after baking, lifts everything with a peppery, fragrant freshness. Nothing here is complicated, but each element is treated with care so the whole pizza tastes balanced and complete.

The homemade crust takes just 10 minutes of hands-on time and rises in about an hour, producing a dough that is soft inside and blisters beautifully in a hot oven. If you are short on time, store-bought vegan dough or a pre-made crust works well. The garlic mushrooms are cooked separately first, which drives off their moisture and prevents a soggy pizza, a step that makes a huge difference.

The vegan mozzarella melts best when shredded and mixed with a little of the homemade cashew-based sauce, or you can use a good store-bought vegan mozzarella. Either way, you get a golden, bubbling top that stretches with every slice.

This recipe is 100% vegan, serves 4, and takes about 45 minutes of active time plus rising.


Recipe Information

Prep TimeRise TimeCook TimeServingsCalories
20 mins60 mins15 mins4 (one 14-inch pizza or two 10-inch)~430 kcal per serving

Ingredients

For the Pizza Dough

  • 3 cups (375g) bread flour or all-purpose flour, plus extra for dusting
  • 2¼ tsp (7g) instant yeast
  • 1½ tsp salt
  • 1 tsp sugar
  • 1 cup (240ml) warm water (about 105°F / 40°C)
  • 2 tbsp olive oil

For the Quick Tomato Sauce

  • 1 can (400g) crushed tomatoes
  • 2 cloves garlic, minced
  • 1 tbsp olive oil
  • 1 tsp dried oregano
  • ½ tsp salt
  • ½ tsp sugar or maple syrup
  • Pinch of chili flakes
  • Black pepper to taste

For the Garlic Mushrooms

  • 8 oz (225g) cremini mushrooms, thinly sliced
  • 3 cloves garlic, minced
  • 1 tbsp olive oil
  • 1 tbsp vegan butter
  • 1 tbsp fresh thyme leaves or ½ tsp dried
  • ¼ tsp salt
  • Black pepper to taste
  • 1 tsp balsamic vinegar or soy sauce

For Assembly

  • 1½ cups (150g) shredded vegan mozzarella
  • 2 ripe Roma tomatoes, thinly sliced
  • 1 tbsp olive oil for brushing the crust
  • Handful of fresh basil leaves
  • Flaky sea salt
  • Cornmeal or semolina for dusting

Optional Finishing Touches

  • Drizzle of balsamic glaze
  • Chili flakes
  • Garlic oil
  • Fresh arugula
  • Vegan parmesan sprinkle

Instructions

  1. Activate the yeast. Stir the sugar and yeast into the warm water and let sit for 5–8 minutes until foamy.
  2. Make the dough. In a large bowl combine the flour and salt. Add the foamy yeast mixture and olive oil. Stir to form a shaggy dough, then knead on a lightly floured surface for 6–8 minutes until smooth and elastic. The dough should be soft and slightly tacky.
  3. Rise. Place in an oiled bowl, cover, and let rise in a warm place for 60 minutes until doubled in size.
  4. Make the sauce. Combine all sauce ingredients in a bowl. There is no need to cook it — the sauce will cook on the pizza. Stir well and taste for seasoning.
  5. Cook the mushrooms. Heat the olive oil and vegan butter in a large skillet over medium-high heat. Add the sliced mushrooms in a single layer and cook, without stirring too often, for 6–8 minutes until deeply golden and all moisture has evaporated. Add the garlic and thyme for the final minute. Finish with salt, pepper, and balsamic. Set aside.
  6. Preheat the oven. Place a pizza stone or inverted baking sheet on the middle rack and preheat the oven to its highest setting, 475–500°F (245–260°C), for at least 30 minutes.
  7. Shape the dough. Punch down the risen dough and shape into a ball. On a lightly floured surface stretch and press the dough into a 14-inch round, leaving the edge slightly thicker. Transfer to a sheet of parchment dusted with cornmeal.
  8. Build the pizza. Brush the edge of the crust with olive oil. Spread a thin layer of sauce over the center, leaving a 1-inch border. Scatter half the vegan mozzarella, then the sliced tomatoes, garlic mushrooms, and remaining cheese.
  9. Bake. Slide the pizza on its parchment onto the hot stone or baking sheet. Bake for 10–14 minutes until the crust is golden and the cheese is bubbling with a few browned spots.
  10. Finish. Remove from the oven. Top with fresh basil, a drizzle of olive oil, flaky salt, and any optional finishing touches. Let rest for 2 minutes before slicing.

Pro Tips for the Best Vegan Pizza

  • Cook the mushrooms first. Raw mushrooms release water in the oven and make the pizza soggy. Pre-cooking concentrates their flavor.
  • Get the oven very hot. A pizza stone or preheated baking sheet gives a crisp base. Preheat for at least 30 minutes.
  • Do not overload the pizza. Too many toppings prevent the crust from crisping and the cheese from melting properly.
  • Use a thin layer of sauce. Excess sauce makes the middle soggy. A light coating gives better flavor balance.
  • Pat the tomato slices dry. Dry slices keep the pizza from becoming watery.
  • Add basil after baking. Fresh basil blackens in the oven. Adding it at the end keeps it bright and fragrant.
  • Choose a good melting vegan mozzarella. Look for one that lists coconut oil and starches, which stretch well when heated.

Why This Topping Combination Works

Great pizza is about balance. The tomato sauce brings acidity and sweetness, the cheese brings creaminess and fat, and the mushrooms bring savory depth. Garlic bridges them all with its aromatic warmth. Fresh tomatoes add juicy bursts that cut through the richness.

Mushrooms are especially valuable on vegan pizza because they are high in natural glutamates, the compounds that create the savory taste associated with meat and aged cheese. When browned, they develop an almost meaty flavor and a chewy texture that satisfies without needing meat substitutes.

Tomatoes contribute lycopene, a powerful antioxidant that becomes more bioavailable when cooked with a little olive oil. Garlic provides allicin, studied for its cardiovascular benefits, while mushrooms supply B vitamins, selenium, and a small amount of vitamin D.


Flavor Variations

  • Pesto Mushroom Pizza: Replace the tomato sauce with vegan basil pesto for a fresh, herby, green version.
  • Spicy Arrabbiata Pizza: Add extra chili flakes and sliced fresh chilies to the sauce for a fiery version.
  • White Garlic Pizza: Skip the tomato sauce and spread a garlic cashew cream base instead for a rich white pizza.
  • Rainbow Veggie Pizza: Add sliced bell peppers, red onion, olives, and spinach to the mushrooms for a loaded veggie version.

Nutritional Highlights (Per Serving)

CaloriesProteinCarbsFiberFat
~430 kcal11g60g4g16g

Storage

  • Refrigerator: Store slices in an airtight container for up to 4 days. Reheat in a hot skillet, covered, or in a 400°F (200°C) oven for 6–8 minutes to re-crisp.
  • Freezer: Wrap individual slices tightly and freeze for up to 2 months. Reheat from frozen in a hot oven.
  • Dough: Refrigerate the risen dough for up to 3 days for deeper flavor, or freeze for 2 months. Thaw overnight in the fridge.
  • Toppings: The cooked mushrooms and sauce keep refrigerated for 4 days, so you can assemble pizza on short notice.

Frequently Asked Questions

Can I use store-bought pizza dough?

Yes — many store-bought doughs are vegan. Check the ingredients to confirm they contain no dairy, eggs, or honey. Let it come to room temperature before stretching.

What is the best vegan mozzarella for pizza?

Look for a shreddable vegan mozzarella that melts and stretches. Brands based on coconut oil with starches usually perform best. Homemade cashew mozzarella also works well.

Why is my crust soggy?

The most common causes are too much sauce, wet toppings, or an oven that was not hot enough. Pre-cook the mushrooms, use a thin layer of sauce, and preheat the oven and stone for 30 minutes.

Can I make the crust gluten-free?

Use a good gluten-free pizza flour blend with xanthan gum. The dough will be stickier and requires a shorter rise, so follow the blend’s package directions.

Can I bake this on a regular baking sheet?

Yes. Preheat the sheet in the oven, then slide the pizza on parchment onto it. It will not be quite as crisp as on a stone but still excellent.

Can I make the dough without yeast?

For a quick option, mix 2 cups of flour, 1 tablespoon of baking powder, ½ teaspoon of salt, and ¾ cup of plant yogurt. It makes a softer, flatbread-style crust and takes no rising time.


Tried this recipe? Leave a comment below and let us know how it turned out! Tag us on Instagram and Facebook — we love seeing your plant-powered creations. Looking for more easy vegan dinner recipes? Browse all recipes on Easy Vegan Recipes — new recipes posted every single week!

Vegan Burritos — The Most Satisfying Plant-Based Dinner You Will Make All Week

vegan burritos

There are dinners you make because something filling is needed. And then there are dinners like these Vegan Burritos — the kind that are stuffed so generously with seasoned black beans, fluffy cilantro lime rice, roasted sweet potato, creamy guacamole, and tangy salsa that the first forkful is simultaneously the most satisfying and the most complete bite imaginable, wrapped in a warm, toasted flour tortilla that holds everything together in a way that makes every single element taste better than it would on its own. This is that burrito. The one that rivals any restaurant version. The one that feeds a family from a single batch of filling and makes everyone at the table genuinely happy.

This recipe builds a truly loaded burrito from scratch — seasoned black beans simmered with cumin, smoked paprika, and garlic into a deeply flavored, slightly saucy filling; cilantro lime rice cooked with lime zest and fresh cilantro for bright, fragrant flavor; roasted sweet potato cubes caramelized in the oven until tender and slightly crispy at the edges; and a quick guacamole and pico de gallo that bring freshness and brightness to the rich, substantial filling.

What makes these burritos so outstanding is how each component is seasoned and prepared individually, then assembled together — ensuring every element contributes its own distinct character to the finished burrito rather than blending into a single uniform flavor.

This recipe is 100% vegan, naturally adaptable to gluten-free with corn tortillas, ready in about 45 minutes, and absolutely magnificent wrapped tightly, toasted briefly in a dry pan until the tortilla is golden and slightly crisp, and served immediately while everything inside is still warm.


Recipe Information

Prep TimeCook TimeTotal TimeServingsCalories
15 mins30 mins45 mins4~580 kcal

Ingredients

For the Seasoned Black Beans

  • 2 cans (800g) black beans, drained and rinsed
  • 1 small onion, finely diced
  • 3 cloves garlic, minced
  • 1 tbsp olive oil
  • 1 tsp cumin
  • 1 tsp smoked paprika
  • ½ tsp chili powder
  • ½ tsp salt
  • ¼ cup (60ml) vegetable broth

For the Cilantro Lime Rice

  • 1½ cups (280g) long grain white rice, cooked
  • Zest and juice of 1 lime
  • ¼ cup (15g) fresh cilantro, finely chopped
  • ½ tsp salt

For the Roasted Sweet Potato

  • 2 medium sweet potatoes, peeled and diced into 1.5cm cubes
  • 1 tbsp olive oil
  • ½ tsp cumin
  • ½ tsp smoked paprika
  • Salt and pepper

For the Quick Guacamole

  • 2 ripe avocados
  • 1 tbsp lime juice
  • ¼ tsp salt
  • ¼ tsp garlic powder

For Assembly

  • 4 large flour tortillas (30cm diameter)
  • ½ cup (120g) pico de gallo or fresh salsa
  • ½ cup (120g) vegan sour cream
  • 1 cup (30g) shredded lettuce or cabbage
  • ½ cup (60g) shredded vegan cheddar (optional)

Instructions

  1. Roast the sweet potato. Preheat the oven to 425°F (220°C). Toss the diced sweet potato with olive oil, cumin, smoked paprika, salt, and pepper. Spread on a lined baking sheet and roast for 20–25 minutes until golden and slightly crispy at the edges, flipping halfway.
  2. Cook the black beans. Heat the olive oil in a skillet over medium heat. Add the onion and cook for 4 minutes until softened. Add the garlic, cumin, smoked paprika, and chili powder and cook for 60 seconds. Add the black beans and vegetable broth. Simmer for 8–10 minutes, stirring occasionally, until the beans are thickened and deeply flavored. Season with salt.
  3. Make the cilantro lime rice. In a bowl combine the cooked rice with lime zest, lime juice, fresh cilantro, and salt. Toss to combine evenly.
  4. Make the guacamole. Mash the avocados with the lime juice, salt, and garlic powder until mostly smooth with some texture remaining.
  5. Warm the tortillas. Heat each tortilla in a dry skillet over medium heat for 30 seconds per side until warm and pliable.
  6. Assemble the burritos. Lay a warm tortilla flat. In the lower third of the tortilla layer the rice, black beans, roasted sweet potato, guacamole, pico de gallo, vegan sour cream, and lettuce, leaving a 3cm border on each side.
  7. Fold and roll. Fold the sides of the tortilla inward over the filling, then roll from the bottom up tightly, keeping the sides tucked in as you roll. Press firmly to seal.
  8. Toast and serve. Place the rolled burrito seam-side down in a dry skillet over medium heat and press lightly with a spatula. Cook for 1–2 minutes per side until golden and sealed. Serve immediately.

Pro Tips

  • Do not overfill — a tempting but very common mistake. Too much filling makes the burrito impossible to fold without splitting the tortilla. Stop at two thirds of the capacity the tortilla appears to have.
  • Warm the tortilla before filling — a cold tortilla cracks and tears when rolled. A warm, pliable tortilla folds cleanly and holds the burrito sealed.
  • Toast the finished burrito in a dry pan — this final step seals the seam, crisps the outside slightly, and makes the burrito much easier to eat without unraveling.
  • Season each component individually — a burrito where the rice, beans, and vegetables are each properly seasoned is dramatically better than one where everything is bland and relies on salsa for flavor.

Why Burritos Are the Perfect Plant-Based Meal

The burrito format is one of the most naturally plant-based-friendly meal structures in all of food culture. Its traditional components — beans, rice, vegetables, avocado, salsa, and herbs — are entirely plant-based in their original forms, making vegan burritos not a compromise version of the original but a return to its most authentic expression. Black beans alone provide a remarkable nutritional profile — complete protein, dietary fiber, folate, iron, and magnesium — making a well-made burrito one of the most nutritionally complete single-dish plant-based meals available.


Flavor Variations

  • Sofritas Style Burrito: Replace the black beans with crumbled tofu cooked in a chipotle-tomato sauce for a Chipotle-inspired filling.
  • Fajita Burrito: Add sautéed bell peppers and onions alongside the beans for a fajita-style version with more vegetable substance.
  • Breakfast Burrito: Replace the black beans with scrambled tofu and swap the sweet potato for diced roasted potato for a morning version.

Nutritional Highlights (Per Serving)

CaloriesProteinCarbsFiberFat
~580 kcal18g82g15g20g

Storage

  • Refrigerator: Store assembled, untoasted burritos wrapped tightly in foil for up to 3 days. Reheat in the oven at 375°F (190°C) for 15 minutes or in a skillet until warmed through.
  • Freezer: Wrap assembled burritos tightly in foil then a freezer bag for up to 2 months. Bake from frozen at 375°F (190°C) for 30–35 minutes until heated through.
  • Components separately: Each filling component stores well separately in the refrigerator for up to 4 days — assemble fresh burritos throughout the week in under 5 minutes.

Frequently Asked Questions

Can I make these burritos gluten-free?

Yes — use large corn tortillas or gluten-free flour tortillas. Corn tortillas are smaller and may require two per serving; warm them very thoroughly before rolling as they are more prone to cracking than flour tortillas.

How do I keep the burrito from unraveling?

Three things — warm the tortilla until very pliable, do not overfill, and toast seam-side down immediately after rolling. The heat seals the seam and the toasted exterior holds the burrito together.

Can I meal prep burritos for the week?

Yes — these are outstanding for meal prep. Assemble completely, wrap tightly in foil, and refrigerate for up to 3 days or freeze for up to 2 months. Reheat in the oven for the best result.


Tried this recipe? Leave a comment below and let us know how it turned out! Tag us on Instagram and Facebook — we love seeing your plant-powered creations. Looking for more addictive vegan snack and appetizer recipes? Browse all recipes on Easy Vegan Recipes — new recipes posted every single week!

Mushroom Alfredo

mushroom alfredo

There are pasta dishes you make on a weeknight because pasta is easy and everyone loves it. And then there are pasta dishes like this Vegan Mushroom Alfredo — the kind that stops conversation at the dinner table, that makes people put down their forks and look at you with genuine disbelief when you tell them there is not a single gram of dairy anywhere in the bowl, that coats every ribbon of pasta in a sauce so impossibly silky, so deeply rich, so extraordinarily creamy that it is indistinguishable in every meaningful way from the finest dairy-based Alfredo you have ever tasted. This is that pasta. The one that becomes the dish people request at every gathering. The one that converts the most committed dairy lovers. The one that proves beyond any conceivable doubt that plant-based cooking is not a compromise — it is an elevation.

This is a Alfredo sauce of extraordinary sophistication — a base of raw cashews blended with roasted garlic and nutritional yeast into the most velvety, dairy-free cream imaginable, enriched with a splash of white wine, brightened with lemon, and folded through with golden pan-seared mushrooms that have been cooked low and slow until they are deeply caramelized, nutty, and concentrated in flavor to an intensity that borders on the transcendent. The mushrooms are not a supporting player in this dish — they are the co-star, contributing an earthy, umami-laden depth that transforms the creamy Alfredo base into something with layers of complexity and character that no amount of Parmesan could replicate.

What makes this recipe so genuinely exceptional is the cashew cream base. Raw cashews soaked briefly in hot water and blended until completely smooth create a cream with a richness, a mouthfeel, and a neutral sweetness that is so close to heavy dairy cream in every sensory respect that blind tasters consistently fail to identify the difference. Combined with nutritional yeast — which contributes a deep, savory, genuinely cheesy flavor through its naturally occurring glutamates — the result is an Alfredo sauce that is not merely a reasonable plant-based substitute but is in its own right one of the finest pasta sauces imaginable.

This recipe is 100% vegan, ready in just 30 minutes, naturally gluten-free when served with gluten-free pasta, high in plant-based protein and healthy fats, and absolutely spectacular served over fettuccine, tagliatelle, pappardelle, or any wide, flat pasta shape that can carry the generous, silky sauce in its every fold and ribbon.


Recipe Information

Prep TimeCook TimeTotal TimeServingsCalories
10 mins20 mins30 mins4~520 kcal

Ingredients

For the Cashew Alfredo Sauce

  • 1½ cups (200g) raw cashews, soaked in boiling water for 15 minutes then drained
  • 1 cup (240ml) vegetable broth, plus more as needed
  • ½ cup (120ml) unsweetened oat milk or plant milk of choice
  • 4 cloves garlic, roasted or sautéed until golden
  • 4 tbsp nutritional yeast
  • 2 tbsp lemon juice
  • 1 tbsp white miso paste (adds extraordinary depth and umami)
  • 1 tsp onion powder
  • ½ tsp salt, plus more to taste
  • ¼ tsp white pepper
  • ¼ tsp nutmeg (the classic Alfredo finishing spice)

For the Mushrooms

  • 500g mixed mushrooms (cremini, shiitake, oyster, or portobello — or a combination)
  • 4 cloves garlic, thinly sliced
  • 2 tbsp olive oil
  • 2 tbsp vegan butter
  • ½ cup (120ml) dry white wine (or vegetable broth)
  • 2 tbsp fresh thyme leaves (or 1 tsp dried thyme)
  • 2 tbsp fresh parsley, finely chopped
  • Salt and black pepper to taste

For the Pasta

  • 400g fettuccine or tagliatelle (use gluten-free pasta if needed)
  • 1 tbsp salt (for pasta water)
  • ½ cup (120ml) pasta cooking water, reserved before draining

Optional Add-ins

  • 1 cup (30g) fresh baby spinach (stir in at the end)
  • ½ cup (60g) frozen peas (add to sauce while warming)
  • 1 medium zucchini, ribboned with a vegetable peeler
  • Sun-dried tomatoes, roughly chopped
  • Toasted pine nuts or walnuts for crunch
  • Fresh truffle oil drizzled at the end for extraordinary luxury

To Serve

  • Fresh parsley, finely chopped
  • Freshly cracked black pepper — generous
  • Vegan Parmesan or nutritional yeast sprinkled over
  • Chili flakes for warmth and color
  • A wedge of fresh lemon for squeezing
  • Crusty sourdough bread or garlic bread alongside

Instructions

  1. Soak the cashews. Place the raw cashews in a heatproof bowl and cover with boiling water. Soak for a minimum of 15 minutes — 30 minutes produces an even silkier result. Drain completely before blending. Properly soaked cashews blend to a perfectly smooth, completely lump-free cream in any standard blender. Under-soaked cashews produce a grainy sauce regardless of blending time — do not rush this step.
  2. Cook the pasta. Bring a large pot of generously salted water to a rolling boil. Add the pasta and cook according to package instructions until al dente — tender with a very slight resistance at the center. Before draining reserve at least half a cup of the starchy pasta cooking water — this liquid is liquid gold in pasta making, used to adjust the consistency of the sauce and help it adhere to the pasta with extraordinary effectiveness. Drain the pasta and set aside.
  3. Sear the mushrooms to golden perfection. While the pasta cooks heat a large skillet over high heat until very hot — almost smoking. Add the olive oil and vegan butter and allow the butter to melt and foam. Add the mushrooms in a single layer — do not stir for the first 2–3 minutes, allowing them to develop a deep golden sear on the bottom. A mushroom that is stirred immediately after hitting the pan will steam in its own moisture rather than caramelizing. Once golden on the bottom flip and cook for a further 2 minutes. Season generously with salt and pepper.
  4. Add garlic, wine, and thyme. Reduce the heat to medium and add the sliced garlic and fresh thyme to the seared mushrooms. Cook for 60 seconds until the garlic is golden and fragrant — watch carefully as thin-sliced garlic burns quickly. Pour in the white wine and allow to bubble and reduce for 2–3 minutes, scraping up any caramelized bits from the bottom of the pan — these concentrated caramelized bits are some of the most flavorful elements in the entire dish. Add the fresh parsley and stir to combine. Remove from heat and set aside.
  5. Blend the cashew Alfredo sauce. Drain the soaked cashews and place in a high-speed blender with the vegetable broth, oat milk, roasted garlic, nutritional yeast, lemon juice, white miso paste, onion powder, salt, white pepper, and nutmeg. Blend on the highest speed for a full 90 seconds — stopping to scrape down the sides halfway through — until the sauce is completely smooth, silky, and pourable with absolutely no graininess or texture remaining. Taste and adjust — more nutritional yeast for cheesiness, more lemon for brightness, more salt for depth.
  6. Warm the sauce. Pour the blended cashew sauce into the large skillet used for the mushrooms over medium-low heat. Warm gently, stirring continuously, until the sauce is heated through and beginning to thicken slightly — approximately 2–3 minutes. Add a splash of the reserved pasta cooking water if the sauce seems too thick — it should be pourable and silky rather than stiff or gluey.
  7. Combine pasta and sauce. Add the drained pasta directly to the warm sauce in the skillet and toss vigorously to coat every strand in the creamy Alfredo sauce. Add the seared mushrooms and toss again to incorporate throughout. If the sauce is too thick add the reserved pasta water one tablespoon at a time, tossing between additions, until the sauce coats the pasta in a silky, flowing way that pools slightly at the bottom of the bowl when served.
  8. Taste and serve immediately. Taste the finished pasta and adjust the seasoning one final time — Alfredo requires confident seasoning with salt, pepper, and lemon to reach its full extraordinary potential. Divide immediately between warmed bowls — pasta waits for no one and Alfredo in particular loses its silky texture as it cools. Finish each bowl with fresh parsley, a very generous crack of black pepper, a drizzle of olive oil, chili flakes, and an additional dusting of nutritional yeast or vegan Parmesan. Serve immediately.

Pro Tips for the Most Extraordinary Vegan Alfredo

  • Soak the cashews in boiling rather than cold water. Boiling water softens raw cashews in 15 minutes — cold water requires 4–6 hours of soaking time. For a last-minute sauce boiling water makes this recipe genuinely achievable in 30 minutes without compromising the silkiness of the finished cream.
  • Never stir the mushrooms immediately after adding to the pan. The single most common mushroom cooking mistake is stirring too soon. Mushrooms placed in a hot pan and left completely undisturbed for 2–3 minutes develop a deep, caramelized, golden-brown crust that concentrates their flavor dramatically. Stirring immediately causes them to steam in their own released moisture and produces grey, flaccid mushrooms with none of the extraordinary depth of properly seared ones.
  • Use white miso paste in the sauce. This single ingredient transforms the cashew Alfredo from very good to genuinely outstanding. White miso contributes a deep, fermented, savory complexity — a roundness and depth of umami that makes the sauce taste aged and sophisticated rather than simply creamy. It is the secret weapon of plant-based sauce making and its contribution here is irreplaceable.
  • Reserve more pasta water than you think you need. Pasta cooking water — enriched with dissolved starch from the pasta — is one of the most powerful tools in pasta cooking. It adjusts sauce consistency, helps sauce adhere to pasta, and creates that glossy, emulsified quality that characterizes great pasta dishes. Reserve at least one full cup even if you think you will not need it all.
  • Serve in warmed bowls. Cashew-based sauces thicken as they cool — serving in warmed bowls keeps the sauce at the perfect silky consistency for significantly longer. Run hot water into your serving bowls for 60 seconds before ladling in the pasta.
  • Use a combination of mushroom varieties. A single variety of mushroom produces a one-dimensional flavor. A combination of cremini for earthiness, shiitake for deep umami, oyster for delicacy, and portobello for meaty substance creates a mushroom component with extraordinary complexity and textural interest that elevates the entire dish to restaurant quality.

The Magic of Cashew Cream in Plant-Based Cooking

Cashew cream is perhaps the single most transformative ingredient in the entire plant-based cooking repertoire — and understanding why it works so extraordinarily well helps explain why this Alfredo is so indistinguishable from its dairy counterpart.

Raw cashews have a unique fat composition among all nuts — their fat is predominantly oleic acid, the same monounsaturated fatty acid that dominates olive oil and dairy cream, which gives them a neutral, clean flavor and a richness on the palate that is remarkably similar to dairy fat. When soaked and blended they release this fat into a stable emulsion with their natural starches and proteins — creating a cream that has the same mouthfeel, the same richness, and the same coating quality as heavy dairy cream.

The protein content of cashews — approximately 5 grams per serving in this recipe — contributes to the sauce’s ability to emulsify and thicken when heated in the same way that milk proteins contribute to the texture of dairy-based sauces. This protein-fat emulsion is what gives the finished Alfredo its characteristic silky, coating quality rather than a thin, watery one.

Nutritional yeast — the other hero ingredient in this sauce — provides its cheesy flavor through naturally occurring glutamic acid — the same amino acid compound responsible for the savory, umami depth of aged Parmesan cheese. It is not an artificial flavoring or an approximation of cheese flavor — it is the same underlying chemistry, derived from a completely different and entirely plant-based source, producing a flavor that is genuinely, authentically cheesy in every meaningful respect.

The combination of cashew cream and nutritional yeast in this sauce does not merely approximate dairy Alfredo — it creates something that is chemically and sensorially remarkably similar to it through entirely plant-based means. This is not compromise. This is ingenuity.


Flavor Variations

  • Truffle Mushroom Alfredo: Add 1 tablespoon of truffle oil to the finished sauce and use exclusively oyster and cremini mushrooms for the most luxurious, restaurant-quality version of this dish imaginable. Finish with shaved vegan truffle cheese if available for an extraordinary special occasion pasta that is genuinely spectacular.
  • Roasted Garlic and Sun-Dried Tomato: Roast a full head of garlic until deeply caramelized and sweet and blend the entire head into the cashew sauce. Add half a cup of finely chopped sun-dried tomatoes to the mushrooms for a version with extraordinary depth and a beautiful Mediterranean character.
  • Spinach and Mushroom: Stir two large handfuls of fresh baby spinach into the warm sauce in the final minute of cooking until just wilted for a vibrant green-flecked version that adds additional nutrition and a beautiful visual contrast to the creamy white sauce.
  • Lemon and Herb: Add the zest of two lemons and a generous handful of fresh basil and tarragon to the blended sauce for a brighter, more herbaceous version with a fresh, spring-like character that is particularly beautiful in warmer months.

Nutritional Highlights (Per Serving)

CaloriesProteinCarbsFiberFat
~520 kcal18g62g5g22g

At 520 calories per serving this pasta delivers a genuinely satisfying and nutritionally substantial meal — 18 grams of plant-based protein from the cashews, pasta, and nutritional yeast, meaningful dietary fiber, and an exceptional concentration of healthy monounsaturated fats from the cashews and olive oil that support cardiovascular health and provide sustained satiety. The mushrooms contribute B vitamins including B12 precursors, selenium, and powerful antioxidant compounds including ergothioneine — a unique antioxidant found almost exclusively in mushrooms that has been studied for its extraordinary cellular protective properties. The nutritional yeast contributes B vitamins including B12 in fortified varieties, making this an outstanding choice for anyone following a plant-based diet who wants to maintain adequate B12 intake.


Storage

  • Sauce separately: The cashew Alfredo sauce stores beautifully in an airtight container in the refrigerator for up to 5 days. It thickens considerably during refrigeration — thin with a splash of vegetable broth or oat milk and reheat gently over low heat, stirring continuously, before tossing with freshly cooked pasta for the finest result.
  • Pasta and sauce combined: Store leftover assembled pasta in an airtight container in the refrigerator for up to 3 days. Reheat gently in a pan over medium-low heat with a generous splash of vegetable broth or water to loosen the sauce and restore its silky consistency. Do not reheat at high heat as the cashew sauce can become grainy.
  • Freezer: The cashew Alfredo sauce freezes well for up to 2 months — freeze before combining with pasta. Thaw overnight in the refrigerator and reheat gently with a splash of broth to restore consistency. Cooked pasta does not freeze well — cook fresh pasta when serving the frozen sauce.
  • Mushrooms: The seared mushrooms store in the refrigerator for up to 4 days and can be reheated quickly in a hot pan with a small amount of olive oil. They also freeze well for up to 1 month — freeze separately from the sauce for the most flexible meal prep system.

Frequently Asked Questions

Can I make this recipe without cashews?

Yes — silken tofu blended until completely smooth is the most effective cashew-free alternative for this sauce. Use 300g of silken tofu in place of the soaked cashews and reduce the plant milk to 2 tablespoons. The flavor profile is slightly different — less rich and buttery than the cashew version — but still produces a genuinely creamy, satisfying Alfredo sauce. Sunflower seeds soaked and blended in the same way as the cashews are another excellent nut-free alternative.

What is the best pasta shape for Alfredo?

Wide, flat pasta shapes carry creamy Alfredo sauce most effectively — fettuccine is the classic and most traditional choice, tagliatelle is an equally excellent alternative, and pappardelle produces an extraordinarily luxurious result with the wide ribbons holding generous amounts of sauce in every fold. Avoid thin pasta shapes like spaghetti or angel hair which do not carry thick, creamy sauces as effectively.

Can I make this recipe without white wine?

Yes — replace the white wine with an equal amount of vegetable broth and add an additional teaspoon of lemon juice and a teaspoon of white wine vinegar to approximate the acidity and complexity that the wine contributes to the mushroom cooking liquid. The result is slightly less complex but still deeply delicious.

Why is my cashew sauce grainy?

A grainy cashew sauce is almost always the result of insufficient soaking time or insufficient blending time. Ensure the cashews are soaked in boiling water for a minimum of 15 minutes and blend on the highest speed for a full 90 seconds. A high-speed blender produces a significantly smoother result than a standard blender — if using a standard blender blend for 2–3 minutes and strain through a fine mesh sieve if any graininess remains.

Can I add protein to this dish?

Yes — this pasta pairs beautifully with additional plant-based protein. Pan-seared tofu cubes, tempeh crumbles browned in soy sauce and garlic, white beans stirred into the sauce, or chickpeas roasted until crispy all work extraordinarily well alongside the mushrooms and creamy Alfredo sauce. Lentil-based pasta used in place of regular pasta also significantly increases the protein content of the finished dish.

Is this recipe suitable for meal prep?

Yes — with the caveat that the sauce and pasta should be stored separately for the finest reheated result. Store the cashew Alfredo sauce and the seared mushrooms in the refrigerator for up to 5 days and cook fresh pasta each time for the best texture. The sauce reheats beautifully in under 5 minutes making this an outstanding weeknight meal prep recipe that requires minimal effort on the day of serving.


Tried this recipe? Leave a comment below and let us know how it turned out! Tag us on Instagram and Facebook — we love seeing your plant-powered creations. Looking for more luxuriously creamy vegan pasta and dinner recipes? Browse all recipes on Easy Vegan Recipes — new recipes posted every single week!