one pan vegan dinner

Vegan Spinach and White Beans with Garlic, Lemon and Olive Oil — The Most Satisfying Plant-Based Skillet You Will Make All Week

spinach and white beans

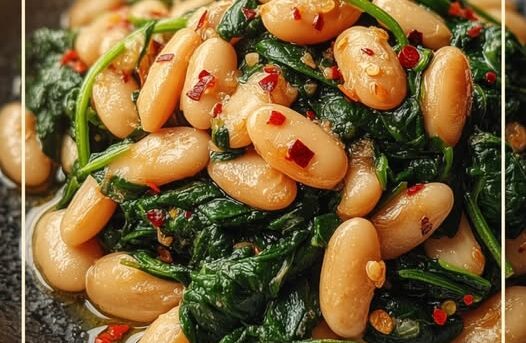
Creamy white beans and tender spinach, cooked together in a skillet with plenty of garlic, good olive oil, and a squeeze of lemon: these Vegan Spinach and White Beans are simple, wholesome, and ready in about 20 minutes. It is a one-pan meal made from pantry staples that tastes far fancier than the effort it takes.

Beans and greens are a classic pairing in Mediterranean and Italian home cooking, and for good reason. White beans are mild, creamy, and filling, and spinach adds color, freshness and a soft, silky texture when it wilts into the pan. Together they make a dish that is hearty without being heavy, with a good amount of plant-based protein and fiber from the beans.

The flavor comes from just a few things. Garlic and a pinch of red pepper flakes are cooked gently in olive oil until fragrant, which flavors the whole dish. A splash of vegetable broth is added to the beans, and a few of the beans are mashed against the side of the pan so the liquid turns creamy and lightly thickened, without any cream. At the end, fresh lemon juice and zest brighten everything and keep it from tasting flat.

This recipe uses canned white beans, such as cannellini or great northern, so there is no soaking or long simmering. Drain and rinse them well. If you only have dried beans, cook them first until tender and use about three cups of cooked beans.

Serve the beans over toasted crusty bread rubbed with garlic, with rice or pasta, or on their own as a light dinner. They are also a good side dish next to roasted vegetables or a simple salad. Leftovers are good the next day, and they make a quick lunch.

This dish is different from our Vegan Tuscan White Beans, which are simmered with sage, rosemary and crushed tomatoes. This one is quicker, lighter, and built around spinach, garlic and lemon, with no tomatoes.

This recipe is 100% vegan, dairy-free, egg-free, and nut-free. It is naturally gluten-free unless you serve it with bread, and it contains no soy as written. Check that your vegetable broth is gluten-free if needed.


Recipe Information

Prep TimeCook TimeTotal TimeServingsCalories
5 mins15 mins20 mins4 servings~260 kcal per serving

Ingredients

For the Skillet

  • 3 tbsp extra virgin olive oil
  • 4 garlic cloves, thinly sliced
  • ¼ tsp red pepper flakes
  • 2 cans (15 oz / 400g each) white beans (cannellini or great northern), drained and rinsed
  • ½ cup (120ml) vegetable broth
  • 6 cups (about 180g) fresh baby spinach
  • 1 tsp dried oregano or thyme
  • ½ tsp salt, to taste
  • ¼ tsp black pepper
  • Zest of 1 lemon
  • 2 tbsp lemon juice, to taste
  • 2 tbsp chopped fresh parsley

To Serve

  • Toasted crusty bread, rubbed with a cut garlic clove
  • Extra olive oil
  • Lemon wedges
  • Nutritional yeast, optional

Instructions

  1. Cook the garlic. Heat the olive oil in a large skillet over medium heat. Add the garlic and red pepper flakes and cook for 1–2 minutes, stirring, until fragrant and just turning golden. Do not let it brown.
  2. Add the beans. Stir in the white beans, oregano, salt, and pepper. Cook for 2 minutes.
  3. Make it creamy. Pour in the vegetable broth. With the back of a spoon, mash about a quarter of the beans against the side of the pan. Simmer for 4–5 minutes, until the liquid has thickened and turned creamy.
  4. Add the spinach. Add the spinach in large handfuls, stirring after each, and cook for 2–3 minutes, until just wilted.
  5. Finish. Remove from the heat. Stir in the lemon zest, lemon juice, and parsley. Taste and adjust the salt, pepper, and lemon.
  6. Serve. Spoon over toasted bread or serve in bowls. Drizzle with olive oil and add a squeeze of lemon.

Pro Tips for the Best Spinach and White Beans

  • Drain and rinse canned beans well to remove the canning liquid.
  • Cook the garlic gently. Burnt garlic turns bitter.
  • Mash some beans to make the sauce creamy without cream.
  • Add the spinach last so it stays bright green.
  • Add lemon off the heat to keep its fresh flavor.
  • Use good olive oil. It is a main flavor here.
  • Season at the end, since broth varies in saltiness.
  • Rub the toast with garlic for extra flavor.

A Few Notes on Ingredients

Cannellini beans are the creamiest, and great northern or navy beans work too. Fresh baby spinach wilts quickly. You can use mature spinach, chopped, and cook it a minute longer. Frozen spinach also works: thaw and squeeze it dry, and add it with the beans. Vegetable broth adds flavor, and water with a pinch more salt can replace it. Lemon is important, so do not skip it.


Flavor Variations

  • Sun-Dried Tomato: Add chopped sun-dried tomatoes with the beans.
  • Kale Version: Replace the spinach with chopped kale and cook for 5 minutes.
  • Creamy Version: Stir in a splash of coconut milk or plant cream.
  • Smoky Version: Add ½ tsp smoked paprika.
  • Mushroom Version: Sauté sliced mushrooms before adding the beans.
  • Spicy Version: Add more red pepper flakes.

Nutritional Highlights (Per Serving)

CaloriesProteinCarbsFiberFat
~260 kcal11g30g10g11g

Values are estimates and vary by brand. Serving bread adds more calories.


Storage

  • Refrigerator: Store in an airtight container for up to 4 days.
  • Reheating: Warm in a skillet or microwave, adding a splash of broth if it has thickened.
  • Freezer: Freeze for up to 2 months. The spinach will be softer after thawing.
  • Make ahead: The beans reheat well, so you can make them ahead.

Frequently Asked Questions

Can I use dried beans?

Yes. Cook them until tender first, then use about 3 cups cooked.

Can I use frozen spinach?

Yes. Thaw it and squeeze out the water before adding.

Is this gluten-free?

It is, as long as you check the broth and serve it without bread or with gluten-free bread.

How do I make it creamier?

Mash more of the beans, or add a splash of plant cream.

What can I serve it with?

Toasted bread, rice, pasta, or roasted vegetables.

How is this different from your other white bean recipes?

This is a quick skillet of white beans with spinach, garlic and lemon. Our Vegan Tuscan White Beans are simmered with sage, rosemary and crushed tomatoes, and our White Bean Soup and Tuscan White Bean Soup are brothy soups.


Tried this recipe? Leave a comment below and let us know how it turned out! Tag us on Instagram and Facebook — we love seeing your plant-powered creations. Browse all recipes on Easy Vegan Recipes — new recipes posted every single week!
Vegan Tuscan White Beans with Garlic, Sage, Rosemary and Crushed Tomatoes — The Most Comforting Plant-Based Skillet You Will Make All Week

vegan tuscan white beans

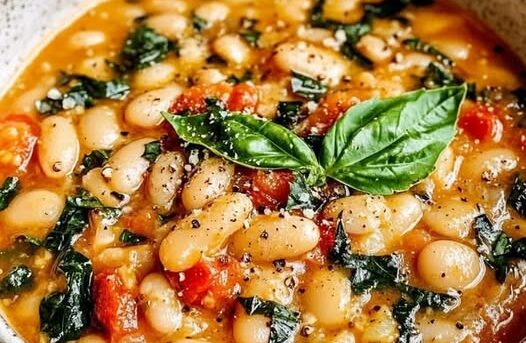
Creamy cannellini beans simmered in olive oil with garlic, sage, rosemary, and crushed tomatoes until they turn rich, silky, and deeply savory: these Vegan Tuscan White Beans are rustic Italian comfort food in one skillet. They are ready in about 25 minutes from pantry staples, and they are delicious as a main, a side, or spooned over toast.

This dish comes from the classic Tuscan way of cooking beans. Tuscans are so famous for loving beans that other Italians nicknamed them “mangiafagioli,” or bean eaters. The method is simple: beans are gently cooked with plenty of good olive oil, fresh herbs, and garlic, and a little tomato to make a light, savory sauce. There is nothing complicated, and that is the beauty of it.

Canned cannellini beans make it weeknight-friendly. Garlic and sage are sizzled in olive oil first, which infuses the oil with a deep, earthy aroma. Crushed tomatoes, rosemary, and a splash of broth go in with the beans, and a few of them are mashed against the pan so the sauce turns creamy without any cream. Baby spinach or kale wilts in at the end, and a squeeze of lemon makes everything bright.

Serve it over grilled or toasted crusty bread with a drizzle of olive oil, alongside roasted vegetables, over polenta or pasta, or as a hearty side. It is also excellent cold the next day with a little vinegar.

This recipe is dairy-free, egg-free, gluten-free, and nut-free (serve with gluten-free bread if needed). Please check labels on your broth and canned tomatoes.


Recipe Information

Prep TimeCook TimeTotal TimeServingsCalories
5 mins20 mins25 mins4~270 kcal each

Ingredients

  • 3 tbsp extra-virgin olive oil, plus more for serving
  • 5 garlic cloves, thinly sliced
  • 8–10 fresh sage leaves
  • 2 sprigs fresh rosemary (or 1 tsp dried)
  • ¼ tsp red pepper flakes
  • 1 can (14 oz / 400g) crushed tomatoes
  • 2 cans (15 oz / 400g each) cannellini beans, drained and rinsed
  • ½ cup (120ml) vegetable broth or water
  • 1 tsp salt, plus more to taste
  • ½ tsp black pepper
  • 3 cups (90g) baby spinach or chopped kale
  • 1 tbsp lemon juice
  • 1 tbsp balsamic or red wine vinegar, optional

To Serve

  • Grilled or toasted crusty bread
  • Fresh parsley or basil
  • Extra olive oil
  • Vegan parmesan, optional

Instructions

  1. Infuse the oil. Heat the oil in a large skillet over medium heat. Add the garlic, sage, rosemary, and red pepper flakes. Cook for 1–2 minutes until the garlic is just golden and fragrant. Do not let it brown.
  2. Add the tomatoes. Stir in the crushed tomatoes. Cook for 3 minutes.
  3. Add the beans. Stir in the beans, broth, salt, and pepper. Bring to a simmer.
  4. Simmer. Cook uncovered for 10–12 minutes, stirring now and then. Mash about a quarter of the beans against the side of the pan to thicken the sauce.
  5. Add the greens. Stir in the spinach until wilted, 1–2 minutes.
  6. Finish. Remove the rosemary stems. Stir in the lemon juice. Taste and adjust the salt, pepper, and lemon.
  7. Serve. Spoon over toasted bread. Drizzle with olive oil, and top with parsley and vegan parmesan.

Pro Tips for the Best Tuscan White Beans

  • Use good olive oil. It is a main flavor here.
  • Cook the garlic gently so it does not burn and turn bitter.
  • Mash some of the beans for a creamy sauce.
  • Do not overcook. The beans should hold their shape.
  • Add salt at the end, since broths vary.
  • Finish with a splash of acid for brightness.
  • Use fresh sage if you can. Dried sage is stronger, so use less.
  • Let the beans rest for 5 minutes before serving.

A Few Notes on Ingredients

Cannellini beans are creamy and mild, and great northern beans work too. Fresh sage gives the dish its classic flavor. Rosemary adds a piney aroma. Crushed tomatoes keep the sauce light. For dried beans, soak overnight and simmer until tender, then use about 3 cups cooked.


Flavor Variations

  • Sausage Version: Add crumbled vegan Italian sausage.
  • Pasta Version: Toss with short pasta.
  • Kale Version: Use lacinato kale instead of spinach.
  • Sun-Dried Tomato Version: Add chopped sun-dried tomatoes.
  • Lemony Version: Add extra lemon zest.
  • Crostini Version: Mash the beans lightly and spoon over crostini as an appetizer.

Nutritional Highlights (Per Serving, without bread)

CaloriesProteinCarbsFiberFat
~270 kcal12g33g11g10g

Storage

  • Refrigerator: Store for up to 5 days. The flavor improves the next day.
  • Freezer: Freeze for up to 3 months.
  • Reheating: Warm on the stove with a splash of broth.
  • Make ahead: Make a day ahead for even better flavor.

Frequently Asked Questions

Can I use dried beans?

Yes. Soak and cook them until tender, then use about 3 cups cooked beans.

Can I make it ahead?

Yes. It tastes even better the next day.

What can I serve it with?

Crusty bread, polenta, pasta, or roasted vegetables.

Can I use other beans?

Yes. Great northern beans or butter beans.

Is it gluten-free?

Yes, if your ingredients are. Serve with gluten-free bread if needed.

How is this different from your other white bean recipes?

This is a simple Tuscan skillet of cannellini beans with sage, rosemary, and tomatoes. Our Vegan Tuscan Pasta is a creamy pasta with sun-dried tomatoes, and our One-Pot White Bean Kale and Sun-Dried Tomato Tortiglioni is a pasta dish.


Tried this recipe? Leave a comment below and let us know how it turned out! Tag us on Instagram and Facebook — we love seeing your plant-powered creations. Browse all recipes on Easy Vegan Recipes — new recipes posted every single week!
Easy Vegan Potato Cauliflower Curry (Aloo Gobi Style) with Turmeric, Cumin and Fresh Ginger in a Light Tomato Sauce — The Most Comforting Plant-Based Curry You Will Make All Week

Easy Potato Cauliflower Curry

Tender potatoes and golden cauliflower florets cooked in a fragrant tomato and onion sauce with turmeric, cumin, coriander, garam masala, and fresh ginger: this Easy Vegan Potato Cauliflower Curry, inspired by the classic Indian dish aloo gobi, is simple, filling, and ready in about 40 minutes in one pan.

Aloo gobi is one of the most beloved vegetarian dishes in Indian cooking, and it happens to be naturally vegan. It needs no coconut milk and no cream. The potatoes turn soft and creamy, the cauliflower stays tender with a little bite, and everything is coated in a thick, spiced, slightly saucy masala that clings to the vegetables.

The method is simple. Cumin seeds sizzle in oil, then onions, garlic, and ginger go in, followed by the ground spices, which are toasted for a few seconds to bring out their flavor. A can of diced tomatoes makes the sauce, and the potatoes and cauliflower cook right in it with a splash of water, so there is no roasting and no extra pans. Frozen peas stirred in at the end add a pop of sweetness and color.

Serve it with basmati rice, warm naan or roti, and a spoonful of plant-based yogurt. It is a budget-friendly meal and wonderful for meal prep, since the flavors deepen overnight.

This recipe is dairy-free, egg-free, gluten-free, and nut-free. Please check labels on your spices, especially garam masala and curry powder blends.


Recipe Information

Prep TimeCook TimeTotal TimeServingsCalories
15 mins25 mins40 mins4~280 kcal each

Ingredients

For the Curry

  • 3 tbsp neutral oil
  • 1 tsp cumin seeds
  • 1 large onion, finely diced
  • 4 garlic cloves, minced
  • 1 tbsp fresh ginger, grated
  • 1 green chili, finely chopped (optional)
  • 1 tsp turmeric
  • 2 tsp ground coriander
  • 1 tsp ground cumin
  • 1 tsp Kashmiri chili powder or paprika
  • 1 can (14 oz / 400g) diced tomatoes
  • 1 lb (450g) Yukon Gold or other waxy potatoes, peeled and cut into ¾-inch cubes
  • 1 medium head cauliflower (about 1½ lb / 680g), cut into bite-size florets
  • ¾ cup (180ml) water
  • 1 tsp salt, plus more to taste
  • 1 cup (140g) frozen peas
  • 1 tsp garam masala
  • 1 tbsp lemon juice
  • ¼ cup fresh cilantro, chopped

To Serve

  • Cooked basmati rice
  • Warm naan or roti
  • Plant-based yogurt
  • Lemon wedges

Instructions

  1. Toast the cumin. Heat the oil in a large, deep skillet or pot with a lid over medium heat. Add the cumin seeds and cook for 30 seconds until they sizzle and smell fragrant.
  2. Cook the onion. Add the onion and cook for 6–8 minutes until soft and golden. Add the garlic, ginger, and green chili. Cook for 1 minute.
  3. Add the spices. Stir in the turmeric, coriander, ground cumin, and chili powder. Cook for 30 seconds.
  4. Add the tomatoes. Pour in the tomatoes and cook for 4–5 minutes, stirring, until the sauce thickens and the oil begins to separate.
  5. Add the vegetables. Add the potatoes, cauliflower, water, and salt. Stir to coat.
  6. Simmer. Bring to a simmer, cover, and cook for 15–18 minutes, stirring now and then, until the potatoes are tender when pierced.
  7. Add the peas. Stir in the peas and cook for 2 minutes, uncovered, until the sauce thickens.
  8. Finish. Stir in the garam masala and lemon juice. Taste and adjust the salt and spice. Top with cilantro.
  9. Serve. Serve over rice with naan and a spoonful of yogurt.

Pro Tips for the Best Potato Cauliflower Curry

  • Use waxy potatoes such as Yukon Gold. They hold their shape.
  • Cut the potatoes slightly smaller than the cauliflower, since they take longer to cook.
  • Cook the tomatoes down until thick for the best flavor.
  • Stir gently so the cauliflower does not break apart.
  • Do not add too much water. This dish should be saucy, not soupy.
  • Add the garam masala at the end to keep its aroma.
  • Finish with lemon for brightness.
  • Cook uncovered at the end for a drier, more traditional aloo gobi.

A Few Notes on Ingredients

Yukon Gold potatoes are creamy and hold their shape. Russets work but break down more. Kashmiri chili powder gives color with mild heat, and paprika is a substitute. Fresh ginger and garlic are important for flavor. Frozen peas are easy and add sweetness.


Flavor Variations

  • Dry Aloo Gobi Version: Reduce the water to ¼ cup and cook uncovered at the end.
  • Creamy Version: Stir in a splash of coconut milk.
  • Chickpea Version: Add a can of chickpeas.
  • Spinach Version: Stir in fresh spinach.
  • Spicy Version: Add extra chili or cayenne.
  • Instant Pot Version: Cook on high pressure for 2 minutes.

Nutritional Highlights (Per Serving, curry only)

CaloriesProteinCarbsFiberFat
~280 kcal7g38g9g11g

Storage

  • Refrigerator: Store for up to 5 days.
  • Freezer: Freeze for up to 2 months. The potatoes may soften.
  • Reheating: Warm on the stove with a splash of water.
  • Make ahead: The flavor is better the next day.

Frequently Asked Questions

What is aloo gobi?

It is a classic Indian dish of potatoes (aloo) and cauliflower (gobi) cooked with spices.

Can I make it with frozen cauliflower?

Yes, though it will be softer. Add it later in the cooking so it does not turn mushy.

Is it spicy?

It is mild. Add the green chili or extra chili powder for more heat.

Can I make it creamy?

Yes. Stir in a splash of coconut milk at the end.

What can I serve with it?

Basmati rice, naan, roti, and plant-based yogurt.

How is this different from your other potato curries?

This is a light tomato-based aloo gobi with potatoes and cauliflower. Our Vegan Saag Aloo is a creamy spinach and potato curry, and our Instant Pot Potato Curry is made in a pressure cooker.


Tried this recipe? Leave a comment below and let us know how it turned out! Tag us on Instagram and Facebook — we love seeing your plant-powered creations. Browse all recipes on Easy Vegan Recipes — new recipes posted every single week!
Vegan Sticky Sesame Cauliflower and Seasoned Vegetables — The Most Addictive Plant-Based Dinner You Will Make All Week

sticky sesame cauliflower and seasoned vegetables

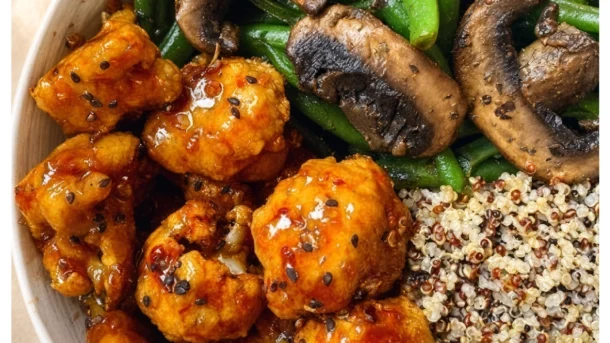
There are weeknight dinners you make because something needs to be on the table. And then there are dinners like this Vegan Sticky Sesame Cauliflower and Seasoned Vegetables — the kind that fills the kitchen with the smell of caramelizing soy and toasted sesame the moment the sauce hits the pan, that delivers cauliflower florets roasted until their edges are almost charred and then coated in a sticky, glossy, garlicky sesame sauce so deeply savory and so satisfying that it has people leaning over the baking dish before it has even made it to the table. This is that dinner. The one that makes cauliflower genuinely, unexpectedly crave-worthy. The one that tastes like a better version of your favorite takeaway. The one that disappears from the serving bowl in minutes and always gets asked for again.

This recipe roasts cauliflower florets at high heat until deeply golden and caramelized at the edges, then tosses them in a homemade sticky sesame sauce built from soy sauce, rice vinegar, garlic, ginger, maple syrup, and toasted sesame oil — the combination of salt, acid, sweetness, and rich sesame character that defines the best sesame dishes of East Asian cuisine. The vegetables — bell pepper, broccoli, snap peas, and carrot — are seasoned and roasted alongside the cauliflower, absorbing the same flavors and providing color, texture, and variety so that every bite is different from the last.

What makes this recipe so outstanding is the sauce technique — making the sticky sauce separately and tossing the already-roasted cauliflower through it in the final minutes of cooking, then returning everything to the oven just long enough for the sauce to caramelize onto the cauliflower’s surface, creates the specific sticky, lacquered coating that makes this dish so irresistible and so completely unlike a simple roasted vegetable tray bake.

This recipe is 100% vegan, naturally dairy-free, ready in under 45 minutes, and spectacular served over steamed jasmine rice or noodles with a scatter of sesame seeds and sliced spring onions.


Recipe Information

Prep TimeCook TimeTotal TimeServingsCalories
15 mins30 mins45 mins4~280 kcal

Ingredients

For the Roasted Cauliflower and Vegetables

  • 1 large head cauliflower, cut into medium florets
  • 1 red bell pepper, cut into strips
  • 1 head broccoli, cut into florets
  • 2 medium carrots, peeled and sliced diagonally
  • 150g (1 cup) snap peas
  • 3 tbsp neutral vegetable oil
  • 1 tsp garlic powder
  • 1 tsp onion powder
  • ½ tsp salt
  • ½ tsp black pepper
  • 1 tsp smoked paprika

For the Sticky Sesame Sauce

  • 4 tbsp soy sauce or tamari
  • 2 tbsp rice vinegar
  • 2 tbsp maple syrup
  • 1 tbsp toasted sesame oil
  • 1 tbsp hoisin sauce
  • 4 cloves garlic, minced
  • 1 tsp fresh ginger, grated
  • 1 tbsp cornstarch mixed with 2 tbsp cold water
  • ½ tsp chili flakes (optional)

To Serve

  • Steamed jasmine rice or noodles
  • 2 tbsp sesame seeds, toasted
  • 3 spring onions, thinly sliced
  • Fresh lime wedges
  • Extra soy sauce or chili oil

Instructions

  1. Preheat and prep. Preheat the oven to 425°F (220°C). Line two large baking sheets with parchment paper. High heat is essential for caramelization — do not lower the temperature.
  2. Season and roast the cauliflower. In a large bowl, toss the cauliflower florets with 2 tablespoons of oil, garlic powder, onion powder, smoked paprika, salt, and pepper. Spread in a single layer on one baking sheet, giving each floret space. Crowding causes steaming rather than roasting. Roast for 20 minutes.
  3. Season and roast the vegetables. In the same bowl, toss the bell pepper, broccoli, carrots, and snap peas with the remaining tablespoon of oil, a pinch of salt, and a pinch of pepper. Spread on the second baking sheet and place in the oven when the cauliflower has been roasting for 10 minutes — the vegetables need only 20 minutes total and should go in 10 minutes after the cauliflower.
  4. Make the sticky sesame sauce. While the vegetables roast, combine the soy sauce, rice vinegar, maple syrup, sesame oil, hoisin, minced garlic, grated ginger, and chili flakes in a small saucepan over medium heat. Bring to a simmer, stirring. Add the cornstarch slurry and cook, stirring constantly, for 1–2 minutes until the sauce thickens to a glossy, coating consistency. Remove from heat.
  5. Coat the cauliflower. After 20 minutes of roasting, remove the cauliflower from the oven. Pour two-thirds of the sauce over the cauliflower and toss to coat every floret completely. Return to the oven for a further 8–10 minutes until the sauce has caramelized onto the cauliflower and the edges are sticky and deeply golden.
  6. Combine and serve. Transfer the sticky sesame cauliflower and all the roasted vegetables to a serving bowl or plate. Drizzle the remaining sauce over the vegetables. Scatter with toasted sesame seeds and sliced spring onions. Serve immediately over steamed rice or noodles with lime wedges.

Pro Tips for the Stickiest Sesame Cauliflower

  • Roast at high heat and give florets space. 425°F is the minimum temperature for proper caramelization. Florets crowded on the sheet steam in their own moisture and stay pale and soft — space them with at least 2cm between each one.
  • Add the sauce in two stages. Tossing the partially-roasted cauliflower in sauce and returning to the oven is what creates the sticky, lacquered coating. Sauce added before roasting burns before the cauliflower is cooked; sauce added only at the end stays raw and sharp rather than caramelized and sweet.
  • Keep the cornstarch slurry measured correctly. Too little cornstarch and the sauce stays watery and slides off; too much and it becomes paste-like. The 1 tablespoon to 2 tablespoons water ratio produces the right coating consistency.
  • Toast the sesame seeds. Raw sesame seeds are fine but toasted sesame seeds have a deep, nutty flavor that raw seeds simply do not match. Toast in a dry pan over medium heat for 2–3 minutes, stirring, until golden.

Why High-Heat Roasting Transforms Cauliflower

Cauliflower is one of the vegetables most dramatically transformed by high-heat roasting, and understanding why helps explain why this recipe works so differently from a simple steamed or boiled cauliflower dish. Raw cauliflower is composed primarily of water — up to 92% by weight — along with complex carbohydrates, a small amount of natural sugars, and sulfur-containing compounds that give it its characteristic mild, slightly bitter flavor. At temperatures above 300°F (150°C), two processes happen simultaneously that completely change the vegetable’s character: the Maillard reaction, in which amino acids and reducing sugars on the surface react to produce hundreds of new flavor compounds and the distinctive golden-brown color associated with properly roasted food; and caramelization, in which the natural sugars in the cauliflower convert under heat into complex caramel compounds that are simultaneously sweet, slightly bitter, and extraordinarily savory. The result is a cauliflower that tastes fundamentally different from its raw form — deeply savory, slightly sweet at the edges, with a dense, meaty texture and a concentrated flavor that makes it one of the most satisfying plant-based proteins in any recipe.


Flavor Variations

  • Teriyaki Sesame Vegetables: Replace the hoisin with 1 tablespoon of mirin and add an extra tablespoon of maple syrup for a sweeter, more traditional teriyaki profile.
  • Spicy Korean Gochujang Cauliflower: Replace the hoisin with 1 tablespoon of gochujang paste and omit the chili flakes for a deeply spicy, fermented-pepper version with a distinctly Korean character.
  • Peanut Sesame Cauliflower: Stir 2 tablespoons of natural peanut butter into the sauce for a richer, nuttier version that pairs especially well with rice noodles and cucumber.

Nutritional Highlights (Per Serving)

CaloriesProteinCarbsFiberFat
~280 kcal8g38g8g12g

This dish delivers an impressive 8 grams of dietary fiber per serving from the combination of cauliflower, broccoli, snap peas, and carrots — a meaningful contribution toward daily fiber goals. Cauliflower is also an excellent source of vitamin C, vitamin K, and choline, while broccoli contributes additional vitamin C, folate, and sulforaphane — one of the most studied plant compounds in nutritional research.


Storage

  • Refrigerator: Store in an airtight container for up to 4 days. The sticky coating firms and becomes even more intensely flavored as it sits.
  • Reheat: Reheat in a hot oven at 400°F (200°C) for 8–10 minutes to restore crispiness, or in a dry skillet over medium-high heat for 3–4 minutes. Microwave reheating softens the texture but preserves the flavor.
  • Freezer: Not recommended — the vegetables lose texture on thawing and the sauce becomes watery.
  • Meal prep: Roast the vegetables and make the sauce up to 3 days ahead. Combine and finish in the oven when ready to serve.

Frequently Asked Questions

Can I use frozen cauliflower?

Fresh cauliflower is strongly recommended — frozen cauliflower releases too much moisture during roasting to caramelize properly, producing a softer, paler result. If frozen is the only option, thaw completely, pat very dry, and roast at the highest temperature your oven allows.

Can I air fry the cauliflower instead?

Yes — air fry the seasoned cauliflower at 400°F (200°C) for 15 minutes, shaking halfway. Toss in two-thirds of the sauce and air fry for a further 5 minutes. The result is excellent and slightly crispier than the oven version.

Is this recipe gluten-free?

Use tamari instead of soy sauce and certified gluten-free hoisin sauce (or omit and add an extra teaspoon of maple syrup) for a completely gluten-free version.

What can I serve this with besides rice?

Noodles, quinoa, cauliflower rice, lettuce wraps, or wrapped in rice paper rolls all work beautifully. This is also excellent served as a side dish alongside a simple tofu stir-fry.


Tried this recipe? Leave a comment below and let us know how it turned out! Tag us on Instagram and Facebook — we love seeing your plant-powered creations. Looking for more addictive vegan recipes? Browse all recipes on Easy Vegan Recipes — new recipes posted every single week!

Vegan Pesto Baked Broccoli and Rice Skillet with Toasted Garlic Crumbs — The Easy One-Pan Green Dinner with Creamy Basil Pesto Rice and a Crunchy Golden Topping

vegan pesto baked broccoli and rice skillet with toasted garlic crumbs

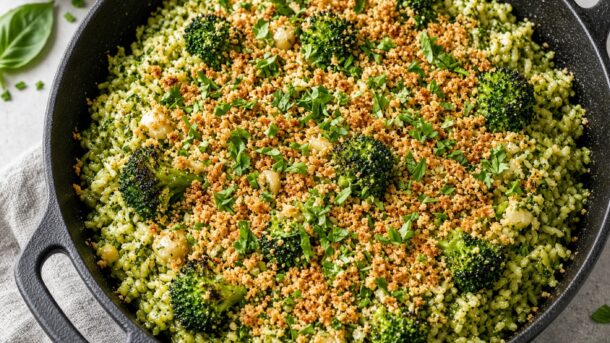
Fluffy rice that cooks right in the pan, tender-crisp broccoli, a swirl of bright basil pesto, and a shower of crunchy toasted garlic crumbs: this Vegan Pesto Baked Broccoli and Rice Skillet is a fresh, fragrant, one-pan dinner that tastes far more impressive than the effort it takes.

The rice bakes in the oven in vegetable broth with garlic and onion, so there is no pot of boiling water and no stirring over the stove. Broccoli florets are laid on top partway through baking and gently steam in the rising heat until bright green and tender. Once the pan comes out, a generous scoop of vegan pesto is folded through, coating every grain of rice and every floret with herby, garlicky flavor.

The toasted garlic crumbs are the finishing touch. Panko is fried in olive oil with garlic until golden and crisp, then scattered over the top for a satisfying crunch that contrasts with the soft, creamy rice. A squeeze of lemon brightens everything at the end.

It is a great way to use up leftover pesto, and the whole dish is ready in about 50 minutes, with just a few minutes of active work. Serve it on its own, or with white beans, chickpeas, or crispy tofu for extra protein.

This recipe is 100% vegan and dairy-free. Classic pesto contains pine nuts or other tree nuts, so see the nut-free pesto swap below. The crumbs contain gluten, and you can use gluten-free breadcrumbs instead.


Recipe Information

Prep TimeCook TimeTotal TimeServingsCalories
15 mins35 mins50 mins4~440 kcal each

Ingredients

For the Rice and Broccoli

  • 1 tbsp olive oil
  • 1 small yellow onion, finely diced
  • 3 garlic cloves, minced
  • 1½ cups (290g) long-grain white rice (or basmati), rinsed well
  • 2¼ cups (540ml) vegetable broth, hot
  • ½ tsp salt
  • 1 large head broccoli (about 1 lb / 450g), cut into small florets
  • 1 tbsp lemon juice

For the Vegan Pesto

  • ½ cup (about 120g) store-bought vegan basil pesto, or homemade (below)

For Quick Homemade Pesto (Optional)

  • 2 cups (50g) packed fresh basil
  • ¼ cup (35g) pine nuts, walnuts, or sunflower seeds
  • 2 tbsp nutritional yeast
  • 1 garlic clove
  • 3 tbsp olive oil
  • 1 tbsp lemon juice
  • ¼ tsp salt
  • 2–3 tbsp water, to blend

For the Toasted Garlic Crumbs

  • ¾ cup (45g) panko breadcrumbs
  • 2 tbsp olive oil
  • 2 garlic cloves, finely minced
  • 1 tbsp nutritional yeast
  • Pinch of salt and chili flakes

To Serve

  • Fresh basil leaves
  • Lemon wedges
  • Cracked black pepper

Optional Additions

  • 1 can white beans or chickpeas
  • Sun-dried tomatoes
  • Green peas
  • Crispy tofu

Instructions

  1. Heat the oven. Preheat the oven to 400°F (200°C). Use a deep 10–12 inch oven-safe skillet with a tight-fitting lid or foil.
  2. Make the pesto (if homemade). Blend the basil, nuts or seeds, nutritional yeast, garlic, olive oil, lemon juice, and salt, adding water a tablespoon at a time, until almost smooth. Set aside.
  3. Start the rice. Heat the olive oil in the skillet over medium heat. Add the onion and cook for 4–5 minutes until soft. Add the garlic for 30 seconds, then stir in the rinsed rice and toast for 1 minute.
  4. Add the broth. Pour in the hot broth and salt and stir once. Bring to a simmer.
  5. Bake the rice. Cover tightly and transfer to the oven. Bake for 20 minutes without opening.
  6. Add the broccoli. Quickly scatter the broccoli florets over the top of the rice without stirring. Re-cover and bake for 10–12 minutes until the broccoli is bright green and tender and the rice has absorbed the liquid.
  7. Make the crumbs. While it bakes, heat the olive oil in a small skillet over medium heat. Add the panko and cook for 3–4 minutes, stirring, until golden. Add the garlic, nutritional yeast, salt, and chili flakes and cook for 30 seconds more. Transfer to a bowl.
  8. Fold in the pesto. Remove the skillet from the oven and let it rest, covered, for 5 minutes. Fluff the rice with a fork, then gently fold in the pesto and lemon juice until everything is coated.
  9. Top and serve. Sprinkle the garlic crumbs over the top and finish with basil, black pepper, and lemon wedges. Serve hot.

Pro Tips for the Best Pesto Rice Skillet

  • Rinse the rice well. This removes surface starch and keeps the grains fluffy.
  • Use hot broth so the rice cooks evenly.
  • Do not lift the lid during the first 20 minutes. Steam is what cooks the rice.
  • Cut the broccoli into small, even florets so they cook at the same pace as the rice.
  • Add the pesto off the heat. Heat dulls its fresh flavor and color.
  • Toast the crumbs until deeply golden. Pale crumbs taste raw.
  • Add the crumbs at the end to keep them crunchy.
  • Finish with lemon to brighten the flavor.

A Few Notes on Ingredients

Long-grain white rice and basmati cook up fluffy and separate, which suits this method. Brown rice needs more broth and a longer bake. Broccoli provides fiber, vitamin C, and vitamin K, and basil pesto provides healthy fats and fresh herb flavor. Check that store-bought pesto is vegan, since many contain parmesan.

Nutritional yeast stands in for the cheese in traditional pesto and the crumbs.


Flavor Variations

  • Nut-Free Pesto: Use sunflower seeds or pumpkin seeds in the pesto and check the store-bought label.
  • Gluten-Free: Use gluten-free breadcrumbs or crushed gluten-free crackers.
  • Protein-Packed: Add white beans, chickpeas, or crispy tofu.
  • Lemony Greens: Stir in spinach or kale at the end.
  • Sun-Dried Tomato: Fold in chopped sun-dried tomatoes with the pesto.

Nutritional Highlights (Per Serving)

CaloriesProteinCarbsFiberFat
~440 kcal11g66g5g15g

Storage

  • Refrigerator: Store the rice and crumbs separately for up to 4 days. Reheat with a splash of water or broth.
  • Freezer: The rice freezes well without the crumbs for up to 2 months. Add fresh crumbs after reheating.
  • Make ahead: Bake the rice and broccoli, then add the pesto and crumbs when ready to serve.
  • Meal prep: Portion into containers and add the crumbs on the day.

Frequently Asked Questions

Can I use brown rice?

Yes, but it needs about 2¾ cups of broth and 35–40 minutes of baking before adding the broccoli.

Can I make it on the stovetop?

Yes. Cook the rice covered over low heat for 15 minutes, add the broccoli on top, and cook 5–8 minutes more.

What if I have no oven-safe skillet?

Cook the rice in a pot with a lid on the stovetop, or transfer the sautéed rice and broth to a baking dish and cover with foil.

Can I use frozen broccoli?

Yes. Add it straight from frozen, and expect it to be a little softer.

Is store-bought pesto vegan?

Many contain parmesan. Check the label, or make the quick homemade version.

How is this different from your other rice dishes?

This is a one-pan, pesto-flavored rice and broccoli skillet with a crunchy crumb topping. Our Vegan Broccoli Rice Casserole uses a creamy cashew sauce with cooked rice in a baked casserole, and our Vegan Teriyaki Fried Rice is a stir-fry.


Tried this recipe? Leave a comment below and let us know how it turned out! Tag us on Instagram and Facebook — we love seeing your plant-powered creations. Browse all recipes on Easy Vegan Recipes — new recipes posted every single week!

Vegan Sheet Pan Sticky Garlic Sesame Tofu and Broccoli with Toasted Sesame Oil, Fresh Ginger and Crispy Charred Edges — The Easy One-Pan Plant-Based Dinner with Almost No Cleanup

290211397 360163922913614 8177461798435669842 N 610x343

Golden, crispy tofu and charred broccoli florets roasted together on one baking sheet, then tossed in a sticky, glossy garlic sesame glaze and sprinkled with toasted sesame seeds: this Vegan Sheet Pan Sticky Garlic Sesame Tofu and Broccoli is a complete, takeout-style dinner with one pan, minimal prep, and almost no cleanup.

Everything roasts together, which makes it easy. The tofu is pressed, tossed in cornstarch, and spread on one side of a hot sheet pan, while the broccoli goes on the other side. In about 25 minutes, the tofu turns crisp and golden and the broccoli chars at the edges and turns sweet and tender. There is no frying, no splattering oil, and no pot of boiling water for the vegetables.

The glaze is the star: a sticky mixture of soy sauce, maple syrup, rice vinegar, toasted sesame oil, lots of garlic, and fresh ginger, thickened with a little cornstarch until it clings. Tossing the hot tofu and broccoli in the glaze, then returning them to the oven for a few minutes, caramelizes the sauce into a shiny, sticky coating.

Serve it over steamed jasmine rice, brown rice, or noodles, and finish with sesame seeds and green onions. It is ready in about 45 minutes and works well for meal prep.

This recipe is 100% vegan and dairy-free, nut-free, and easily gluten-free. It contains soy (tofu, soy sauce) and sesame.


Recipe Information

Prep TimeCook TimeTotal TimeServingsCalories
15 mins (plus pressing)30 mins45 mins4~350 kcal each (without rice)

Ingredients

For the Tofu and Broccoli

  • 1 block (14–16 oz / 400–450g) extra-firm tofu, pressed and cut into 1-inch (2.5cm) cubes
  • 3 tbsp cornstarch
  • 2 tbsp neutral oil, divided
  • ½ tsp salt
  • 1 large head broccoli (about 1 lb / 450g), cut into medium florets

For the Sticky Garlic Sesame Glaze

  • 3 tbsp soy sauce or tamari
  • 3 tbsp maple syrup
  • 2 tbsp rice vinegar
  • 1 tbsp toasted sesame oil
  • 5 garlic cloves, minced
  • 1 tbsp grated fresh ginger
  • 1 tsp cornstarch mixed with 1 tbsp water
  • ½ tsp chili flakes (optional)

To Serve

  • 1 tbsp toasted sesame seeds
  • 2 sliced green onions
  • Steamed rice or noodles
  • Lime wedges
  • Chili crisp or sriracha

Optional Additions

  • Sliced bell peppers or snap peas on the pan
  • Edamame
  • Crushed peanuts

Instructions

  1. Press the tofu. Wrap the tofu in a clean towel and press for 15–20 minutes under a heavy pan. Cut into cubes.
  2. Heat the oven. Preheat the oven to 425°F (220°C). Put a large baking sheet in the oven to heat up.
  3. Coat the tofu. Toss the tofu with the cornstarch, 1 tablespoon of oil, and salt until evenly coated.
  4. Prepare the broccoli. Toss the broccoli with the remaining tablespoon of oil and a pinch of salt.
  5. Roast. Carefully remove the hot pan. Spread the tofu on one side and the broccoli on the other, with space between the pieces. Roast for 22–25 minutes, flipping halfway, until the tofu is golden and crisp and the broccoli is tender and charred at the edges.
  6. Make the glaze. While it roasts, whisk the soy sauce, maple syrup, vinegar, sesame oil, garlic, ginger, cornstarch mixture, and chili flakes in a small saucepan. Simmer over medium heat for 2–3 minutes, stirring, until thick and glossy.
  7. Glaze. Pour the glaze over the tofu and broccoli on the pan and toss gently until coated.
  8. Caramelize. Return the pan to the oven for 4–5 minutes, until the glaze is sticky and bubbling at the edges.
  9. Serve. Sprinkle with sesame seeds and green onions and serve over rice or noodles with lime wedges.

Pro Tips for the Best Sheet Pan Sesame Tofu

  • Press the tofu well. Dry tofu crisps and takes the glaze better.
  • Preheat the baking sheet for a golden crust from the start.
  • Do not crowd the pan. Use two sheets if needed.
  • Cut broccoli florets about the same size as the tofu cubes so they cook at the same rate.
  • Add the glaze near the end. Sugar burns if it is added early.
  • Watch the last 5 minutes closely, because the glaze caramelizes quickly.
  • Add sesame oil to the glaze, not the roasting oil. It has a low smoke point.
  • Toast the sesame seeds for a stronger nutty flavor.

A Few Notes on Ingredients

Extra-firm tofu stays together and crisps best. Garlic and ginger give the glaze its savory punch, maple adds sweetness, and rice vinegar adds tang. Toasted sesame oil has a strong, nutty flavor, so a little goes a long way. Broccoli supplies vitamin C, fiber, and a slight bitterness that balances the sweet glaze.

Tamari makes the dish gluten-free.


Flavor Variations

  • Spicy Version: Add sriracha or gochujang to the glaze.
  • Air Fryer Version: Air fry the tofu at 400°F (200°C) for 12–15 minutes, and the broccoli for 8 minutes.
  • Cauliflower Version: Swap broccoli for cauliflower florets.
  • Orange Version: Add orange juice and zest to the glaze.
  • Noodle Bowl: Toss with cooked soba or rice noodles.

Nutritional Highlights (Per Serving, without rice)

CaloriesProteinCarbsFiberFat
~350 kcal19g30g5g18g

Storage

  • Refrigerator: Store in an airtight container for up to 4 days.
  • Reheating: Re-crisp in a 400°F (200°C) oven or air fryer for 8–10 minutes.
  • Meal prep: Store with rice in separate containers.
  • Freezer: Not recommended for the broccoli. Cooked tofu can be frozen for up to a month.

Frequently Asked Questions

Do I need to press the tofu?

Yes, for the crispiest result. Pressing removes moisture.

Can I make it without cornstarch?

You can skip it, but the tofu will be less crisp and the glaze will not cling as well.

Can I use frozen broccoli?

Fresh broccoli gives the best texture. Frozen broccoli releases water and will be soft.

Can I make it gluten-free?

Yes. Use tamari and check that your other ingredients are gluten-free.

Can I make it ahead?

Yes. Press the tofu, cut the broccoli, and make the glaze a day ahead.

How is this different from your other garlic sesame tofu?

This is a one-pan, oven-baked recipe where the tofu and broccoli roast together, then get glazed with garlic, ginger, and sesame oil. Our Crispy Garlic Soy Tofu with Sticky Sesame Glaze is mainly a pan-fried tofu recipe served on its own, and our Vegan Sticky Sesame Cauliflower and Seasoned Vegetables is a cauliflower version.


Tried this recipe? Leave a comment below and let us know how it turned out! Tag us on Instagram and Facebook — we love seeing your plant-powered creations. Browse all recipes on Easy Vegan Recipes — new recipes posted every single week!

Herby Vegan Spinach Feta Orzo with Crispy Harissa Chickpeas, Lemon and Fresh Dill — The Most Flavorful Plant-Based Orzo Dinner You Will Make All Week

Herby Spinach Feta Orzo with Crispy Harissa Chickpeas ​

Creamy, lemony orzo cooked in one pan with garlic and baby spinach, loaded with fresh parsley, dill, and mint, topped with tangy marinated tofu feta and crunchy, smoky harissa chickpeas: this Herby Vegan Spinach Feta Orzo is a bright, filling Mediterranean-style dinner that is ready in about 35 minutes.

The orzo cooks in vegetable broth like a risotto. It absorbs the liquid slowly while stirring, which releases its starch and makes the dish naturally creamy without any cream or cheese. Garlic, shallot, and lemon zest give it a fresh, savory base, and a big handful of spinach wilts in at the end for color and nutrition. Fresh herbs, stirred in off the heat, make it taste bright and green.

The tofu feta brings the tangy, salty, crumbly flavor. Firm tofu is crumbled and marinated for 15 minutes in lemon juice, apple cider vinegar, olive oil, oregano, garlic, and salt. It tastes remarkably like feta, and it is sprinkled on top and also stirred through the warm orzo.

The harissa chickpeas add smoky heat and crunch. Canned chickpeas are tossed with harissa paste, olive oil, and cumin, then roasted or pan-fried until crisp and deeply red. The creamy, herby orzo and the spicy, crunchy chickpeas are a wonderful contrast.

This recipe is dairy-free and egg-free. It contains gluten (orzo) and soy (tofu). Harissa varies in heat and ingredients, so taste it first. It is nut-free as written. Please check labels on your orzo, harissa, and broth.


Recipe Information

Prep TimeCook TimeTotal TimeServingsCalories
15 mins20 mins35 mins4~520 kcal each

Ingredients

For the Marinated Tofu Feta

  • 1 block (14 oz / 400g) firm tofu, drained and pressed
  • 3 tbsp lemon juice
  • 1 tbsp apple cider vinegar
  • 2 tbsp olive oil
  • 1 tsp dried oregano
  • 1 garlic clove, grated
  • ½ tsp salt

For the Crispy Harissa Chickpeas

  • 1 can (15 oz / 400g) chickpeas, drained, rinsed, and patted very dry
  • 1 tbsp olive oil
  • 1½ tbsp harissa paste
  • ½ tsp ground cumin
  • ¼ tsp salt

For the Herby Spinach Orzo

  • 1 tbsp olive oil
  • 1 shallot, finely diced
  • 4 garlic cloves, minced
  • 1½ cups (270g) orzo
  • 3¼ cups (780ml) vegetable broth
  • 5 oz (140g) baby spinach
  • Zest and juice of 1 lemon
  • ½ tsp salt, plus more to taste
  • ¼ tsp black pepper
  • ¼ cup fresh parsley, chopped
  • 2 tbsp fresh dill, chopped
  • 2 tbsp fresh mint, chopped

To Serve

  • Extra lemon wedges
  • Extra herbs
  • Olive oil, for drizzling

Instructions

  1. Marinate the tofu feta. Crumble the tofu into a bowl. Add the lemon juice, vinegar, oil, oregano, garlic, and salt. Toss gently and let it sit for at least 15 minutes.
  2. Heat the oven. Heat the oven to 425°F (220°C). Line a baking sheet with parchment.
  3. Roast the chickpeas. Toss the chickpeas with the oil, harissa, cumin, and salt. Spread on the pan. Roast for 20–25 minutes, shaking once, until crisp.
  4. Start the orzo. Heat the oil in a large, deep skillet over medium heat. Cook the shallot for 3 minutes. Add the garlic and cook for 1 minute. Add the orzo and stir for 1–2 minutes to toast it lightly.
  5. Cook the orzo. Pour in the broth, salt, and pepper. Bring to a simmer. Cook for 9–11 minutes, stirring often, until the orzo is tender and the liquid is mostly absorbed and creamy.
  6. Add the spinach. Stir in the spinach until wilted, about 1–2 minutes.
  7. Finish. Remove from the heat. Stir in the lemon zest, lemon juice, parsley, dill, mint, and about half of the tofu feta. Taste and adjust.
  8. Serve. Spoon into bowls. Top with the remaining tofu feta and the crispy harissa chickpeas. Drizzle with olive oil and serve with lemon wedges.

Pro Tips for the Best Herby Spinach Feta Orzo

  • Press the tofu so the feta is crumbly, not watery.
  • Marinate the tofu for at least 15 minutes. Longer is better.
  • Pat the chickpeas very dry so they crisp.
  • Stir the orzo often so it releases its starch and stays creamy.
  • Add the fresh herbs off the heat so they stay bright.
  • Add a splash of broth if the orzo gets too thick.
  • Serve right away, since orzo thickens as it sits.
  • Taste your harissa first. Brands vary in heat.

A Few Notes on Ingredients

Orzo is a rice-shaped pasta that cooks quickly and gets creamy. Firm tofu makes the best feta. Harissa is a North African chili paste made from peppers, garlic, and spices. Use a mild one if you are sensitive to heat. Fresh dill, parsley, and mint give the dish its bright flavor.


Flavor Variations

  • Extra Greens: Add kale or arugula.
  • Olive Version: Add chopped Kalamata olives.
  • Tomato Version: Add cherry tomatoes or sun-dried tomatoes.
  • Mild Version: Use less harissa and add smoked paprika.
  • Store-Bought Feta: Use vegan feta crumbles.
  • Gluten-Free: Use gluten-free orzo or small gluten-free pasta.

Nutritional Highlights (Per Serving)

CaloriesProteinCarbsFiberFat
~520 kcal26g70g9g17g

Storage

  • Refrigerator: Store the orzo, tofu feta, and chickpeas separately for up to 4 days.
  • Freezer: Not recommended.
  • Reheating: Warm the orzo with a splash of broth. Crisp the chickpeas in the oven.
  • Make ahead: Marinate the tofu feta up to 2 days ahead.

Frequently Asked Questions

What is tofu feta?

It is crumbled tofu marinated in lemon, vinegar, and herbs so it tastes tangy and salty like feta.

Can I use store-bought vegan feta?

Yes. Use about 1 cup of vegan feta crumbles.

Is this spicy?

It is medium. Use a mild harissa and less of it for a gentler heat.

Can I make it ahead?

Yes, but orzo thickens as it sits. Add broth when reheating.

Can I make it gluten-free?

Yes. Use gluten-free orzo and check your broth and harissa.

How is this different from your other orzo recipes?

This is a one-pan herby orzo with marinated tofu feta and crispy harissa chickpeas. Our Vegan Spinach Mushroom Orzo is a mushroom-based version, and our Vegan Roasted Veggie Orzo Salad is a cold salad.


Tried this recipe? Leave a comment below and let us know how it turned out! Tag us on Instagram and Facebook — we love seeing your plant-powered creations. Browse all recipes on Easy Vegan Recipes — new recipes posted every single week!