kid friendly vegan

Garlic Butter Zucchini Grilled Cheese

garlic butter zucchini grilled cheese

There are sandwiches you make because lunch needs to happen. And then there are sandwiches like this Garlic Butter Zucchini Grilled Cheese — the kind that comes off the pan deeply golden and shatteringly crisp on the outside, with melted vegan cheese pulling into long strands and tender, garlicky zucchini tucked between every layer. This is that sandwich. The one that turns a classic comfort food into something with genuine vegetable substance. The one that makes people ask for the recipe before they have even finished their first half.

This recipe takes the beloved combination of a crisp, buttery grilled cheese and elevates it with thin, garlic-butter sautéed zucchini layered alongside melted vegan cheese, all pressed between slices of bread that have been generously buttered with a garlicky vegan butter and toasted until deeply golden on a hot pan.

What makes this sandwich so outstanding is the garlic butter — used both to sauté the zucchini and to coat the bread before toasting, ensuring the garlic flavor is present throughout the entire sandwich rather than only in one component.

This recipe is 100% vegan, ready in just 20 minutes, and absolutely wonderful served hot off the pan, sliced in half so the melted cheese and tender zucchini are visible in every bite.


Recipe Information

Prep TimeCook TimeTotal TimeServingsCalories
10 mins10 mins20 mins2~480 kcal

Ingredients

For the Garlic Butter

  • 4 tbsp vegan butter, softened
  • 3 cloves garlic, minced
  • 1 tbsp fresh parsley, finely chopped
  • Pinch of salt

For the Sandwich

  • 1 medium zucchini, sliced into thin rounds
  • 4 slices sturdy sandwich bread (sourdough or similar)
  • 1 cup (120g) shredded vegan mozzarella or cheddar
  • Salt and black pepper to taste

Optional Add-ins

  • ¼ tsp chili flakes for gentle heat in the garlic butter
  • A handful of fresh basil leaves layered into the sandwich
  • A thin layer of vegan pesto spread inside

To Serve

  • A side of soup for dipping
  • Fresh tomato slices alongside
  • A simple side salad

Instructions

  1. Make the garlic butter. In a small bowl mix together the softened vegan butter, minced garlic, parsley, and a pinch of salt until evenly combined.
  2. Sauté the zucchini. Heat 1 tablespoon of the garlic butter in a skillet over medium heat. Add the zucchini slices in a single layer and cook for 2–3 minutes per side until golden and tender. Season with salt and pepper and set aside.
  3. Butter the bread. Spread the remaining garlic butter generously over one side of each slice of bread.
  4. Assemble the sandwiches. On the unbuttered side of two slices, layer half the shredded cheese, followed by the sautéed zucchini, then the remaining cheese. Top with the second slice of bread, buttered side facing out.
  5. Toast until golden. Heat a clean skillet over medium heat. Place the sandwiches in the pan and cook for 3–4 minutes per side, pressing gently with a spatula, until deeply golden and the cheese has melted throughout.
  6. Slice and serve. Remove from the pan, let rest for a minute, then slice in half and serve immediately while hot.

Pro Tips

  • Cook the zucchini until properly golden before assembling, rather than leaving it raw, to avoid excess moisture inside the finished sandwich.
  • Use a sturdy bread that can hold up to the filling without becoming soggy.
  • Cook over medium, not high, heat to allow the cheese time to melt fully before the bread burns.
  • Press gently with a spatula while cooking to help the sandwich hold together and toast evenly.

Why This Combination Works

Garlic butter provides rich, aromatic flavor that complements both the bread and the zucchini, while the zucchini itself adds a tender, slightly sweet bite that balances the richness of the melted cheese. Together they transform a simple grilled cheese into something more substantial and interesting without losing any of its essential comfort.


Flavor Variations

  • Caprese Style: Add fresh basil and sliced tomato alongside the zucchini for a caprese-inspired version.
  • Spicy Garlic Grilled Cheese: Add chili flakes to the garlic butter for gentle heat throughout.
  • Pesto Zucchini Grilled Cheese: Spread a thin layer of vegan pesto inside the sandwich alongside the cheese and zucchini.

Nutritional Highlights (Per Serving)

CaloriesProteinCarbsFiberFat
~480 kcal14g40g3g28g

Storage

  • Best fresh: This sandwich is best eaten immediately while the bread is crisp and the cheese is melted.
  • Components: The garlic butter keeps in the refrigerator for up to a week and the sautéed zucchini for up to 3 days, making quick assembly easy on busy days.

Frequently Asked Questions

Can I use a different vegetable instead of zucchini?

Yes — thinly sliced eggplant or yellow squash work well as substitutes using the same method.

Can I make this in a sandwich press instead of a skillet?

Yes — a sandwich press or panini maker works well and may produce an even more evenly toasted result.

What vegan cheese melts best for this sandwich?

A good quality vegan mozzarella or cheddar that is specifically formulated to melt works best; check the packaging for melting properties if unsure.


Tried this recipe? Leave a comment below and let us know how it turned out! Tag us on Instagram and Facebook — we love seeing your plant-powered creations. Looking for more satisfying vegan sandwich recipes? Browse all recipes on Easy Vegan Recipes — new recipes posted every single week!

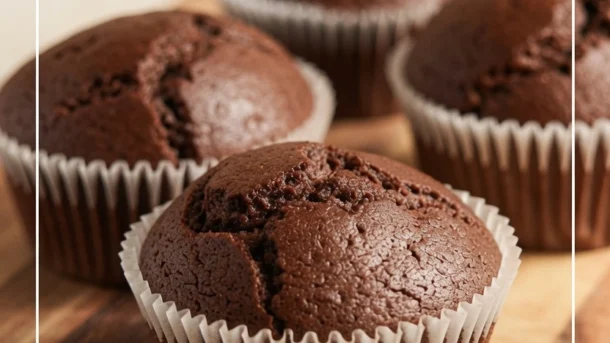
Vegan Flour-less Chocolate Muffins

vegan flour less chocolate muffins

There are muffins you bake because breakfast needs something sweet. And then there are muffins like these Vegan Flourless Chocolate Muffins — the kind that come out of the oven with a slightly cracked, deeply dark top and an interior so dense, so fudgy, and so intensely chocolatey that they taste far more like a brownie than anything that should reasonably be called a muffin. This is that muffin. The one that proves flourless baking is not a compromise but a genuinely different and in many ways superior category of chocolate treat. The one that is so rich and satisfying that a single muffin genuinely, completely satisfies a chocolate craving.

These muffins use almond flour and oat flour in place of all-purpose flour, with flax eggs and almond butter providing binding and richness in the absence of both gluten and eggs. The result is a deeply fudgy, dense, intensely chocolate muffin that is naturally gluten-free, higher in protein and fiber than a standard muffin, and somehow tastes more indulgent despite being made from ingredients that are genuinely more nourishing.

What makes these muffins so outstanding is the texture — the combination of melted dark chocolate, almond butter, and the two alternative flours produces a crumb that is fudgy and dense in a way that wheat flour simply cannot replicate, creating a muffin that is categorically different from a standard chocolate muffin in the best possible way.

This recipe is 100% vegan, naturally gluten-free, ready in just 30 minutes, and absolutely wonderful eaten slightly warm when the chocolate is still soft and the fudgy texture is at its most spectacular.


Recipe Information

Prep TimeCook TimeTotal TimeServingsCalories
10 mins20 mins30 mins10~210 kcal

Ingredients

For the Muffins

  • 150g vegan dark chocolate (70% cocoa), melted and cooled slightly
  • ½ cup (130g) natural almond butter
  • ½ cup (100g) cane sugar or coconut sugar
  • 2 flax eggs (2 tbsp flaxseed meal + 6 tbsp water — rest 5 minutes)
  • ⅓ cup (80ml) plant milk
  • 1 tsp pure vanilla extract
  • ½ cup (50g) almond flour
  • ¼ cup (25g) oat flour (certified gluten-free if needed)
  • 2 tbsp cocoa powder
  • 1 tsp baking powder
  • ¼ tsp fine salt

Optional Add-ins

  • ½ cup (85g) vegan chocolate chips folded through for extra indulgence
  • ¼ tsp espresso powder to intensify the chocolate flavor
  • A pinch of flaky sea salt pressed onto each muffin before baking
  • ¼ cup (30g) chopped toasted walnuts or pecans folded through

Instructions

  1. Preheat the oven. Preheat the oven to 350°F (175°C). Line a 10-hole muffin tin with paper liners.
  2. Make the flax eggs. Combine the flaxseed meal and water, stir, and let rest for 5 minutes until gel-like.
  3. Melt the chocolate. Melt the dark chocolate in a heatproof bowl over a pot of gently simmering water, stirring until smooth. Let cool for 5 minutes.
  4. Combine wet ingredients. In a large bowl whisk together the melted chocolate, almond butter, sugar, prepared flax eggs, plant milk, and vanilla extract until smooth and well combined.
  5. Add dry ingredients. Add the almond flour, oat flour, cocoa powder, baking powder, and salt to the wet mixture. Fold until just combined — the batter will be thick and dense. Fold in any optional add-ins.
  6. Fill and bake. Divide the batter evenly between the 10 lined muffin holes — it will be considerably thicker than standard muffin batter. Smooth the tops slightly. Bake for 18–22 minutes until the tops are set and a slight crack has formed on the surface. The centers will seem underdone — this is correct. They firm up to a fudgy consistency as they cool.
  7. Cool before eating. Let cool in the tin for 10 minutes before transferring to a wire rack. These muffins are good warm but genuinely spectacular once fully cooled, when the fudgy center texture has fully set.

Pro Tips

  • Do not overbake — flourless chocolate muffins firm up considerably during cooling and should be removed from the oven when they still look underdone in the center.
  • Allow the melted chocolate to cool slightly before adding to the other wet ingredients — hot chocolate can begin to cook the flax eggs.
  • Use good quality dark chocolate with at least 70% cocoa — the chocolate is the dominant flavor in this recipe and its quality is directly reflected in the finished muffin.
  • Let the muffins cool fully before eating for the best fudgy texture — eating them warm produces a slightly gooey, almost molten center that is also delicious but different in character.

Why Flourless Chocolate Baking Works

Removing wheat flour from a chocolate muffin does not produce a lesser version — it produces a fundamentally different product with its own distinct appeal. Without the gluten network that wheat flour creates, flourless chocolate muffins cannot trap as much air and therefore cannot rise to a light, cakey texture. Instead they set around their fat, chocolate, and nut flour base into a dense, fudgy, concentrated mass that delivers more chocolate flavor per bite than a conventional muffin, with a texture that is closer to a ganache or truffle than a standard baked good.

This is not a compromise. It is a different category.


Flavor Variations

  • Peanut Butter Chocolate Muffins: Replace the almond butter with natural peanut butter for a classic peanut butter and chocolate combination.
  • Mocha Chocolate Muffins: Add 1 teaspoon of espresso powder to the batter for a deep coffee-chocolate mocha character.
  • Orange Chocolate Muffins: Add the zest of an orange to the batter for a chocolate-orange version that is particularly spectacular for the holiday season.

Nutritional Highlights (Per Muffin)

CaloriesProteinCarbsFiberFat
~210 kcal6g20g4g13g

Storage

  • Room temperature: Store in an airtight container for up to 3 days. The texture improves during storage as the fudgy center sets further.
  • Refrigerator: Keeps for up to 6 days. Bring to room temperature or warm briefly before eating.
  • Freezer: Freeze individually wrapped muffins for up to 2 months. Thaw at room temperature or microwave for 30 seconds.

Frequently Asked Questions

Can I use a different nut butter instead of almond butter?

Yes — peanut butter produces a slightly stronger flavor, cashew butter produces a milder result, and tahini produces a more neutral, slightly sesame-flavored version. All work well with the same quantities.

Why are my muffins falling apart?

Flourless muffins are more fragile than conventional muffins, especially when warm. Let them cool fully in the tin before removing and handling. They firm up considerably once completely cool.

Can I make these without oat flour?

Yes — replace the oat flour with additional almond flour in the same quantity for a fully nut-flour-based muffin with a slightly richer, more tender result.


Tried this recipe? Leave a comment below and let us know how it turned out! Tag us on Instagram and Facebook — we love seeing your plant-powered creations. Looking for more indulgent vegan chocolate and gluten-free dessert recipes? Browse all recipes on Easy Vegan Recipes — new recipes posted every single week!

Vegan Strawberry Pudding Cake — The Most Magical Plant-Based Dessert You Will Make All Summer

vegan strawberry pudding cake

There are desserts that look ordinary going into the oven and come out as something genuinely surprising. And then there are desserts like this Vegan Strawberry Pudding Cake — the kind that bakes into a single dish that separates all by itself into a soft, cakey top layer and a warm, luscious strawberry pudding sauce beneath it, with no effort or technique beyond simply pouring the batter into a dish and letting the oven do something almost magical. This is that dessert. The one that makes people ask how you got two distinct layers from one pour. The one that comes out bubbling with jammy strawberry sauce beneath a tender, golden sponge and tastes like the best summer dessert imaginable.

A pudding cake is one of the most wonderfully deceptive preparations in baking — a single batter, poured into a dish with boiling water poured over the top, that separates during baking into a cakey layer above and a glossy, saucy pudding below. This strawberry version builds on that technique with fresh or frozen strawberries, a light vanilla sponge batter, and a strawberry sugar layer that dissolves into the sauce as the cake bakes.

What makes this pudding cake so outstanding is the textural contrast between the layers — a slightly crisp, cakey top giving way to the soft interior of the sponge, and then the warm, glossy, intensely strawberry sauce beneath that pools in the spoon when served and turns a simple bowl of cake into something genuinely special.

This recipe is 100% vegan, ready in just 45 minutes, and absolutely magnificent served warm with a scoop of vegan vanilla ice cream that melts into the hot strawberry sauce in the most extraordinary way.


Recipe Information

Prep TimeCook TimeTotal TimeServingsCalories
15 mins30 mins45 mins6~290 kcal

Ingredients

For the Cake Batter

  • 1 cup (120g) all-purpose flour
  • ½ cup (100g) cane sugar
  • 1½ tsp baking powder
  • ¼ tsp fine salt
  • ½ cup (120ml) plant milk
  • 3 tbsp melted coconut oil or neutral vegetable oil
  • 1 tsp pure vanilla extract
  • 1 cup (150g) fresh or frozen strawberries, hulled and halved

For the Pudding Layer

  • ½ cup (100g) cane sugar
  • 1 tbsp cornstarch
  • 1 cup (240ml) boiling water
  • 1 tbsp strawberry jam or preserves

To Serve

  • Vegan vanilla ice cream
  • Extra fresh strawberries
  • A dusting of powdered sugar

Instructions

  1. Preheat the oven. Preheat the oven to 350°F (175°C). Lightly grease a deep 20cm (8-inch) square or round baking dish.
  2. Arrange the strawberries. Scatter the halved strawberries evenly across the base of the prepared baking dish.
  3. Make the cake batter. In a bowl whisk together the flour, sugar, baking powder, and salt. Add the plant milk, melted oil, and vanilla extract and stir until just combined into a smooth batter. Pour the batter evenly over the strawberries in the baking dish.
  4. Make the pudding layer. In a small bowl combine the sugar and cornstarch. Scatter this mixture evenly over the top of the batter — do not stir. Dot the strawberry jam over the surface. Then carefully pour the boiling water evenly over the entire surface — again, do not stir. This is the step that looks wrong but is correct.
  5. Bake. Place in the preheated oven and bake for 28–32 minutes until the top is set and lightly golden and the sauce is visibly bubbling around the edges.
  6. Rest and serve. Let rest for 5 minutes before serving. Spoon into bowls ensuring each serving gets both the cakey top and the strawberry pudding sauce from beneath. Serve warm with vegan vanilla ice cream.

Pro Tips

  • Do not stir after adding the boiling water — the separation into two distinct layers depends entirely on leaving the layers undisturbed so they can separate properly during baking.
  • Use ripe, sweet strawberries for the most vibrant sauce — if your strawberries are slightly tart, increase the pudding layer sugar by a tablespoon.
  • Serve immediately after the brief rest, as the pudding sauce is at its most fluid and abundant while hot — it absorbs more into the cake layer as it cools.
  • A deep dish is important — the pudding layer bubbles vigorously during baking and needs room to expand without overflowing.

The Science Behind the Magic

The “magic” of a pudding cake is actually a straightforward application of density and heat. The boiling water dissolves the sugar layer on top and creates a liquid that sinks through the batter during baking because it is denser than the unbaked sponge. Meanwhile the batter, which contains baking powder, rises upward and sets into the cakey layer as it bakes. The result is a self-separating dessert that looks effortful and produces two genuinely different textures from a single preparation.


Flavor Variations

  • Blueberry Pudding Cake: Replace the strawberries with fresh or frozen blueberries and add a pinch of cinnamon to the batter.
  • Lemon Strawberry Pudding Cake: Add the zest of a lemon to the batter and a tablespoon of lemon juice to the boiling water for a brighter, citrus-forward version.
  • Mixed Berry Pudding Cake: Use a mixture of strawberries, raspberries, and blackberries for a more complex, layered berry flavor.

Nutritional Highlights (Per Serving)

CaloriesProteinCarbsFiberFat
~290 kcal3g52g2g7g

Storage

  • Best fresh: This dessert is at its best served warm, straight from the oven, when the pudding sauce is at its most fluid and abundant.
  • Refrigerator: Store covered for up to 3 days. Reheat individual portions in the microwave for 60–90 seconds before serving; the pudding sauce will loosen again when warmed.
  • Freezer: Not recommended, as the pudding layer does not freeze and thaw well.

Frequently Asked Questions

Why didn’t my cake separate into two layers?

This is almost always caused by stirring after adding the boiling water, using a dish that is too shallow, or underbaking. Do not stir at any point after adding the water, use a deep dish, and bake until the top is properly set and the edges are visibly bubbling.

Can I use frozen strawberries?

Yes — add directly from frozen without thawing. The cake may need an extra 3–5 minutes of baking time since the frozen fruit releases more liquid.

Can I make this gluten-free?

Yes — use a 1:1 gluten-free flour blend in the batter. The pudding layer is already gluten-free.


Tried this recipe? Leave a comment below and let us know how it turned out! Tag us on Instagram and Facebook — we love seeing your plant-powered creations. Looking for more magical vegan dessert recipes? Browse all recipes on Easy Vegan Recipes — new recipes posted every single week!

Vegan Breaded Cheese Bombs

vegan breaded cheese bombs

There are snacks you make because something indulgent is needed. And then there are snacks like these Vegan Breaded Cheese Bombs — the kind that come out of the oil or air fryer shatteringly golden, and when you bite into them reveal a molten, gooey center of melted vegan cheese that pulls into long strands and makes the entire effort feel completely, absolutely worth it. This is that snack. The one that makes people stop talking the moment they bite into the first one. The one that disappears in minutes and has everyone asking for the recipe before the plate is empty.

These cheese bombs are made by wrapping cubes of vegan mozzarella in a simple dough or coating, double breading them in a panko crust, freezing briefly to lock the cheese in place, then frying or air frying until the exterior is deeply golden and the inside has melted into a gooey, stretchy center. The brief freeze is the key step — it ensures the cheese stays contained during cooking rather than leaking out before the crust has had time to set.

What makes these bombs so outstanding is the contrast between the shatteringly crispy exterior and the molten, creamy, pulling cheese center — a textural combination so specifically satisfying that it is genuinely difficult to eat just one.

This recipe is 100% vegan, ready in about 35 minutes including the freeze, and absolutely wonderful served immediately while the cheese is still melted and the crust is at its crispiest, with a marinara or ranch dipping sauce alongside.


Recipe Information

Prep TimeFreeze TimeCook TimeTotal TimeServingsCalories
15 mins15 mins8 mins38 mins4~290 kcal

Ingredients

For the Cheese Bombs

  • 250g vegan mozzarella block, cut into 2cm cubes (must be a firm, meltable block variety)

For the Coating

  • ½ cup (60g) all-purpose flour
  • ½ cup (120ml) plant milk
  • 1 tsp apple cider vinegar
  • ½ cup (50g) panko breadcrumbs
  • 2 tbsp nutritional yeast
  • ½ tsp garlic powder
  • ½ tsp smoked paprika
  • ½ tsp salt

For Frying

  • 3 cups (720ml) neutral vegetable oil (for deep frying), or oil spray for air frying

For the Marinara Dipping Sauce

  • 1 cup (240ml) tomato passata
  • 1 clove garlic, minced
  • 1 tsp olive oil
  • ½ tsp dried oregano
  • Salt and pepper

Optional Variations

  • Add dried herbs to the panko coating for extra flavor
  • Mix chili flakes into the breadcrumbs for a spicy version
  • Use a smoked vegan cheese for a deeper, more complex flavor

Instructions

  1. Prepare the cheese cubes. Cut the vegan mozzarella block into 2cm cubes. Place on a parchment-lined tray and freeze for 15 minutes — this step is non-negotiable.
  2. Set up the coating stations. Combine the plant milk and apple cider vinegar and let sit for 2 minutes. Place the flour in one shallow dish, the plant milk mixture in a second, and the panko breadcrumbs mixed with nutritional yeast, garlic powder, smoked paprika, and salt in a third.
  3. Double coat the cheese bombs. Working quickly with the cold cheese cubes, dredge each one in flour, then dip in the plant milk mixture, then coat in the panko mixture, pressing firmly. Repeat the plant milk and panko steps for a second coat — the double coating is essential for preventing leakage during cooking.
  4. Freeze again briefly. Return the coated bombs to the freezer tray for 5 more minutes while the oil heats.
  5. Fry or air fry. For deep frying, heat oil to 375°F (190°C) and fry the bombs in small batches for 2–3 minutes until deeply golden all over. For air frying, spray generously with oil and air fry at 400°F (200°C) for 6–8 minutes until deeply golden.
  6. Make the marinara sauce. Heat the olive oil in a small pan. Add the garlic and cook for 30 seconds. Add the passata, oregano, salt, and pepper. Simmer for 5 minutes.
  7. Serve immediately. Serve the hot cheese bombs with the marinara sauce while the cheese is still molten inside.

Pro Tips

  • Use a firm, meltable block vegan mozzarella — pre-shredded vegan cheese does not hold together or melt in the same way.
  • Do not skip the initial freeze — this is what keeps the cheese from melting out through the unset coating in the first moments of cooking.
  • Double coat without exception — a single coat is rarely thick enough to contain the melting cheese throughout the full cooking time.
  • Work quickly when coating the cold cheese — the warmth of your hands begins to soften the cheese, so coat and return to the freezer promptly.
  • Serve within 2 minutes of cooking — melted vegan cheese firms up faster than dairy cheese as it cools.

Why the Freeze Step Is So Important

When vegan cheese meets high heat it melts rapidly — faster than the outer crust can set if the cheese starts at room temperature. Freezing the cheese before coating means the cheese begins at a much lower temperature when it enters the fryer, giving the outer crust 30–45 additional seconds to set into a solid shell before the cheese reaches melting temperature. Those extra seconds are what make the difference between a cheese bomb that holds its shape and delivers a molten center, and one that leaks cheese into the oil before the crust has formed.


Flavor Variations

  • Spicy Cheese Bombs: Add chili flakes and smoked paprika to the breadcrumb coating and serve with a chipotle dipping sauce.
  • Herb Cheese Bombs: Mix dried Italian herbs into the panko coating for a more herbaceous, fragrant version.
  • Jalapeño Cheese Bombs: Press a thin slice of jalapeño against each cheese cube before coating for a spicy surprise inside each bomb.

Nutritional Highlights (Per Serving — 4 bombs)

CaloriesProteinCarbsFiberFat
~290 kcal9g24g2g18g

Storage

  • Best fresh: These bombs are at their absolute best within 2 minutes of cooking while the cheese is still fully molten.
  • Refrigerator: Store cooked bombs for up to 2 days. Reheat in an air fryer at 375°F (190°C) for 3–4 minutes — the cheese will remelt inside.
  • Freezer: Freeze uncooked, coated bombs on a tray until solid then transfer to a freezer bag for up to 1 month. Fry or air fry directly from frozen, adding 2–3 extra minutes.

Frequently Asked Questions

What vegan mozzarella works best?

A firm, block-style vegan mozzarella specifically marketed as meltable produces the most satisfying molten center. Brands vary widely in melt quality — check reviews or packaging for melting claims before purchasing.

Can I bake these instead of frying?

Yes — bake at 425°F (220°C) for 10–12 minutes. The result will be slightly less golden and the cheese may not melt as dramatically as in frying, but still delicious.

Can I make these gluten-free?

Yes — use a gluten-free flour and gluten-free panko breadcrumbs. All other ingredients are naturally gluten-free.


Tried this recipe? Leave a comment below and let us know how it turned out! Tag us on Instagram and Facebook — we love seeing your plant-powered creations. Looking for more addictive vegan snack and appetizer recipes? Browse all recipes on Easy Vegan Recipes — new recipes posted every single week!

Vegan Baked Potato

vegan baked potato

There are dinners that require a long list of ingredients and hours of effort. And then there are dinners like this Vegan Baked Potato — the kind that needs almost nothing beyond a good potato and a hot oven, yet delivers a fluffy, steaming interior and a perfectly crisp skin loaded with all the toppings that make a baked potato genuinely satisfying as a complete meal. This is that dinner. The one that proves the simplest foods, done properly, can be just as comforting as anything more complicated.

This recipe focuses on getting the technique exactly right — a properly crisp skin, a fluffy interior, and a generous loaded topping of vegan butter, cashew sour cream, vegan cheese, and chives that turns a humble baked potato into a genuinely complete and satisfying dinner.

What makes this baked potato so outstanding is the simple but essential technique of rubbing the skin with oil and salt before baking, producing a properly crisp, flavorful exterior rather than the soft, papery skin that results from skipping this step.

This recipe is 100% vegan, naturally gluten-free, ready in about an hour, and absolutely wonderful loaded generously and eaten straight from its skin with a fork.


Recipe Information

Prep TimeCook TimeTotal TimeServingsCalories
10 mins55 mins65 mins4~310 kcal

Ingredients

For the Potatoes

  • 4 large russet potatoes, scrubbed clean
  • 2 tbsp olive oil
  • 1 tsp salt

For the Toppings

  • ½ cup (60g) vegan butter
  • ½ cup (120g) vegan sour cream
  • 1 cup (120g) shredded vegan cheddar
  • 3 spring onions, thinly sliced
  • Salt and black pepper to taste

Optional Add-ins

  • Crispy chickpeas or air-fried tofu bits for a protein boost
  • Sautéed mushrooms
  • A drizzle of hot sauce
  • Crumbled vegan bacon

To Serve

  • A simple side salad
  • Steamed broccoli alongside
  • Extra chives or fresh parsley

Instructions

  1. Preheat the oven. Preheat the oven to 425°F (220°C).
  2. Prepare the potatoes. Scrub the potatoes thoroughly and pat dry. Pierce each potato several times with a fork. Rub each potato all over with olive oil and sprinkle generously with salt.
  3. Bake. Place the potatoes directly on the oven rack or on a baking sheet. Bake for 50–60 minutes until the skin is crisp and a knife inserted into the center meets no resistance.
  4. Open and fluff. Remove the potatoes from the oven and let rest for 5 minutes. Slice an opening lengthwise along the top of each potato and use a fork to gently fluff the interior.
  5. Add the toppings. Top each potato generously with vegan butter, vegan sour cream, shredded vegan cheese, and sliced spring onions. Season with salt and pepper to taste.
  6. Serve immediately. Serve hot, while the cheese is still melting from the residual heat of the potato.

Pro Tips

  • Rub the potato skin generously with oil and salt before baking for the crispiest, most flavorful exterior.
  • Bake directly on the oven rack rather than wrapped in foil for the crispiest skin.
  • Pierce the potato several times before baking to allow steam to escape evenly during cooking.
  • Let the potato rest briefly after baking before slicing open, as the interior will be extremely hot.

Why This Technique Matters

A baked potato wrapped in foil steams in its own moisture, resulting in a soft, slightly damp skin rather than a properly crisp one. Baking unwrapped, with oil and salt rubbed directly onto the skin, allows the exterior to dry out and crisp properly in the oven’s heat while the interior steams gently inside, producing the ideal contrast between a crisp skin and a fluffy center.


Flavor Variations

  • Loaded Mexican Baked Potato: Top with black beans, salsa, vegan sour cream, and fresh cilantro.
  • BBQ Pulled Jackfruit Potato: Top with BBQ-seasoned pulled jackfruit and a drizzle of vegan ranch.
  • Garlic Herb Potato: Mix fresh herbs and roasted garlic into the vegan butter before topping.

Nutritional Highlights (Per Serving)

CaloriesProteinCarbsFiberFat
~310 kcal8g44g4g12g

Storage

  • Refrigerator: Store baked, unloaded potatoes for up to 4 days. Reheat in the oven or microwave before adding fresh toppings.
  • Freezer: Baked potatoes freeze reasonably well unloaded for up to 2 months; thaw and reheat in the oven before topping.

Frequently Asked Questions

Can I cook the potatoes in the microwave instead?

Yes — microwave on high for 8–10 minutes, turning halfway, though the skin will not be as crisp as oven baking.

What potato variety works best for baking?

Russet potatoes are ideal due to their high starch content, which produces the fluffiest interior.

Can I make these ahead for a party?

Yes — bake the potatoes ahead and keep warm in a low oven, adding toppings just before serving for the freshest result.


Tried this recipe? Leave a comment below and let us know how it turned out! Tag us on Instagram and Facebook — we love seeing your plant-powered creations. Looking for more simple, satisfying vegan dinner recipes? Browse all recipes on Easy Vegan Recipes — new recipes posted every single week!

Vegan Apple Cinnamon Muffins

vegan apple cinnamon muffins

There are muffins you bake because breakfast needs to happen. And then there are muffins like these Vegan Apple Cinnamon Muffins — the kind that come out of the oven domed and golden, smelling of warm cinnamon and caramelized apple, with a tender, moist crumb studded throughout with soft chunks of sweet apple and a cinnamon sugar crust on top that catches the light beautifully. This is that muffin. The one that makes the whole house smell like the best autumn morning imaginable. The one that disappears from the cooling rack before the second tray has even finished baking.

These muffins use applesauce in the batter to provide both moisture and natural sweetness, with additional diced fresh apple folded through for texture, and a generous amount of cinnamon and a touch of nutmeg throughout for the warm, spiced character that makes apple cinnamon such a universally beloved combination. A simple cinnamon sugar topping baked directly onto the muffin creates a slightly crunchy, fragrant crust that is one of the most satisfying textural contrasts in all of muffin baking.

What makes these muffins so outstanding is how moist they stay — the combination of applesauce, plant milk, and oil produces a crumb that remains genuinely tender for days rather than drying out overnight like so many homemade muffins, making them an ideal make-ahead breakfast for the entire week.

This recipe is 100% vegan, ready in just 35 minutes, naturally dairy-free and egg-free, and absolutely wonderful eaten warm with a smear of vegan butter or simply on their own.


Recipe Information

Prep TimeCook TimeTotal TimeServingsCalories
15 mins22 mins37 mins12~210 kcal

Ingredients

For the Muffins

  • 2 cups (240g) all-purpose flour
  • 1 tsp baking powder
  • ½ tsp baking soda
  • 1½ tsp ground cinnamon
  • ¼ tsp ground nutmeg
  • ¼ tsp fine salt
  • ¾ cup (150g) cane sugar or brown sugar
  • ½ cup (120g) unsweetened applesauce
  • ½ cup (120ml) plant milk
  • ⅓ cup (80ml) neutral vegetable oil
  • 1 tsp pure vanilla extract
  • 1 tsp apple cider vinegar
  • 1½ cups (180g) fresh apple, peeled and diced small (about 2 medium apples)

For the Cinnamon Sugar Topping

  • 3 tbsp cane sugar
  • 1 tsp ground cinnamon
  • 1 tbsp vegan butter, melted (brushed over muffin tops before topping)

Optional Add-ins

  • ½ cup (55g) toasted walnuts or pecans folded into the batter
  • ¼ tsp cardamom added to the spice blend
  • ½ cup (85g) raisins folded through
  • A drizzle of maple glaze over the cooled muffins

Instructions

  1. Preheat and prepare. Preheat the oven to 375°F (190°C). Line a 12-hole muffin tin with paper liners or grease generously.
  2. Mix the dry ingredients. In a large bowl whisk together the flour, baking powder, baking soda, cinnamon, nutmeg, salt, and sugar until evenly combined.
  3. Mix the wet ingredients. In a separate bowl whisk together the applesauce, plant milk, oil, vanilla extract, and apple cider vinegar until smooth.
  4. Combine. Pour the wet ingredients into the dry ingredients and fold gently with a spatula until just combined — a few small lumps are fine. Do not overmix.
  5. Fold in the apple. Gently fold the diced apple pieces through the batter with two or three strokes.
  6. Fill and top. Divide the batter evenly between the 12 muffin holes, filling each about three quarters full. Brush the tops lightly with the melted vegan butter, then sprinkle the cinnamon sugar mixture generously over each muffin.
  7. Bake. Bake for 20–23 minutes until a toothpick inserted in the center comes out clean and the tops are golden with a slightly crisp cinnamon sugar crust.
  8. Cool and serve. Let cool in the tin for 5 minutes before transferring to a wire rack. Best served warm.

Pro Tips

  • Do not overmix the batter — fold until just combined, with a few small lumps remaining, for the most tender muffin crumb. Overmixing develops gluten and produces tough, dense muffins.
  • Dice the apple into small, even pieces so it distributes evenly through the batter and cooks through fully during the baking time.
  • Use a combination of applesauce and fresh apple for the best result — the applesauce keeps the batter moist without making it heavy, while the fresh apple provides texture and distinct apple flavor.
  • Fill the muffin holes three quarters full for the most dramatically domed tops — underfilled muffins bake flat rather than rising into the characteristic rounded dome.

Why These Muffins Stay Moist Longer Than Most

The combination of oil and applesauce in this batter provides two different moisture mechanisms. Oil coats the flour proteins and prevents them from absorbing moisture as the muffins cool, keeping the crumb tender and soft. Applesauce provides hygroscopic moisture — it actively holds onto water molecules, preventing the finished muffin from drying out over the first few days of storage. Together they produce a muffin that is genuinely as moist on day 3 as on day 1.


Flavor Variations

  • Apple Walnut Muffins: Fold in ½ cup of toasted walnuts for a nuttier, more substantial version.
  • Spiced Chai Apple Muffins: Add cardamom, ginger, and cloves alongside the cinnamon for a warming chai-inspired version.
  • Apple Streusel Muffins: Replace the cinnamon sugar topping with a crumbly streusel made from oats, brown sugar, and vegan butter for a more dramatic, bakery-style finish.

Nutritional Highlights (Per Muffin)

CaloriesProteinCarbsFiberFat
~210 kcal3g34g1g7g

Storage

  • Room temperature: Store in an airtight container for up to 3 days. The cinnamon sugar topping softens slightly after the first day but the muffins remain moist and delicious.
  • Refrigerator: Keeps for up to 5 days; bring to room temperature or warm briefly before serving.
  • Freezer: Freeze individually wrapped muffins for up to 2 months. Thaw at room temperature or microwave for 45 seconds from frozen.
  • Meal prep: These muffins are ideal for meal prep — bake a full batch on Sunday for grab-and-go breakfasts all week.

Frequently Asked Questions

Can I use a different type of apple?

Yes — any eating apple works well. Granny Smith provides a more tart, defined apple flavor; Honeycrisp or Fuji provides a sweeter, juicier result. Avoid very soft varieties that may become mushy during baking.

Can I make these gluten-free?

Yes — use a 1:1 gluten-free flour blend. The muffins will be slightly more delicate in texture but still moist and flavorful.

Can I reduce the sugar?

Yes — reduce to ½ cup for a less sweet muffin that lets the apple and cinnamon flavor dominate more prominently. Do not reduce below ⅓ cup as the sugar contributes to texture and moisture as well as sweetness.


Tried this recipe? Leave a comment below and let us know how it turned out! Tag us on Instagram and Facebook — we love seeing your plant-powered creations. Looking for more warmly spiced vegan breakfast and baking recipes? Browse all recipes on Easy Vegan Recipes — new recipes posted every single week!

Vegan Onion Rings

vegan onion rings

There are snacks you make because something crunchy is needed. And then there are snacks like these Vegan Onion Rings — the kind that come out of the oil shatteringly crisp, deeply golden, with a coating so craggy and satisfying that the sweet, tender onion inside feels like a genuine reward for getting through that incredible crunch first. This is that snack. The one that disappears from the plate the moment it is set down. The one that proves, decisively, that a great onion ring needs absolutely nothing from an egg or a drop of dairy to be extraordinary.

This recipe uses a buttermilk-style plant milk soak to tenderize the onion slightly and help the coating adhere, followed by a seasoned flour and cornstarch dredge that fries up into a thick, crunchy, golden shell. The onion inside stays tender and slightly sweet, contrasting beautifully against the crispy exterior.

What makes these onion rings so outstanding is the double dredge technique — dipping the soaked onion rings into seasoned flour, back into the milk, then into the flour again — which builds a thicker, craggier crust than a single coating ever could, producing a result that rivals any restaurant version.

This recipe is 100% vegan, ready in about 30 minutes, and absolutely wonderful served hot from the fryer with a tangy dipping sauce alongside.


Recipe Information

Prep TimeCook TimeTotal TimeServingsCalories
15 mins15 mins30 mins4~310 kcal

Ingredients

For the Onions

  • 2 large yellow onions, cut into 1cm thick rings, separated

For the Buttermilk Soak

  • 1½ cups (360ml) plant milk
  • 1 tbsp apple cider vinegar

For the Coating

  • 1½ cups (180g) all-purpose flour
  • 2 tbsp cornstarch
  • 1 tsp smoked paprika
  • 1 tsp garlic powder
  • 1 tsp onion powder
  • 1 tsp salt
  • ½ tsp black pepper
  • ¼ tsp cayenne pepper (optional)

For Frying

  • 3 cups (720ml) neutral vegetable oil

For the Dipping Sauce

  • ½ cup (120g) vegan mayonnaise
  • 1 tbsp ketchup
  • 1 tsp hot sauce
  • ½ tsp smoked paprika
  • 1 tsp lemon juice

Instructions

  1. Make the buttermilk soak. Combine the plant milk and apple cider vinegar in a bowl and let sit for 5 minutes until slightly thickened. Add the separated onion rings and let soak for 10–15 minutes.
  2. Make the coating. In a wide shallow dish whisk together the flour, cornstarch, smoked paprika, garlic powder, onion powder, salt, pepper, and cayenne if using.
  3. Heat the oil. Pour the oil into a deep, heavy pot to a depth of about 4cm and heat to 350°F (175°C), using a thermometer for accuracy.
  4. Double coat the onion rings. Remove an onion ring from the soak, letting excess drip off, and dredge in the seasoned flour, pressing to coat. Dip briefly back into the milk, then dredge again in the flour, pressing firmly to build a thick, craggy crust. Repeat with all the rings.
  5. Fry in batches. Carefully lower a few coated rings into the hot oil at a time, avoiding overcrowding. Fry for 2–3 minutes per side until deeply golden and crispy. Transfer to a wire rack to drain.
  6. Make the dipping sauce. Whisk together the vegan mayonnaise, ketchup, hot sauce, smoked paprika, and lemon juice until smooth.
  7. Serve immediately. Serve the hot onion rings with the dipping sauce while they are at their crispiest.

Pro Tips

  • Double coat without exception. The flour-milk-flour sequence is what creates the thick, craggy, restaurant-quality crust on these onion rings.
  • Maintain oil temperature throughout frying, working in small batches so the oil does not drop too low and produce greasy results.
  • Drain on a wire rack rather than paper towel, which traps steam and softens the bottom of the coating.
  • Serve immediately — onion rings lose their crispness relatively quickly once they sit, so timing the frying close to serving makes a real difference.

Why the Double Dredge Matters

A single pass through flour produces a thin, smooth coating that can slide off or crisp unevenly. Dipping back into the liquid and dredging a second time creates small clumps and ridges of flour that expand and crisp dramatically in the hot oil, producing the thick, textured, shatteringly crunchy exterior associated with the best onion rings.


Flavor Variations

  • Spicy Onion Rings: Increase the cayenne in the coating and add extra hot sauce to the dipping sauce for serious heat.
  • Beer Battered Style: Replace some of the plant milk in the soak with a vegan beer for a lighter, more aerated crust.
  • Garlic Parmesan Onion Rings: Toss the freshly fried rings in a mixture of garlic powder and vegan parmesan immediately after frying.

Nutritional Highlights (Per Serving)

CaloriesProteinCarbsFiberFat
~310 kcal5g38g2g15g

Storage

  • Best fresh: Onion rings are at their crispiest within 10 minutes of frying and should be eaten immediately whenever possible.
  • Refrigerator: Store leftover cooked rings for up to 2 days. Reheat in an air fryer at 375°F (190°C) for 4–5 minutes to restore crispness.
  • Freezer: Freeze cooked, cooled rings in a single layer for up to 1 month. Reheat from frozen in an air fryer or oven until crispy and heated through.

Frequently Asked Questions

Can I air fry instead of deep frying?

Yes — air fry the double-coated rings at 400°F (200°C) for 10–12 minutes, flipping halfway, for a lighter result with most of the crunch of frying.

Can I make these gluten-free?

Yes — use a gluten-free flour blend with cornstarch in the coating, and check that all other ingredients are certified gluten-free.

Why is my coating falling off in the oil?

This is usually caused by skipping the double dredge or not pressing the flour onto the onion firmly enough. Make sure each coat is pressed on well and consider letting the coated rings rest briefly before frying.


Tried this recipe? Leave a comment below and let us know how it turned out! Tag us on Instagram and Facebook — we love seeing your plant-powered creations. Looking for more crispy, crave-worthy vegan snack recipes? Browse all recipes on Easy Vegan Recipes — new recipes posted every single week!

Vegan Cottage Cheese Cookie Bites

vegan cottage cheese cookie bites

There are cookies you bake because something sweet is needed. And then there are cookies like these Vegan Cottage Cheese Cookie Bites — the kind that use a base of vegan cottage cheese to produce a soft, slightly chewy, protein-rich cookie bite that is genuinely satisfying in a way that a standard sugar cookie simply is not, delivering the comfort of a cookie alongside the nutritional substance of a high-protein snack. This is that cookie. The one that feels like a treat and functions like a proper snack. The one that people reach for again and again from the jar on the counter.

These bites use vegan cottage cheese — blended smooth for a creamy, neutral base — combined with oat flour, a touch of maple syrup, vanilla extract, and chocolate chips into a dough that bakes into soft, tender, slightly cakey rounds with crisp edges and a moist, chewy center. The vegan cottage cheese adds protein and moisture while contributing almost no flavor of its own, making these bites taste like indulgent cookies while delivering considerably more nutritional substance than their appearance suggests.

What makes these bites so outstanding is the texture — softer and more tender than a standard cookie, with a slightly cakey interior that makes them feel genuinely satisfying after just two or three pieces, unlike many lower-calorie cookies that leave you reaching for more.

This recipe is 100% vegan, naturally gluten-free when made with certified gluten-free oat flour, ready in just 25 minutes, and absolutely wonderful eaten warm from the oven when the chocolate chips are still melted, or at room temperature from the refrigerator as a protein-rich snack.


Recipe Information

Prep TimeCook TimeTotal TimeServingsCalories
10 mins15 mins25 mins12 bites~95 kcal

Ingredients

For the Cookie Bites

  • 1 cup (240g) vegan cottage cheese
  • 1½ cups (135g) oat flour (blended from rolled oats)
  • 3 tbsp maple syrup
  • 1 tsp pure vanilla extract
  • ½ tsp baking powder
  • Pinch of salt
  • ½ cup (85g) vegan chocolate chips

Optional Add-ins

  • 2 tbsp natural peanut butter stirred through the dough
  • ¼ tsp cinnamon for warmth
  • 2 tbsp desiccated coconut folded through
  • A scattering of flaky sea salt pressed onto each bite before baking

Instructions

  1. Preheat the oven. Preheat the oven to 350°F (175°C). Line a baking sheet with parchment paper.
  2. Blend the cottage cheese. Place the vegan cottage cheese in a blender or food processor and blend until completely smooth — this eliminates any lumps and produces a silky, even-textured dough.
  3. Make the dough. In a large bowl combine the blended vegan cottage cheese, oat flour, maple syrup, vanilla extract, baking powder, and salt. Mix until a soft, slightly sticky dough forms. Fold in the chocolate chips.
  4. Shape the bites. Scoop tablespoon-sized portions of dough onto the prepared baking sheet, spacing them about 3cm apart. Flatten each slightly with the back of a spoon — these bites do not spread much during baking.
  5. Bake. Bake for 13–16 minutes until the edges are set and lightly golden and the centers look just cooked through.
  6. Cool briefly and serve. Let cool on the baking sheet for 5 minutes before transferring. Serve warm or at room temperature.

Pro Tips

  • Blend the vegan cottage cheese thoroughly before adding to the dough — any lumps will create an uneven texture in the finished bites.
  • Do not overbake — these bites firm up considerably as they cool and should be removed from the oven while the centers still look slightly underdone.
  • Flatten each portion slightly before baking as the dough does not spread significantly on its own.
  • Store in the refrigerator for the best texture and longest shelf life — the vegan cottage cheese base means these hold up better cold than at room temperature.

Why Vegan Cottage Cheese Works in Cookies

Vegan cottage cheese — typically made from tofu, cashews, or other plant bases — provides a creamy, protein-rich, mildly flavored base that adds moisture and binding to cookie dough without contributing a strong flavor of its own. This makes it an ideal ingredient for higher-protein baked goods, producing a tender, slightly cakey texture that standard cookies lack.


Flavor Variations

  • Peanut Butter Chocolate Chip: Stir 2 tablespoons of natural peanut butter into the dough before adding the chocolate chips.
  • Lemon Blueberry: Replace the chocolate chips with dried blueberries and add lemon zest to the dough for a brighter, fruit-forward version.
  • Double Chocolate: Add 2 tablespoons of cocoa powder to the dough alongside the chocolate chips for a deeply chocolatey version.

Nutritional Highlights (Per Bite)

CaloriesProteinCarbsFiberFat
~95 kcal4g13g1g3g

Storage

  • Refrigerator: Store in an airtight container for up to 5 days. These bites hold their texture best when refrigerated.
  • Freezer: Freeze in a sealed container for up to 2 months. Thaw at room temperature or microwave for 20–30 seconds.
  • Room temperature: Can be kept at room temperature for up to 2 days in an airtight container.

Frequently Asked Questions

What is vegan cottage cheese made from?

Vegan cottage cheese is typically made from tofu, cashews, or almonds blended with lemon juice, vinegar, and seasonings to replicate the mild, slightly tangy, textured character of dairy cottage cheese. Several brands now produce commercially available vegan cottage cheese, or it can be made at home from firm tofu.

Can I make my own vegan cottage cheese for this recipe?

Yes — blend 300g of firm tofu with 2 tablespoons of lemon juice, 1 tablespoon of apple cider vinegar, and a pinch of salt until smooth for a quick homemade version that works perfectly in this recipe.

Can I use a different flour instead of oat flour?

Yes — almond flour produces a slightly denser, nuttier bite. All-purpose flour also works but produces a chewier, less tender result than oat flour.


Tried this recipe? Leave a comment below and let us know how it turned out! Tag us on Instagram and Facebook — we love seeing your plant-powered creations. Looking for more protein-packed vegan snack and dessert recipes? Browse all recipes on Easy Vegan Recipes — new recipes posted every single week!

Crispy Vegan Roasted Cauliflower

crispy vegan roasted cauliflower

There are vegetables that surprise you. And then there are vegetables like this Crispy Vegan Roasted Cauliflower — the kind that comes out of the oven so deeply golden, so shatteringly crispy at the edges, so intensely caramelized and nutty and complex in flavor that people who claim to dislike cauliflower eat three portions before they realize what has happened. This is that cauliflower. The one that converts skeptics. The one that makes people understand — perhaps for the first time — what cauliflower is actually capable of when it is treated not as a pale, watery substitute for something more exciting but as the genuinely extraordinary vegetable it is in its own right, roasted at high heat with proper seasoning until it becomes something that borders on magnificent.

This is roasted cauliflower taken to its absolute furthest possible expression — florets cut to maximize surface area, dried thoroughly to eliminate the surface moisture that is the enemy of crispiness, tossed in a coating of olive oil, nutritional yeast, smoked paprika, garlic, and turmeric that caramelizes in a screaming hot oven into a crust of extraordinary flavor and texture, and roasted with sufficient space on the pan that every single floret develops that specific combination of crispy, golden exterior and tender, yielding interior that makes roasted cauliflower so deeply satisfying to eat.

What makes this recipe so genuinely outstanding is the nutritional yeast coating. Two tablespoons of nutritional yeast added to the seasoning blend does three remarkable things simultaneously — it adds a deep, savory, genuinely cheesy flavor that amplifies every other spice in the blend, it creates a coating that sets to an extraordinary golden crust in the hot oven, and it contributes a concentration of B vitamins and protein that makes these florets nutritionally significant as well as completely delicious. Combined with smoked paprika for depth, garlic for pungency, turmeric for its extraordinary golden color and anti-inflammatory properties, and a touch of cayenne for building warmth — this coating transforms ordinary cauliflower into something genuinely spectacular.

This recipe is 100% vegan, naturally gluten-free, ready in just 30 minutes, and absolutely spectacular served as a side dish, piled into grain bowls, tucked into tacos, scattered over salads, or eaten directly from the baking sheet standing at the kitchen counter because the smell made waiting for anything else completely impossible.


Recipe Information

Prep TimeCook TimeTotal TimeServingsCalories
10 mins22 mins32 mins4~160 kcal

Ingredients

For the Cauliflower

  • 1 large head cauliflower (approximately 900g), cut into florets
  • 3 tbsp olive oil
  • 2 tbsp nutritional yeast
  • 1 tsp smoked paprika
  • 1 tsp garlic powder
  • ½ tsp turmeric
  • ½ tsp onion powder
  • ¼ tsp cayenne pepper
  • 1 tsp fine salt
  • ½ tsp black pepper
  • 1 tbsp cornstarch (the secret to extra crispiness)

Optional Seasonings

  • 1 tsp cumin (adds beautiful earthiness)
  • 1 tsp dried oregano
  • ½ tsp chili flakes
  • 1 tbsp lemon zest (add after roasting)
  • 1 tsp curry powder (for an Indian inspired version)
  • 2 tbsp tahini drizzled over after roasting

For the Lemon Herb Finishing Sauce

  • 3 tbsp tahini
  • 2 tbsp lemon juice
  • 1 clove garlic, grated
  • 2–3 tbsp water (to thin)
  • Salt to taste
  • Fresh parsley, roughly chopped

Optional Toppings After Roasting

  • Flaky sea salt
  • Fresh lemon juice squeezed over
  • Fresh parsley or cilantro
  • Pomegranate seeds for color and sweetness
  • Toasted pine nuts or almonds
  • Chili flakes for heat
  • Drizzle of balsamic glaze

To Serve

  • Over rice or quinoa as a grain bowl base
  • Tucked into warm tacos with salsa and avocado
  • Alongside curries and stews
  • On top of hummus with pita bread
  • In a Buddha bowl with roasted vegetables
  • As a side dish for any plant-based main
  • Scattered over green salads

Instructions

  1. Preheat oven and prepare baking sheets. Preheat your oven to 425°F (220°C) — this high temperature is essential for genuine crispiness. Place two large baking sheets in the oven to preheat simultaneously. Hot baking sheets produce immediate contact heat that begins crisping the cauliflower from the bottom the moment it touches the surface — producing a crispier result than cold sheets.
  2. Prepare the cauliflower. Remove the outer leaves and cut the cauliflower into florets of approximately equal size — roughly 4–5cm across. Cut larger florets in half through the stem to create flat surfaces that sit flush against the pan and caramelize evenly. Smaller florets can be left whole. The flat cut surface is where the most dramatic caramelization happens — maximize it.
  3. Dry the florets thoroughly. Spread the florets on a clean kitchen towel and pat completely dry. This step is absolutely critical — cauliflower contains significant water that must be removed before roasting or it will steam in the oven rather than roast, producing pale, soft florets rather than the golden, crispy result this recipe achieves.
  4. Season the cauliflower. Place the dried florets in a large bowl. Add the olive oil and toss to coat every surface. Add the cornstarch and toss again until evenly coated with no white clumps visible. Add the nutritional yeast, smoked paprika, garlic powder, turmeric, onion powder, cayenne, salt, and pepper. Toss thoroughly until every floret is evenly, generously coated in the golden spice mixture.
  5. Arrange on preheated baking sheets. Remove the hot baking sheets from the oven carefully. Arrange the seasoned florets in a single layer across both sheets — cut side down where possible to maximize the caramelized flat surface. Ensure generous space between each floret — no touching, no overlapping. A crowded pan steams rather than roasts.
  6. Roast to golden perfection. Roast for 15 minutes without opening the oven door. Remove and flip each floret with tongs. Return to the oven for a further 7–10 minutes until deeply golden, crispy at the edges with slightly charred tips, and caramelized and nutty smelling throughout. The tips should be almost dark — this char is desirable and contributes significantly to the flavor.
  7. Make the tahini sauce. While the cauliflower roasts whisk together the tahini, lemon juice, grated garlic, and salt in a small bowl. Add water one tablespoon at a time until the sauce reaches a smooth, drizzleable consistency. Taste and adjust with additional lemon or salt. Add the fresh parsley and stir through.
  8. Serve immediately. Transfer the roasted cauliflower to a serving platter or bowl. Drizzle the tahini sauce generously over the top. Add any desired toppings — pomegranate seeds, toasted pine nuts, fresh herbs, a squeeze of lemon. Serve immediately while the cauliflower is at its crispiest and most fragrant.

Pro Tips for the Crispiest Vegan Roasted Cauliflower

  • Cut florets with flat surfaces. When cutting the cauliflower aim to create florets with at least one flat, cut surface — this is the side that sits against the hot pan and caramelizes most dramatically. A floret with a large flat base produces significantly more caramelization and crispiness than a small, rounded one.
  • Dry the cauliflower obsessively. Cauliflower is approximately 92% water by weight — more water per gram than almost any other common vegetable. This extraordinary water content means thorough drying is more critical for cauliflower than for almost any other roasted vegetable. Pat dry with kitchen towels and if time allows spread on a tray and refrigerate uncovered for 30 minutes before roasting — the refrigerator air dries the surface further and produces even crispier results.
  • Use nutritional yeast in the coating always. The nutritional yeast performs multiple functions that make it irreplaceable in this coating — it adds savory depth, it creates a crust through its protein content, and it provides that barely-there cheesy quality that makes people reach for more without being able to identify exactly why. Do not substitute or omit.
  • Add the cornstarch. One tablespoon of cornstarch in the coating absorbs residual surface moisture from the florets and sets to a light, crispy film in the oven. It is the difference between good roasted cauliflower and extraordinary roasted cauliflower.
  • Roast at 425°F minimum. High heat is non-negotiable for crispy cauliflower. At lower temperatures the water in the cauliflower steams out gradually, preventing the surface from ever achieving the dryness needed for crisping. At 425°F the surface water evaporates rapidly, the natural sugars caramelize, and the coating sets to a crispy crust — all in under 25 minutes.
  • Do not stir during roasting — flip once. Stirring the cauliflower during roasting disrupts the crust formation on the bottom surface. Leave completely undisturbed for the first 15 minutes then flip once to crisp the second side. The bottom surface — in contact with the hot pan throughout — will be the most dramatically caramelized and is the most spectacular side to serve face up.

The Extraordinary Versatility of Roasted Cauliflower

Cauliflower is one of the most versatile and most nutritionally impressive vegetables available in the plant-based kitchen — and understanding why roasting transforms it so dramatically helps explain why this recipe produces results so far beyond what most people expect from this vegetable.

Raw cauliflower is mild, slightly bitter, and characterised primarily by its crunch and its watery texture. At this stage its flavor compounds are largely inactive — locked away in cellular structures that mute and contain them. The roasting process at high heat does several things simultaneously that transform cauliflower from merely edible to genuinely extraordinary.

The Maillard reaction — the same chemical process that creates the complex flavors and aromas of roasted coffee, bread crust, and seared vegetables — activates on the surface of the cauliflower when it reaches approximately 300°F (150°C), creating hundreds of new flavor compounds that were simply not present in the raw vegetable. These compounds produce the characteristic nutty, deeply savory, complex flavor of properly roasted cauliflower that is one of the most satisfying flavor experiences in all of plant-based cooking.

Simultaneously the natural sugars in the cauliflower — present in relatively small amounts compared to sweeter vegetables — caramelize on the cut surfaces in contact with the hot pan, adding a subtle sweetness and complexity that contrasts beautifully with the savory spice coating and the slight bitterness of the slightly charred tips.

The glucosinolates — the sulfur compounds responsible for cauliflower’s characteristic mild bitterness and pungency when raw — break down during roasting into indoles and isothiocyanates that have been extensively studied for their anti-cancer properties. Roasting cauliflower does not diminish its nutritional value — it transforms its phytochemical profile into a form that is more bioavailable and more medicinally active than the raw vegetable.

Nutritionally cauliflower provides Vitamins C, K, B6, and folate alongside choline — an essential nutrient particularly important for brain health and liver function — and meaningful amounts of fiber, potassium, and manganese. The turmeric in the coating contributes curcumin with powerful anti-inflammatory properties. The nutritional yeast contributes B vitamins including B12 in fortified varieties.


Flavor Variations

  • Buffalo Roasted Cauliflower: After roasting toss the hot florets in buffalo sauce — vegan butter mixed with hot sauce — and return to the oven for 5 minutes for a fiery, sticky version that is spectacular in tacos with cool vegan ranch dressing and sliced celery.
  • Indian Spiced Cauliflower: Replace the spice blend with 2 teaspoons of curry powder, 1 teaspoon of garam masala, and half a teaspoon of ground ginger for a fragrant, warmly spiced version that is outstanding alongside dal, basmati rice, and cooling coconut yogurt.
  • Lemon and Herb Cauliflower: Add the zest of two lemons to the spice blend and finish with a generous handful of fresh herbs — parsley, dill, and mint — tossed through the hot florets immediately before serving for a bright, fresh, Mediterranean-inspired version.
  • Sticky Teriyaki Cauliflower: Toss the roasted florets in a teriyaki glaze — soy sauce, maple syrup, ginger, and garlic — in the final 5 minutes of roasting for a sticky, sweet-savory Asian-inspired version that is spectacular over steamed rice with sliced scallions and sesame seeds.

Nutritional Highlights (Per Serving)

CaloriesProteinCarbsFiberFat
~160 kcal7g16g5g9g

At just 160 calories per serving this roasted cauliflower delivers an outstanding nutritional profile — 7 grams of plant-based protein from the cauliflower and nutritional yeast combined, 5 grams of dietary fiber, and an exceptional concentration of Vitamins C, K, and B6 alongside choline, potassium, and manganese. The turmeric contributes curcumin with extensively studied anti-inflammatory properties. The nutritional yeast contributes B vitamins including B12 in fortified varieties alongside all nine essential amino acids. The olive oil contributes heart-healthy monounsaturated fats and supports the absorption of the fat-soluble vitamins present in the cauliflower and spice blend.


Storage

  • Best fresh: Roasted cauliflower is at its crispiest and most spectacular within 15 minutes of coming out of the oven. It softens as it cools and stored cauliflower never quite achieves the crispiness of freshly roasted — make it fresh whenever possible.
  • Refrigerator: Store in an airtight container in the refrigerator for up to 4 days. Reheat in a hot oven at 400°F (200°C) for 8–10 minutes or in an air fryer at 375°F (190°C) for 4–5 minutes to restore crispiness. Do not microwave.
  • Freezer: Freeze roasted florets in a single layer until solid then transfer to a freezer bag for up to 2 months. Reheat from frozen in a 400°F (200°C) oven for 15 minutes until heated through and re-crisped.
  • Meal prep: Roast a large batch and store in the refrigerator for adding to grain bowls, salads, tacos, and wraps throughout the week. Roasted cauliflower is one of the most versatile meal prep ingredients available — it improves virtually any plant-based meal it is added to.

Frequently Asked Questions

Why is my roasted cauliflower soft instead of crispy?

Soft cauliflower is caused by insufficient drying, a crowded baking sheet, oven temperature too low, or skipping the cornstarch. Ensure florets are completely dry before seasoning, use two baking sheets with generous space, roast at the full 425°F, and include the cornstarch in the coating.

Can I use frozen cauliflower?

Yes — thaw completely and dry as thoroughly as possible before seasoning. Frozen cauliflower contains significantly more moisture than fresh and must be dried extremely well to achieve any crispiness. Fresh cauliflower always produces a superior result but frozen is a perfectly viable alternative.

Can I make this in an air fryer?

Yes — air fryer roasted cauliflower is outstanding. Season as directed and air fry in a single layer at 400°F (200°C) for 12–15 minutes, shaking the basket every 5 minutes. The circulating hot air produces extremely even crispiness on all surfaces and is arguably the best method for small batches.

What size should the florets be?

Approximately 4–5cm across is ideal — large enough to have substance and develop both a crispy exterior and tender interior, small enough to cook through completely in 22 minutes. Very large florets should be cut in half through the stem. Very small florets can burn before the interior cooks — remove them early if needed.

Is roasted cauliflower good for meal prep?

Yes — roasted cauliflower stores well in the refrigerator for 4 days and reheats beautifully in a hot oven or air fryer. It pairs with virtually every plant-based meal making it one of the most versatile meal prep vegetables available. Roast a full head at the beginning of the week for effortless additions to every meal.

Can I roast the whole cauliflower as a head?

Yes — a whole roasted cauliflower head is a spectacular presentation piece. Coat the entire head in the seasoning mixture and roast at 400°F (200°C) for 45–60 minutes until deeply golden all over and a knife inserted in the center meets no resistance. Serve whole at the table for dramatic effect.


Tried this recipe? Leave a comment below and let us know how it turned out! Tag us on Instagram and Facebook — we love seeing your plant-powered creations. Looking for more crispy, flavorful vegan side dish and vegetable recipes? Browse all recipes on Easy Vegan Recipes — new recipes posted every single week!

Vegan Crispy Broccoli Cheese Bites — The Most Addictive Plant-Based Snack You Will Make All Week

vegan crispy broccoli cheese bites

There are snacks you make because something is needed before dinner. And then there are snacks like these Vegan Crispy Broccoli Cheese Bites — the kind that come out of the oven golden and crisp on the outside, tender and cheesy on the inside, with a savory, slightly nutty flavor that makes it genuinely impossible to eat just one. This is that snack. The one that disappears from the plate before it has properly cooled. The one that turns broccoli into the most popular thing on the table without anyone quite understanding how it happened.

These bites combine finely chopped broccoli with vegan cheese, chickpea flour, and seasoning, formed into small rounds and baked until shatteringly crisp on the outside and tender throughout, producing a snack or appetizer that delivers all the satisfaction of a cheesy fried bite without the mess of deep frying.

What makes these bites so outstanding is the combination of chickpea flour as the binder and nutritional yeast in the coating — the chickpea flour holds the bites together and crisps beautifully in the oven, while the nutritional yeast adds a deep savory, cheesy flavor that makes every bite taste genuinely indulgent.

This recipe is 100% vegan, naturally gluten-free, ready in just 35 minutes, and absolutely wonderful served warm with a dipping sauce alongside as a snack, appetizer, or side dish.


Recipe Information

Prep TimeCook TimeTotal TimeServingsCalories
15 mins20 mins35 mins4~190 kcal

Ingredients

For the Bites

  • 3 cups (270g) broccoli florets, very finely chopped
  • ½ cup (60g) vegan cheddar or mozzarella, shredded
  • ¼ cup (25g) nutritional yeast
  • ¼ cup (30g) chickpea flour
  • 2 cloves garlic, minced
  • 2 tbsp fresh chives or parsley, finely chopped
  • ½ tsp smoked paprika
  • ½ tsp salt
  • ¼ tsp black pepper
  • 2 tbsp plant milk, to help bind if needed

For the Crispy Coating

  • ½ cup (50g) panko breadcrumbs or regular breadcrumbs
  • 2 tbsp nutritional yeast
  • ¼ tsp smoked paprika
  • 1 tbsp olive oil

For the Dipping Sauce

  • ½ cup (120g) vegan mayonnaise
  • 1 tbsp sriracha
  • 1 tsp lime juice

Instructions

  1. Preheat the oven. Preheat the oven to 400°F (200°C). Line a baking sheet with parchment paper.
  2. Prepare the broccoli. Very finely chop the broccoli florets — they should be almost minced so they bind properly into bites rather than falling apart.
  3. Make the mixture. In a large bowl combine the finely chopped broccoli, shredded vegan cheese, nutritional yeast, chickpea flour, garlic, herbs, smoked paprika, salt, and pepper. Mix thoroughly. Add plant milk one tablespoon at a time if the mixture seems too dry to hold together when pressed.
  4. Make the coating. In a shallow dish combine the breadcrumbs, nutritional yeast, smoked paprika, and olive oil. Toss to combine until the breadcrumbs are lightly coated in oil.
  5. Shape and coat the bites. Divide the mixture into 16–18 equal portions and roll each into a ball, pressing firmly. Roll each ball in the breadcrumb coating, pressing to adhere well on all sides.
  6. Bake. Arrange on the prepared baking sheet with space between each bite. Bake for 18–22 minutes until deeply golden and crisp on the outside, turning once halfway through.
  7. Make the dipping sauce. Whisk together the vegan mayonnaise, sriracha, and lime juice until smooth.
  8. Serve immediately. Serve the warm bites with the dipping sauce while at their crispiest.

Pro Tips

  • Chop the broccoli very finely — large pieces make the bites harder to hold together and more likely to fall apart during rolling and baking.
  • Press each bite firmly when shaping to ensure they hold together during baking.
  • Roll the bites in the breadcrumb coating with genuine pressure so the coating adheres rather than falling off during baking.
  • Turn once during baking for even crispiness on all sides.

Why These Bites Work So Well

The combination of chickpea flour, vegan cheese, and finely minced broccoli creates a mixture with enough binding power to hold together during baking while the breadcrumb coating provides the crispy exterior. The nutritional yeast in both the mixture and the coating ensures a deep, savory, cheesy flavor throughout rather than only on the surface.


Flavor Variations

  • Spicy Broccoli Bites: Add chili flakes and extra sriracha to the mixture for building heat.
  • Herbed Broccoli Bites: Add dried Italian herbs and lemon zest to the mixture for a Mediterranean-inspired version.
  • Buffalo Broccoli Bites: Toss the baked bites in buffalo sauce immediately after baking for a spicy, sticky version.

Nutritional Highlights (Per Serving — 4 bites)

CaloriesProteinCarbsFiberFat
~190 kcal9g18g4g9g

Storage

  • Refrigerator: Store in an airtight container for up to 3 days. Reheat in the oven or air fryer to restore crispiness.
  • Freezer: Freeze baked, cooled bites for up to 2 months. Reheat from frozen in an air fryer or oven until heated through and crispy.
  • Air fryer: These bites reheat particularly well in an air fryer at 375°F (190°C) for 4–5 minutes.

Frequently Asked Questions

Can I air fry these instead of baking?

Yes — air fry at 390°F (200°C) for 12–14 minutes, shaking halfway, for an even crispier result than oven baking.

Why are my bites falling apart?

This is usually caused by broccoli pieces that are too large or insufficient chickpea flour. Chop the broccoli more finely and add an extra tablespoon of chickpea flour to help bind the mixture.

Can I make these gluten-free?

Yes — use gluten-free breadcrumbs in the coating and check that all other ingredients are certified gluten-free.


Tried this recipe? Leave a comment below and let us know how it turned out! Tag us on Instagram and Facebook — we love seeing your plant-powered creations. Looking for more crispy, addictive vegan snack and appetizer recipes? Browse all recipes on Easy Vegan Recipes — new recipes posted every single week!