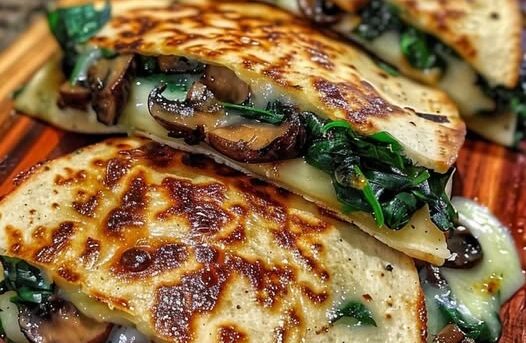
30-minute vegan dinner

Vegan Spinach Mushroom Quesadillas with Garlicky Browned Mushrooms, Wilted Spinach and a Creamy White Bean Cheese Spread — The Most Crispy Plant-Based Weeknight Dinner You Will Make All Week

vegan spinach mushroom quesadillas

Crispy golden tortillas stuffed with garlicky browned mushrooms, wilted spinach, and a creamy, melty cheese spread, ready in 25 minutes. These Vegan Spinach Mushroom Quesadillas are savory, satisfying, and the kind of fast weeknight dinner that everyone in the house will ask for again.

The filling is simple and full of flavor. Mushrooms are browned in a hot pan until deeply golden, which concentrates their savory, meaty taste, then tossed with garlic, cumin, smoked paprika, and fresh spinach until just wilted. The key to a good quesadilla is a filling that is flavorful but not wet, so the mushrooms are cooked until their liquid has evaporated.

To bind everything together, the quesadillas use a quick white bean cheese spread. Canned white beans are blended with nutritional yeast, lemon juice, garlic, and a little smoked paprika into a creamy, savory spread that acts like melted cheese. It is nut-free, cheap, and holds the filling in the tortilla beautifully. Add a handful of vegan cheese shreds if you want extra melt and stretch.

Cook the quesadillas in a hot skillet with a little oil until crisp and golden on both sides, then cut into wedges and serve with salsa, guacamole, or a squeeze of lime. They are also great for lunchboxes and easy to make in batches for a crowd.

This recipe is 100% vegan, dairy-free, egg-free, and nut-free.


Recipe Information

Prep TimeCook TimeTotal TimeServingsCalories
10 mins20 mins30 mins4 (4 large quesadillas)~420 kcal each

Ingredients

For the Mushroom Spinach Filling

  • 1 tbsp olive oil
  • 12 oz (340g) cremini mushrooms, thinly sliced
  • 3 garlic cloves, minced
  • 5 oz (150g) baby spinach (about 5 cups)
  • 1 tsp ground cumin
  • ½ tsp smoked paprika
  • ½ tsp salt
  • ¼ tsp black pepper
  • 1 tsp lime juice

For the White Bean Cheese Spread

  • 1 can (15 oz / 400g) white beans (cannellini or great northern), drained and rinsed
  • 3 tbsp nutritional yeast
  • 2 tbsp olive oil
  • 1 tbsp lemon juice
  • 1 garlic clove
  • ½ tsp smoked paprika
  • ½ tsp salt
  • 2–3 tbsp water, as needed

For the Quesadillas

  • 4 large flour tortillas (10–12 inches)
  • 1 cup (100g) vegan mozzarella or cheddar shreds (optional)
  • 2 tbsp olive oil or vegan butter, for cooking

To Serve

  • Salsa
  • Guacamole
  • Vegan sour cream
  • Lime wedges
  • Fresh cilantro

Optional Additions

  • Sautéed onion
  • Roasted red peppers
  • Black beans
  • Jalapeños

Instructions

  1. Brown the mushrooms. Heat the olive oil in a large skillet over medium-high heat. Add the mushrooms in a single layer with a pinch of salt and cook for 7–8 minutes, stirring occasionally, until deeply browned and the liquid has evaporated.
  2. Add the aromatics. Add the garlic, cumin, smoked paprika, and pepper and cook for 1 minute.
  3. Wilt the spinach. Add the spinach in handfuls and cook for 2 minutes until wilted. Stir in the lime juice, then transfer the filling to a plate and press out any excess liquid. Wipe the pan.
  4. Make the spread. Blend the white beans, nutritional yeast, olive oil, lemon juice, garlic, paprika, and salt until completely smooth, adding water a tablespoon at a time as needed until it is thick and spreadable.
  5. Assemble. Spread about 3 tablespoons of the bean spread over half of each tortilla. Top with a quarter of the filling and a sprinkle of vegan cheese. Fold the tortilla in half.
  6. Cook. Heat 1 tablespoon of oil in the skillet over medium heat. Cook the quesadillas, one or two at a time, for 3–4 minutes per side, pressing down gently, until golden and crisp.
  7. Serve. Cut into wedges and serve hot with salsa, guacamole, and lime wedges.

Pro Tips for the Best Quesadillas

  • Cook the mushrooms until dry. A wet filling makes soggy tortillas.
  • Squeeze the spinach. Excess liquid will soak through.
  • Spread the bean cheese thick. It acts as glue and gives a creamy bite.
  • Use medium heat. High heat burns the tortilla before the middle warms.
  • Press lightly. It helps the tortilla crisp evenly.
  • Do not overfill. Too much filling spills out when you flip.
  • Use large tortillas. They fold more easily.
  • Let them rest for a minute. The filling sets and cuts cleanly.

A Few Notes on Ingredients

Mushrooms provide umami flavor and B vitamins, and spinach adds iron and vitamins. White beans add fiber and plant protein, and nutritional yeast gives a cheesy flavor and is often fortified with B vitamins.

This is a quick, balanced dinner. Add black beans or serve with a side salad for more protein and freshness.


Flavor Variations

  • Spicy Quesadillas: Add jalapeños and a pinch of cayenne to the filling.
  • Extra-Cheesy Quesadillas: Add more vegan cheese shreds.
  • Protein-Packed Quesadillas: Add black beans or crumbled tofu.
  • Gluten-Free Quesadillas: Use gluten-free tortillas or corn tortillas.

Nutritional Highlights (Per Quesadilla)

CaloriesProteinCarbsFiberFat
~420 kcal15g55g8g15g

Storage

  • Refrigerator: Store in an airtight container for up to 3 days.
  • Freezer: Freeze cooked, cooled quesadillas, wrapped, for up to 2 months.
  • Reheat: Use a hot skillet, oven, or air fryer to re-crisp. The microwave makes them soft.
  • Make ahead: Make the filling and spread up to 3 days ahead.

Frequently Asked Questions

Can I make them without vegan cheese?

Yes. The white bean spread provides the creamy, cheesy texture.

Can I use frozen spinach?

Yes. Thaw and squeeze it very dry first, then add it with the mushrooms.

How do I keep the quesadillas from falling apart?

Use large tortillas, spread the bean cheese thickly, and do not overfill.

Can I bake them instead?

Yes. Bake on a sheet at 425°F (220°C) for 8–10 minutes per side, brushed with oil.

Can I make them in an air fryer?

Yes. Air fry at 375°F (190°C) for 5–6 minutes, flipping halfway.

How is this different from your Buffalo Chickpea Quesadillas?

These are mild, savory quesadillas with a garlicky mushroom and spinach filling and a nut-free white bean cheese. Our Vegan Buffalo Chickpea Quesadillas are spicy and use buffalo chickpeas and vegan cream cheese.


Tried this recipe? Leave a comment below and let us know how it turned out! Tag us on Instagram and Facebook — we love seeing your plant-powered creations. Browse all recipes on Easy Vegan Recipes — new recipes posted every single week!

Vegan Chickpea Paprikash with Buttery Parsley Noodles — The Quick, Cozy 30-Minute Paprika Dinner That Needs Just One Skillet and a Pot of Noodles

Unknown 323834597 137500489158275 8950084909604116099 N 1 610x343

Tender chickpeas simmered in a rich, velvety paprika sauce with sweet onions and peppers, spooned over glossy, buttery parsley noodles: this Vegan Chickpea Paprikash is a cozy, Central European–inspired dinner you can make in about 30 minutes, with just pantry staples and no tempeh or special ingredients.

Paprikash is all about the paprika. Sweet paprika is stirred into softened onions and bell pepper so the spice blooms in the oil and turns the whole pan a deep, brick-red color. Tomato paste and a splash of broth turn it into a sauce, and canned chickpeas soak up all that flavor while staying soft and creamy. A swirl of coconut cream or plain unsweetened vegan yogurt at the end gives the classic silky finish, with a squeeze of lemon to keep it bright.

The noodles are what make this meal special. Hot egg-free noodles are tossed with vegan butter, garlic, and a generous handful of fresh parsley until every strand is glossy and fragrant. Spoon the paprikash over the top, and you have a bowl that feels like a hug.

It is a simple, budget-friendly weeknight meal, and the sauce keeps well, so leftovers are even better the next day.

This recipe is 100% vegan and dairy-free. It contains gluten (noodles) and may contain soy or coconut, depending on your vegan butter and cream. See the swaps below.


Recipe Information

Prep TimeCook TimeTotal TimeServingsCalories
10 mins20 mins30 mins4~480 kcal each

Ingredients

For the Chickpea Paprikash

  • 2 tbsp olive oil
  • 1 large yellow onion, thinly sliced
  • 1 large red bell pepper, sliced
  • 4 garlic cloves, minced
  • 1 tbsp tomato paste
  • 2 tbsp sweet paprika (Hungarian if possible)
  • 1 tsp smoked paprika
  • ½ tsp dried thyme
  • 2 cans (15 oz / 400g each) chickpeas, drained and rinsed
  • 1 can (14 oz / 400g) crushed tomatoes
  • 1 cup (240ml) vegetable broth
  • 1 tbsp soy sauce or tamari
  • 1 tsp maple syrup or sugar
  • ½ cup (120ml) full-fat coconut cream, or ½ cup unsweetened plain vegan yogurt
  • 1 tbsp lemon juice
  • Salt and black pepper, to taste

For the Buttery Parsley Noodles

  • 10 oz (280g) egg-free wide noodles
  • 2 tbsp vegan butter
  • 1 garlic clove, grated
  • ½ cup (25g) chopped fresh parsley
  • Salt and black pepper, to taste

To Serve

  • Extra parsley
  • A dollop of vegan sour cream or yogurt
  • A dusting of paprika
  • Cracked black pepper

Optional Additions

  • Sliced mushrooms
  • Fresh spinach
  • Caraway seeds
  • Pickles on the side

Instructions

  1. Soften the vegetables. Heat the olive oil in a large, deep skillet over medium heat. Add the onion, bell pepper, and a pinch of salt and cook for 8–10 minutes, stirring often, until very soft and just starting to turn golden.
  2. Bloom the spices. Add the garlic and tomato paste and cook for 1 minute. Reduce the heat to low, then stir in the sweet paprika, smoked paprika, and thyme for 30 seconds only. Paprika burns quickly and turns bitter, so keep the heat low and stir constantly.
  3. Build the sauce. Immediately pour in the crushed tomatoes and vegetable broth, scraping up the bottom of the pan. Add the soy sauce and maple syrup.
  4. Simmer. Add the chickpeas and bring to a simmer. Cook uncovered for 12–15 minutes, stirring occasionally, until the sauce is thick and the chickpeas are tender and coated.
  5. Cook the noodles. While the sauce simmers, cook the noodles in salted boiling water according to the package directions. Reserve ¼ cup of the pasta water, then drain.
  6. Make the parsley noodles. Return the noodles to the pot off the heat. Add the vegan butter, grated garlic, parsley, salt, pepper, and a splash of pasta water. Toss until glossy.
  7. Finish the paprikash. Reduce the heat to low and stir in the coconut cream and lemon juice. Warm through gently without boiling. Taste and adjust the salt, pepper, and paprika.
  8. Serve. Divide the noodles among bowls and spoon the paprikash over the top. Finish with parsley, vegan sour cream, and a dusting of paprika.

Pro Tips for the Best Chickpea Paprikash

  • Cook the onions slowly. Soft, sweet onions are the base of the sauce.
  • Add the paprika off high heat. Burnt paprika tastes bitter.
  • Use fresh paprika. Old paprika tastes dusty and flat.
  • Add the cream at the end and avoid boiling to keep the sauce smooth.
  • Mash a few chickpeas against the side of the pan to thicken the sauce naturally.
  • Add a splash of lemon at the end to brighten the flavor.
  • Toss the noodles with butter while still hot so the parsley wilts and perfumes them.
  • Keep noodles and sauce separate for leftovers.

A Few Notes on Ingredients

Chickpeas provide protein and fiber and give the dish a hearty bite. Sweet paprika is the star, and a little smoked paprika adds depth. Tomato paste and crushed tomatoes give the sauce body. Check that your vegan butter and cream are free of anything you avoid, since brands vary.

Hungarian sweet paprika has the best flavor, but any good-quality sweet paprika works.


Flavor Variations

  • Soy-Free: Use coconut aminos instead of soy sauce, and a soy-free vegan butter.
  • Coconut-Free: Use cashew cream or plain vegan yogurt.
  • Gluten-Free: Use gluten-free noodles and tamari.
  • Potato Paprikash: Add diced potatoes with the broth and simmer until tender.
  • Spicy Paprikash: Add a pinch of cayenne or chili flakes.

Nutritional Highlights (Per Serving)

CaloriesProteinCarbsFiberFat
~480 kcal17g68g14g15g

Storage

  • Refrigerator: Store the paprikash and noodles separately for up to 4 days.
  • Freezer: Freeze the paprikash without the cream for up to 3 months. Thaw overnight and stir in the cream when reheating.
  • Reheating: Warm gently on the stovetop with a splash of broth.
  • Make ahead: The sauce tastes even better after a day in the fridge.

Frequently Asked Questions

What is paprikash?

Paprikash is a Hungarian-style dish where meat or vegetables are cooked in a rich paprika and onion sauce, usually finished with sour cream.

What should I serve with it?

Buttery noodles are classic. Mashed potatoes, rice, dumplings, and crusty bread are also good, with a cucumber or green salad alongside.

Can I make it without coconut?

Yes. Use cashew cream or unsweetened plain vegan yogurt.

Can I make it gluten-free?

Yes. Use gluten-free noodles and tamari.

Why does my sauce taste bitter?

The paprika probably burned. Add it off the heat or on low heat and follow it quickly with liquid.

How is this different from your Hungarian paprikash?

This is a faster, chickpea-only version, with no tempeh and a simple sauce, served over buttery parsley noodles. Our Vegan Hungarian Chickpea Tempeh Paprikash adds browned tempeh for extra protein and uses a creamy tomato and paprika sauce with bell pepper.


Tried this recipe? Leave a comment below and let us know how it turned out! Tag us on Instagram and Facebook — we love seeing your plant-powered creations. Browse all recipes on Easy Vegan Recipes — new recipes posted every single week!

Vegan Coconut Chickpea Curry with Mustard Seeds, Curry Leaves and Black Pepper — The Fragrant South Indian–Inspired Coconut Curry That Needs No Tomatoes and Comes Together in 30 Minutes

Coconut Chickpea Curry

Tender chickpeas simmered in a light, silky coconut sauce scented with popping mustard seeds, fresh curry leaves, ginger, and black pepper: this Vegan Coconut Chickpea Curry is a fragrant, South Indian–inspired dinner that is creamy without being heavy and ready in about 30 minutes.

Unlike tomato-based curries, this one lets coconut take the lead. The flavor is built on a tadka, the fragrant technique of sizzling whole spices in hot oil. Mustard seeds pop, curry leaves crackle, shallots soften, and green chili, ginger, and garlic join in, all before the chickpeas and coconut milk go into the pan. The result is a sauce that tastes bright, aromatic, and gently spiced, with a warm, peppery finish.

A pinch of turmeric and coriander adds color and earthiness, and a squeeze of lime at the end makes the coconut flavor sparkle. A handful of fresh coconut or desiccated coconut on top adds texture, and the dish is delicious as it is or with a few vegetables stirred in.

Serve it over steamed basmati or jasmine rice, with warm flatbread or dosa, or with a simple cucumber salad. It uses mostly pantry staples, and it reheats beautifully.

This recipe is 100% vegan, dairy-free, gluten-free, and nut-free. It contains coconut, which many people with tree nut allergies can eat, but check with your doctor if you have any concerns.


Recipe Information

Prep TimeCook TimeTotal TimeServingsCalories
10 mins20 mins30 mins4~380 kcal each (without rice)

Ingredients

For the Tadka

  • 2 tbsp coconut oil (or neutral oil)
  • 1 tsp black mustard seeds
  • 1 tsp cumin seeds
  • 12–15 fresh curry leaves (optional but recommended)
  • 1 small dried red chili (optional)

For the Curry

  • 3 small shallots (or 1 small onion), finely sliced
  • 4 garlic cloves, minced
  • 1 tbsp fresh ginger, grated
  • 1–2 green chilies, slit or sliced (adjust to taste)
  • 1 tsp ground coriander
  • ½ tsp ground turmeric
  • ½ tsp freshly ground black pepper
  • ¼ tsp chili powder or Kashmiri chili powder (optional)
  • 2 cans (15 oz / 400g each) chickpeas, drained and rinsed
  • 1 can (13.5 oz / 400ml) full-fat coconut milk
  • ½ cup (120ml) water or vegetable broth
  • 1 tsp salt, plus more to taste
  • 1 tbsp lime juice, plus more to taste
  • 1 tsp maple syrup (optional)

To Serve

  • Steamed basmati rice
  • Fresh cilantro
  • Toasted desiccated coconut
  • Lime wedges
  • Warm flatbread

Optional Additions

  • Cubed potato or carrot
  • Green beans
  • Baby spinach
  • Tamarind paste, 1 tsp

Instructions

  1. Start the tadka. Heat the coconut oil in a large, deep skillet or pot over medium-high heat. Add the mustard seeds and wait until they start to pop, about 30 seconds. Add the cumin seeds, curry leaves, and dried chili and stir for 15 seconds. Be careful, because the leaves may spatter.
  2. Cook the aromatics. Reduce the heat to medium. Add the shallots and cook for 4–5 minutes until soft and golden. Add the garlic, ginger, and green chilies and cook for 1 minute.
  3. Add the spices. Stir in the coriander, turmeric, black pepper, and chili powder for 20–30 seconds.
  4. Add the chickpeas. Add the chickpeas and stir to coat them in the spices. Mash about a quarter of them against the pan with the back of a spoon to thicken the sauce.
  5. Add the coconut milk. Pour in the coconut milk, water, and salt. Bring to a gentle simmer, then cook uncovered for 10–12 minutes, stirring occasionally, until the sauce thickens and the flavors meld.
  6. Finish. Stir in the lime juice and maple syrup. Taste and adjust the salt, lime, and heat.
  7. Serve. Spoon over rice and top with cilantro, toasted coconut, and a lime wedge.

Pro Tips for the Best Coconut Chickpea Curry

  • Let the mustard seeds pop. Unpopped seeds taste bitter.
  • Use fresh curry leaves if possible. They add a unique, citrusy aroma. Find them at Indian or Asian grocery stores.
  • Use full-fat coconut milk for a creamy sauce.
  • Mash a few chickpeas to thicken the sauce naturally.
  • Do not boil the sauce hard. Gentle simmering keeps the coconut milk smooth.
  • Grind the black pepper fresh. It is a key flavor in this curry.
  • Add the lime at the end to brighten the flavor.
  • Taste for salt at the end. Coconut curries need it.

A Few Notes on Ingredients

Chickpeas provide protein and fiber and soak up the coconut sauce. Mustard seeds, curry leaves, and green chilies are typical of South Indian cooking. Coconut milk makes the sauce rich and mellow, and lime adds sharpness.

If you cannot find curry leaves, the curry will still taste good. Add a little extra lime zest for brightness.


Flavor Variations

  • Tomato Version: Add a can of crushed tomatoes for a richer, tangier sauce.
  • Greens Version: Stir in spinach or kale at the end.
  • Dry Roasted Coconut Masala: Toast 3 tablespoons of desiccated coconut with spices and blend into the sauce.
  • Spicy Curry: Add extra green chilies or chili powder.
  • Instant Pot Version: Use dry soaked chickpeas and pressure cook for 20 minutes.

Nutritional Highlights (Per Serving, without rice)

CaloriesProteinCarbsFiberFat
~380 kcal12g34g10g22g

Storage

  • Refrigerator: Store in an airtight container for up to 5 days. The sauce thickens, so add water when reheating.
  • Freezer: Freeze in portions for up to 3 months. Thaw overnight.
  • Make ahead: The flavor deepens overnight.
  • Reheating: Warm gently on the stovetop and avoid boiling.

Frequently Asked Questions

What are curry leaves?

They are small, aromatic leaves used in South Indian cooking, with a citrusy, slightly nutty flavor. They are not the same as curry powder.

Can I make it without mustard seeds?

Yes, but the flavor will be milder. Use extra cumin seeds.

Can I use light coconut milk?

Yes, but the sauce will be thinner and less rich.

Is it spicy?

It is mildly spicy. Adjust the green chilies and chili powder for your taste.

Can I use dried chickpeas?

Yes. Soak overnight and cook until tender, then use about 3 cups.

How is this different from your other chickpea curries?

This is a tomato-free, South Indian–inspired coconut curry with mustard seeds, curry leaves and black pepper. Our Quick Vegan Chickpea and Spinach Curry and Vegan Creamy Chickpea and Spinach Curry use tomatoes, spinach and garam masala, and our Vegan Sweet Potato and Chickpea Curry uses Thai red curry paste.


Tried this recipe? Leave a comment below and let us know how it turned out! Tag us on Instagram and Facebook — we love seeing your plant-powered creations. Browse all recipes on Easy Vegan Recipes — new recipes posted every single week!

Creamy Vegan Sun-Dried Tomato Pasta with Silky Cashew Cream Sauce, Garlic and Fresh Basil — The Most Flavorful Plant-Based Pasta You Will Make All Week

Creamy Sun-dried Tomato Pasta

Tender penne coated in a velvety, blush-pink sauce made from sun-dried tomatoes, cashew cream, garlic, and herbs, then finished with fresh basil and a squeeze of lemon: this Creamy Vegan Sun-Dried Tomato Pasta has the deep, sweet, tangy flavor of a restaurant cream sauce and is ready in about 30 minutes.

Sun-dried tomatoes are small but very powerful. Drying concentrates their sugars and acidity, so a handful gives a sauce an intense, savory, slightly sweet flavor that tastes like it simmered for hours. Here, they are blended with soaked cashews, garlic, sautéed shallot, tomato paste, and a little of the pasta water into a smooth, creamy sauce that has no dairy and no cream.

The sauce is made in a blender while the pasta cooks, which makes the whole dish quick. The cashews give it a rich, silky body, and nutritional yeast adds a cheesy savoriness. A pinch of Italian seasoning, smoked paprika, and red pepper flakes round out the flavor, and lemon juice added at the end keeps everything bright.

Toss the sauce with the hot pasta, add chopped sun-dried tomatoes and fresh basil on top, and the dish is done. It works with penne, rigatoni, fettuccine, or any shape you like, and it is great with chickpeas, white beans, or wilted spinach stirred in for extra protein and greens.

This recipe is dairy-free and egg-free. It contains tree nuts (cashews) and gluten (wheat pasta). For a nut-free version, use blended white beans in place of the cashews. Please check labels on your pasta, sun-dried tomatoes, and nutritional yeast.


Recipe Information

Prep TimeCook TimeTotal TimeServingsCalories
10 mins20 mins30 mins4~540 kcal each

Ingredients

For the Pasta

  • 12 oz (340g) penne, rigatoni, or fettuccine
  • Salt for the pasta water

For the Sun-Dried Tomato Cream Sauce

  • 1 cup (140g) raw cashews, soaked in hot water for 15 minutes and drained
  • ½ cup (70g) sun-dried tomatoes in oil, drained (plus 2 tbsp of the oil)
  • 1 tbsp olive oil
  • 1 shallot, diced
  • 4 garlic cloves, minced
  • 2 tbsp tomato paste
  • 1 cup (240ml) reserved pasta water, as needed
  • ¾ cup (180ml) unsweetened plant milk
  • 3 tbsp nutritional yeast
  • 1 tsp Italian seasoning
  • ½ tsp smoked paprika
  • ½ tsp salt, plus more to taste
  • ¼ tsp black pepper
  • ¼ tsp red pepper flakes, optional
  • 1 tbsp lemon juice

To Finish

  • ¼ cup (30g) extra sun-dried tomatoes, sliced
  • ½ cup fresh basil, torn
  • Optional: 2 cups baby spinach or 1 can chickpeas
  • Extra red pepper flakes and black pepper

Instructions

  1. Boil the pasta. Cook the pasta in well-salted water until al dente. Save 1½ cups of the pasta water before draining.
  2. Cook the aromatics. While the pasta cooks, heat the olive oil in a skillet over medium heat. Cook the shallot for 3 minutes, then add the garlic and tomato paste and cook for 2 minutes.
  3. Blend the sauce. Add the shallot mixture to a blender with the cashews, sun-dried tomatoes and oil, plant milk, nutritional yeast, Italian seasoning, paprika, salt, pepper, and red pepper flakes. Add ½ cup of pasta water. Blend for 1–2 minutes until completely smooth.
  4. Combine. Return the pasta to the pot over low heat. Pour in the sauce and stir for 2 minutes. Add the spinach or chickpeas, if using. Add more pasta water as needed until creamy and glossy.
  5. Finish. Stir in the lemon juice and half of the basil. Taste and adjust the salt.
  6. Serve. Divide into bowls. Top with the extra sun-dried tomatoes, remaining basil, and red pepper flakes.

Pro Tips for the Best Creamy Sun-Dried Tomato Pasta

  • Soak the cashews in hot water for a smoother sauce.
  • Blend the sauce for a full 1 to 2 minutes until silky.
  • Use oil-packed sun-dried tomatoes for the best texture. The oil adds flavor.
  • If using dry-packed tomatoes, soak them in hot water for 10 minutes first.
  • Save plenty of pasta water to loosen the sauce.
  • Add lemon at the end for brightness.
  • Serve right away, since the sauce thickens as it sits.
  • Taste at the end. Sun-dried tomatoes are salty, so you may need less salt.

A Few Notes on Ingredients

Oil-packed sun-dried tomatoes are soft and flavorful. Dry-packed tomatoes work if you soak them first. Raw cashews make the creamiest sauce. For a nut-free version, use one can of drained white beans plus a little extra plant milk. Nutritional yeast adds savory depth.


Flavor Variations

  • Nut-Free: Replace the cashews with white beans.
  • Spinach Version: Stir in baby spinach until wilted.
  • Protein Boost: Add chickpeas or sliced vegan sausage.
  • Spicy Version: Add more red pepper flakes.
  • Creamy Tuscan: Add kale and a splash of white wine.
  • Gluten-Free: Use gluten-free pasta.

Nutritional Highlights (Per Serving)

CaloriesProteinCarbsFiberFat
~540 kcal18g72g6g20g

Storage

  • Refrigerator: Store in an airtight container for up to 4 days.
  • Freezer: Freeze the sauce for up to 3 months. Cook fresh pasta when serving.
  • Reheating: Warm in a skillet with a splash of plant milk or water.
  • Make ahead: Make the sauce a day ahead and reheat.

Frequently Asked Questions

Do I need to soak the sun-dried tomatoes?

Not if they are oil-packed. Soak dry-packed ones in hot water for 10 minutes.

Can I make it nut-free?

Yes. Use white beans instead of cashews, and check your plant milk.

Can I make the sauce ahead?

Yes. It keeps for up to 4 days in the fridge.

Can I use another pasta?

Yes. Rigatoni, fettuccine, shells, and rotini work well.

Can I make it gluten-free?

Yes. Use gluten-free pasta.

How is this different from your other sun-dried tomato recipes?

This is a creamy, blended cashew and sun-dried tomato sauce on pasta. Our Vegan One Pot White Bean, Kale and Sun-Dried Tomato Tortiglioni is a one-pot dish, and our Vegan Pasta with Spinach, Almond Ricotta and Sun-Dried Tomatoes is topped with almond ricotta.


Tried this recipe? Leave a comment below and let us know how it turned out! Tag us on Instagram and Facebook — we love seeing your plant-powered creations. Browse all recipes on Easy Vegan Recipes — new recipes posted every single week!
Vegan Cashew Pineapple Tofu Stir-Fry with Snap Peas, Ginger and a Tangy Pineapple Teriyaki Sauce — The Most Flavorful Plant-Based Stir-Fry You Will Make All Week

⁣⁣VEGAN CASHEW PINEAPPLE TOFU

Golden seared tofu, juicy pineapple, crisp snap peas, and buttery toasted cashews tossed in a glossy ginger-pineapple teriyaki sauce: this Vegan Cashew Pineapple Tofu Stir-Fry is sweet, tangy, and savory, and it is on the table in about 30 minutes.

The sauce is the heart of the dish. Real pineapple juice is simmered with soy sauce, rice vinegar, fresh ginger, garlic, and a little maple syrup until it thickens into a glossy, sticky teriyaki-style glaze. It tastes bright and tropical but not too sweet, with a touch of heat from sriracha if you like.

The tofu is pressed and seared in a hot pan until golden, with no batter and no deep frying, so it is quick and uses very little oil. It stays firm and takes on the sauce beautifully. Fresh pineapple chunks are browned in the same pan for a caramelized edge, and snap peas and red onion add color and crunch. Roasted cashews go in last for a rich, buttery bite.

Serve it over steamed jasmine rice, cauliflower rice, or noodles. It is a fast weeknight dinner that also works well for meal prep.

This recipe is dairy-free and egg-free. It contains soy (tofu, soy sauce) and cashews (tree nuts). Please check labels, and use tamari for a gluten-free stir-fry.


Recipe Information

Prep TimeCook TimeTotal TimeServingsCalories
15 mins15 mins30 mins (plus pressing)4~430 kcal each

Ingredients

For the Stir-Fry

  • 2 blocks (14 oz / 400g each) extra-firm tofu, pressed for 15 minutes and cut into ¾-inch cubes
  • 2 tbsp neutral oil, divided
  • 1 small red onion, cut into wedges
  • 1 red bell pepper, sliced
  • 2 cups (200g) snap peas
  • 1½ cups (250g) fresh pineapple chunks
  • ¾ cup (100g) roasted cashews
  • 2 green onions, sliced

For the Pineapple Teriyaki Sauce

  • ¾ cup (180ml) pineapple juice
  • ¼ cup (60ml) soy sauce or tamari
  • 2 tbsp rice vinegar
  • 1 tbsp maple syrup
  • 1 tbsp fresh ginger, grated
  • 3 garlic cloves, minced
  • 1 tsp sriracha, optional
  • 1 tbsp cornstarch mixed with 2 tbsp cold water

To Serve

  • Steamed jasmine rice or cauliflower rice
  • Sesame seeds
  • Lime wedges

Instructions

  1. Press and cube the tofu. Press for at least 15 minutes, then pat dry and cut into cubes.
  2. Make the sauce. Whisk the pineapple juice, soy sauce, vinegar, maple syrup, ginger, garlic, and sriracha in a small bowl. Keep the cornstarch mixture separate.
  3. Sear the tofu. Heat 1 tablespoon of oil in a large nonstick skillet or wok over medium-high heat. Add the tofu in a single layer. Cook for 8–10 minutes, turning every couple of minutes, until golden on most sides. Remove to a plate.
  4. Brown the pineapple. Add the remaining oil. Cook the pineapple for 2 minutes until the edges caramelize. Remove with the tofu.
  5. Cook the vegetables. Add the onion, bell pepper, and snap peas. Stir-fry for 3–4 minutes until tender-crisp.
  6. Add the sauce. Pour in the sauce and bring to a simmer. Stir the cornstarch mixture, add it to the pan, and cook for 1–2 minutes until thick and glossy.
  7. Combine. Return the tofu and pineapple to the pan. Add the cashews and toss gently for 1 minute.
  8. Serve. Top with green onions and sesame seeds. Serve over rice with lime wedges.

Pro Tips for the Best Cashew Pineapple Tofu

  • Press the tofu well so it sears and does not steam.
  • Do not crowd the pan. Work in batches if needed.
  • Do not stir too much. Let the tofu brown.
  • Use fresh or canned pineapple in juice, not syrup.
  • Add the cashews at the end so they stay crunchy.
  • Stir the cornstarch mixture right before adding it, since it settles.
  • Keep the vegetables crisp by not overcooking.
  • Finish with lime for brightness.

A Few Notes on Ingredients

Fresh pineapple gives the best caramelized flavor, but canned pineapple chunks in juice work too. Use the canned juice in the sauce. Roasted unsalted cashews give the best crunch. Tamari makes the dish gluten-free. Sriracha adds gentle heat and can be skipped.


Flavor Variations

  • Nut-Free Version: Use pumpkin seeds or peanuts if peanuts are safe for you.
  • Spicy Version: Add red pepper flakes or fresh chili.
  • Crispy Version: Toss the tofu in cornstarch before searing.
  • Veggie Version: Add broccoli or carrots.
  • Noodle Version: Serve over rice noodles.
  • Air Fryer Version: Air fry the tofu at 400°F (200°C) for 12 minutes.

Nutritional Highlights (Per Serving, without rice)

CaloriesProteinCarbsFiberFat
~430 kcal24g34g5g23g

Storage

  • Refrigerator: Store for up to 4 days. The cashews will soften.
  • Freezer: Not recommended.
  • Reheating: Warm in a skillet. Add fresh cashews for crunch.
  • Make ahead: Make the sauce up to 5 days ahead.

Frequently Asked Questions

Can I use canned pineapple?

Yes. Use pineapple in juice, not syrup, and use the juice in the sauce.

Do I have to coat the tofu in cornstarch?

No. This version is seared with no coating. For extra crispy tofu, toss it in cornstarch first.

Can I make it gluten-free?

Yes. Use tamari.

Can I make it nut-free?

Swap the cashews for pumpkin seeds or omit them.

How do I keep the cashews crunchy?

Add them at the end and serve right away.

How is this different from your other cashew and pineapple tofu recipes?

This is a pan-seared stir-fry with a pineapple teriyaki sauce, with no batter. Our Crispy Vegan Pineapple Tofu is coated and crisped with a sweet and tangy glaze, and our Saucy Vegan Cashew Tofu with Greens uses a savory brown sauce with bok choy and broccoli.


Tried this recipe? Leave a comment below and let us know how it turned out! Tag us on Instagram and Facebook — we love seeing your plant-powered creations. Browse all recipes on Easy Vegan Recipes — new recipes posted every single week!

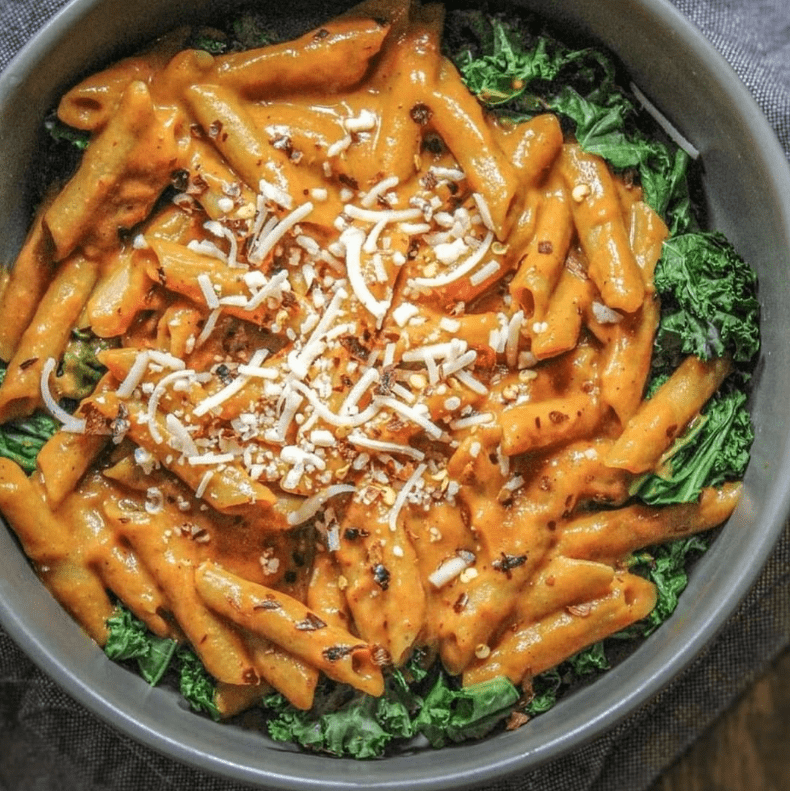
Creamy Vegan Roasted Red Pepper Penne with Garlicky Kale and a Nut-Free Silken Tofu Sauce — The Most Vibrant Plant-Based Weeknight Pasta You Will Make All Week

Creamy Roasted Red Pepper Penne with Galicky Kale

Silky, smoky, bright red roasted red pepper sauce coating tender penne, with a pile of garlicky sautéed kale on top: this Creamy Vegan Roasted Red Pepper Penne is colorful, comforting, and ready in 30 minutes. The sauce is nut-free and uses jarred peppers, so there is no roasting and no soaking.

The sauce is the star. Jarred roasted red peppers are blended with silken tofu, garlic, smoked paprika, nutritional yeast, and a squeeze of lemon until completely smooth. The silken tofu gives it a creamy, rich body without cashews or cream, and the peppers give it a sweet, smoky flavor and a gorgeous color. It tastes like a restaurant sauce but comes together in a blender in two minutes.

The kale makes it a full meal. It is cooked in olive oil with plenty of garlic and a pinch of red pepper flakes until it is tender with crisp edges, then piled over the pasta. A little lemon juice and a handful of fresh basil finish the dish.

Serve it right away with crusty bread and a green salad. Leftovers reheat well with a splash of water or plant milk.

This recipe is dairy-free, egg-free, and nut-free. It contains gluten (pasta) and soy (tofu). Please check labels, and use gluten-free penne for a gluten-free version.


Recipe Information

Prep TimeCook TimeTotal TimeServingsCalories
10 mins20 mins30 mins4~440 kcal each

Ingredients

For the Creamy Red Pepper Sauce

  • 1 jar (12 oz / 340g) roasted red peppers, drained
  • 1 package (12 oz / 340g) silken tofu
  • 2 garlic cloves
  • 3 tbsp nutritional yeast
  • 2 tbsp olive oil
  • 1 tbsp lemon juice
  • 1 tsp smoked paprika
  • 1 tsp salt, plus more to taste
  • ½ tsp black pepper
  • ½ cup (120ml) reserved pasta water, as needed

For the Pasta and Kale

  • 12 oz (340g) penne
  • 2 tbsp olive oil
  • 5 garlic cloves, thinly sliced
  • 1 large bunch (about 8 oz / 225g) lacinato or curly kale, stems removed, leaves chopped
  • Pinch of red pepper flakes
  • ¼ tsp salt
  • 1 tbsp lemon juice

To Serve

  • Fresh basil
  • Vegan parmesan
  • Red pepper flakes
  • Lemon wedges

Instructions

  1. Cook the pasta. Boil the penne in well-salted water until al dente. Reserve 1 cup of pasta water, then drain.
  2. Blend the sauce. In a blender, combine the roasted peppers, tofu, garlic, nutritional yeast, olive oil, lemon juice, paprika, salt, and pepper. Blend for 1–2 minutes until completely smooth.
  3. Cook the kale. Heat the oil in a large, deep skillet over medium heat. Add the garlic and cook for 1 minute until fragrant and just golden. Add the kale, red pepper flakes, and salt. Cook for 4–5 minutes, stirring, until tender with a few crisp edges. Squeeze in the lemon juice. Remove about a third of the kale and set aside for topping.
  4. Warm the sauce. Pour the sauce into the skillet with the remaining kale. Heat gently over medium-low for 3–4 minutes, stirring, until warm.
  5. Combine. Add the penne and toss. Add pasta water a splash at a time until the sauce is silky and coats the pasta.
  6. Serve. Top with the reserved kale, basil, and vegan parmesan. Serve with lemon wedges.

Pro Tips for the Best Red Pepper Penne

  • Drain the peppers well so the sauce is not watery.
  • Blend until completely smooth for a silky sauce.
  • Use silken tofu, not firm tofu. Firm tofu will be grainy.
  • Do not let the sauce boil hard. Heat gently.
  • Slice the garlic thin and do not let it burn.
  • Add pasta water gradually to loosen the sauce.
  • Salt the pasta water well.
  • Finish with lemon for brightness.

A Few Notes on Ingredients

Jarred roasted red peppers save time and have a sweet, smoky flavor. Silken tofu gives the sauce its creamy base, and it should be the soft, shelf-stable kind. Lacinato kale is tender and less bitter, but curly kale works. Smoked paprika adds depth. Use gluten-free penne for a gluten-free version.


Flavor Variations

  • Spicy Version: Add chili flakes to the sauce.
  • Roasted Version: Roast fresh red peppers for a deeper flavor.
  • Protein Version: Add white beans or crispy chickpeas.
  • Spinach Version: Use spinach instead of kale.
  • Mushroom Version: Add sautéed mushrooms.
  • Bake Version: Bake with a breadcrumb topping at 375°F (190°C) for 15 minutes.

Nutritional Highlights (Per Serving)

CaloriesProteinCarbsFiberFat
~440 kcal18g70g7g11g

Storage

  • Refrigerator: Store for up to 4 days.
  • Freezer: Not recommended.
  • Reheating: Warm on the stove with a splash of water or plant milk.
  • Make ahead: Make the sauce up to 4 days ahead and keep it chilled.

Frequently Asked Questions

Can I make the sauce ahead?

Yes. It keeps in the fridge for up to 4 days.

Can I use firm tofu?

No. Use silken tofu for a smooth sauce.

Is the sauce nut-free?

Yes. It uses silken tofu, not cashews.

Can I use fresh peppers?

Yes. Roast 3 large red peppers until charred, peel, and use in place of the jar.

Can I make it gluten-free?

Yes. Use gluten-free penne.

How is this different from your other red pepper pasta?

This penne has a nut-free silken tofu and roasted red pepper sauce with garlicky kale. Our Roasted Red Pepper and Cherry Tomato Fettuccine uses a creamy cashew sauce and cherry tomatoes.


Tried this recipe? Leave a comment below and let us know how it turned out! Tag us on Instagram and Facebook — we love seeing your plant-powered creations. Browse all recipes on Easy Vegan Recipes — new recipes posted every single week!

Vegan One-Pot Mushroom and White Bean Pasta with Garlic, Rosemary and Lemon, No Blender Needed — The Most Cozy Plant-Based Weeknight Dinner You Will Make All Week

One-Pot Mushroom & White Bean Pasta

Golden browned mushrooms, creamy white beans, and tender pasta all cooked together in one pot with garlic, rosemary, and a squeeze of lemon: this Vegan One-Pot Mushroom and White Bean Pasta is cozy, filling, and ready in about 30 minutes with just one pot to wash.

Here, the pasta cooks right in the sauce. Dry pasta simmers in vegetable broth and a splash of plant milk with the mushrooms and beans, and as it cooks, the starch from the pasta naturally thickens the liquid into a silky, creamy sauce. There is no blender, no draining, and no separate sauce pan.

Mushrooms are browned first for deep, savory flavor, and cannellini beans add creaminess and plant protein. When you stir the pasta, some of the beans break down and melt into the sauce, making it even richer. Garlic, fresh rosemary, thyme, and a little Dijon mustard give it an earthy, cozy flavor, and lemon juice and parsley at the end keep it fresh.

It is a perfect weeknight dinner, and it reheats well for lunch the next day. Serve with a green salad and crusty bread.

This recipe is dairy-free, egg-free, and nut-free. It contains gluten (pasta) and may contain soy (nutritional yeast and broth vary). Please check labels, and use gluten-free pasta for a gluten-free version, adding a little extra broth.


Recipe Information

Prep TimeCook TimeTotal TimeServingsCalories
10 mins22 mins32 mins4~420 kcal each

Ingredients

  • 2 tbsp olive oil
  • 12 oz (340g) cremini mushrooms, sliced
  • 1 medium onion, diced
  • 4 garlic cloves, minced
  • 1 tbsp fresh rosemary, finely chopped (or 1 tsp dried)
  • 1 tsp fresh thyme leaves (or ½ tsp dried)
  • 1 tbsp tomato paste
  • 1 tsp Dijon mustard
  • 2 cups (480ml) vegetable broth
  • 1½ cups (360ml) unsweetened plant milk
  • 8 oz (225g) short pasta, such as penne, rotini, or small shells
  • 1 can (15 oz / 400g) cannellini beans, drained and rinsed
  • 2 tbsp nutritional yeast
  • ¾ tsp salt, plus more to taste
  • ½ tsp black pepper
  • 1–2 tbsp lemon juice
  • 2 tbsp chopped fresh parsley

Optional

  • A splash of white wine
  • Red pepper flakes
  • Vegan parmesan
  • A handful of baby spinach

Instructions

  1. Brown the mushrooms. Heat the oil in a large, deep pot or Dutch oven over medium-high heat. Add the mushrooms in a single layer and cook for 6–8 minutes without stirring too much, until deeply browned. Season with a pinch of salt.
  2. Add the aromatics. Add the onion and cook for 3 minutes. Stir in the garlic, rosemary, thyme, tomato paste, and mustard. Cook for 1 minute. If using wine, add it now and let it cook off for 1 minute.
  3. Add the liquids and pasta. Pour in the broth and plant milk. Add the pasta, salt, and pepper. Bring to a boil.
  4. Simmer. Reduce the heat to medium-low, cover, and cook for 10–12 minutes, stirring every few minutes so the pasta does not stick, until the pasta is just tender.
  5. Add the beans. Stir in the beans and nutritional yeast. Cook uncovered for 2–3 minutes, mashing a few beans against the side of the pot, until the sauce is thick and creamy.
  6. Finish. Stir in the lemon juice and parsley. Taste and adjust the salt and lemon. If the pasta is too thick, add a splash of broth.
  7. Serve. Serve hot with black pepper, vegan parmesan, and red pepper flakes if you like.

Pro Tips for the Best One-Pot Pasta

  • Brown the mushrooms well. It is where most of the flavor comes from.
  • Use a wide, deep pot so the pasta cooks evenly.
  • Stir often so the pasta does not stick to the bottom.
  • Mash a few beans to make the sauce creamier.
  • Do not use quick-cook or fresh pasta, which can turn mushy.
  • Add liquid a little at a time if the sauce gets too thick.
  • Add the lemon at the end for brightness.
  • Let it rest for 2 minutes before serving so the sauce thickens.

A Few Notes on Ingredients

Cremini mushrooms have the most flavor, but white or mixed mushrooms work. Short pasta shapes cook best in one pot. Cannellini beans are creamy, and great northern beans also work. Unsweetened plant milk makes the sauce creamy, and oat or soy milk works best. Rosemary and thyme give an earthy flavor, and dried herbs work if needed.


Flavor Variations

  • Spinach Version: Stir in baby spinach at the end.
  • Spicy Version: Add red pepper flakes.
  • Lemony Version: Add lemon zest.
  • Extra-Creamy Version: Stir in a spoonful of vegan cream cheese.
  • Protein Version: Add crumbled tempeh or baked tofu.
  • Gluten-Free Version: Use gluten-free pasta and add extra broth.

Nutritional Highlights (Per Serving)

CaloriesProteinCarbsFiberFat
~420 kcal17g66g9g9g

Storage

  • Refrigerator: Store for up to 4 days. The pasta will absorb the sauce.
  • Freezer: Not recommended, since the pasta can turn soft.
  • Reheating: Warm on the stove with a splash of broth or plant milk.
  • Make ahead: Best served fresh, though leftovers reheat well.

Frequently Asked Questions

Can I use any pasta?

Short pasta shapes such as penne, rotini, or shells work best. Avoid fresh or quick-cook pasta.

Is it creamy without a blender?

Yes. The pasta starch and the mashed beans thicken the sauce naturally.

Can I make it gluten-free?

Yes. Use gluten-free pasta and add extra broth, since it absorbs differently.

Can I use a different bean?

Yes. Great northern beans or chickpeas work.

Why is my pasta sticking?

Stir more often and use a wide, deep pot.

How is this different from your other mushroom pasta recipes?

This is a true one-pot pasta with no blender, and it cooks the pasta in the sauce. Our Creamy Vegan Mushroom Pasta uses a blended white bean sauce with spinach, and our One-Pot White Bean Kale Sun-Dried Tomato Tortiglioni is built on kale and sun-dried tomatoes.


Tried this recipe? Leave a comment below and let us know how it turned out! Tag us on Instagram and Facebook — we love seeing your plant-powered creations. Browse all recipes on Easy Vegan Recipes — new recipes posted every single week!