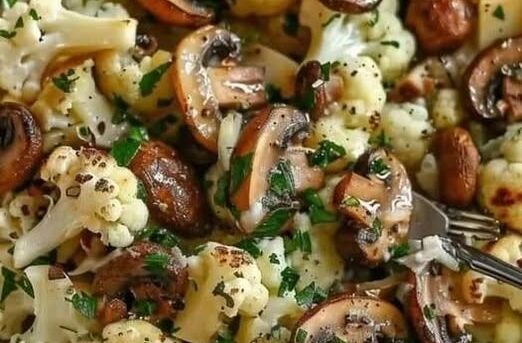
25-minute vegan dinner

Vegan Garlic Mushroom Cauliflower Skillet with Golden Seared Florets, Savory Mushrooms and a Lemon Herb Garlic Glaze — The Most Easy One-Pan Plant-Based Dinner You Will Make All Week

garlic mushrooms cauliflower skillet

Golden-seared cauliflower and browned, meaty mushrooms tossed in a sticky garlic glaze, all made in one skillet in about 25 minutes. This Vegan Garlic Mushroom Cauliflower Skillet is a simple, flavor-packed weeknight dinner that is naturally gluten-free and needs only a handful of everyday ingredients.

The two vegetables complement each other beautifully. Cauliflower turns sweet, nutty, and caramelized when seared in a hot pan, and mushrooms bring deep, savory umami. Cooked side by side with plenty of garlic, thyme, and a splash of soy sauce, they take on a rich, almost meaty flavor without any meat substitute.

The secret is cooking in stages. Cauliflower goes in first so it browns and softens, then mushrooms are added to the empty space in the pan so they sear instead of steam. Garlic goes in last so it stays fragrant instead of burning, and a quick pan glaze of vegan butter, soy sauce, lemon juice, and herbs brings it all together.

Serve it over rice, quinoa, or creamy mashed potatoes, spoon it into warm tortillas, or pile it onto toast. It also makes a great side dish for holiday meals, and it reheats well for lunches.

This recipe is 100% vegan, dairy-free, and nut-free. It is gluten-free if you use tamari.


Recipe Information

Prep TimeCook TimeTotal TimeServingsCalories
10 mins18 mins28 mins4~190 kcal each

Ingredients

For the Skillet

  • 1 large head cauliflower (about 2 lb / 900g), cut into small florets
  • 12 oz (340g) cremini or button mushrooms, quartered
  • 3 tbsp olive oil, divided
  • 6 garlic cloves, minced
  • 1 tsp fresh thyme leaves (or ½ tsp dried)
  • ½ tsp smoked paprika
  • ½ tsp salt, plus more to taste
  • ¼ tsp black pepper

For the Garlic Glaze

  • 2 tbsp vegan butter
  • 1 tbsp soy sauce or tamari
  • 1 tbsp lemon juice
  • 2 tbsp water or vegetable broth

To Finish

  • 2 tbsp chopped fresh parsley
  • Lemon wedges
  • Flaky salt
  • Chili flakes

To Serve

  • Cooked rice or quinoa
  • Mashed potatoes
  • Warm tortillas
  • Toasted bread

Optional Additions

  • Baby spinach
  • Chickpeas
  • Sun-dried tomatoes
  • Vegan parmesan

Instructions

  1. Sear the cauliflower. Heat 2 tablespoons olive oil in a large, wide skillet (12-inch is ideal) over medium-high heat. Add the cauliflower in a single layer with the salt. Cook for 7–8 minutes, turning only once or twice, until deeply golden and starting to soften.
  2. Push to the side. Move the cauliflower to one side of the pan.
  3. Brown the mushrooms. Add the remaining tablespoon of oil to the empty side and add the mushrooms in a single layer. Cook for 5–6 minutes without stirring too often, until browned and their liquid has evaporated.
  4. Add the aromatics. Stir everything together. Add the garlic, thyme, smoked paprika, and pepper and cook for 1 minute until fragrant.
  5. Glaze. Add the vegan butter, soy sauce, lemon juice, and water. Stir for 1–2 minutes until the sauce becomes glossy and coats the vegetables. Cover for 2 minutes if you want the cauliflower softer.
  6. Finish. Taste and adjust the salt and lemon. Top with parsley, chili flakes, and flaky salt.
  7. Serve. Serve hot over rice, quinoa, or mashed potatoes.

Pro Tips for the Best Skillet

  • Use a large pan. Crowding steams the vegetables instead of browning them.
  • Cut small florets. They brown and cook faster.
  • Do not move the cauliflower too much. Leave it still so it caramelizes.
  • Salt mushrooms after browning. It keeps them from releasing too much water early.
  • Add garlic late. It burns quickly and turns bitter.
  • Deglaze with a little water. It lifts the browned bits and makes the sauce.
  • Add lemon at the end. It keeps the glaze bright.
  • Serve right away. The vegetables are at their best hot from the pan.

A Few Notes on Ingredients

Cauliflower provides fiber and vitamin C, and mushrooms add savory umami along with B vitamins. Garlic and thyme add flavor without much sodium. Lemon brightens the dish.

This is a light, vegetable-forward meal. For more protein, add chickpeas or serve it over quinoa.


Flavor Variations

  • Spicy Garlic Skillet: Add chili flakes and a spoonful of sriracha to the glaze.
  • Herb and Lemon Skillet: Add dill and extra lemon zest.
  • Protein-Packed Skillet: Stir in chickpeas or white beans.
  • Creamy Version: Add a splash of coconut cream to the glaze.

Nutritional Highlights (Per Serving)

CaloriesProteinCarbsFiberFat
~190 kcal7g15g5g12g

Storage

  • Refrigerator: Store in an airtight container for up to 4 days.
  • Freezer: Not ideal, since mushrooms and cauliflower soften when thawed.
  • Reheat: Use a hot skillet for 3–4 minutes to bring back the browning.
  • Make ahead: Cut the vegetables up to 2 days ahead.

Frequently Asked Questions

Can I use frozen cauliflower?

Yes, but it browns less and releases water. Cook it in a very hot pan without thawing, and expect a softer texture.

Why are my mushrooms soggy?

The pan was too crowded or not hot enough. Cook them in a single layer and let the liquid evaporate before stirring.

Can I make it gluten-free?

Yes. Use tamari instead of soy sauce.

Can I use other mushrooms?

Yes. Portobello, shiitake, or oyster mushrooms all work.

Can I roast the vegetables instead?

Yes. Roast both on a sheet pan at 425°F for 20–25 minutes, then toss with the garlic glaze.

How is this different from your other mushroom and cauliflower recipes?

This is a one-pan skillet of seared cauliflower and mushrooms in a garlic soy-lemon glaze. Our Vegan Garlic Butter Mushrooms is a mushroom-only side dish, our Vegan Mushroom Skillet in Creamy Asiago-Style Sauce is a cream-based mushroom dish, and our Easy Vegan Roasted Cauliflower is a plain oven-roasted cauliflower.


Tried this recipe? Leave a comment below and let us know how it turned out! Tag us on Instagram and Facebook — we love seeing your plant-powered creations. Browse all recipes on Easy Vegan Recipes — new recipes posted every single week!
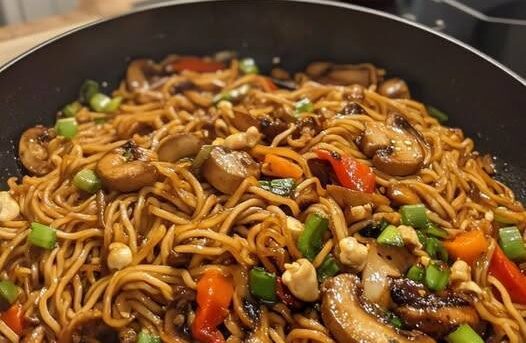
Easy Vegan Lo Mein with Chewy Noodles, Crisp Cabbage, Shiitake Mushrooms and a Savory Garlic Soy Sauce — The Most Craveable Plant-Based Noodle Dinner You Will Make All Week

vegan lo mein

Chewy noodles tossed with crisp cabbage, tender shiitake mushrooms, sweet carrots, and green onions in a glossy, savory garlic soy sauce: this Easy Vegan Lo Mein tastes like your favorite Chinese takeout and is ready in about 25 minutes in one pan.

Lo mein means “stirred noodles” in Cantonese, and the dish is all about the sauce and the noodles. The noodles are boiled until tender, then tossed in a hot wok or skillet with stir-fried vegetables and a quick sauce, so each strand is coated and glossy. It is quicker than fried noodles and uses less oil, but it has just as much flavor.

The sauce is made with simple pantry ingredients. Soy sauce brings the salt and umami, a little dark soy sauce or molasses adds color and depth, and hoisin or maple syrup adds sweetness. Toasted sesame oil gives it the signature aroma, and garlic and ginger add warmth. Shiitake mushrooms add a meaty, savory depth that stands in for the typical oyster sauce flavor, and a spoonful of cornstarch helps the sauce cling.

Many store-bought lo mein noodles contain egg, so use eggless noodles, or plain spaghetti, linguine, or ramen noodles that do not contain egg. Serve it right away with chili crisp or sriracha. It makes excellent leftovers and is a great way to use up whatever vegetables you have.

This recipe is dairy-free. It contains gluten (noodles, soy sauce) and soy, and sesame. Please check that your noodles are egg-free, and check labels on your hoisin and soy sauce. Use tamari and gluten-free noodles for a gluten-free version.


Recipe Information

Prep TimeCook TimeTotal TimeServingsCalories
10 mins15 mins25 mins4~430 kcal each

Ingredients

For the Lo Mein

  • 8 oz (225g) dried egg-free lo mein noodles, spaghetti, or linguine
  • 3 tbsp neutral oil, divided
  • 8 oz (225g) shiitake or cremini mushrooms, sliced
  • 3 cups (about 250g) shredded green cabbage
  • 2 carrots, julienned or grated
  • 1 red bell pepper, thinly sliced
  • 4 garlic cloves, minced
  • 1 tbsp fresh ginger, grated
  • 4 green onions, sliced, white and green parts separated
  • 1 cup (90g) bean sprouts, optional

For the Sauce

  • ¼ cup (60ml) soy sauce or tamari
  • 1 tbsp dark soy sauce or ½ tbsp molasses
  • 1 tbsp hoisin sauce or maple syrup
  • 1 tbsp toasted sesame oil
  • 1 tbsp rice vinegar
  • 1 tsp sugar
  • ¼ tsp white pepper or black pepper
  • 2 tbsp water
  • 1 tsp cornstarch

To Serve

  • Sesame seeds
  • Chili crisp or sriracha
  • Lime wedges

Instructions

  1. Make the sauce. Whisk all the sauce ingredients in a small bowl until the cornstarch dissolves.
  2. Cook the noodles. Boil the noodles in salted water until just al dente, about 1 minute less than the package says. Drain, rinse briefly with cold water, and toss with 1 teaspoon of oil to keep them from sticking.
  3. Sear the mushrooms. Heat 2 tablespoons of oil in a large wok or skillet over high heat. Add the mushrooms and cook for 4–5 minutes until golden. Remove to a plate.
  4. Cook the vegetables. Add the remaining oil. Stir-fry the carrots, cabbage, and bell pepper for 3–4 minutes until crisp-tender. Add the garlic, ginger, and white parts of the green onions. Cook for 30 seconds.
  5. Add the noodles. Add the noodles, mushrooms, and sauce. Toss with tongs for 2–3 minutes until the noodles are coated and the sauce thickens and turns glossy.
  6. Finish. Add the bean sprouts and green onion tops. Toss for 30 seconds.
  7. Serve. Serve hot with sesame seeds and chili crisp.

Pro Tips for the Best Vegan Lo Mein

  • Use eggless noodles. Many fresh lo mein noodles contain egg.
  • Cook the noodles just to al dente, since they finish cooking in the pan.
  • Use high heat and do not crowd the pan so the vegetables stir-fry and do not steam.
  • Stir the sauce again just before pouring, since the cornstarch settles.
  • Prepare everything before you start, since the cooking is fast.
  • Toss the noodles with tongs for even coating.
  • Add the bean sprouts at the end for crunch.
  • Add a splash of water if the noodles look dry.

A Few Notes on Ingredients

Lo mein noodles are thick, soft wheat noodles. Fresh ones are often made with egg, so check the label. Dried vegan lo mein, spaghetti, linguine, or ramen noodles without egg all work. Dark soy sauce adds color and a mild sweetness. If you do not have it, use molasses. Hoisin adds sweetness, and some hoisin contains wheat. Toasted sesame oil is a key flavor, so add it at the end of cooking.


Flavor Variations

  • Tofu Version: Add crispy or baked tofu.
  • Spicy Version: Add chili crisp or sriracha.
  • Veggie Version: Add snow peas, broccoli, or bok choy.
  • Peanut Version: Add a spoonful of peanut butter to the sauce.
  • Gluten-Free Version: Use tamari and gluten-free noodles.
  • Edamame Version: Add edamame for extra protein.

Nutritional Highlights (Per Serving)

CaloriesProteinCarbsFiberFat
~430 kcal12g65g6g14g

Storage

  • Refrigerator: Store for up to 4 days.
  • Freezer: Not recommended.
  • Reheating: Warm in a skillet with a splash of water.
  • Make ahead: Make the sauce up to 5 days ahead.

Frequently Asked Questions

What is the difference between lo mein and chow mein?

Lo mein noodles are boiled and tossed with sauce, so they are soft. Chow mein noodles are stir-fried until crisp.

Are lo mein noodles vegan?

Many contain egg. Look for egg-free noodles, or use spaghetti or linguine.

Can I make it gluten-free?

Yes. Use tamari and gluten-free noodles.

Can I add protein?

Yes. Add tofu, tempeh, or edamame.

Why are my noodles sticky?

They may have been overcooked. Rinse them after boiling and toss them with a little oil.

How is this different from your other noodle recipes?

This is a classic Chinese takeout-style lo mein with cabbage, shiitake, and a garlic soy sauce. Our Vegan Udon Noodles use thick udon with broccoli and bell peppers, and our Pad Thai uses rice noodles with tamarind peanut sauce.


Tried this recipe? Leave a comment below and let us know how it turned out! Tag us on Instagram and Facebook — we love seeing your plant-powered creations. Browse all recipes on Easy Vegan Recipes — new recipes posted every single week!

Chinese-Style Vegan Sesame Mushroom Stir-Fry with Shiitake, Snow Peas and a Glossy Garlic Sesame Sauce — The Most Flavorful Plant-Based Stir-Fry You Will Make All Week

CHINESE SESAME MUSHROOM STIR-FRY

Meaty, golden mushrooms and crisp snow peas coated in a glossy garlic and ginger sesame sauce, finished with toasted sesame seeds and fresh scallions: this Chinese-Style Vegan Sesame Mushroom Stir-Fry tastes like your favorite takeout and is ready in about 25 minutes.

Mushrooms are perfect for stir-frying. When they are cooked over high heat in a single layer, they lose their moisture, brown deeply, and turn chewy and savory, almost like meat. A mix of shiitake, cremini, and king oyster mushrooms gives you a range of textures, from silky to firm.

The sauce is a classic Chinese-style brown sauce with a sesame twist. Soy sauce and a little hoisin give it a deep, savory sweetness, rice vinegar adds tang, and fresh ginger and garlic bring the aroma. A spoonful of tahini and a drizzle of toasted sesame oil make it nutty and rich, and cornstarch turns it into a glossy glaze that clings to every piece. A pinch of chili flakes adds a little heat if you like.

Serve it over steamed jasmine rice or tossed with noodles. It is simple enough for a weeknight and flavorful enough for guests.

This recipe is dairy-free, egg-free, and nut-free. It contains soy and sesame (tahini and sesame oil and seeds). Hoisin sauce sometimes contains wheat, so check labels. It is gluten-free if you use tamari and a gluten-free hoisin.


Recipe Information

Prep TimeCook TimeTotal TimeServingsCalories
10 mins15 mins25 mins4~250 kcal each (without rice)

Ingredients

For the Stir-Fry

  • 3 tbsp neutral oil, divided
  • 1 lb (450g) mixed mushrooms (shiitake, cremini, and king oyster), sliced or torn
  • 2 cups (150g) snow peas, trimmed
  • 1 large carrot, thinly sliced on the diagonal
  • 4 garlic cloves, minced
  • 1 tbsp fresh ginger, grated
  • 4 green onions, white and green parts separated, sliced
  • 1 tbsp toasted sesame seeds

For the Garlic Sesame Sauce

  • 3 tbsp soy sauce or tamari
  • 1 tbsp hoisin sauce
  • 1 tbsp tahini
  • 1 tbsp rice vinegar
  • 1 tbsp maple syrup
  • 1 tsp toasted sesame oil
  • ¼ tsp red pepper flakes, optional
  • ⅓ cup (80ml) vegetable broth or water
  • 2 tsp cornstarch

To Serve

  • Steamed jasmine rice or noodles
  • Extra sesame seeds
  • Chili crisp, optional

Instructions

  1. Make the sauce. Whisk the soy sauce, hoisin, tahini, vinegar, maple syrup, sesame oil, red pepper flakes, broth, and cornstarch in a small bowl until smooth.
  2. Sear the mushrooms. Heat 2 tablespoons of oil in a large skillet or wok over high heat. Add the mushrooms in a single layer, in two batches if needed. Cook for 5–6 minutes without stirring too much, until deeply golden. Remove to a plate.
  3. Cook the vegetables. Add the remaining oil. Stir-fry the carrot for 2 minutes. Add the snow peas and cook for 1–2 minutes until bright green and crisp-tender.
  4. Add the aromatics. Add the garlic, ginger, and the white parts of the green onions. Cook for 30 seconds.
  5. Add the sauce. Return the mushrooms to the pan. Whisk the sauce again and pour it in. Cook for 1–2 minutes, tossing, until the sauce thickens and turns glossy.
  6. Serve. Top with the green onion tops and sesame seeds. Serve over rice or noodles with chili crisp.

Pro Tips for the Best Mushroom Stir-Fry

  • Use high heat and do not crowd the pan so the mushrooms brown.
  • Do not salt the mushrooms until the end. Salt draws out water.
  • Cook the mushrooms in batches if your pan is small.
  • Whisk the sauce again right before pouring it in, since the cornstarch settles.
  • Add the garlic and ginger late so they do not burn.
  • Keep the snow peas crisp. Do not overcook them.
  • Use toasted sesame oil at the end for the best aroma.
  • Have everything prepped before you start, since the cooking is fast.

A Few Notes on Ingredients

Shiitake mushrooms add deep, earthy flavor. King oyster mushrooms have a firm, meaty stem that can be sliced into rounds or torn. Cremini mushrooms are an easy base. Tahini gives the sauce a creamy, nutty body, and smooth peanut butter or sunflower butter can replace it. Hoisin adds sweetness, and extra maple syrup can replace it.


Flavor Variations

  • Spicy Version: Add chili crisp or sambal.
  • Protein Version: Add crispy tofu or edamame.
  • Noodle Version: Toss with cooked lo mein noodles.
  • Veggie Version: Add bok choy, bell pepper, or baby corn.
  • Sweeter Version: Add a little more maple syrup.
  • Gluten-Free Version: Use tamari and gluten-free hoisin.

Nutritional Highlights (Per Serving, without rice)

CaloriesProteinCarbsFiberFat
~250 kcal7g22g4g15g

Storage

  • Refrigerator: Store for up to 4 days.
  • Freezer: Not recommended.
  • Reheating: Warm in a hot skillet to bring back some texture.
  • Make ahead: Make the sauce up to 5 days ahead.

Frequently Asked Questions

Which mushrooms are best?

A mix of shiitake, cremini, and king oyster gives the best texture, but any mushrooms work.

Why are my mushrooms soggy?

The pan may be too crowded or not hot enough. Cook in batches over high heat.

Can I make it gluten-free?

Yes. Use tamari and gluten-free hoisin.

Can I leave out the tahini?

Yes. Use a little extra sesame oil, though the sauce will be less creamy.

What can I serve it with?

Jasmine rice, noodles, or cauliflower rice.

How is this different from your other mushroom stir-fries?

This is a Chinese-style stir-fry with a garlic sesame sauce made with tahini and hoisin. Our Vegan Broccoli and Mushroom Stir Fry is built on broccoli and a simple soy sauce, and our Vegan Glazed Mushrooms with Sesame Seeds is a side dish with a garlic soy glaze.


Tried this recipe? Leave a comment below and let us know how it turned out! Tag us on Instagram and Facebook — we love seeing your plant-powered creations. Browse all recipes on Easy Vegan Recipes — new recipes posted every single week!

Vegan Ginger Black Bean Bowl with Sticky Soy Ginger Beans, Jasmine Rice, Avocado and Quick-Pickled Cabbage — The Most Satisfying Plant-Based Bowl You Will Make All Week

Ginger Black Bean Bowl

Savory, sticky black beans simmered in fresh ginger, garlic, and soy sauce, piled over fluffy jasmine rice with creamy avocado, crunchy quick-pickled cabbage, and fresh cilantro: this Vegan Ginger Black Bean Bowl is budget-friendly, high in plant protein, and ready in about 25 minutes.

Black beans are a pantry hero, and fresh ginger gives them a bright, warm, zingy flavor that is nothing like the usual taco-style beans. Canned beans are simmered for a few minutes with ginger, garlic, soy sauce, rice vinegar, a little maple syrup, and a pinch of chili flakes, until the sauce reduces into a glossy glaze that coats every bean. A few of the beans break down as they cook, making the sauce thick and rich.

The bowl is built around contrasts. Warm, saucy beans meet cool, creamy avocado. Tangy quick-pickled red cabbage adds crunch and brightness, and the pickling takes just 10 minutes while the beans cook. Cucumber, green onions, cilantro, and toasted sesame seeds finish it with freshness and texture.

Serve it over jasmine rice, brown rice, or quinoa. It also works as a wrap filling or a rice-paper roll, and the beans keep well for meal prep.

This recipe is dairy-free, egg-free, and nut-free. It contains soy (soy sauce) and sesame. It is gluten-free if you use tamari. Please check labels on your soy sauce, rice vinegar, and chili flakes.


Recipe Information

Prep TimeCook TimeTotal TimeServingsCalories
10 mins15 mins25 mins4~480 kcal each

Ingredients

For the Ginger Black Beans

  • 1 tbsp neutral oil
  • 4 garlic cloves, minced
  • 2 tbsp fresh ginger, finely grated
  • 2 cans (15 oz / 400g each) black beans, drained and rinsed
  • ½ cup (120ml) vegetable broth or water
  • 3 tbsp soy sauce or tamari
  • 1 tbsp rice vinegar
  • 1 tbsp maple syrup
  • 1 tsp toasted sesame oil
  • ¼ tsp red pepper flakes, optional
  • 1 tsp cornstarch mixed with 1 tbsp water
  • 1 tbsp lime juice

For the Quick-Pickled Cabbage

  • 2 cups (180g) red cabbage, thinly shredded
  • ¼ cup (60ml) rice vinegar
  • 1 tsp sugar
  • ¼ tsp salt

For the Bowls

  • 3 cups cooked jasmine rice (from about 1½ cups uncooked)
  • 2 ripe avocados, sliced
  • 1 cucumber, sliced
  • 3 green onions, sliced
  • Fresh cilantro
  • 1 tbsp toasted sesame seeds
  • Lime wedges

Instructions

  1. Pickle the cabbage. In a bowl, toss the cabbage with the vinegar, sugar, and salt. Massage lightly. Set aside for at least 10 minutes.
  2. Cook the rice. Cook the rice according to the package directions.
  3. Start the beans. Heat the oil in a saucepan over medium heat. Add the garlic and ginger and cook for 1 minute until fragrant.
  4. Simmer. Add the beans, broth, soy sauce, vinegar, maple syrup, sesame oil, and red pepper flakes. Bring to a simmer and cook for 6–8 minutes, mashing a few beans with the back of a spoon.
  5. Thicken. Stir in the cornstarch mixture and cook for 1–2 minutes until glossy and thick. Stir in the lime juice.
  6. Build the bowls. Divide the rice among four bowls. Top with the beans, avocado, cucumber, and drained pickled cabbage.
  7. Finish. Sprinkle with green onions, cilantro, and sesame seeds. Serve with lime wedges.

Pro Tips for the Best Ginger Black Bean Bowl

  • Use fresh ginger. Ground ginger does not give the same flavor.
  • Grate the ginger finely so it melts into the sauce.
  • Mash a few beans to thicken the sauce.
  • Do not skip the pickled cabbage. It adds crunch and brightness.
  • Rinse the canned beans well so the sauce is not too salty.
  • Add the lime juice at the end for freshness.
  • Slice the avocado just before serving.
  • Taste the beans and adjust the soy sauce or maple syrup.

A Few Notes on Ingredients

Canned black beans make this quick. If using dried beans, cook them first. Fresh ginger is the star, so use plenty. Tamari makes the bowl gluten-free. Toasted sesame oil adds a nutty aroma, and a little goes a long way. Brown rice, quinoa, or cauliflower rice are good swaps for the jasmine rice.


Flavor Variations

  • Spicy Version: Add sriracha or chili crisp.
  • Protein Version: Add baked tofu or edamame.
  • Sweet Potato Version: Add roasted sweet potato cubes.
  • Wrap Version: Fill tortillas with the beans and slaw.
  • Noodle Version: Serve over soba or rice noodles.
  • Mango Version: Add diced mango.

Nutritional Highlights (Per Serving)

CaloriesProteinCarbsFiberFat
~480 kcal15g74g16g14g

Storage

  • Refrigerator: Store the beans, rice, and cabbage separately for up to 4 days.
  • Freezer: Freeze the beans for up to 3 months.
  • Reheating: Warm the beans with a splash of water.
  • Make ahead: Prepare all parts ahead and assemble the bowls fresh.

Frequently Asked Questions

Can I use dried black beans?

Yes. Cook them until tender first, then follow the recipe from step 3.

Can I make it gluten-free?

Yes. Use tamari.

Can I meal prep it?

Yes. Store the parts separately and slice the avocado fresh.

Is it spicy?

Mild. Add more red pepper flakes or sriracha for heat.

What can I use instead of rice?

Quinoa, brown rice, cauliflower rice, or noodles.

How is this different from your other bowls?

This bowl is built on ginger-soy black beans with quick-pickled cabbage. Our Sweet Asian Quinoa Bowl uses sticky glazed tofu and quinoa, and our Cilantro Lime Nourish Bowl has a fresh cilantro lime flavor.


Tried this recipe? Leave a comment below and let us know how it turned out! Tag us on Instagram and Facebook — we love seeing your plant-powered creations. Browse all recipes on Easy Vegan Recipes — new recipes posted every single week!

Vegan Whole Wheat Noodles in Creamy Coconut Milk Peanut Sauce with Crunchy Vegetables — The Most Craveable Plant-Based Noodles You Will Make All Week

Creamy Peanut Noodles with Mixed Vegetables

Chewy whole wheat noodles tossed in a silky coconut milk and peanut sauce, with crisp vegetables and a squeeze of lime, make these Vegan Whole Wheat Noodles in Coconut Milk Peanut Sauce an irresistible 25-minute dinner. The sauce is creamy, nutty, lightly sweet, and gently spicy, and it clings to every strand.

Peanut butter and coconut milk form the base of the sauce, and soy sauce, lime juice, ginger, garlic, and a little chili paste bring salty, tangy, and warm flavors into balance. A touch of maple syrup rounds it all out. Whole wheat noodles add a nutty flavor and extra fiber, which pairs beautifully with the peanut and coconut.

Because the sauce is made in one pan with pantry staples, this recipe is ideal for busy weeknights, packed lunches, and meal prep. The vegetables stay crunchy for freshness and color. Shredded carrot, red cabbage, cucumber, and bell pepper work well, but use whatever you have on hand.

It is also easy to customize: add crispy tofu, edamame, or tempeh for extra protein, or turn up the heat with chili oil. Serve it warm or chilled.

This recipe is 100% vegan, dairy-free, and easy to adapt to gluten-free and nut-free.


Recipe Information

Prep TimeCook TimeTotal TimeServingsCalories
10 mins15 mins25 mins4~520 kcal

Ingredients

For the Noodles and Vegetables

  • 250g whole wheat spaghetti or whole wheat noodles
  • 1 cup (80g) shredded red cabbage
  • 1 large carrot, julienned or grated
  • 1 red bell pepper, thinly sliced
  • ½ cucumber, sliced into thin half-moons
  • 3 green onions, sliced
  • ¼ cup (15g) chopped fresh cilantro
  • 2 tbsp roasted peanuts, chopped
  • 1 tsp toasted sesame seeds

For the Coconut Peanut Sauce

  • ½ cup (130g) creamy peanut butter
  • ¾ cup (180ml) full-fat coconut milk
  • 3 tbsp soy sauce or tamari
  • 2 tbsp lime juice
  • 1 tbsp maple syrup
  • 1 tbsp rice vinegar
  • 1 tbsp fresh ginger, grated
  • 2 cloves garlic, minced
  • 1–2 tsp chili garlic sauce or sriracha
  • 1 tsp toasted sesame oil
  • 2–4 tbsp hot water (to thin)

To Serve

  • Lime wedges
  • Extra chopped peanuts
  • Chili flakes
  • Fresh cilantro

Optional Additions

  • Crispy tofu cubes
  • Shelled edamame
  • Roasted broccoli
  • Mango slices for sweetness

Instructions

  1. Cook the noodles. Boil the whole wheat noodles in salted water according to the package directions until al dente. Reserve ½ cup of the pasta water, then drain and rinse briefly under cool water to stop the cooking.
  2. Make the sauce. Whisk together the peanut butter, coconut milk, soy sauce, lime juice, maple syrup, rice vinegar, ginger, garlic, chili sauce, and sesame oil in a saucepan or bowl until smooth. For a warm sauce, heat gently over low heat for 3–4 minutes, stirring until silky.
  3. Adjust the consistency. Thin the sauce with hot water or reserved pasta water, a tablespoon at a time, until it is pourable but still creamy. Taste and adjust the salt, lime, and heat.
  4. Toss. Add the noodles to the sauce and toss until every strand is coated, adding a little more water if the sauce thickens.
  5. Add the vegetables. Fold in half of the cabbage, carrot, bell pepper, cucumber, and green onions.
  6. Serve. Divide into bowls and top with the remaining vegetables, cilantro, chopped peanuts, and sesame seeds. Serve with lime wedges.

Pro Tips for the Best Peanut Noodles

  • Use creamy, natural peanut butter. It blends into the smoothest sauce.
  • Thin the sauce gradually. Peanut sauce thickens as it cools, so keep extra water on hand.
  • Rinse the noodles briefly. This stops the cooking and prevents sticking.
  • Toss while the sauce is warm. The noodles absorb more flavor.
  • Taste before serving. Adjust the lime, soy sauce, and chili to your liking.
  • Save the pasta water. Its starch helps the sauce cling.
  • Add crunchy vegetables last. This keeps their texture and bright color.

Why This Noodle Dish Is Satisfying

Whole wheat noodles provide more fiber and B vitamins than refined pasta, and they keep you full longer. Peanut butter adds plant protein and healthy fats, and coconut milk contributes creaminess along with medium-chain fats.

The mix of raw vegetables adds vitamin C, vitamin A, and extra fiber. A serving provides about 16 grams of plant protein and 10 grams of fiber, which makes this a balanced meal on its own.


Flavor Variations

  • Spicy Thai Style: Add red curry paste and extra chili to the sauce.
  • Tofu Peanut Noodles: Top with crispy baked tofu for extra protein.
  • Cold Peanut Noodle Salad: Chill the noodles and sauce and serve cold with crunchy vegetables.
  • Nut-Free Version: Use sunflower seed butter instead of peanut butter.

Nutritional Highlights (Per Serving)

CaloriesProteinCarbsFiberFat
~520 kcal16g58g10g26g

Storage

  • Refrigerator: Store in an airtight container for up to 4 days. The noodles will absorb sauce, so add a splash of water when reheating.
  • Reheating: Warm gently in a skillet with a little water, or microwave in 30-second bursts.
  • Cold serving: Enjoy straight from the fridge as a noodle salad.
  • Sauce: Store separately for up to 1 week and thin with warm water before using.

Frequently Asked Questions

Can I make it nut-free?

Yes. Replace the peanut butter with sunflower seed butter or tahini.

Can I make it gluten-free?

Use gluten-free noodles, such as brown rice noodles, and tamari instead of soy sauce.

Why is my sauce too thick?

Peanut sauce thickens quickly. Whisk in hot water or reserved pasta water a tablespoon at a time.

Can I use light coconut milk?

Yes, but the sauce will be less creamy. Add an extra spoonful of peanut butter.

Can I serve it cold?

Yes. Chill the noodles and toss with the sauce just before serving, adding a little water to loosen.

Can I make it ahead?

Yes. Store the sauce and noodles separately and toss them together before serving.


Tried this recipe? Leave a comment below and let us know how it turned out! Tag us on Instagram and Facebook — we love seeing your plant-powered creations. Looking for more quick vegan noodle dishes? Browse all recipes on Easy Vegan Recipes — new recipes posted every single week!

Vegan Crunchy Chickpea and Basil Tomato Pasta with Garlicky Pan-Crisped Chickpeas and a Quick Fresh Tomato Sauce — The Easy 25-Minute Plant-Based Pasta That Uses Just One Pan for the Sauce

CRUNCHY CHICKPEA AND BASIL TOMATO PASTA

Spaghetti tossed in a bright, simple tomato sauce with a big handful of torn fresh basil and a generous topping of crunchy, garlicky pan-crisped chickpeas: this Vegan Crunchy Chickpea and Basil Tomato Pasta is a fast, satisfying weeknight dinner that takes just 25 minutes and needs no oven.

The chickpeas are the secret. Drained, dried well, and fried in olive oil until golden and crackling, they turn into crunchy little bites that taste like a cross between croutons and roasted nuts. Tossed with garlic, chili flakes, and a pinch of salt at the end, they add protein, texture, and a savory crunch that contrasts perfectly with the soft pasta and juicy sauce.

The sauce is as easy as it gets. Garlic and a pinch of chili are warmed in olive oil, then crushed tomatoes go in with a bit of tomato paste and simmer for 10 minutes until thick and sweet. A spoonful of nutritional yeast or a splash of pasta water makes it silky, and a big handful of basil stirred in at the end keeps it fresh and fragrant.

Serve it right away, topped with the crunchy chickpeas, extra basil, and a drizzle of olive oil. It is a great pantry meal, since everything comes from cans and the spice rack, with only the basil needing to be fresh.

This recipe is 100% vegan and dairy-free, and nut-free. It contains gluten (pasta). See the swaps below for a gluten-free version.


Recipe Information

Prep TimeCook TimeTotal TimeServingsCalories
5 mins20 mins25 mins4~510 kcal each

Ingredients

For the Crunchy Pan-Fried Chickpeas

  • 1 can (15 oz / 400g) chickpeas, drained, rinsed, and patted very dry
  • 3 tbsp olive oil
  • 2 garlic cloves, thinly sliced
  • ½ tsp smoked paprika
  • ¼ tsp chili flakes
  • ¼ tsp salt

For the Basil Tomato Sauce

  • 2 tbsp olive oil
  • 4 garlic cloves, thinly sliced
  • ¼ tsp chili flakes
  • 1 tbsp tomato paste
  • 1 can (28 oz / 800g) crushed tomatoes
  • 1 tsp sugar or maple syrup
  • ½ tsp salt, plus more to taste
  • Black pepper, to taste
  • 1 cup (25g) loosely packed fresh basil leaves, torn
  • 1 tbsp nutritional yeast (optional)

For the Pasta

  • 12 oz (340g) spaghetti, penne, or rigatoni
  • Salt, for the pasta water

To Serve

  • Extra fresh basil
  • Vegan parmesan
  • A drizzle of olive oil
  • Lemon zest

Optional Additions

  • Baby spinach
  • Capers or olives
  • A splash of balsamic vinegar
  • Toasted breadcrumbs

Instructions

  1. Boil the pasta. Cook the pasta in a large pot of well-salted water until al dente. Reserve 1 cup of the pasta water, then drain.
  2. Dry the chickpeas. Pat the chickpeas thoroughly dry with a clean towel, removing any loose skins.
  3. Crisp the chickpeas. Heat 3 tablespoons of olive oil in a large skillet over medium-high heat. Add the chickpeas (carefully, as they may spatter) and cook for 8–10 minutes, shaking the pan often, until golden and crunchy. Add the sliced garlic, paprika, chili flakes, and salt and cook for 30 seconds. Transfer to a plate.
  4. Start the sauce. Wipe out the pan and heat 2 tablespoons of olive oil over medium heat. Add the garlic and chili flakes and cook for 1 minute until fragrant but not browned. Stir in the tomato paste for 1 minute.
  5. Simmer. Add the crushed tomatoes, sugar, salt, and pepper. Simmer for 10–12 minutes, stirring occasionally, until thickened.
  6. Add basil. Stir in half the basil and the nutritional yeast, if using. Taste and adjust.
  7. Toss. Add the pasta to the sauce with ½ cup of pasta water and toss over low heat for 1–2 minutes until the sauce clings. Add more pasta water as needed.
  8. Serve. Divide among bowls. Top with the crunchy chickpeas, the remaining basil, vegan parmesan, lemon zest, and a drizzle of olive oil.

Pro Tips for the Best Crunchy Chickpea Pasta

  • Dry the chickpeas completely. Water makes the oil spatter and the chickpeas steam.
  • Shake the pan often. This browns them evenly.
  • Add the garlic at the end. It burns quickly in hot oil.
  • Add the chickpeas at the last moment. They stay crunchy when sprinkled on top.
  • Do not skip the pasta water. Its starch helps the sauce cling.
  • Use good canned tomatoes. San Marzano-style tomatoes give the sweetest sauce.
  • Add basil at the end. Heat dulls its flavor.
  • Season the sauce well. Tomato sauce needs salt and a pinch of sugar to balance the acidity.

A Few Notes on Ingredients

Chickpeas provide protein and fiber and turn crunchy in a hot pan. Crushed tomatoes give the sauce body, and tomato paste deepens the flavor. Basil is the signature herb for tomato pasta, so use fresh if you can. Nutritional yeast adds a savory, cheesy depth.

Dried basil is not a good replacement here. Use fresh parsley if you have no basil.


Flavor Variations

  • Oven-Crisped Chickpeas: Roast the chickpeas at 425°F (220°C) for 25 minutes instead of frying.
  • Creamy Version: Stir in plant cream or cashew cream at the end.
  • Gluten-Free: Use gluten-free pasta.
  • Greens Version: Wilt in spinach or kale.
  • Spicy Version: Add more chili flakes or Calabrian chili paste.

Nutritional Highlights (Per Serving)

CaloriesProteinCarbsFiberFat
~510 kcal17g78g9g15g

Storage

  • Refrigerator: Store the pasta and chickpeas separately for up to 4 days.
  • Chickpeas: Keep in an open container at room temperature to stay crunchy, and use within a day.
  • Reheating: Warm pasta with a splash of water, and re-crisp chickpeas in a hot pan.
  • Sauce: The sauce freezes well for up to 3 months.

Frequently Asked Questions

How do I make chickpeas crunchy on the stovetop?

Dry them very well and cook them in hot oil, shaking often, for 8–10 minutes until golden.

Can I bake the chickpeas instead?

Yes. Roast at 425°F (220°C) for 22–28 minutes, shaking halfway.

Can I use canned whole tomatoes?

Yes. Crush them by hand and add them with their juices.

Can I make the sauce ahead?

Yes. The sauce keeps for 5 days. Fry the chickpeas just before serving.

What pasta is best?

Spaghetti, penne, or rigatoni all work.

How is this different from your other tomato and chickpea pasta?

This is a quick stovetop sauce with fresh basil and pan-fried crunchy chickpeas on top. Our Vegan Roasted Tomato Spaghetti with Spinach and Chickpeas roasts the tomatoes and chickpeas in the oven, and our Creamy Vegan Roasted Tomato Pasta blends roasted tomatoes into a sauce.


Tried this recipe? Leave a comment below and let us know how it turned out! Tag us on Instagram and Facebook — we love seeing your plant-powered creations. Browse all recipes on Easy Vegan Recipes — new recipes posted every single week!