All Recipes

Vegan Caramel Eggnog Chia Pudding

vegan caramel eggnog chia pudding

There are breakfasts you make because something needs to happen before the day starts. And then there are breakfasts like this Vegan Caramel Eggnog Chia Pudding — the kind that sets overnight in the refrigerator into a thick, creamy, spiced pudding that tastes remarkably like classic eggnog, finished with a rich, buttery caramel swirl that makes every spoonful feel genuinely festive and indulgent. This is that breakfast. The one that makes a cold morning feel celebratory. The one that takes five minutes to prepare the night before and rewards you with something that tastes like dessert for breakfast.

This recipe uses chia seeds soaked in a spiced plant milk base flavored with nutmeg, cinnamon, and vanilla — the classic eggnog spice profile — sweetened naturally and swirled with a simple date caramel sauce. As the chia seeds soak overnight they absorb the liquid and swell into a thick, pudding-like texture, creating a breakfast that is both nutritious and genuinely reminiscent of the holiday classic.

What makes this pudding so outstanding is the spice blend — nutmeg in particular is the defining flavor of eggnog, and used generously here it produces a pudding that captures the essence of the holiday drink in a completely different, spoonable format.

This recipe is 100% vegan, naturally gluten-free, requires just 5 minutes of active preparation, and absolutely wonderful served chilled with an extra drizzle of caramel and a dusting of nutmeg on top.


Recipe Information

Prep TimeChill TimeTotal TimeServingsCalories
5 mins4 hours4 hrs 5 min4~260 kcal

Ingredients

For the Eggnog Chia Pudding

  • ½ cup (90g) chia seeds
  • 2 cups (480ml) plant milk (oat or coconut milk recommended)
  • 3 tbsp maple syrup
  • 1 tsp pure vanilla extract
  • ½ tsp ground nutmeg
  • ¼ tsp ground cinnamon
  • Pinch of ground cloves
  • Pinch of salt

For the Date Caramel Sauce

  • 10 medjool dates, pitted and soaked in hot water for 10 minutes
  • ¼ cup (60ml) full-fat coconut cream
  • 1 tbsp maple syrup
  • ½ tsp vanilla extract
  • ¼ tsp salt
  • 2–3 tbsp water, to thin

Optional Toppings

  • Extra ground nutmeg, dusted over
  • Toasted pecans, chopped
  • A dollop of vegan whipped coconut cream
  • Cinnamon stick for garnish

Instructions

  1. Make the chia pudding base. In a bowl or jar, whisk together the plant milk, maple syrup, vanilla extract, nutmeg, cinnamon, cloves, and salt until combined.
  2. Add the chia seeds. Add the chia seeds and whisk thoroughly to prevent clumping. Let sit for 5 minutes, then whisk again to break up any clumps that have formed.
  3. Chill. Cover and refrigerate for a minimum of 4 hours, ideally overnight, until thickened to a pudding-like consistency. Stir once after the first hour if possible to ensure even thickening.
  4. Make the date caramel. Drain the soaked dates and place in a blender with the coconut cream, maple syrup, vanilla extract, and salt. Blend until completely smooth, adding water a tablespoon at a time until the caramel reaches a thick, pourable consistency.
  5. Assemble and serve. Divide the chilled chia pudding between bowls or glasses. Swirl or drizzle the date caramel generously over each serving. Top with extra nutmeg, toasted pecans, or whipped coconut cream as desired.

Pro Tips

  • Whisk thoroughly when first combining the chia seeds with the liquid, and again after 5 minutes, to prevent clumping and ensure even thickening throughout.
  • Use full-fat coconut milk for the richest, most authentically eggnog-like result, though oat milk also works beautifully for a lighter version.
  • Do not skip the overnight chill if possible — a full 8 hours produces the thickest, most pudding-like texture.
  • Make a double batch of the date caramel, as it is excellent on virtually anything — oatmeal, pancakes, ice cream, or simply by the spoonful.

Why Nutmeg Defines the Eggnog Flavor

Nutmeg is the single most recognizable flavor component of traditional eggnog, and its warm, slightly sweet, aromatic character is what immediately signals “eggnog” to the palate even in the absence of dairy, eggs, or alcohol. Used generously alongside a smaller amount of cinnamon and a pinch of clove, nutmeg recreates the festive spice profile that makes eggnog so beloved during the holiday season, transferring that flavor experience seamlessly into this chia pudding format.


Flavor Variations

  • Boozy Eggnog Pudding: Add a tablespoon of rum or bourbon to the chia mixture for an adult version with a more complex, warming character.
  • Gingerbread Chia Pudding: Add ground ginger and extra cinnamon for a gingerbread-inspired version.
  • Chocolate Eggnog Pudding: Add 2 tablespoons of cocoa powder to the base for a chocolate eggnog variation.

Nutritional Highlights (Per Serving)

CaloriesProteinCarbsFiberFat
~260 kcal6g38g10g10g

Storage

  • Refrigerator: Store the chia pudding in an airtight container for up to 5 days. The caramel can be stored separately in a sealed jar for up to 2 weeks.
  • Meal prep: This pudding is ideal for meal prep — make a large batch at the start of the week and portion into individual jars for grab-and-go breakfasts.
  • Freezer: Chia pudding does not freeze well, as the texture becomes watery upon thawing. The date caramel freezes beautifully for up to 2 months.

Frequently Asked Questions

Can I make this pudding without coconut milk?

Yes — any plant milk works, though oat milk or coconut milk produce the richest, creamiest results most similar to traditional eggnog. Almond or soy milk also work well for a lighter version.

Why is my chia pudding too thin?

This is usually caused by insufficient chia seeds, insufficient chilling time, or not whisking thoroughly enough to prevent clumping. Ensure you whisk well immediately after adding the seeds and again after 5 minutes, and chill for the full recommended time.

Can I use a different sweetener instead of maple syrup?

Yes — agave syrup or date syrup both work as direct substitutes in the same quantity.


Tried this recipe? Leave a comment below and let us know how it turned out! Tag us on Instagram and Facebook — we love seeing your plant-powered creations. Looking for more festive vegan breakfast and holiday recipes? Browse all recipes on Easy Vegan Recipes — new recipes posted every single week!

⁣⁣VEGAN CASHEW PINEAPPLE TOFU

Capture 3

Ingredients.

  • For SAUCE – Combine all the ingredients below in a bowl.
  • 1 tbsp sweet chili sauce
  • 2 tbsp soy sauce
  • 2 tbsp maple syrup
  • 2 medium garlic cloves, minced
  • 2 tsp ginger, grated
  • 2 tbsp rice wine vinegar
  • 1 tbsp corn starch dissolved in 2 tbsp water
  • 1 scallion, chopped
  • For KUNG PAO
  • 1 tbsp avocado oil
  • 1 tbsp rice wine vinegar
  • 1 cup pineapple, cubed
  • ¼ cup cashews, lightly toasted
  • 1 green bell pepper, chopped
  • 1 bird’s eye chili, chopped
  • 1 red bell pepper, chopped
  • 1 tsp Szechuan pepper
  • 1 medium onion, chopped
  • Crispy tofu and sauce
  • Chopped scallions to serve

Method.

Heat the avocado oil in a skillet and once hot add the onion and salute 2 mins. Add the bell peppers, pineapple and bird’s eye chili and continue cooking until peppers slightly soften or 5 mins max.


Add the Szechuan pepper and stir again then add the rice wine vinegar and cook until it for 1-2 mins. Add the sauce and stir everything together until the sauce thickens. Add the tofu and stir to coat in the sauce and cook 1 more min.


Remove from heat, stir in the cashews and serve alongside grain of choice then top with scallions.
Enjoy!

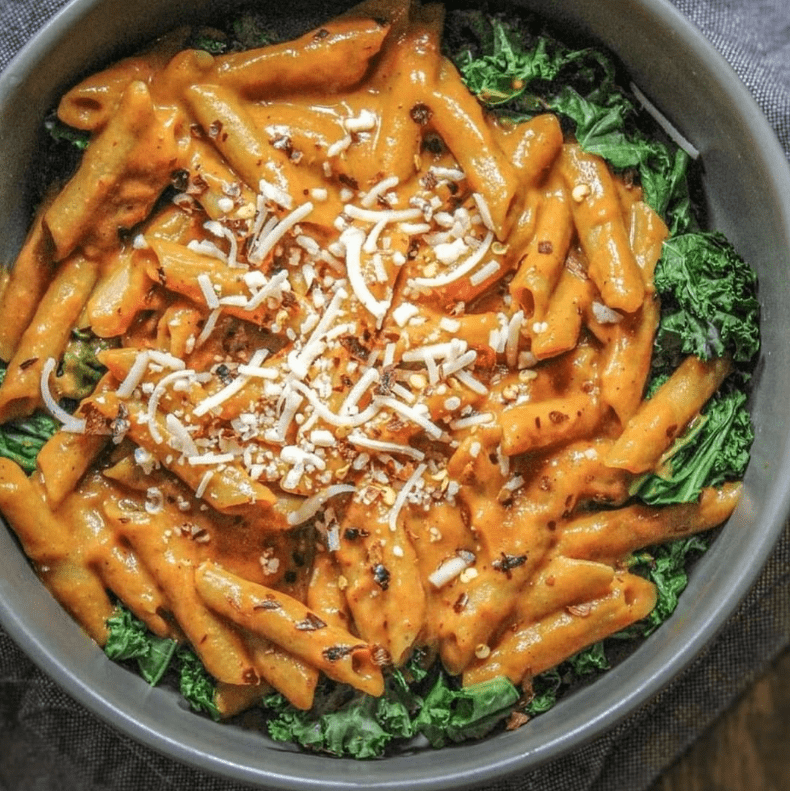
Creamy Roasted Red Pepper Penne with Galicky Kale

Capture

Ingredients.

  • ⁣2 tbsp vegan cream cheese⁣
  • ⁣2 tbsp nutritional yeast ⁣
  • ⁣150g pasta of choice⁣
  • ⁣100g butternut squash, in small cubes⁣
  • ⁣3/4 cup plant-based milk⁣
  • ⁣red chili flakes⁣
  • ⁣vegan parm⁣
  • ⁣1-2 tbsp evoo⁣
  • ⁣1 red pepper, stem and seeds removed⁣
  • ⁣1 onion, cut in quarters⁣
  • ⁣2 cloves garlic, whole⁣
  • ⁣salt + pepper to taste⁣
  • ⁣garlicky sautéed kale (vegan butter, garlic and kale pan-fried)⁣

Method.

Add red pepper, onion, garlic and squash to an oven safe pan. Drizzle with evoo and roast at 450 degrees for 25-30 minutes (roughly)—toss halfway through. Veggies should be soft and slightly charred. ⁣

Transfer veggies to a high speed blender. Add 1/2 plant-based milk, vegan cream cheese, nutritional yeast, salt and pepper. Blend until smooth, adding more plant-based milk as needed (just a little at a time). Sauce should coat the back of a spoon.⁣

Cook pasta according to package instructions. Drain and toss in sauce. Sprinkle with red chili flakes and vegan parm.⁣
Serve on a bed of garlicky pan-fried kale.
Enjoy!⁣

VEGAN MEATLOAF

Capture 3

Ingredients.

  • 2 Tbsp soy sauce or gluten-free soy sauce
  • 2 Tbsp of nutritional yeast
  • 1/4 Tbsp ground flaxseed
  • 3 cups of mushrooms, chopped
  • 1 ½ cups of cooked lentils, red or green
  • 2 Tbsp cooking oil
  • 1 tsp thyme, dried or fresh
  • 1 whole onion, chopped
  • 3 carrots, chopped, peeled and tops removed
  • 3 stalks of celery, chopped
  • 1 1/4 cups breadcrumbs, gluten-free
  • 2 Tbsp tomato paste
  • ¼ tsp salt
  • ¼ black pepper
  • 1 tsp oregano, dried or fresh
  • 1 Tbsp of garlic powder

GLAZE

  • 3/4 cup of ketchup
  • ½ tsp apple cider vinegar

Method.

Preheat your oven at 350 degrees F (176 C). Line your 9 inch by 5 inch loaf pan with parchment paper. Heat the pan over medium heat.
Once hot add your oil, carrots, onions, mushrooms and cerely. Season with salt, pepper, garlic powder, oregano, and thyme. Cook for about 4-5 minutes.


Drain the excess liquid by placing the veggies on a kitchen linen and squeezing the liquid out. Or place them in a colander and dabbing the liquid from the veggies with a towel.
Transfer your ingredients from the to your blender. Add 1 cup of lentils and pulse (do not blend) your ingredients about 2-3 times by pressing your finger on the blender and letting go. Make sure not to over blend your ingredients into a paste. Drain the excess liquid from your vegetables once more.
Place your veggies into a large bowl. Add the rest of the lentils, ground flaxseed, nutritional yeast, bread crumbs, tomato paste, and soy sauce.


Mix all ingredients together and transfer them to the loaf pan. Press the ingredients down shaping it into a loaf, I used a rubber spatula for this. Spread your ketchup glaze over the top of your loaf. Bake the vegan meatloaf in the oven for 45-50 minutes.


Enjoy!

Roasted Broccoli & Quinoa Salad

Veganandplantbasedrecipes 278610915 3117509068515499 4606926900028474452 N

Ingredients.

  • 3 cup uncooked quinoa
  • 1 tsp avocado oil
  • 1/4 tsp each kosher salt
  • 1/4 pepper,
  • 1/4 garlic powder,
  • 1/4 paprika for cooking
  • 1 avocado, diced
  • 1 pint cherry tomatoes, halved
  • Chickpeas
  • 1/8 to 1/4 small red onion, thinly sliced
  • Juice of 1/2 lemon
  • 4 cups small broccoli florets
  • 1 tbsp avocado oil
  • 1/4 tsp kosher salt for roasting broccoli
  • 1 15 oz. can chickpeas, rinsed
  • 1/2 tsp each kosher salt, pepper, garlic powder
  • 2 tbsp each finely chopped fresh dill and parsley
  • 2 tbsp vegan mayo
  • Creamy Herb Vinaigrette, whisk together thoroughly
  • 1.5 tbsp olive oil
  • 1.5 tbsp stone ground mustard
  • 2 tbsp agave nectar
  • 3 tbsp apple cider vinegar
  • lemon juice, 1 cup

Method.

Preheat oven to 375 degree and cook quinoa according to package directions. once it’s complete, let it cool in a mixing bowl or on serving platter, then mix juice of 1 lemon into it. Meanwhile, cut brocc florets into similar small size and arrange on baking tray lined with parchment paper. Sprinkle its oil and salt, and toss. Bake 10 to 16 min, stirring halfway until bright green and lightly browning in spots. Remove tray from oven and let cool somewhat.


Add chickpeas, their oil and seasonings to a pan and cook on medium heat for 2 to 3 min until heated. Combine half of the dressing, cooked quinoa, roasted brocc, sliced onion, chickpeas, halved tomatoes, reserving some to add on top at the end. Top with diced avocado. Serve with extra dressing as desired.

White Bean, Barley & Coconut Stew⁣

Veganandplantbasedrecipes 278530481 287811796874806 5640540638395242079 N

Ingredients.

  • Basmati⁣
  • 90g dry barley
  • 250 ml veggie stock⁣
  • salt, according to taste⁣
  • 180g diced tomatoes
  • 60 ml tomato purée⁣
  • 1 can coconut milk⁣
  • 2 tbsp curry powder⁣
  • 1/2 tbsp cumin⁣
  • 1/2 tbsp garam masala⁣
  • 1 tbsp coconut oil⁣
  • 3 cloves garlic, minced⁣
  • 1 inch ginger, minced⁣
  • 1 red chili, chopped ⁣
  • 1 onion, diced⁣
  • 1/2 tbsp coriander, ground ⁣
  • 1 can white beans, drained and rinsed ⁣
  • coriander
  • A dollop or two of coconut yogurt⁣

Method.

Take a pot and heat coconut oil over medium heat. Cook ginger, garlic and onion until it gets soft or with a bit of color. Now add tomato purée, tomatoes and spices. Cook for a few minutes, until tomatoes begin to break down. Add pinch of salt and coconut milk and cook for few more minutes. Remove from than pan from heat and transfer mixture to a blender. Blend until smooth. When the color comes after blending return mixture to pot. ⁣


Add beans and barley. Add veggie stock and season. Bring to a boil with stirring often, then reduce the heat and keep the simmer uncovered until the sauce thickens. ⁣Serve with coconut yogurt and basmati. Enjoy!⁣ <3

One-Pot Mushroom & White Bean Pasta

Veganandplantbasedrecipes 278829053 1390710138083543 3386910054730560198 N

Ingredients.

  • 3 tbsp all-purpose flour, substitute with gluten-free flour
  • 2 cups vegetable broth
  • 6 ounces (6-7) lasagna noodles, substitute with gluten-free noodles
  • 2 tbsp neutral oil, substitute with water
  • 2 cups unsweetened dairy-free milk, I used soy milk
  • 1 package (8 ounces) of white mushrooms, chopped
  • 2 tbsp nutritional yeast
  • 1 medium white or yellow onion (chopped into small pieces)
  • 4 cloves garlic, minced
  • 1 cup cooked white beans
  • 1 tbsp Italian seasoning
  • 1 tsp salt
  • 1 tsp pepper
  • ½ tsp garlic powder

Method.

​Heat a large pot on medium heat. After adding the oil add onion and cook it until softened about 4-5 minutes. Now add some garlic and cook until for 2 minutes. Add the flour and stir to combine. Pour in the vegetable broth and mix. Break the lasagna noodles into bite sized pieces and add it to the pot. Pour the milk, Italian seasoning, salt, pepper, garlic powder, stirring frequently, and cook until the noodles are completely cooked, 8 minutes.


Add the mushrooms, beans, and nutritional yeast. Cook for 3-4 minutes or until the mushrooms are soft. Taste the pasta and add additional seasoning (salt, pepper, or italian seasoning) if needed.
Take pasta off the heat. Divide into bowls and garnish with fresh parsley or crushed red pepper.
Leftovers can be kept in the refrigerator in an airtight container for 3-4 days.

Vegan Blueberry Crisp — The Easiest Summer Dessert You Will Make All Season

Veganandplantbasedrecipes 278559273 399874121652538 6472568239226961907 N

There are desserts that require technique, patience, and a certain relationship with precision. And then there are desserts like this Vegan Blueberry Crisp — the kind that you throw together in fifteen minutes with a bowl and a spoon, slide into the oven, and pull out forty minutes later bubbling, golden, and smelling so extraordinary that everyone in the house arrives in the kitchen without being asked. This is that dessert. The one that turns a punnet of blueberries into something that feels genuinely celebratory. The one that makes summer feel like exactly what it should.

This recipe layers sweet, jammy blueberries that bubble and thicken as they bake beneath a golden, buttery oat and almond crisp topping that is crunchy, nutty, and caramelized at the edges in a way that is so satisfying and so deeply delicious that it makes every other blueberry dessert feel unnecessarily complicated. The contrast between the warm, softened fruit and the crunchy, golden topping is what makes a crisp one of the most satisfying desserts in existence — and this vegan version achieves that contrast perfectly.

What makes this recipe so outstanding beyond its simplicity is the topping — a combination of rolled oats, almond flour, coconut oil, maple syrup, and a pinch of cinnamon that bakes into a genuinely crunchy, caramelized crumble that shatters slightly when you press a spoon through it and releases a nutty, sweet fragrance that rivals any bakery crisp you have ever eaten.

This recipe is 100% vegan, naturally dairy-free, easily made gluten-free with certified GF oats, ready in under an hour, and absolutely perfect served warm with a scoop of vegan vanilla ice cream melting into the bubbling blueberry filling.


Recipe Information

Prep TimeCook TimeTotal TimeServingsCalories
15 mins40 mins55 mins6~320 kcal

Ingredients

For the Blueberry Filling

  • 4 cups (600g) fresh or frozen blueberries
  • 2 tbsp maple syrup or coconut sugar
  • 1 tbsp cornstarch or arrowroot powder
  • 1 tsp lemon juice
  • ½ tsp lemon zest
  • ½ tsp vanilla extract

For the Oat Crisp Topping

  • 1 cup (90g) rolled oats (certified GF if needed)
  • ½ cup (50g) almond flour
  • ¼ cup (40g) coconut sugar or brown sugar
  • 3 tbsp coconut oil, melted
  • 2 tbsp maple syrup
  • ½ tsp cinnamon
  • ¼ tsp salt

To Serve

  • Vegan vanilla ice cream or coconut whipped cream

Instructions

  1. Preheat the oven to 375°F (190°C). Lightly grease a 9-inch (23cm) baking dish or equivalent-sized oven-safe dish.
  2. Make the blueberry filling. In the prepared baking dish, combine the blueberries, maple syrup, cornstarch, lemon juice, lemon zest, and vanilla extract. Toss everything together gently until the blueberries are evenly coated. Spread into an even layer across the bottom of the dish.
  3. Make the crisp topping. In a medium bowl, combine the rolled oats, almond flour, coconut sugar, cinnamon, and salt. Pour the melted coconut oil and maple syrup over the dry ingredients and stir with a fork until everything is moistened and clumps form. The mixture should hold together when pressed but still be crumbly.
  4. Top and bake. Scatter the crisp topping evenly over the blueberry filling, pressing it gently to create an even layer that covers the fruit completely. Bake for 35–40 minutes until the topping is deep golden brown and the blueberry filling is bubbling around the edges.
  5. Rest and serve. Remove from the oven and allow to rest for 10 minutes before serving — this allows the filling to thicken slightly. Serve warm with vegan vanilla ice cream or coconut whipped cream.

Pro Tips

  • Do not stir the filling once the topping is on — let it bake undisturbed so the topping crisps evenly and the fruit bubbles up around the edges naturally.
  • Use frozen blueberries straight from the freezer if fresh are unavailable — they work perfectly and may need an extra 5 minutes of baking time.
  • Add the cornstarch to the filling — this thickens the blueberry juices as they bake, producing a jammy, saucy filling rather than a watery one.
  • Cool slightly before serving — the filling continues to thicken as it cools and is at its best texture after resting for 10 minutes out of the oven.

The History of the Fruit Crisp

The fruit crisp is an American invention born from the practical kitchen wisdom of the early twentieth century — a simplified, more forgiving cousin of the fruit crumble that arrived in British cooking during World War II when pastry ingredients were rationed and a simple oat and butter topping became the practical alternative. The American crisp evolved slightly differently, leaning into rolled oats and nuts for a topping that was crunchy rather than merely crumbly — the name itself reflecting the texture that distinguishes it from a crumble. Blueberry crisp became a summer staple across the American Northeast and Great Lakes regions where wild blueberries grow abundantly, and it remains one of the most beloved summer desserts in American home cooking for the simple reason that it is extraordinary for the amount of effort it requires.


Flavor Variations

  • Mixed Berry Crisp: Replace half the blueberries with raspberries and blackberries for a more complex, tangy berry filling.
  • Blueberry Peach Crisp: Add 2 cups of diced fresh peaches to the blueberry filling for a summer combination that is exceptional.
  • Blueberry Lemon Crisp: Double the lemon zest and add a tablespoon of lemon curd to the filling for a more intensely citrus-forward version.

Nutritional Highlights (Per Serving)

CaloriesProteinCarbsFiberFat
~320 kcal5g48g5g13g

Storage

  • Room temperature: Best eaten the day it is made while the topping is at its crunchiest.
  • Refrigerator: Store covered for up to 4 days. The topping will soften slightly but the flavor remains excellent. Reheat in a 350°F (175°C) oven for 10–12 minutes to restore crunch.
  • Freezer: Freeze the fully baked and cooled crisp for up to 2 months. Reheat from frozen in a 350°F oven for 20–25 minutes until heated through and the topping has crisped up again.

Frequently Asked Questions

Can I make this crisp ahead of time?

Yes — assemble the crisp up to 24 hours ahead, cover, and refrigerate unbaked. Bake directly from the refrigerator, adding 5 extra minutes to the baking time.

Can I use other berries?

Absolutely — this crisp topping works with any berry or stone fruit. Raspberries, blackberries, cherries, peaches, and plums all work beautifully using the same method.

How do I know when it’s done?

The crisp is ready when the topping is deep golden brown and the blueberry filling is actively bubbling around the edges of the dish — not just the center.


Tried this recipe? Leave a comment below and let us know how it turned out! Tag us on Instagram and Facebook — we love seeing your plant-powered creations. Looking for more addictive vegan snack and appetizer recipes? Browse all recipes on Easy Vegan Recipes — new recipes posted every single week!

Vegan Cream of Mushroom Soup

Veganandplantbasedrecipes 278479203 396345552063968 3383961975822139037 N

INGREDIENTS:-
1 Cup Coconut Milk
1/2 Cup Dry White Wine
1/4 Cup Vegan Butter
6 Tbsp All-Purpose Flour
1 Tsp Dried Thyme
2 Bay Leaves
1 Pounds Sliced Mushrooms
1 Onion (diced)
4 Cloves Garlic (minced)
4 Cups Vegetable Broth
3/4 Tsp Salt
3/4 Tsp Pepper


INSTRUCTION:-
Over medium heat, add the vegan butter and diced onion. Cook for 3-4 minutes wih stirring often. Add garlic (minced) and continue cooking for another minute. Add sliced mushrooms and thyme, cooking 4-5 minutes stirring often until it gets softened. Add wine, cook it for 2-3 minutes while stirring constantly. Add flour, cook for another 2 minutes stirring it constantly than add bay leaves, broth, salt and pepper and stir well. Bring to a soft boil and reduce heat and simmer, uncovered for 15 minutes.
Remove bay leaves and blend or let the soup cool slightly and carefully scoop into a blender with a ladle. Blend until smooth or leave some texture if you’d like. Return to pan and add coconut milk, bring to a very light simmer and cook another 5 minutes or so and serve with toppings.

Mushroom & Chickpea Bourguignon

Veganandplantbasedrecipes 278568130 799061018163936 4867554105978754981 N

Ingredients:
1 or 2 large carrot, sliced as 1 cm thick
1 large white onion
4 cloves garlic, minced
10 small pearl onions, whole
240 ml vegan red wine
300 ml veggie stock
2 tbsp tomato paste
3 tsp fresh thyme, finely chopped
2 bay leaves
3 tsp dark soy sauce
200 g cooked chickpeas
1 tbsp olive oil
1 tablespoon vegan butter
1/2 tbsp cornstarch + 1/2 tbsp water (mixed well together)
salt and freshly ground pepper to taste
2 tbsp of finely choped fresh parsley

You can serve with mashed potatoes.

Instruction:
Heat 1 tbsp olive oil in a pan and fry carrot & onion over medium heat for one minute, add half of the garlic and stir-fry for 15 seconds, add the tomato paste and stir-fry for another 1-2 minutes or until it becomes a bit darker in color. Add pearl onions, wine, veggie stock, thyme, bay leaves, soy sauce, salt and pepper. Mix well and bring to a boil. Let boil 4-5 minutes, then cover and let simmer on low heat for 20 minutes. When 5 minutes of cooking time remains, heat 1 tbsp olive oil and butter in a separate pan. Wait until the butter starts to bubble than add mushrooms, season with salt & pepper. Fry mushrooms until slightly golden brown (5 Minutes) then add to the stew along with the chickpeas. Let simmer uncovered 2-3 minutes. Then add the cornstarch slurry while stirring until the sauce has thickened (1-2 minutes).