vegan baking

Vegan Chocolate Tart

vegan chocolate tart

There are desserts that impress. And then there are desserts like this Vegan Chocolate Tart — the kind that silences a room the moment it is set on the table, that makes people lean forward before they have even been served a slice, that delivers with every single forkful a depth of chocolate flavor so intense, so pure, and so completely satisfying that the word dessert feels wholly inadequate. This is that tart. The one that looks like it came from a Parisian patisserie window. The one that tastes like the finest chocolate truffle you have ever eaten but in slice form. The one that no one believes for a single second is entirely plant-based until you tell them — and even then they ask you to say it again.

This is a tart of extraordinary elegance and extraordinary simplicity. A buttery, crisp chocolate shortcrust pastry shell — made from almond flour, coconut oil, and raw cacao — filled with a ganache of such silky, glossy, intensely chocolatey perfection that it sets in the refrigerator into something that is simultaneously firm enough to slice cleanly and yielding enough to melt completely on the tongue within seconds. The ganache is made from just three ingredients — dark vegan chocolate, full-fat coconut cream, and a touch of maple syrup — and it is one of the most extraordinary things you will ever make from three ingredients.

What makes this tart so genuinely outstanding is the quality of its restraint. There is nothing superfluous here. No unnecessary ingredients competing for attention. No elaborate techniques masking mediocre flavors. Just the finest dark chocolate you can find, treated with the respect it deserves, allowed to be exactly what it is — extraordinary — in the most beautiful vessel possible.

This recipe is 100% vegan, naturally gluten-free when made with almond flour, ready in just 30 minutes of active preparation plus chilling time, and absolutely magnificent served with fresh raspberries, a dusting of flaky sea salt, and a scoop of vegan vanilla ice cream.


Recipe Information

Prep TimeCook TimeChill TimeServingsCalories
20 mins12 mins2 hours8~380 kcal

Ingredients

For the Chocolate Tart Shell

  • 2 cups (200g) almond flour
  • 3 tbsp raw cacao powder or cocoa powder
  • 3 tbsp coconut oil, melted
  • 2 tbsp maple syrup
  • 1 tsp pure vanilla extract
  • Pinch of salt

For the Chocolate Ganache Filling

  • 300g vegan dark chocolate (70% cocoa or higher — quality is everything here)
  • 1 can (400ml) full-fat coconut cream
  • 2 tbsp maple syrup
  • 1 tsp pure vanilla extract
  • ¼ tsp fine sea salt
  • 1 tbsp coconut oil (for extra gloss)

Optional Toppings

  • Fresh raspberries or strawberries
  • Flaky sea salt scattered over the surface
  • Edible gold leaf for extraordinary occasions
  • Freeze-dried raspberry powder dusted over
  • Vegan white chocolate drizzle for visual contrast
  • Toasted crushed hazelnuts or almonds around the edge
  • Fresh mint leaves
  • Cocoa powder dusted through a fine sieve

To Serve

  • Vegan vanilla ice cream
  • Vegan whipped coconut cream
  • Fresh berry compote
  • A drizzle of raspberry coulis
  • Strong espresso or coffee alongside

Instructions

  1. Preheat the oven and prepare the tin. Preheat your oven to 350°F (175°C). Grease a 23cm (9-inch) loose-bottomed tart tin generously with coconut oil — the loose bottom is essential for removing the finished tart cleanly and presenting it beautifully. Line the base with a circle of parchment paper for additional insurance.
  2. Make the chocolate tart shell. In a large bowl combine the almond flour, cacao powder, and salt. Whisk together until evenly combined and lump-free. Add the melted coconut oil, maple syrup, and vanilla extract and mix with a fork until the mixture comes together into a soft, slightly sticky dough that holds its shape when pressed. The dough should feel like slightly damp sand — firm enough to press into the tin but not so wet that it sticks to your fingers excessively.
  3. Press the shell into the tin. Transfer the dough to the prepared tart tin and press evenly across the base and up the sides using your fingers and the back of a spoon — working to achieve a completely uniform thickness of approximately 4–5mm throughout. Pay particular attention to the corners where the base meets the sides — these areas tend to be thicker than the rest and will take longer to cook if left too thick. Use a flat-bottomed glass to smooth and compress the base for the most even result.
  4. Blind bake the shell. Prick the base all over with a fork — approximately 20 pricks across the surface — to prevent the base from puffing during baking. Place in the preheated oven and bake for 10–12 minutes until the shell is set, dry to the touch, and smells deeply of toasted chocolate. It should feel firm when gently pressed in the center. Do not overbake — the shell will firm further as it cools and an overbaked almond flour shell becomes brittle and crumbly. Allow to cool completely in the tin before adding the filling.
  5. Make the chocolate ganache. Place the chopped dark chocolate in a large heatproof bowl. Pour the full-fat coconut cream into a small saucepan and heat over medium heat until it just reaches a simmer — small bubbles appearing around the edges of the pan. Do not allow it to boil vigorously. Pour the hot coconut cream immediately over the chopped chocolate and leave completely undisturbed for 3 full minutes — this resting time allows the heat of the cream to melt the chocolate gently and evenly without the need for stirring.
  6. Emulsify the ganache. After 3 minutes begin stirring from the center of the bowl outward in slow, deliberate circular motions — never beating or whisking which incorporates air and dulls the glossy surface. Stir until the ganache is completely smooth, uniformly glossy, and flowing like liquid silk. Add the maple syrup, vanilla extract, salt, and coconut oil and stir gently to incorporate. The finished ganache should be deeply glossy, completely smooth, and intensely fragrant of dark chocolate.
  7. Pour the ganache into the shell. Pour the warm ganache into the completely cooled tart shell in a single, slow, steady pour — starting from the center and allowing it to flow outward to the edges naturally. Tap the tin gently on the counter three or four times to release any air bubbles and level the surface. If any bubbles remain on the surface pass a kitchen torch briefly over them or touch each one with the tip of a toothpick to break them.
  8. Add toppings and chill. Arrange any desired toppings — fresh raspberries, a scatter of flaky sea salt, a dusting of freeze-dried raspberry powder — over the surface of the ganache while it is still warm and fluid enough to hold them in place. Transfer to the refrigerator and chill for a minimum of 2 hours — ideally 4 hours or overnight — until the ganache is completely set and firm enough to slice cleanly.
  9. Unmould and serve beautifully. Remove the tart from the refrigerator 15 minutes before serving — allowing it to come slightly toward room temperature improves both the texture and the flavor of the ganache dramatically. Place the tart tin on a tall glass or can and allow the outer ring to drop away. Slide onto a serving plate or cake stand. Slice with a sharp knife dipped in hot water and wiped dry between each cut for the cleanest, most professional slices. Serve with vegan vanilla ice cream or whipped coconut cream alongside.

Pro Tips for a Perfect Vegan Chocolate Tart

  • Use the best quality dark chocolate you can afford. The ganache is three ingredients — the chocolate is the overwhelming majority of the flavor. A mediocre chocolate produces a mediocre ganache regardless of technique. Look for dark chocolate with a minimum of 70% cocoa solids, a short ingredients list, and ideally single-origin cacao for the most complex, nuanced flavor.
  • Heat the coconut cream to a simmer — not a boil. Boiling coconut cream can cause the fat to separate from the liquid, producing a grainy, split ganache rather than the silky, emulsified result this recipe achieves. Heat just until the first small bubbles appear around the edges then pour immediately.
  • Rest the cream on the chocolate for the full 3 minutes. This resting period — without touching, stirring, or disturbing the mixture — allows the heat of the cream to distribute evenly through the chocolate and melt it gently from the outside in. Stirring too soon while the chocolate is still partially unmelted produces a grainy, lumpy ganache.
  • Stir from the center outward in slow circles. This specific stirring technique — starting at the center and moving outward in slow, deliberate circles — produces a perfectly emulsified ganache with maximum gloss. Stirring vigorously or in random directions incorporates air and produces a matte, duller surface.
  • Cool the shell completely before filling. A warm shell causes the ganache to melt and absorb into it rather than sitting in a clean, defined layer above it. The shell must be at room temperature — ideally slightly cool — before the ganache is poured.
  • Dip the knife in hot water between slices. This professional technique produces clean, sharp slices with the ganache cut rather than dragged. Dip, wipe dry, cut, repeat — the difference in presentation between slices cut with a dry knife and slices cut with a hot, dry knife is significant and completely worth the extra 5 seconds per slice.

The Art and Science of Chocolate Ganache

Ganache is one of the most elegant preparations in all of confectionery — and understanding the science behind it explains why this three-ingredient filling is so extraordinarily good and why the specific technique used to make it matters so much.

Ganache is an emulsion — a stable suspension of fat droplets in a water-based liquid — created when the fat in chocolate and the fat in cream are combined in the presence of the emulsifying compounds naturally present in cocoa. The lecithin in dark chocolate acts as a natural emulsifier, allowing the fat and water phases to combine into a smooth, stable, glossy liquid that sets to a firm, silky solid as it cools.

The quality of the emulsion — and therefore the quality of the finished ganache — depends entirely on the technique used to create it. Stirring from the center outward in slow circles begins the emulsification process at the point of highest fat concentration in the bowl and gradually incorporates the surrounding liquid into a stable emulsion. Beating or whisking incorporates air into the mixture, disrupts the emulsion structure, and produces a ganache that is matte rather than glossy and grainy rather than silky.

The ratio of chocolate to cream in this recipe — approximately 300g of chocolate to 400ml of coconut cream — produces a ganache that is soft enough to pour and spread easily when warm but firm enough to slice cleanly after chilling. A higher chocolate-to-cream ratio produces a firmer ganache suitable for truffles. A lower ratio produces a pourable sauce. This specific ratio is calibrated for a tart filling that holds its shape when sliced while melting completely on the tongue within seconds of tasting.

The coconut cream in this recipe performs identically to dairy cream in the ganache-making process — its fat content, water content, and temperature behavior are sufficiently similar to dairy cream that the emulsification chemistry proceeds in exactly the same way. The subtle sweetness of the coconut complements rather than competes with the bitterness of the dark chocolate, adding a gentle tropical note that makes this vegan ganache arguably more interesting in flavor than its dairy counterpart.


Flavor Variations

  • Salted Caramel Chocolate Tart: Before pouring the chocolate ganache spread a generous layer of salted date caramel over the cooled tart shell. Pour the ganache over the caramel layer and chill as directed for a tart with a molten caramel surprise beneath the chocolate that is one of the most extraordinary dessert combinations imaginable.
  • Raspberry Chocolate Tart: Arrange a layer of fresh raspberries over the cooled tart shell before pouring the ganache — the berries will be suspended in the chocolate as it sets, creating a tart with a beautiful ruby interior and a bright, fruity tartness that cuts through the richness of the chocolate perfectly.
  • Mint Chocolate Tart: Add half a teaspoon of pure peppermint extract to the ganache in place of the vanilla for a mint chocolate tart with a cool, refreshing character that is particularly spectacular decorated with fresh mint leaves and a dusting of cacao powder.
  • Orange Chocolate Tart: Add the zest of two large oranges and a tablespoon of Grand Marnier or fresh orange juice to the ganache for a version inspired by the classic chocolate-orange combination — particularly spectacular served with candied orange peel decorating the surface.

Nutritional Highlights (Per Serving)

CaloriesProteinCarbsFiberFat
~380 kcal7g28g5g28g

At 380 calories per serving this tart delivers genuine indulgence alongside meaningful nutrition from its whole food ingredients. The almond flour shell provides protein, healthy monounsaturated fats, Vitamin E, and magnesium alongside its buttery, crisp texture. The dark chocolate filling provides an extraordinary concentration of flavonoid antioxidants — particularly epicatechin and catechin — that have been studied for cardiovascular protective properties, blood pressure reduction, and mood enhancement through serotonin stimulation. The coconut cream contributes medium-chain triglycerides alongside the richness that makes this tart so deeply satisfying.


Storage

  • Refrigerator: Store the tart covered loosely with plastic wrap in the refrigerator for up to 5 days. Remove 15 minutes before serving to allow the ganache to soften slightly to the perfect texture. The tart actually improves on day 2 as the flavors deepen and the ganache reaches its ideal texture.
  • Freezer: This tart freezes beautifully for up to 2 months. Freeze without toppings — add fresh toppings after thawing. Freeze sliced or whole on a baking sheet until solid then wrap tightly in plastic wrap and foil. Thaw overnight in the refrigerator.
  • Room temperature: The tart can be kept at cool room temperature for up to 4 hours for serving at a dinner party — the ganache softens to an extraordinarily luxurious, almost mousse-like texture at room temperature that is in some ways even more spectacular than the firmer refrigerator version.
  • Individual slices: Slice the tart before storing for the most convenient serving system — individual slices wrapped in parchment paper keep perfectly in the refrigerator for up to 5 days and make an extraordinary make-ahead dessert for dinner parties or special occasions.

Frequently Asked Questions

Can I make this tart without a tart tin?

Yes — a springform cake tin of similar diameter works well as an alternative. The sides will be straight rather than fluted but the tart will be equally delicious. Individual tart tins — 8–10cm diameter — produce beautiful personal-sized tarts that are particularly elegant for dinner party desserts.

Why did my ganache turn grainy?

A grainy ganache is caused by one of three things — the cream was too hot when poured over the chocolate causing the cocoa butter to separate, the mixture was stirred too vigorously incorporating air and disrupting the emulsion, or the cream and chocolate were not at compatible temperatures when combined. If the ganache seizes or turns grainy add a tablespoon of warm coconut cream and stir gently from the center — this usually rescues the emulsion and restores smoothness.

Can I use milk chocolate instead of dark?

Yes — vegan milk chocolate produces a sweeter, creamier, less intense ganache that is particularly appealing to anyone who finds dark chocolate too bitter. Reduce the maple syrup to one tablespoon as milk chocolate is significantly sweeter than dark. The finished tart will be lighter in color and flavor with a more approachable, crowd-pleasing character.

How do I know when the tart shell is properly baked?

The shell is properly baked when it is set and dry to the touch, the edges have pulled very slightly away from the sides of the tin, and the kitchen smells of toasted chocolate and almond. It should feel firm when very gently pressed in the center but not hard or brittle. Remember it will firm further as it cools — a shell that feels slightly soft when hot will be perfectly crisp when cool.

Can I make this tart nut-free?

Yes — replace the almond flour with oat flour made from blending rolled oats to a fine powder in a food processor. Add an additional tablespoon of coconut oil to compensate for the lower fat content of oat flour. The shell will be slightly less rich than the almond flour version but still delicious and completely nut-free.

Can I make the ganache without coconut cream?

Yes — any high-fat plant milk works in ganache making though the results vary. Oat cream produces a good result with a neutral flavor. Cashew cream — made from blended soaked cashews with water — produces an extraordinarily rich, neutral-tasting ganache that many consider superior to the coconut cream version. Avoid low-fat plant milks which do not contain sufficient fat to properly emulsify with the chocolate.


Tried this recipe? Leave a comment below and let us know how it turned out! Tag us on Instagram and Facebook — we love seeing your plant-powered creations. Looking for more stunning vegan dessert recipes? Browse all recipes on Easy Vegan Recipes — new recipes posted every single week!

Vegan Chocolate Cinnamon Rolls

vegan chocolate cinnamon rolls

There are breakfasts you eat because mornings demand something. And then there are breakfasts like these Vegan Chocolate Cinnamon Rolls — the kind that fill the entire house with the smell of warm yeast dough and melting chocolate as they bake, that come out of the oven puffed and golden, pulling apart into soft, pillowy spirals with rivers of chocolate running through every single one. This is that breakfast. The one that turns an ordinary weekend morning into something genuinely special. The one people remember long after the plate is empty.

These rolls take the beloved technique of a classic cinnamon roll — a soft, enriched yeasted dough rolled around a generous filling, sliced into spirals, and baked until puffed and golden — and combine it with a rich chocolate and cinnamon filling that melts into gooey pockets throughout each roll. Finished with a simple vanilla glaze, they deliver everything wonderful about a classic cinnamon roll with the added indulgence of real melted chocolate.

What makes these rolls so outstanding is the double filling — a brown sugar cinnamon layer combined with a generous scattering of vegan chocolate chips that melts during baking into gooey, chocolatey pockets throughout the dough, ensuring every single bite delivers both the classic cinnamon roll flavor and a genuine chocolate experience.

This recipe is 100% vegan, ready in about two hours including rising time, and absolutely magnificent eaten warm, pulled apart by hand, with the chocolate still soft and the glaze just beginning to melt into the spirals.


Recipe Information

Prep TimeRise TimeCook TimeTotal TimeServingsCalories
20 mins75 mins25 mins2 hrs10~390 kcal

Ingredients

For the Dough

  • 3¼ cups (390g) all-purpose flour
  • 2¼ tsp (7g) active dry yeast
  • ¼ cup (50g) cane sugar
  • ½ tsp fine salt
  • ¾ cup (180ml) plant milk, warmed to 110°F (43°C)
  • ¼ cup (55g) vegan butter, melted and slightly cooled
  • 1 tsp pure vanilla extract

For the Filling

  • ⅓ cup (75g) vegan butter, softened
  • ½ cup (100g) brown sugar
  • 1½ tbsp cinnamon
  • 1 cup (170g) vegan chocolate chips
  • 2 tbsp cocoa powder, mixed into the brown sugar

For the Vanilla Glaze

  • 1 cup (120g) powdered sugar
  • 2–3 tbsp plant milk
  • ½ tsp pure vanilla extract
  • Pinch of salt

Instructions

  1. Activate the yeast. Combine the warm plant milk, sugar, and yeast in a bowl and let sit for 5–10 minutes until foamy on the surface.
  2. Make the dough. In a large bowl or stand mixer combine the flour and salt. Add the activated yeast mixture, melted vegan butter, and vanilla extract. Mix until a shaggy dough forms, then knead for 8–10 minutes by hand or 6 minutes in a stand mixer until smooth and elastic.
  3. First rise. Place the dough in a lightly oiled bowl, cover, and let rise in a warm place for 60–75 minutes until doubled in size.
  4. Make the filling. Mix the brown sugar with the cocoa powder and cinnamon in a small bowl.
  5. Roll and fill. Turn the risen dough out onto a lightly floured surface and roll into a large rectangle, roughly 30 x 45cm. Spread the softened vegan butter evenly over the surface, then sprinkle the cinnamon cocoa sugar mixture evenly over the butter. Scatter the chocolate chips evenly across the entire surface.
  6. Roll and slice. Starting from the long edge, roll the dough tightly into a log. Slice into 10 equal rolls using a sharp knife or unflavored dental floss for the cleanest cuts.
  7. Second rise. Arrange the rolls in a greased baking dish with a little space between each. Cover and let rise for 30–40 minutes until visibly puffed.
  8. Bake. Preheat the oven to 350°F (175°C) and bake for 22–26 minutes until deeply golden on top and cooked through in the center.
  9. Glaze and serve. Whisk together the powdered sugar, plant milk, vanilla extract, and salt until smooth and pourable. Drizzle generously over the warm rolls before serving.

Pro Tips

  • Use a thermometer to check the milk temperature for activating the yeast — too hot will kill it, too cool will not activate it properly.
  • Roll the dough as evenly as possible to ensure consistent baking and uniform spirals.
  • Use unflavored dental floss to slice the rolled log for the cleanest cuts without squashing the spiral.
  • Do not skip the second rise — it is what produces the light, pillowy texture that makes these rolls so special.
  • Glaze while the rolls are still warm so the glaze melts slightly into the spirals rather than sitting on top as a thick layer.

Why This Combination Works

The classic cinnamon roll filling of butter, brown sugar, and cinnamon already creates a deeply caramelized, fragrant filling during baking. Adding cocoa powder to that sugar mixture and chocolate chips throughout introduces real chocolate flavor without disrupting the texture or rise of the dough, producing rolls that taste like a genuine hybrid between a classic cinnamon roll and a chocolate pastry.


Flavor Variations

  • Chocolate Orange Rolls: Add the zest of an orange to the dough and filling for a chocolate orange variation.
  • Peanut Butter Chocolate Rolls: Spread a thin layer of warmed peanut butter over the filling before adding the chocolate chips.
  • Espresso Chocolate Rolls: Add a teaspoon of instant espresso powder to the filling for a deeper, mocha-like flavor.

Nutritional Highlights (Per Serving)

CaloriesProteinCarbsFiberFat
~390 kcal6g54g3g16g

Storage

  • Room temperature: Store unglazed rolls in an airtight container for up to 2 days.
  • Refrigerator: Glazed rolls keep for up to 5 days; warm briefly before serving.
  • Freezer: Freeze baked, unglazed rolls for up to 2 months. Thaw and warm in the oven, then glaze fresh before serving.
  • Make ahead: Assemble and slice the rolls, then refrigerate overnight before the second rise; bring to room temperature for about an hour before baking.

Frequently Asked Questions

Can I make the dough the night before?

Yes — after the first rise, refrigerate the dough overnight, then roll, fill, and slice the next morning, allowing extra time for the second rise since the dough will be cold.

Why didn’t my dough rise properly?

This is usually caused by yeast that did not activate due to milk that was too hot or too cold, or expired yeast. Always check the milk temperature and yeast expiration date.

Can I make these gluten-free?

A dedicated gluten-free yeasted dough blend can work, though the texture will be denser than the traditional version.


Tried this recipe? Leave a comment below and let us know how it turned out! Tag us on Instagram and Facebook — we love seeing your plant-powered creations. Looking for more indulgent vegan breakfast and baking recipes? Browse all recipes on Easy Vegan Recipes — new recipes posted every single week!

Vegan Cottage Cheese Cookie Bites

vegan cottage cheese cookie bites

There are cookies you bake because something sweet is needed. And then there are cookies like these Vegan Cottage Cheese Cookie Bites — the kind that use a base of vegan cottage cheese to produce a soft, slightly chewy, protein-rich cookie bite that is genuinely satisfying in a way that a standard sugar cookie simply is not, delivering the comfort of a cookie alongside the nutritional substance of a high-protein snack. This is that cookie. The one that feels like a treat and functions like a proper snack. The one that people reach for again and again from the jar on the counter.

These bites use vegan cottage cheese — blended smooth for a creamy, neutral base — combined with oat flour, a touch of maple syrup, vanilla extract, and chocolate chips into a dough that bakes into soft, tender, slightly cakey rounds with crisp edges and a moist, chewy center. The vegan cottage cheese adds protein and moisture while contributing almost no flavor of its own, making these bites taste like indulgent cookies while delivering considerably more nutritional substance than their appearance suggests.

What makes these bites so outstanding is the texture — softer and more tender than a standard cookie, with a slightly cakey interior that makes them feel genuinely satisfying after just two or three pieces, unlike many lower-calorie cookies that leave you reaching for more.

This recipe is 100% vegan, naturally gluten-free when made with certified gluten-free oat flour, ready in just 25 minutes, and absolutely wonderful eaten warm from the oven when the chocolate chips are still melted, or at room temperature from the refrigerator as a protein-rich snack.


Recipe Information

Prep TimeCook TimeTotal TimeServingsCalories
10 mins15 mins25 mins12 bites~95 kcal

Ingredients

For the Cookie Bites

  • 1 cup (240g) vegan cottage cheese
  • 1½ cups (135g) oat flour (blended from rolled oats)
  • 3 tbsp maple syrup
  • 1 tsp pure vanilla extract
  • ½ tsp baking powder
  • Pinch of salt
  • ½ cup (85g) vegan chocolate chips

Optional Add-ins

  • 2 tbsp natural peanut butter stirred through the dough
  • ¼ tsp cinnamon for warmth
  • 2 tbsp desiccated coconut folded through
  • A scattering of flaky sea salt pressed onto each bite before baking

Instructions

  1. Preheat the oven. Preheat the oven to 350°F (175°C). Line a baking sheet with parchment paper.
  2. Blend the cottage cheese. Place the vegan cottage cheese in a blender or food processor and blend until completely smooth — this eliminates any lumps and produces a silky, even-textured dough.
  3. Make the dough. In a large bowl combine the blended vegan cottage cheese, oat flour, maple syrup, vanilla extract, baking powder, and salt. Mix until a soft, slightly sticky dough forms. Fold in the chocolate chips.
  4. Shape the bites. Scoop tablespoon-sized portions of dough onto the prepared baking sheet, spacing them about 3cm apart. Flatten each slightly with the back of a spoon — these bites do not spread much during baking.
  5. Bake. Bake for 13–16 minutes until the edges are set and lightly golden and the centers look just cooked through.
  6. Cool briefly and serve. Let cool on the baking sheet for 5 minutes before transferring. Serve warm or at room temperature.

Pro Tips

  • Blend the vegan cottage cheese thoroughly before adding to the dough — any lumps will create an uneven texture in the finished bites.
  • Do not overbake — these bites firm up considerably as they cool and should be removed from the oven while the centers still look slightly underdone.
  • Flatten each portion slightly before baking as the dough does not spread significantly on its own.
  • Store in the refrigerator for the best texture and longest shelf life — the vegan cottage cheese base means these hold up better cold than at room temperature.

Why Vegan Cottage Cheese Works in Cookies

Vegan cottage cheese — typically made from tofu, cashews, or other plant bases — provides a creamy, protein-rich, mildly flavored base that adds moisture and binding to cookie dough without contributing a strong flavor of its own. This makes it an ideal ingredient for higher-protein baked goods, producing a tender, slightly cakey texture that standard cookies lack.


Flavor Variations

  • Peanut Butter Chocolate Chip: Stir 2 tablespoons of natural peanut butter into the dough before adding the chocolate chips.
  • Lemon Blueberry: Replace the chocolate chips with dried blueberries and add lemon zest to the dough for a brighter, fruit-forward version.
  • Double Chocolate: Add 2 tablespoons of cocoa powder to the dough alongside the chocolate chips for a deeply chocolatey version.

Nutritional Highlights (Per Bite)

CaloriesProteinCarbsFiberFat
~95 kcal4g13g1g3g

Storage

  • Refrigerator: Store in an airtight container for up to 5 days. These bites hold their texture best when refrigerated.
  • Freezer: Freeze in a sealed container for up to 2 months. Thaw at room temperature or microwave for 20–30 seconds.
  • Room temperature: Can be kept at room temperature for up to 2 days in an airtight container.

Frequently Asked Questions

What is vegan cottage cheese made from?

Vegan cottage cheese is typically made from tofu, cashews, or almonds blended with lemon juice, vinegar, and seasonings to replicate the mild, slightly tangy, textured character of dairy cottage cheese. Several brands now produce commercially available vegan cottage cheese, or it can be made at home from firm tofu.

Can I make my own vegan cottage cheese for this recipe?

Yes — blend 300g of firm tofu with 2 tablespoons of lemon juice, 1 tablespoon of apple cider vinegar, and a pinch of salt until smooth for a quick homemade version that works perfectly in this recipe.

Can I use a different flour instead of oat flour?

Yes — almond flour produces a slightly denser, nuttier bite. All-purpose flour also works but produces a chewier, less tender result than oat flour.


Tried this recipe? Leave a comment below and let us know how it turned out! Tag us on Instagram and Facebook — we love seeing your plant-powered creations. Looking for more protein-packed vegan snack and dessert recipes? Browse all recipes on Easy Vegan Recipes — new recipes posted every single week!

Vegan Chocolate Peanut Butter Brownie Bars

vegan chocolate peanut butter brownie bars

There are brownies you bake because something chocolatey is needed. And then there are brownies like these Vegan Chocolate Peanut Butter Brownie Bars — the kind that come out of the oven dense and fudgy and glossy on top, sliced to reveal a thick layer of creamy peanut butter rippling through the center of each bar, finished with a thin chocolate ganache that sets to a barely-there sheen over the entire surface. This is that brownie. The one that combines two of the most universally beloved flavors on the planet in a single bar so deeply satisfying that one piece is never quite enough. The one that disappears from the tin before it has properly cooled.

These bars layer a rich, fudgy vegan chocolate brownie batter with a thick peanut butter filling that sets into a distinct, creamy layer during baking, all finished with a glossy chocolate ganache topping. The result is a bar that delivers three genuinely distinct layers — fudgy brownie, creamy peanut butter, and glossy ganache — in every single bite.

What makes these bars so outstanding is the peanut butter layer — thickened with powdered sugar and a touch of coconut oil into a consistency that holds its shape as a distinct layer during baking rather than sinking into the brownie batter, ensuring that every single square has a generous, visible stripe of peanut butter throughout.

This recipe is 100% vegan, ready in just 45 minutes, naturally dairy-free and egg-free, and absolutely magnificent eaten at room temperature when the layers are at their most distinct and the ganache has set to a perfectly glossy finish.


Recipe Information

Prep TimeCook TimeChill TimeTotal TimeServingsCalories
20 mins25 mins30 mins75 mins16~290 kcal

Ingredients

For the Brownie Batter

  • 1 cup (120g) all-purpose flour
  • ½ cup (45g) cocoa powder
  • 1 cup (200g) cane sugar
  • ½ tsp baking powder
  • ¼ tsp fine salt
  • ½ cup (120ml) neutral vegetable oil
  • ½ cup (120ml) plant milk
  • 1 tsp pure vanilla extract
  • 1 tsp apple cider vinegar
  • ½ cup (85g) vegan chocolate chips

For the Peanut Butter Layer

  • 1 cup (260g) natural smooth peanut butter
  • ½ cup (60g) powdered sugar
  • 2 tbsp coconut oil, melted
  • ½ tsp vanilla extract
  • Pinch of salt

For the Chocolate Ganache Topping

  • 150g vegan dark chocolate, finely chopped
  • ½ cup (120ml) full-fat coconut cream
  • 1 tbsp maple syrup

Instructions

  1. Preheat the oven and prepare the pan. Preheat the oven to 350°F (175°C). Line a 20cm (8-inch) square baking pan with parchment paper, leaving overhang on the sides for easy removal.
  2. Make the brownie batter. In a large bowl whisk together the flour, cocoa powder, sugar, baking powder, and salt. Add the oil, plant milk, vanilla extract, and apple cider vinegar. Stir until just combined and smooth. Fold in the chocolate chips.
  3. Make the peanut butter layer. In a bowl combine the peanut butter, powdered sugar, melted coconut oil, vanilla extract, and salt. Mix until smooth and thick — the mixture should be firm enough to spread without sinking into the brownie batter.
  4. Assemble the bars. Pour the brownie batter into the prepared pan and spread evenly. Drop the peanut butter mixture in large spoonfuls across the surface of the brownie batter, then spread gently into an even layer using an offset spatula or the back of a spoon, being careful not to mix the layers together.
  5. Bake. Bake for 22–26 minutes until the edges are set and a toothpick inserted in the brownie layer (avoiding the peanut butter) comes out with just a few moist crumbs. Do not overbake — the bars firm up considerably as they cool.
  6. Make the ganache. While the bars cool, heat the coconut cream in a small saucepan until just simmering. Remove from heat, add the chopped chocolate, and let sit for 2 minutes undisturbed. Stir gently from the center outward until completely smooth and glossy. Stir in the maple syrup.
  7. Top and chill. Pour the ganache over the cooled bars and spread to the edges. Refrigerate for 30 minutes until the ganache has set.
  8. Slice and serve. Lift the bars out using the parchment overhang and slice into 16 squares with a sharp knife dipped in hot water between cuts.

Pro Tips

  • Do not overbake the brownie layer — remove when the edges are set but the center still looks slightly underdone, as the bars continue to firm during cooling and chilling.
  • Make the peanut butter layer thick enough to hold its shape — if it seems too soft, add additional powdered sugar one tablespoon at a time.
  • Spread the peanut butter layer gently to avoid mixing it into the brownie batter — keep the layers distinct for the most dramatic visual and textural result.
  • Dip the knife in hot water and wipe between slices for the cleanest, most professional cuts through the ganache layer.

Why Peanut Butter and Chocolate Work So Well Together

As with all peanut butter and chocolate combinations, the appeal lies in the complementary balance of flavors — the bitterness of dark chocolate balanced by the sweetness of the brownie, against the rich, slightly salty, intensely nutty peanut butter that provides depth, texture, and the specific sweet-salty contrast that makes this pairing so universally addictive.


Flavor Variations

  • Almond Butter Brownie Bars: Replace the peanut butter with almond butter for a subtler, more delicate nut flavor.
  • Salted Caramel Brownie Bars: Replace the peanut butter layer with a thick salted date caramel for a different but equally indulgent variation.
  • Raspberry Brownie Bars: Replace the peanut butter layer with a thick raspberry jam spread for a chocolate-raspberry combination.

Nutritional Highlights (Per Bar)

CaloriesProteinCarbsFiberFat
~290 kcal6g30g3g17g

Storage

  • Room temperature: Store in an airtight container for up to 3 days. The ganache remains set at cool room temperature.
  • Refrigerator: Keeps for up to 1 week; bring to room temperature for 10 minutes before serving for the best texture.
  • Freezer: Freeze individually wrapped bars for up to 2 months. Thaw in the refrigerator overnight before serving.

Frequently Asked Questions

Can I make these bars gluten-free?

Yes — use a 1:1 gluten-free flour blend in the brownie batter. The other layers are naturally gluten-free.

Why is my peanut butter layer sinking into the brownie?

This is caused by a peanut butter mixture that is too soft or a brownie batter that is too thin. Ensure the peanut butter layer is thick and firm before spreading, and add extra powdered sugar if needed to stiffen it.

Can I skip the ganache topping?

Yes — the bars are delicious without the ganache, though it adds a professional finish and an extra layer of chocolate indulgence.


Tried this recipe? Leave a comment below and let us know how it turned out! Tag us on Instagram and Facebook — we love seeing your plant-powered creations. Looking for more indulgent vegan brownie and dessert bar recipes? Browse all recipes on Easy Vegan Recipes — new recipes posted every single week!

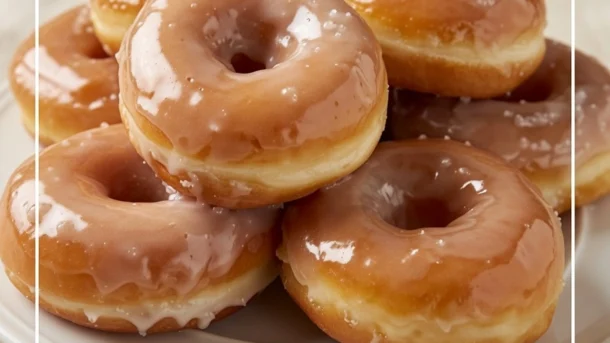
Vegan Homemade Krispy Kremes

vegan homemade krispy kremes

There are moments in baking that stop you completely. And then there are moments like pulling a batch of these Vegan Homemade Krispy Kremes from the hot oil — watching them emerge golden and impossibly light and already puffing up in that characteristic way that makes a great donut look like it is barely holding together from the inside out — dipping them immediately into the warm vanilla glaze and watching that glaze set to a barely-there, translucent, sweet coating that clings to the surface in a way that is so immediately, recognizably right that you understand in that moment exactly why Krispy Kreme became one of the most beloved donut brands in the entire world. These are those donuts. Light as air. Pillowy beyond belief. Glazed to perfection. And completely, entirely plant-based.

These donuts are built on a yeasted dough of extraordinary delicacy — enriched with oat milk, vegan butter, and just enough sugar to feed the yeast and create the characteristic sweetness that makes a great glazed donut so distinctive, and leavened with active dry yeast that produces a rise so dramatic and a crumb so impossibly light and airy that the finished donuts seem to weigh almost nothing despite their generous size. The secret to their legendary lightness is threefold — the enriched dough, the double rise that develops both flavor and structure, and the brief frying at the precise correct temperature that creates a barely-there crust and a completely, gloriously tender interior.

What makes this recipe so genuinely outstanding is its commitment to replicating not merely the flavor of a Krispy Kreme donut but its specific, extraordinary texture. The original Krispy Kreme donut is not merely sweet and fried — it is a specific textural experience of a crust so thin it is almost nonexistent, an interior so soft and pillowy it barely resists the bite, and a glaze so perfectly balanced between sweet and vanilla that it enhances rather than overwhelms everything beneath it. Achieving this in a plant-based version requires specific techniques — the right flour, the right liquid temperature for activating the yeast, the right oil temperature for frying, and the right glaze consistency for dipping — and this recipe delivers all of them.

This recipe is 100% vegan, ready in approximately 2 hours including rising time, and absolutely magnificent eaten warm — ideally within 30 seconds of being glazed, when the glaze is still slightly warm and the donut interior is at its most extraordinary.


Recipe Information

Prep TimeRise TimeCook TimeTotal TimeServingsCalories
20 mins1.5 hours20 mins2 hrs 10 mins12~280 kcal

Ingredients

For the Donut Dough

  • 3 cups (360g) all-purpose flour plus extra for dusting
  • 2¼ tsp (7g) active dry yeast or instant yeast
  • ¼ cup (50g) cane sugar
  • ½ tsp fine salt
  • ¾ cup (180ml) oat milk, warmed to 110°F (43°C)
  • ¼ cup (55g) vegan butter, melted and slightly cooled
  • 1 flax egg (1 tbsp flaxseed meal + 3 tbsp water — rest 5 minutes)
  • 1 tsp pure vanilla extract

For Frying

  • 4 cups (960ml) neutral vegetable oil (canola, sunflower, or refined coconut)

For the Krispy Kreme Style Glaze

  • 2 cups (240g) powdered sugar, sifted
  • ¼ cup (60ml) oat milk, warmed
  • 2 tbsp vegan butter, melted
  • 1½ tsp pure vanilla extract
  • Pinch of salt

Optional Variations

  • Chocolate glaze: Replace 3 tbsp powdered sugar with 3 tbsp cocoa powder and add 50g melted vegan dark chocolate
  • Strawberry glaze: Replace oat milk with fresh strawberry puree
  • Cinnamon sugar: Skip the glaze and roll warm donuts in cinnamon sugar
  • Filled donuts: Skip cutting the hole and fill with vegan vanilla cream or jam

To Serve

  • Warm from the fryer with fresh glaze
  • With a cup of coffee or oat milk latte
  • Stacked on a plate for the most beautiful presentation
  • With extra glaze for dipping alongside

Instructions

  1. Activate the yeast. Warm the oat milk to exactly 110°F (43°C) — warm enough to activate the yeast but not so hot it kills it. A kitchen thermometer is ideal here. Add the sugar and yeast to the warm milk, stir gently, and leave for 5–10 minutes until the surface is foamy and the mixture smells distinctly yeasty. If no foam develops after 10 minutes the yeast is dead — start again with fresh yeast and correctly tempered milk.
  2. Make the flax egg. Combine the flaxseed meal and water in a small bowl, stir, and rest for 5 minutes until gel-like.
  3. Make the dough. In a large bowl or stand mixer bowl combine the flour and salt. Add the activated yeast mixture, melted vegan butter, flax egg, and vanilla extract. Mix with a wooden spoon or dough hook until a shaggy dough forms then knead for 8–10 minutes by hand on a lightly floured surface — or 6 minutes on medium speed in a stand mixer — until the dough is smooth, elastic, and slightly tacky but not sticky. It should spring back slowly when poked. This kneading develops the gluten structure that gives the donuts their characteristic chew and ability to hold the light, airy texture created by the yeast.
  4. First rise. Place the dough in a lightly oiled bowl, cover with a clean damp kitchen towel or plastic wrap, and leave in a warm place for 60–75 minutes until doubled in size. The ideal proofing environment is a turned-off oven with just the light on — approximately 80°F (27°C) — which provides the consistent warmth that produces the most reliable, even rise.
  5. Shape the donuts. Turn the risen dough out onto a lightly floured surface and roll to approximately 1.5cm (½ inch) thickness — not thinner or the donuts will be dense after frying. Use a 9cm (3½ inch) round cutter to cut out circles and a 3cm (1¼ inch) cutter or the cap of a bottle for the holes. Re-roll the scraps once to cut additional donuts. Place the cut donuts and holes on a parchment-lined baking sheet with space between each one.
  6. Second rise. Cover the cut donuts loosely with a clean kitchen towel and allow to rise for a further 30–45 minutes until visibly puffed and pillowy — they will not double in size but should look noticeably lighter and more voluminous than when first cut. Do not skip this second rise — it is what produces the extraordinarily light, airy interior that defines a great glazed donut.
  7. Make the glaze. While the donuts complete their second rise whisk together the sifted powdered sugar, warm oat milk, melted vegan butter, vanilla extract, and salt until completely smooth and flowing — the glaze should be thick enough to coat the back of a spoon but thin enough to drip slowly from it. If too thick add oat milk one teaspoon at a time. If too thin add powdered sugar one tablespoon at a time. Keep warm — a glaze that has cooled and thickened will not create the characteristic thin, translucent Krispy Kreme coating.
  8. Fry the donuts. Heat the oil in a large deep pot to exactly 350°F (175°C) — use a thermometer and maintain this temperature throughout frying. Too cool and the donuts absorb oil and are greasy. Too hot and the exterior burns before the interior cooks. Carefully lower 2–3 donuts into the oil at a time — never crowd the pot. Fry for 60–90 seconds per side until deep golden on both sides. Remove with a slotted spoon and drain on a wire rack set over a baking sheet for 30 seconds — not paper towel which makes the bottom soggy.
  9. Glaze immediately. Dip each warm donut into the glaze face down, hold for 3 seconds, lift and allow excess to drip off, then place glaze-side up on the wire rack. The glaze should be thin, translucent, and set within 60–90 seconds on the warm donut. Glaze the donut holes too — they are arguably the best part. Eat immediately for the most extraordinary experience.

Pro Tips for Perfect Vegan Krispy Kreme Style Donuts

  • Temperature is everything — measure it. The yeast activation temperature, the oil frying temperature, and the glaze temperature are all critical variables that significantly affect the finished result. A kitchen thermometer is not optional for this recipe — it is essential. The difference between oil at 340°F and 360°F produces a meaningfully different donut.
  • Do not skip the second rise. The first rise develops flavor. The second rise — after the donuts are cut and shaped — develops the specific lightness and airy texture that makes a great glazed donut so extraordinary. Donuts fried without the second rise will be noticeably denser and less pillow-like than those given the full proofing time.
  • Fry in small batches and maintain oil temperature. Adding too many donuts to the oil at once drops the oil temperature dramatically — causing the donuts to absorb oil before the exterior can set and producing greasy, dense results. Two to three donuts per batch with the oil returned to temperature between batches produces the best results.
  • Glaze while warm — not hot, not cool. The ideal glazing temperature is approximately 30–60 seconds after the donuts come out of the oil — warm enough that the glaze flows and adheres beautifully but not so hot it slides off before setting. A donut glazed when completely cool will have a thicker, more opaque glaze coating rather than the characteristic thin, translucent Krispy Kreme finish.
  • Eat within 30 minutes of glazing. Yeasted donuts deteriorate faster than almost any other baked good — the extraordinary lightness and pillowy texture that makes them so spectacular lasts for approximately 2 hours after frying, after which they begin to firm and toughen. Make them, glaze them, eat them immediately.
  • Use a wire rack not paper towel for draining. Paper towel creates a steam trap under the donut that makes the bottom soggy. A wire rack allows air to circulate completely around the donut and maintains the integrity of the exterior on all surfaces.

The Science of the Perfect Yeasted Donut

A yeasted donut is one of the most technically demanding preparations in all of home baking — and understanding the science behind why each step matters helps explain why these donuts are so extraordinary when the technique is followed precisely.

The yeast is the heart of the recipe. Saccharomyces cerevisiae — the species of yeast used in bread and donut making — consumes the sugars in the dough and produces carbon dioxide gas and ethanol as metabolic byproducts. The carbon dioxide becomes trapped in the gluten network developed during kneading and causes the dough to expand dramatically during both rising periods. The ethanol evaporates during frying and contributes to the characteristic flavor compounds that distinguish a yeasted donut from a cake donut.

The gluten network — developed during the 8–10 minutes of kneading — is what gives the donut its ability to stretch and expand as the yeast produces carbon dioxide without tearing. Insufficient kneading produces a weak gluten network that tears during rising and produces a dense, uneven crumb. Proper kneading produces an elastic, extensible network that stretches smoothly as the dough rises and then sets during frying into the characteristic light, pillowy structure of a great glazed donut.

The frying temperature is critical because of how the starch and protein in the dough respond to heat. At 350°F (175°C) the exterior of the donut sets almost immediately on contact with the oil — creating a thin, sealed crust that traps the moisture inside the donut and keeps the interior extraordinarily tender while the exterior turns golden. At lower temperatures the exterior takes too long to set and absorbs oil before the crust forms. At higher temperatures the exterior burns before the interior has time to cook through.

The glaze — so simple in its ingredients — achieves its characteristic thinness and translucency through the specific ratio of sugar to liquid and the temperature at which it is applied. Applied warm to a warm donut the glaze flows freely over the surface and sets to a thin, even film as both the glaze and the donut cool simultaneously. This simultaneous cooling is what creates the perfectly uniform, paper-thin coating that is the defining visual and textural characteristic of a Krispy Kreme glaze.


Flavor Variations

  • Chocolate Frosted: Dip in a chocolate glaze made from melted vegan dark chocolate, powdered sugar, oat milk, and vanilla for a rich, deeply chocolatey version that is particularly spectacular with rainbow sprinkles pressed into the surface while the chocolate is still wet.
  • Strawberry Glazed: Replace the oat milk in the glaze with fresh strawberry puree for a beautiful pink glaze with a natural, vibrant strawberry flavor and color that is particularly stunning in summer.
  • Cinnamon Sugar: Skip the glaze entirely and roll the warm fried donuts immediately in a generous mixture of cinnamon and caster sugar for a churro-inspired version that is particularly extraordinary with a dipping sauce of vegan chocolate ganache.
  • Filled Cream Donuts: Skip cutting the hole and fry as full circles. Once cooled use a piping bag to fill each donut with vegan vanilla pastry cream, vegan lemon curd, or strawberry jam for a filled donut that is an entirely different but equally spectacular experience.

Nutritional Highlights (Per Serving — 1 donut with glaze)

CaloriesProteinCarbsFiberFat
~280 kcal4g42g1g11g

These donuts are unambiguously an indulgence — and they are completely, unreservedly worth it. Made from real, whole, plant-based ingredients without artificial flavors, preservatives, or additives of any kind, they are a significantly cleaner version of the commercial original while delivering every element of the flavor and texture experience that makes glazed donuts so universally beloved. The flaxseed meal contributes ALA omega-3 fatty acids and lignans. The oat milk base provides beta-glucan fiber. The vegan butter contributes plant-based fats without the cholesterol of dairy butter. This is an indulgence with integrity.


Storage

  • Best eaten immediately: Yeasted glazed donuts are at their absolute, unequivocal peak within 30–60 minutes of being glazed. The texture deteriorates significantly after 2–3 hours as the yeast structure firms and the glaze absorbs into the surface. Make them and eat them immediately whenever possible.
  • Room temperature: Store unglazed fried donuts in an airtight container at room temperature for up to 1 day. Warm briefly in a 300°F (150°C) oven for 3–4 minutes before glazing and serving — this partially restores the fresh-fried texture.
  • Freezer — unfried dough: After cutting the donut shapes freeze them on a parchment-lined baking sheet until solid then transfer to a freezer bag for up to 1 month. Thaw overnight in the refrigerator, complete the second rise at room temperature for 45–60 minutes, then fry and glaze as directed.
  • Freezer — fried unglazed: Freeze fried unglazed donuts for up to 1 month. Thaw at room temperature for 30 minutes and warm in a 300°F (150°C) oven for 5 minutes before glazing and serving.

Frequently Asked Questions

Can I bake these instead of frying?

Yes — bake at 375°F (190°C) for 12–15 minutes until golden. Baked donuts have a more bread-like texture than fried ones and lack the characteristic thin, barely-there crust of a fried donut but are still delicious and significantly lower in fat. An air fryer at 350°F (175°C) for 5–6 minutes per side produces a result closer to fried than the oven.

Why didn’t my dough rise?

Failed dough rise is almost always caused by dead yeast or milk that was too hot and killed the yeast. Always check that your yeast is within its expiration date and that the milk temperature is between 105–115°F (40–46°C). If the yeast does not foam after 10 minutes in the warm milk it is dead — start again with fresh yeast.

Can I make the dough the night before?

Yes — after the first rise punch the dough down, wrap tightly in plastic wrap, and refrigerate overnight. The next morning remove from the refrigerator, roll and cut the donuts, and allow to complete the second rise at room temperature for 60–75 minutes before frying — the cold dough takes longer to proof than room temperature dough.

What oil is best for frying donuts?

A neutral oil with a high smoke point is essential — canola oil, sunflower oil, or refined coconut oil all work beautifully. Avoid olive oil which has too low a smoke point and too strong a flavor. The oil should be clean and fresh — reused oil with food particles produces off-flavors in the finished donuts.

How do I keep the glaze from being too thick?

The glaze thickens as it cools — reheat briefly in the microwave for 15 seconds and stir well to restore a flowing consistency. If making the glaze in advance keep it in a bowl set over warm water to maintain the ideal dipping temperature and consistency throughout the glazing process.

Can I make these donuts gluten-free?

Gluten-free yeasted donuts are significantly more challenging than regular ones — the gluten network is essential for trapping the carbon dioxide produced by the yeast. A dedicated gluten-free donut flour blend with added psyllium husk or xanthan gum produces the best results. Expect a slightly denser texture than the regular version but still genuinely delicious.


Tried this recipe? Leave a comment below and let us know how it turned out! Tag us on Instagram and Facebook — we love seeing your plant-powered creations. Looking for more indulgent vegan baking and dessert recipes? Browse all recipes on Easy Vegan Recipes — new recipes posted every single week!
Vegan Blueberry Cobbler

vegan blueberry cobbler

There are desserts that feel like home. And then there are desserts like this Vegan Blueberry Cobbler — the kind that comes out of the oven bubbling and fragrant and so deeply, warmly inviting that people are already reaching for bowls before it has properly cooled, that fills the kitchen with the most extraordinary aroma of caramelized blueberry and warm butter and vanilla as it bakes, and that delivers with every single spoonful a combination of jammy, intensely sweet blueberry filling and golden, biscuity, tender cobbler topping that is one of the most satisfying dessert experiences imaginable. This is that cobbler. The one that makes summer feel complete. The one that has been requested at every gathering since the first time it was made. The one that tastes like the very best version of every blueberry dessert you have ever eaten, distilled into a single baking dish.

This is a cobbler of extraordinary simplicity and extraordinary deliciousness — a bubbling, deeply purple blueberry filling thickened with just enough cornstarch to hold its shape when spooned into a bowl while still flowing in slow, generous ribbons of juice around the golden cobbler biscuits that sit on top, their crispy, slightly caramelized tops giving way to the softest, most tender, buttermilk-style interiors that absorb the blueberry juices from below into something that is simultaneously biscuit and cake and pudding all at once. It is genuinely one of the finest things you will make all summer.

What makes this cobbler so genuinely outstanding is the cobbler topping. Made with vegan butter, oat milk curdled with apple cider vinegar into a plant-based buttermilk, and a touch of coconut sugar that caramelizes in the oven into a barely-there golden crust — these biscuits are extraordinary on their own and transcendent in combination with the blueberry filling beneath them. They are dropped onto the filling in rustic, irregular mounds rather than rolled and cut — a technique that produces a more tender, more interesting, more genuinely homemade result than any precision cutting could achieve.

This recipe is 100% vegan, ready in just 45 minutes, made with fresh or frozen blueberries, naturally adaptable to gluten-free, and absolutely magnificent served warm with a generous scoop of vegan vanilla ice cream that melts into the hot blueberry filling in the most extraordinary way.


Recipe Information

Prep TimeCook TimeTotal TimeServingsCalories
15 mins30 mins45 mins6~320 kcal

Ingredients

For the Blueberry Filling

  • 6 cups (900g) fresh or frozen blueberries (do not thaw if frozen)
  • ⅓ cup (65g) cane sugar or coconut sugar
  • 2 tbsp cornstarch
  • 1 tbsp lemon juice
  • Zest of 1 lemon
  • 1 tsp pure vanilla extract
  • ¼ tsp cinnamon
  • Pinch of salt

For the Cobbler Topping

  • 1½ cups (180g) all-purpose flour
  • ¼ cup (50g) cane sugar plus 1 tbsp for sprinkling
  • 1½ tsp baking powder
  • ¼ tsp baking soda
  • ¼ tsp fine salt
  • ½ tsp cinnamon
  • ⅓ cup (75g) cold vegan butter, cut into small cubes
  • ½ cup (120ml) oat milk
  • 1 tsp apple cider vinegar
  • 1 tsp pure vanilla extract

Optional Add-ins for the Filling

  • 1 cup (150g) fresh raspberries mixed with blueberries
  • 1 tbsp bourbon or dark rum (adds beautiful depth)
  • ¼ tsp cardamom (adds beautiful floral warmth)
  • 1 tbsp maple syrup in place of some sugar
  • Fresh basil leaves torn through the warm filling

Optional Toppings for the Cobbler Biscuits

  • 1 tbsp turbinado sugar sprinkled over before baking
  • 1 tsp lemon zest mixed into the biscuit dough
  • 2 tbsp sliced almonds pressed into the tops

To Serve

  • Vegan vanilla ice cream — the classic and essential pairing
  • Whipped coconut cream
  • Vegan custard poured over the top
  • Plain coconut yogurt for a lighter option
  • A drizzle of maple syrup
  • Fresh blueberries and mint alongside

Instructions

  1. Preheat the oven. Preheat your oven to 375°F (190°C). Lightly grease a 23 x 33cm (9 x 13 inch) baking dish or a similar sized deep casserole dish with vegan butter or coconut oil. A dish with some depth is important — the blueberry filling bubbles significantly during baking and needs room to expand without overflowing.
  2. Make the vegan buttermilk. Combine the oat milk and apple cider vinegar in a small bowl or measuring jug, stir briefly, and set aside for 5 minutes. The acid causes the plant milk to curdle slightly — creating a vegan buttermilk that produces a more tender, more flavorful cobbler topping than plain milk alone.
  3. Make the blueberry filling. In a large bowl combine the blueberries, sugar, cornstarch, lemon juice, lemon zest, vanilla extract, cinnamon, and salt. Toss gently until the blueberries are evenly coated and the cornstarch has completely dissolved into the juices. Pour the blueberry mixture into the prepared baking dish and spread in an even layer. The filling will look sparse at this stage — it compresses and releases juice dramatically during baking.
  4. Make the cobbler biscuit dough. In a large bowl whisk together the flour, sugar, baking powder, baking soda, salt, and cinnamon. Add the cold cubed vegan butter and work it into the flour using your fingertips — pressing each piece of butter between your fingers and thumbs until the mixture resembles coarse, sandy crumbs with some pea-sized pieces of butter still visible. These larger butter pieces are what create the flaky, layered texture of the finished biscuits — do not work the butter in too completely.
  5. Add the wet ingredients. Pour the vegan buttermilk and vanilla extract over the flour and butter mixture and fold gently with a spatula until just combined — the dough should be shaggy, slightly sticky, and rough rather than smooth. Do not overmix — overworked biscuit dough produces tough, dense biscuits rather than the light, tender result this recipe achieves.
  6. Top the filling with the biscuit dough. Drop the cobbler dough over the blueberry filling in large, irregular spoonfuls — approximately 6 to 8 generous mounds distributed evenly across the surface. Do not spread or flatten — the irregular, rustic mounds bake into beautifully varied textures with crispy peaks, tender valleys, and jammy blueberry-soaked edges that are the defining characteristic of a great cobbler. Leave gaps between the dough mounds — the blueberry filling should be visible between them and will bubble up through these gaps during baking.
  7. Sprinkle and bake. Sprinkle the remaining tablespoon of sugar evenly over the cobbler biscuits — this creates the barely-there caramelized crust that makes the tops so irresistible. Place in the center of the preheated oven and bake for 28–35 minutes until the cobbler topping is deeply golden, the biscuits have puffed and set, and the blueberry filling is bubbling vigorously around the edges and through the gaps — the bubbling is essential and indicates the cornstarch has activated and the filling has properly thickened.
  8. Rest briefly before serving. Remove from the oven and allow to rest for 10 minutes before serving — the filling is extraordinarily hot directly from the oven and resting allows it to thicken slightly from its liquid state to the jammy, spoonable consistency that makes it so spectacular. Serve warm — directly from the baking dish at the table — with generous scoops of vegan vanilla ice cream that melt into the hot blueberry filling in the most extraordinary way.

Pro Tips for the Perfect Vegan Blueberry Cobbler

  • Use cold vegan butter for the biscuit topping always. The temperature of the butter is one of the most critical factors in cobbler biscuit success. Cold butter — cut into the flour quickly before it has time to warm — creates steam pockets during baking that produce the flaky, layered texture that distinguishes great cobbler biscuits from dense, cakey ones. Room temperature butter produces a uniform, greasy dough with none of this texture.
  • Do not spread or flatten the biscuit dough. The dropped, irregular mounds of dough bake into beautifully varied textures — crispy peaks, tender centers, jammy edges — that a smoothed or rolled topping simply cannot achieve. The rusticity is intentional and is what makes homemade cobbler so much more interesting than any commercial version.
  • Leave gaps between the biscuit mounds. The blueberry filling visible between the biscuit mounds bubbles up through these gaps during baking — basting the edges of the biscuits in blueberry juice and creating those extraordinary jammy, purple-stained cobbler edges that are arguably the best bites in the entire dish.
  • Use frozen blueberries directly from the freezer. Frozen blueberries added directly from the freezer without thawing hold their shape better during baking, release their juice more gradually, and produce a filling with more body and structure than thawed berries which collapse into mush and produce a watery filling.
  • Bake until the filling is visibly bubbling. The bubbling of the blueberry filling is not merely aesthetic — it indicates that the filling has reached the temperature at which the cornstarch activates and thickens the blueberry juices into a glossy, coating sauce rather than a thin, watery liquid. A cobbler removed from the oven before the filling is bubbling will have a thin, runny filling that pools rather than holds when served.
  • Serve warm — not hot, not cold. Cobbler served immediately from the oven is too hot to eat comfortably and the filling is too liquid to serve cleanly. Cobbler served cold loses all the extraordinary contrast between the warm, jammy filling and the cool, melting ice cream. The 10-minute rest produces the perfect serving temperature — warm enough to melt the ice cream dramatically, cool enough to eat immediately and enjoy every element of the dish at its best.

The Story of Cobbler in American Baking

Cobbler is one of the most beloved and most distinctly American desserts in the entire baking canon — a preparation born of necessity and improvisation that became a classic through the sheer power of how extraordinarily delicious it is when made well.

The origins of cobbler trace to the early nineteenth century American frontier where British settlers attempting to recreate the suet puddings and steamed dumplings of their homeland found themselves without the proper equipment and many of the correct ingredients. The solution was characteristically practical — a simple biscuit or dumpling dough dropped onto stewed or fresh fruit and baked in a dutch oven or camp fire until the topping set and the fruit beneath it became jammy and intensely concentrated in flavor.

The name cobbler is thought to derive from the irregular, cobblestone-like appearance of the dropped biscuit topping — each mound a different size and shape, like the varied stones of a cobbled street — though some food historians argue it derives from the British word cobbler meaning to mend or patch, a reference to the patched appearance of the topping over the fruit beneath.

What distinguishes cobbler from crumble, crisp, and buckle — the other great American fruit bake traditions — is the biscuit topping. Where a crumble uses a dry, sandy, streusel-like topping and a crisp adds oats for additional texture, a cobbler uses a soft, wet, buttermilk-style biscuit dough that bakes into something simultaneously crispy on top and tender throughout — absorbing the fruit juices from below as it cooks into a genuinely extraordinary hybrid of biscuit and pudding that has no equivalent in any other baking tradition.

This vegan version honours every element of the classical preparation — the jammy, intensely flavored fruit filling, the dropped biscuit topping, the bubbling, caramelized edges — while replacing the dairy and eggs with plant-based alternatives that perform identically and produce a cobbler that is indistinguishable in flavor and texture from the finest dairy version.


Flavor Variations

  • Mixed Berry Cobbler: Replace half the blueberries with raspberries, blackberries, and sliced strawberries for a vibrant mixed berry version with more complex, layered fruit flavor and a beautiful deep purple filling.
  • Peach and Blueberry Cobbler: Add 2 cups of diced fresh peach to the blueberry filling for a classic Southern-inspired combination that is particularly spectacular in late summer when both fruits are at their peak.
  • Lemon Blueberry Cobbler: Add the zest of two additional lemons to both the filling and the biscuit dough and replace 2 tablespoons of the oat milk with fresh lemon juice for a brighter, more citrus-forward version that is particularly refreshing in summer.
  • Lavender Blueberry Cobbler: Add 1 teaspoon of culinary dried lavender to the blueberry filling for a sophisticated, floral version with a beautiful Provençal character that is particularly elegant for dinner party desserts.

Nutritional Highlights (Per Serving)

CaloriesProteinCarbsFiberFat
~320 kcal4g54g5g10g

At 320 calories per serving this cobbler delivers genuine summer dessert satisfaction alongside meaningful nutrition from its whole food ingredients. Blueberries are among the most antioxidant-rich foods available — providing extraordinary concentrations of anthocyanins that have been studied for their ability to reduce inflammation, protect brain cells from oxidative damage, improve memory and cognitive function, and support cardiovascular health. A single serving of this cobbler provides approximately one and a half cups of blueberries — a genuinely significant dose of these extraordinary compounds. The lemon juice and zest contribute Vitamin C and limonene with antioxidant and anti-cancer properties. The oat milk base contributes beta-glucan fiber.


Storage

  • Serve fresh: Blueberry cobbler is at its absolute peak within 2 hours of coming out of the oven — when the topping is still slightly crispy, the filling is warm and jammy, and the contrast with cold ice cream is at its most spectacular. Make it fresh whenever possible.
  • Refrigerator: Store covered with plastic wrap or in an airtight container in the refrigerator for up to 4 days. The topping softens during refrigeration as it absorbs moisture from the filling — the texture changes but the flavor remains extraordinary. Reheat individual portions in a 350°F (175°C) oven for 10 minutes or in a microwave for 90 seconds.
  • Freezer: Cobbler freezes well for up to 2 months. Cool completely before wrapping tightly in plastic wrap and foil. Thaw overnight in the refrigerator and reheat in a 350°F (175°C) oven for 15–20 minutes until heated through and the topping has regained some crispiness.
  • Make ahead: The blueberry filling can be prepared up to 24 hours in advance and stored in the refrigerator. Make the biscuit topping fresh on the day of baking — the leavening in the biscuit dough loses its effectiveness if stored before baking.

Frequently Asked Questions

Can I use frozen blueberries instead of fresh?

Yes — frozen blueberries work beautifully in cobbler and in many ways produce a better result than out-of-season fresh blueberries. Add them directly from frozen without thawing — thawed berries release too much liquid and produce a watery filling. You may need to add an additional teaspoon of cornstarch when using frozen berries to account for the additional moisture they release during baking.

Why is my cobbler topping raw in the middle?

An undercooked cobbler topping is caused by biscuit mounds that are too thick, oven temperature too low, or insufficient baking time. Drop the biscuit dough in mounds no thicker than 2–3cm, ensure the oven is fully preheated to the correct temperature, and bake until a toothpick inserted in the center of the largest biscuit mound comes out clean. If the topping is browning too quickly before the center is cooked, cover loosely with foil for the remaining baking time.

Can I make individual cobblers?

Yes — divide the blueberry filling between 6 individual ramekins and top each with one large mound of biscuit dough. Reduce the baking time to 20–25 minutes. Individual cobblers are particularly elegant for dinner party desserts — each guest receives their own perfectly formed cobbler with its own bubbling filling and golden biscuit topping.

How do I know when the cobbler is done?

The cobbler is done when the biscuit topping is deeply golden and set — dry rather than shiny on top — and a skewer inserted in the center of the largest biscuit comes out clean. Most importantly the blueberry filling should be visibly bubbling vigorously around the edges and through the gaps between the biscuits. If the topping is golden but the filling is not yet bubbling, continue baking until it is.

Can I make this cobbler gluten-free?

Yes — replace the all-purpose flour in the biscuit topping with a 1:1 gluten-free flour blend and add half a teaspoon of xanthan gum if your blend does not already contain it. The cornstarch in the filling is already gluten-free. The gluten-free biscuit topping will be slightly more delicate in texture than the regular version but still delicious, golden, and beautifully flavored.

Can I reduce the sugar in this recipe?

Yes — the sugar in the filling can be reduced to 3 tablespoons for a less sweet, more tart filling that allows the natural flavor of the blueberries to dominate. The sugar in the biscuit topping can be reduced to 2 tablespoons. Do not eliminate the sugar entirely as it contributes to the texture and browning of the biscuits as well as their flavor.


Tried this recipe? Leave a comment below and let us know how it turned out! Tag us on Instagram and Facebook — we love seeing your plant-powered creations. Looking for more comforting vegan dessert and baking recipes? Browse all recipes on Easy Vegan Recipes — new recipes posted every single week!

Vegan Chocolate Fudge

vegan chocolate fudge

There are treats you make because something sweet is needed. And then there are treats like this Vegan Chocolate Fudge — the kind that sets into perfectly dense, glossy squares that melt slowly on the tongue with a rich, intensely chocolatey flavor that rivals anything from a candy shop. This is that fudge. The one that requires no candy thermometer, no stovetop drama, and no risk of grainy, broken sugar crystals. The one that disappears from the tin within a day of being made.

This fudge uses a simple, foolproof method built on melted vegan chocolate, full-fat coconut cream, and a touch of vegan butter, set in the refrigerator until firm and sliceable. It avoids the traditional candy-making process entirely, relying instead on the natural setting properties of chocolate and coconut fat to produce a result that is every bit as rich and dense as classical fudge.

What makes this fudge so outstanding is its simplicity — four main ingredients, no thermometer, no boiling sugar syrup, just melted chocolate and coconut cream combined and chilled, producing a result that is consistently smooth and perfectly set every single time.

This recipe is 100% vegan, naturally gluten-free, ready in just 15 minutes of active preparation plus chilling time, and absolutely wonderful cut into small squares for gifting, parties, or simply keeping in the refrigerator for whenever a chocolate craving strikes.


Recipe Information

Prep TimeChill TimeTotal TimeServingsCalories
15 mins3 hours3 hrs 15 mins16~150 kcal

Ingredients

For the Fudge

  • 400g vegan dark chocolate (60-70% cocoa), finely chopped
  • 1 cup (240ml) full-fat coconut cream
  • 3 tbsp vegan butter
  • 2 tbsp maple syrup
  • 1 tsp pure vanilla extract
  • Pinch of salt

Optional Add-ins

  • ½ cup (75g) chopped toasted walnuts or pecans, folded in before setting
  • ¼ cup (45g) vegan chocolate chips folded in for extra texture
  • ½ tsp espresso powder for a deeper chocolate flavor
  • Flaky sea salt scattered over the top before chilling

For Topping

  • Flaky sea salt
  • Crushed nuts
  • A light dusting of cocoa powder

Instructions

  1. Prepare the pan. Line an 20cm (8-inch) square baking dish with parchment paper, leaving some overhang on the sides for easy removal later.
  2. Heat the coconut cream. In a small saucepan, heat the coconut cream and vegan butter over medium heat until just beginning to simmer at the edges, with small bubbles forming. Do not let it boil vigorously.
  3. Melt the chocolate. Remove the pan from heat and add the finely chopped chocolate. Let sit undisturbed for 2 minutes to allow the heat to begin melting the chocolate evenly.
  4. Stir until smooth. Stir gently from the center outward until the mixture is completely smooth, glossy, and fully combined. Stir in the maple syrup, vanilla extract, and salt.
  5. Add optional ingredients. Fold in any nuts or chocolate chips if using, reserving a small amount for topping if desired.
  6. Pour and chill. Pour the mixture into the prepared dish and smooth the top with a spatula. Scatter with flaky sea salt or reserved toppings if using. Refrigerate for a minimum of 3 hours, ideally overnight, until completely firm.
  7. Slice and serve. Once fully set, lift the fudge out using the parchment overhang and slice into small squares with a sharp knife.

Pro Tips

  • Use good quality dark chocolate, since it makes up the majority of the flavor in this simple recipe.
  • Heat the coconut cream just to a gentle simmer, not a vigorous boil, to avoid the fat separating.
  • Let the hot cream sit on the chopped chocolate for a couple of minutes before stirring, to ensure even, gentle melting.
  • Chill the fudge fully before slicing — cutting too early will result in a softer, less clean slice.
  • Use a sharp knife and wipe it clean between cuts for the neatest squares.

Why This Method Works

Traditional fudge relies on carefully cooking sugar to a precise temperature to control crystallization, which can easily go wrong without a thermometer. This recipe sidesteps that process entirely by relying on the natural fat content of dark chocolate and coconut cream, which set firmly when chilled, producing a dense, smooth texture without any risk of grainy or seized sugar.


Flavor Variations

  • Peppermint Chocolate Fudge: Add ½ teaspoon of peppermint extract in place of vanilla for a festive, minty version.
  • Peanut Butter Fudge Swirl: Swirl warmed peanut butter through the top of the fudge before chilling for a marbled effect.
  • Orange Chocolate Fudge: Add the zest of an orange to the mixture for a bright, citrus-chocolate combination.

Nutritional Highlights (Per Serving — 1 square)

CaloriesProteinCarbsFiberFat
~150 kcal2g12g2g11g

Storage

  • Refrigerator: Store in an airtight container for up to 2 weeks. Keep chilled, as the fudge softens at room temperature.
  • Freezer: Freeze in a sealed container for up to 3 months. Thaw in the refrigerator before serving.
  • Gifting: Fudge squares travel well when kept cool, making them an excellent homemade gift for holidays or special occasions.

Frequently Asked Questions

Can I use coconut milk instead of coconut cream?

Full-fat coconut cream is recommended for the best set, as coconut milk contains more water and may result in a softer fudge. If using coconut milk, reduce slightly over low heat before proceeding.

Why didn’t my fudge set firm?

This is usually caused by using a lower percentage chocolate with less cocoa solids, or coconut milk instead of full-fat cream. Stick to dark chocolate with at least 60% cocoa and full-fat coconut cream for the most reliable result.

Can I make this fudge nut-free?

Yes — simply omit any nuts and use a nut-free topping like crushed pretzels or extra chocolate chips instead.


Tried this recipe? Leave a comment below and let us know how it turned out! Tag us on Instagram and Facebook — we love seeing your plant-powered creations. Looking for more indulgent vegan dessert and treat recipes? Browse all recipes on Easy Vegan Recipes — new recipes posted every single week!

Vegan Italian Cream Pound Cake

vegan italian cream pound cake

There are cakes that exist simply to be sweet. And then there are cakes like this Vegan Italian Cream Pound Cake — the kind that comes out of the oven dense, golden, and impossibly tender, studded throughout with toasted coconut and pecans, and finished with a tangy cream cheese frosting so rich and smooth that the first bite stops conversation completely. This is that cake. The one that turns an ordinary Sunday into an occasion. The one that makes people ask, twice, whether it could really be entirely plant-based.

Italian cream cake is a beloved Southern American dessert known for its incredibly moist, tender crumb studded with coconut and pecans, traditionally finished with a cream cheese frosting. This pound cake adaptation takes the same beloved flavor profile — coconut, pecans, vanilla, and tangy cream cheese — and bakes it into a dense, rich, buttery pound cake format that slices beautifully and keeps even better than a layer cake.

What makes this cake so outstanding is the crumb. Buttermilk-style plant milk, vegan butter, and a careful balance of leavening produce a pound cake that is dense without being heavy, rich without being greasy, and tender enough to almost melt on the tongue, while toasted coconut and pecans folded through the batter add texture and flavor in every single slice.

This recipe is 100% vegan, ready in about 90 minutes including baking and cooling, and absolutely stunning served sliced with a generous swipe of cream cheese frosting and an extra scattering of toasted coconut.


Recipe Information

Prep TimeCook TimeTotal TimeServingsCalories
20 mins65 mins90 mins12~460 kcal

Ingredients

For the Cake

  • 3 cups (360g) all-purpose flour
  • 1 tsp baking powder
  • ½ tsp baking soda
  • ½ tsp fine salt
  • 1 cup (225g) vegan butter, softened
  • 1¾ cups (350g) cane sugar
  • 1 cup (240ml) plant milk
  • 1 tbsp apple cider vinegar
  • 2 tsp pure vanilla extract
  • 1 cup (85g) shredded coconut, toasted
  • 1 cup (110g) pecans, toasted and roughly chopped

For the Cream Cheese Frosting

  • 250g vegan cream cheese, softened
  • ½ cup (115g) vegan butter, softened
  • 3 cups (360g) powdered sugar, sifted
  • 1½ tsp pure vanilla extract
  • Pinch of salt

For Garnish

  • Extra toasted coconut
  • Extra toasted pecans, chopped

Instructions

  1. Toast the coconut and pecans. Spread the shredded coconut and chopped pecans separately on a baking sheet and toast at 325°F (160°C) for 5–7 minutes, watching closely, until lightly golden and fragrant. Set aside to cool.
  2. Make the plant buttermilk. Combine the plant milk and apple cider vinegar in a small bowl and let sit for 5 minutes until slightly thickened.
  3. Preheat and prepare the pan. Preheat the oven to 325°F (160°C). Grease a 10-inch bundt or tube pan thoroughly, including all crevices.
  4. Mix dry ingredients. In a bowl whisk together the flour, baking powder, baking soda, and salt.
  5. Cream butter and sugar. In a large bowl beat the vegan butter and sugar together for 3–4 minutes until pale and fluffy.
  6. Combine wet and dry. Add the vanilla extract and plant buttermilk to the butter mixture and mix briefly. Add the flour mixture in two additions, folding gently until just combined — do not overmix.
  7. Fold in coconut and pecans. Gently fold in the toasted coconut and pecans until evenly distributed throughout the batter.
  8. Bake. Pour the batter into the prepared pan and smooth the top. Bake for 60–70 minutes until a skewer inserted in the center comes out clean and the top is deeply golden. Cool in the pan for 15 minutes before turning out onto a wire rack to cool completely.
  9. Make the frosting. Beat the vegan cream cheese and vegan butter together until smooth. Add the powdered sugar gradually, beating between additions, then add the vanilla extract and salt. Beat until light and fluffy.
  10. Frost and garnish. Once the cake is completely cool, spread or drizzle the cream cheese frosting generously over the top, allowing it to drip down the sides. Scatter with extra toasted coconut and pecans before slicing.

Pro Tips

  • Toast the coconut and pecans before adding to the batter — this dramatically deepens their flavor compared to using them raw.
  • Do not overmix the batter once the flour is added, or the dense, tender pound cake texture will become tough.
  • Cool the cake completely before frosting, or the frosting will melt and slide off.
  • Use room temperature butter and cream cheese for the smoothest, lump-free frosting.

The Story Behind Italian Cream Cake

Despite its name, Italian cream cake is widely believed to have Southern American origins rather than Italian ones, becoming a beloved celebration cake across the American South in the mid-twentieth century. Its signature combination of coconut, pecans, and tangy cream cheese frosting has made it a staple at birthdays, holidays, and potlucks ever since. This pound cake version brings the same beloved flavor combination into a denser, easier-to-slice, easier-to-store format.


Flavor Variations

  • Lemon Italian Cream Cake: Add lemon zest to the batter and frosting for a brighter, citrus-forward version.
  • Chocolate Drizzle: Drizzle melted vegan chocolate over the finished cake alongside the cream cheese frosting.
  • Spiced Version: Add a pinch of cinnamon and nutmeg to the batter for a warmer, more autumnal flavor.

Nutritional Highlights (Per Serving)

CaloriesProteinCarbsFiberFat
~460 kcal5g56g2g24g

Storage

  • Room temperature: Unfrosted cake keeps in an airtight container for up to 3 days.
  • Refrigerator: Frosted cake should be refrigerated and keeps for up to 5 days; bring to room temperature before serving for the best texture.
  • Freezer: Freeze unfrosted cake, well wrapped, for up to 2 months. Thaw completely before frosting.

Frequently Asked Questions

Can I make this as a layer cake instead?

Yes — divide the batter between two 9-inch round pans and bake for 30–35 minutes, then frost between layers and on top.

Can I make this gluten-free?

Yes, using a 1:1 gluten-free flour blend, though the crumb may be slightly more delicate.

Can I omit the pecans for a nut-free version?

Yes — simply omit the pecans or replace with sunflower seeds for crunch without nuts.


Tried this recipe? Leave a comment below and let us know how it turned out! Tag us on Instagram and Facebook — we love seeing your plant-powered creations. Looking for more indulgent vegan cake and dessert recipes? Browse all recipes on Easy Vegan Recipes — new recipes posted every single week!

Vegan German Chocolate Loaf Cake

vegan german chocolate loaf cake

There are chocolate cakes that simply satisfy a craving. And then there are cakes like this Vegan German Chocolate Loaf Cake — the kind that comes out of the oven deeply dark and tender, sliced into thick, generous pieces and topped with a sticky, caramelized coconut pecan frosting so rich and so deeply flavored that it threatens to steal the show from the chocolate cake beneath it. This is that cake. The one that turns a humble loaf pan into something genuinely celebratory. The one where every single bite delivers chocolate, caramel, toasted coconut, and pecans all at once.

German chocolate cake is a beloved American dessert known for its signature coconut pecan frosting — a cooked caramel-style topping studded with toasted coconut and pecans — layered over a tender, deeply chocolate cake. This loaf cake version takes the same iconic flavor combination and bakes it in a simple, easy-to-slice loaf format, finished with a generous spread of that same unmistakable frosting on top.

What makes this cake so outstanding is the coconut pecan frosting — a slow-cooked mixture of coconut sugar or brown sugar, plant milk, and vegan butter, simmered until thickened and caramel-like before toasted coconut and pecans are stirred in, producing a topping that is sticky, chewy, nutty, and deeply caramelized in a way that no simple buttercream could ever replicate.

This recipe is 100% vegan, ready in about 90 minutes including baking and cooling, and absolutely magnificent sliced thick and served with a strong cup of coffee.


Recipe Information

Prep TimeCook TimeTotal TimeServingsCalories
20 mins55 mins90 mins10~440 kcal

Ingredients

For the Chocolate Loaf Cake

  • 1¾ cups (210g) all-purpose flour
  • ¾ cup (65g) cocoa powder
  • 1 tsp baking soda
  • ½ tsp baking powder
  • ½ tsp fine salt
  • 1¼ cups (250g) cane sugar
  • 1 cup (240ml) plant milk
  • 1 tbsp apple cider vinegar
  • ½ cup (120ml) neutral vegetable oil
  • 1 tsp pure vanilla extract
  • ½ cup (120ml) hot strong coffee or hot water

For the Coconut Pecan Frosting

  • 1 cup (200g) coconut sugar or brown sugar
  • 1 cup (240ml) full-fat coconut cream
  • ¼ cup (55g) vegan butter
  • 1 tsp pure vanilla extract
  • Pinch of salt
  • 1½ cups (130g) shredded coconut, toasted
  • 1 cup (110g) pecans, toasted and roughly chopped

Instructions

  1. Preheat and prepare the pan. Preheat the oven to 350°F (175°C). Grease and line a 23 x 13cm (9 x 5 inch) loaf pan with parchment paper.
  2. Make the plant buttermilk. Combine the plant milk and apple cider vinegar in a small bowl and let sit for 5 minutes.
  3. Mix dry ingredients. In a large bowl whisk together the flour, cocoa powder, baking soda, baking powder, salt, and sugar.
  4. Combine wet ingredients. Add the plant buttermilk, oil, and vanilla extract to the dry ingredients and whisk until mostly combined. Slowly pour in the hot coffee or water, whisking until the batter is smooth — it will be quite thin, which is correct.
  5. Bake. Pour the batter into the prepared pan. Bake for 50–58 minutes until a skewer inserted in the center comes out clean or with just a few moist crumbs. Cool in the pan for 15 minutes before turning out onto a wire rack to cool completely.
  6. Make the frosting. While the cake cools, combine the coconut sugar, coconut cream, vegan butter, and salt in a saucepan over medium heat. Bring to a gentle simmer, stirring frequently, and cook for 8–10 minutes until thickened and darkened to a caramel color. Remove from heat and stir in the vanilla extract, toasted coconut, and toasted pecans. Let cool for 10–15 minutes until thickened to a spreadable consistency.
  7. Frost and serve. Once the cake is completely cool, spread the coconut pecan frosting generously over the top, letting some drip down the sides. Slice thick and serve.

Pro Tips

  • Use hot coffee rather than water if possible — it intensifies the chocolate flavor noticeably without adding a coffee taste to the finished cake.
  • Cook the frosting until properly thickened and caramel-colored; an undercooked frosting will be loose and slide off the cake rather than holding its shape.
  • Toast the coconut and pecans before adding to the frosting for maximum flavor depth.
  • Let the cake cool completely before frosting to prevent the topping from melting and sliding off.

The Story Behind German Chocolate Cake

Despite the name, German chocolate cake did not originate in Germany. It is named after Samuel German, an American baker who developed a type of dark baking chocolate in the 1850s. A century later, a Texas homemaker’s recipe using “German’s Chocolate” was published in a newspaper, and the cake — with its now-iconic coconut pecan frosting — became a beloved American classic almost overnight. This loaf version brings that same nostalgic flavor combination into an easier, more everyday format.


Flavor Variations

  • Espresso Chocolate Loaf: Increase the coffee for a more pronounced mocha flavor throughout the cake.
  • Extra Chocolate Version: Fold vegan chocolate chips into the batter before baking for an even richer chocolate experience.
  • Salted Caramel Pecan: Add an extra pinch of flaky sea salt to the finished frosting for a more pronounced salted caramel character.

Nutritional Highlights (Per Serving)

CaloriesProteinCarbsFiberFat
~440 kcal5g54g4g23g

Storage

  • Room temperature: Store frosted cake in an airtight container for up to 2 days.
  • Refrigerator: Keeps well for up to 5 days; bring to room temperature before serving for the best texture.
  • Freezer: Freeze unfrosted cake, well wrapped, for up to 2 months. Thaw completely before frosting.

Frequently Asked Questions

Can I make this as a round layer cake instead?

Yes — divide the batter between two 8-inch round pans and bake for 28–32 minutes, then frost between layers and on top.

Why is my frosting too thin?

The frosting needs to cook long enough to reach a true caramel consistency. If it remains thin after 10 minutes, continue simmering for a few more minutes, stirring constantly, until properly thickened.

Can I make this nut-free?

Yes — omit the pecans from the frosting or replace with sunflower seeds for crunch without nuts.


Tried this recipe? Leave a comment below and let us know how it turned out! Tag us on Instagram and Facebook — we love seeing your plant-powered creations. Looking for more decadent vegan cake and dessert recipes? Browse all recipes on Easy Vegan Recipes — new recipes posted every single week!

Vegan Cheesy Garlic Breadsticks

vegan cheesy garlic breadsticks

There are side dishes you make because something needs to accompany the pasta. And then there are side dishes like these Vegan Cheesy Garlic Breadsticks — the kind that come out of the oven golden and pulling apart, drenched in garlic butter and bubbling with melted vegan cheese, so deeply savory and so completely irresistible that they upstage whatever they are supposed to be accompanying. This is that breadstick. The one that disappears before the main dish has even been plated. The one that makes people reach across the table without waiting to be offered one.

These breadsticks start with a simple yeasted dough that bakes into a soft, pillowy base, brushed generously with garlicky vegan butter and topped with a generous layer of shredded vegan mozzarella that melts into long, glossy strands, then scattered with fresh parsley and a pinch of chili flakes for color and warmth. They are simultaneously one of the simplest and most crowd-pleasing things you can pull out of an oven.

What makes these breadsticks so outstanding is the garlic butter — made with real minced garlic, vegan butter, fresh parsley, and a pinch of salt, brushed both under and over the cheese layer so that the garlic flavor permeates every component of the finished stick rather than sitting only on the surface.

This recipe is 100% vegan, ready in about 90 minutes including rising time, and absolutely wonderful served immediately from the oven, pulled apart by hand, alongside pasta, soup, or a simple salad.


Recipe Information

Prep TimeRise TimeCook TimeTotal TimeServingsCalories
20 mins60 mins15 mins95 mins8~280 kcal

Ingredients

For the Dough

  • 2½ cups (300g) all-purpose flour
  • 2¼ tsp (7g) active dry yeast
  • 1 tsp sugar
  • ¾ tsp salt
  • ¾ cup (180ml) warm water (110°F / 43°C)
  • 2 tbsp olive oil

For the Garlic Butter

  • 5 tbsp vegan butter, softened
  • 4 cloves garlic, very finely minced
  • 2 tbsp fresh parsley, finely chopped
  • Pinch of salt
  • ¼ tsp chili flakes (optional)

For the Topping

  • 1½ cups (180g) vegan mozzarella, shredded
  • Extra fresh parsley for garnish
  • Flaky sea salt for finishing

Optional Add-ins

  • 2 tbsp nutritional yeast mixed into the garlic butter for extra savory depth
  • A light dusting of smoked paprika before baking
  • Vegan parmesan scattered over alongside the mozzarella

Instructions

  1. Activate the yeast. Combine the warm water, sugar, and yeast in a small bowl. Stir gently and let sit for 5–10 minutes until foamy.
  2. Make the dough. In a large bowl combine the flour and salt. Add the activated yeast mixture and olive oil. Mix until a shaggy dough forms, then knead for 7–8 minutes until smooth and elastic.
  3. First rise. Place the dough in a lightly oiled bowl, cover, and let rise in a warm place for 45–60 minutes until doubled.
  4. Make the garlic butter. Mix together the softened vegan butter, minced garlic, fresh parsley, salt, and chili flakes if using until well combined.
  5. Shape the breadsticks. Punch down the risen dough and roll or press into a rectangle approximately 25 x 30cm on a lined baking sheet. Spread half the garlic butter evenly over the surface.
  6. Top with cheese. Scatter the shredded vegan mozzarella evenly over the garlic butter surface. Spread the remaining garlic butter over the cheese.
  7. Rest briefly. Cover loosely and let rest for 15 minutes while preheating the oven to 425°F (220°C).
  8. Bake. Bake for 12–15 minutes until the dough is golden at the edges and the cheese is melted and bubbling with golden patches.
  9. Cut and serve. Remove from the oven and immediately scatter with extra fresh parsley and a pinch of flaky sea salt. Cut into sticks and serve immediately while the cheese is still melted and the garlic butter is fragrant.

Pro Tips

  • Use plenty of garlic butter — these breadsticks are not the place for restraint. A generous, even coating under and over the cheese is what makes them so deeply flavored and satisfying.
  • Shred the vegan mozzarella yourself from a block if possible, as pre-shredded vegan cheese often contains anti-caking agents that prevent it from melting as smoothly.
  • Bake at a high temperature for the best melt and golden color — a lower temperature produces paler, less appealing cheese.
  • Serve immediately while the cheese is still in its best melted state — vegan cheese firms up more quickly than dairy cheese as it cools.

Why These Breadsticks Are Universally Irresistible

Garlic bread in any form occupies a specific category of food that combines three of the most universally appealing flavors — butter, garlic, and bread — in a single preparation. Adding melted cheese introduces a fourth deeply satisfying element (the specific umami and textural satisfaction of molten cheese), and the combination of all four becomes almost impossible to resist for most people regardless of dietary preference.


Flavor Variations

  • Pesto Cheesy Breadsticks: Replace the garlic butter with a generous layer of vegan pesto under the cheese for a herby, nutty version.
  • Marinara Dipping Breadsticks: Serve with a bowl of warm marinara sauce alongside for dipping for a classic Italian-American combination.
  • Everything Bagel Breadsticks: Replace the chili flakes with everything bagel seasoning scattered over the cheese before baking.

Nutritional Highlights (Per Serving — 2 breadsticks)

CaloriesProteinCarbsFiberFat
~280 kcal7g34g1g12g

Storage

  • Best fresh: Cheesy garlic breadsticks are at their absolute peak straight from the oven while the cheese is still melted. Serve immediately whenever possible.
  • Refrigerator: Store in an airtight container for up to 2 days. Reheat in a hot oven or air fryer for 4–5 minutes to restore some of the original texture.
  • Freezer: Freeze baked, cooled breadsticks for up to 1 month. Reheat from frozen in a 375°F (190°C) oven for 10–12 minutes.

Frequently Asked Questions

Can I make these without yeast using store-bought dough?

Yes — store-bought vegan pizza dough works beautifully as the base for these breadsticks and reduces the total time to under 30 minutes.

What vegan mozzarella melts best?

Brands specifically marketed as melting or stretchy vegan mozzarella perform best — check the packaging for melting claims. Block-style vegan mozzarella shredded fresh generally outperforms pre-shredded varieties.

Can I make these gluten-free?

Yes — use a gluten-free pizza dough or a gluten-free flour blend for the yeasted dough. The texture will be slightly different but still delicious when topped generously with garlic butter and cheese.


Tried this recipe? Leave a comment below and let us know how it turned out! Tag us on Instagram and Facebook — we love seeing your plant-powered creations. Looking for more irresistible vegan bread and side dish recipes? Browse all recipes on Easy Vegan Recipes — new recipes posted every single week!