There are cakes that simply satisfy a sweet craving. And then there are cakes like this Vegan Mediterranean Maple-Apple Olive Oil Cake — the kind that comes out of the oven with a delicate, slightly fruity aroma, a moist, tender crumb, and thin slices of caramelized apple arranged across the top, finished with a gentle drizzle of maple syrup that catches the light beautifully. This is that cake. The one that feels at home with afternoon coffee or as the elegant finish to a dinner party. The one where good olive oil does as much work as the apples and maple do.
This cake takes its inspiration from the olive oil cakes found throughout Mediterranean baking, where good quality olive oil replaces butter to create a cake with a distinctively moist crumb and a subtle, savory-edged richness that pairs beautifully with fruit and natural sweeteners. Thin apple slices are arranged across the top before baking, caramelizing gently in the oven, and the whole cake is finished with a light maple glaze.
What makes this cake so outstanding is the olive oil itself — a good, flavorful extra virgin olive oil contributes a subtle fruitiness and richness that is genuinely different from butter, producing a cake that tastes sophisticated and a little unexpected in the best possible way, while staying moist for days after baking.
This recipe is 100% vegan, ready in about an hour, and absolutely wonderful served slightly warm with a cup of tea or coffee.
Recipe Information
Prep Time
Cook Time
Total Time
Servings
Calories
20 mins
40 mins
60 mins
10
~310 kcal
Ingredients
For the Cake
2 cups (240g) all-purpose flour
1½ tsp baking powder
½ tsp baking soda
½ tsp fine salt
1 tsp cinnamon
¾ cup (180ml) good quality extra virgin olive oil
¾ cup (180ml) maple syrup
¾ cup (180ml) plant milk
1 tbsp apple cider vinegar
1 tsp pure vanilla extract
1 medium apple, peeled, cored, and finely diced
For the Topping
1 medium apple, very thinly sliced (unpeeled)
1 tbsp maple syrup, for brushing
½ tsp cinnamon
For the Glaze
¼ cup (60ml) maple syrup
1 tsp lemon juice
Instructions
Preheat and prepare the pan. Preheat the oven to 350°F (175°C). Grease a 23cm (9-inch) round cake pan and line the base with parchment paper.
Make the plant buttermilk. Combine the plant milk and apple cider vinegar in a small bowl and let sit for 5 minutes.
Mix dry ingredients. In a large bowl whisk together the flour, baking powder, baking soda, salt, and cinnamon.
Combine wet ingredients. In a separate bowl whisk together the olive oil, maple syrup, plant buttermilk, and vanilla extract until well combined.
Make the batter. Pour the wet ingredients into the dry ingredients and fold gently until just combined. Fold in the finely diced apple.
Arrange the topping. Pour the batter into the prepared pan and smooth the top. Arrange the thin apple slices in a circular, slightly overlapping pattern over the surface. Brush with the tablespoon of maple syrup and dust with cinnamon.
Bake. Bake for 38–42 minutes until a skewer inserted in the center comes out clean and the apple slices on top are tender and lightly caramelized. Cover loosely with foil partway through if the apple slices begin to brown too quickly.
Cool and glaze. Let the cake cool in the pan for 15 minutes before transferring to a wire rack. Whisk together the maple syrup and lemon juice for the glaze and brush gently over the top of the cooled or slightly warm cake.
Pro Tips
Use a good quality, flavorful extra virgin olive oil — its character genuinely comes through in the finished cake and is part of what makes this cake special.
Slice the apples for the topping very thinly so they cook through and caramelize properly in the baking time rather than staying firm.
Do not overmix the batter once the dry and wet ingredients are combined, to keep the crumb tender.
Cover the apple topping loosely with foil if it begins browning too quickly before the cake has fully baked through.
Why Olive Oil Cakes Work So Well
Olive oil cakes are a beloved tradition throughout Mediterranean baking, prized for producing an exceptionally moist, long-lasting crumb that improves over the first day or two after baking. Unlike butter, olive oil remains liquid at room temperature, which helps keep the finished cake tender for days, while a flavorful extra virgin variety adds a subtle complexity that pairs particularly well with fruit and warm spices like cinnamon.
Flavor Variations
Orange Olive Oil Cake: Add the zest of an orange to the batter and replace some of the plant milk with fresh orange juice for a citrus-forward version.
Pear and Maple Cake: Replace the apple with thinly sliced pear for a softer, more delicate fruit topping.
Walnut Apple Cake: Fold ½ cup of chopped toasted walnuts into the batter for added texture and nuttiness.
Nutritional Highlights (Per Serving)
Calories
Protein
Carbs
Fiber
Fat
~310 kcal
3g
42g
2g
14g
Storage
Room temperature: Store in an airtight container for up to 2 days; the cake stays moist thanks to the olive oil.
Refrigerator: Keeps well for up to 5 days; bring to room temperature before serving.
Freezer: Freeze unglazed cake, well wrapped, for up to 2 months. Thaw completely before glazing and serving.
Frequently Asked Questions
Does the olive oil make the cake taste savory?
Used in this proportion alongside maple syrup and cinnamon, the olive oil adds richness and a subtle complexity rather than a noticeably savory flavor — the cake still tastes distinctly sweet and dessert-like.
Can I use a milder olive oil?
Yes — a milder extra virgin olive oil produces a more neutral-tasting cake, while a robust, fruitier oil will come through more distinctly in the finished flavor.
Can I make this cake gluten-free?
Yes, using a 1:1 gluten-free flour blend, though the crumb may be slightly more delicate.
Tried this recipe? Leave a comment below and let us know how it turned out! Tag us on Instagram and Facebook — we love seeing your plant-powered creations. Looking for more elegant vegan cake and dessert recipes? Browse all recipes on Easy Vegan Recipes — new recipes posted every single week!
There are desserts that make an occasion feel genuinely special. And then there are desserts like this Vegan German Chocolate Cheesecake — the kind that combines the rich, tangy creaminess of a classic cheesecake with the deeply chocolatey base of a German chocolate cake, topped with the iconic sticky coconut pecan frosting that makes German chocolate cake so beloved, into a single, spectacular dessert that looks like it came from a professional bakery and tastes even better than it looks. This is that dessert. The one that silences the table on the first bite. The one that people remember long after the occasion is over.
This cheesecake starts with a rich chocolate Oreo-style cookie crust, filled with a silky cashew and vegan cream cheese filling deeply flavored with dark chocolate and vanilla, baked until set and perfectly smooth, then crowned with the signature German chocolate topping — a slow-cooked caramelized coconut pecan frosting so rich and deeply flavored that it elevates the cheesecake beneath it from excellent to genuinely extraordinary.
What makes this cheesecake so outstanding is the layering of distinct but complementary elements — the crunch of the chocolate crust, the silky richness of the chocolate cheesecake filling, and the sticky, caramelized, texturally complex coconut pecan topping, all present simultaneously in every single forkful.
This recipe is 100% vegan, ready in about 90 minutes of active preparation plus chilling time, and absolutely magnificent served in generous slices at any celebration where you want to demonstrate beyond doubt that plant-based desserts are not a compromise but a genuine upgrade.
Recipe Information
Prep Time
Cook Time
Chill Time
Total Time
Servings
Calories
30 mins
55 mins
6 hours
~8 hours
12
~520 kcal
Ingredients
For the Chocolate Cookie Crust
250g vegan chocolate sandwich cookies (Oreo-style)
5 tbsp vegan butter, melted
For the Chocolate Cheesecake Filling
2 cups (260g) raw cashews, soaked in boiling water for 30 minutes then drained
400g vegan cream cheese, softened
½ cup (120ml) full-fat coconut cream
¾ cup (150g) cane sugar
150g vegan dark chocolate (70%), melted and cooled slightly
2 tbsp cocoa powder
2 tsp pure vanilla extract
2 tbsp cornstarch
Pinch of salt
For the Coconut Pecan Topping
1 cup (200g) brown sugar or coconut sugar
1 cup (240ml) full-fat coconut cream
½ cup (115g) vegan butter
1½ cups (130g) shredded coconut, toasted
1 cup (110g) pecans, toasted and roughly chopped
1 tsp pure vanilla extract
Pinch of salt
Instructions
Make the chocolate crust. Preheat the oven to 325°F (160°C). Process the chocolate cookies in a food processor until fine crumbs form. Add the melted vegan butter and pulse until combined. Press firmly into the base and slightly up the sides of a greased 23cm (9-inch) springform pan. Bake for 8 minutes. Set aside to cool slightly.
Make the cheesecake filling. Place the drained cashews, vegan cream cheese, coconut cream, sugar, melted chocolate, cocoa powder, vanilla extract, cornstarch, and salt in a high-speed blender. Blend for 90 seconds until completely smooth, silky, and lump-free. Taste and adjust sweetness if needed.
Bake the cheesecake. Pour the filling over the prepared crust and smooth the top. Bake at 325°F (160°C) for 45–50 minutes until the edges are set and the center has only a very slight wobble. Do not overbake — the filling firms considerably during chilling.
Cool and chill. Remove from the oven and let cool completely at room temperature, then refrigerate for a minimum of 6 hours, ideally overnight, until completely firm.
Make the coconut pecan topping. In a saucepan over medium heat, combine the brown sugar, coconut cream, vegan butter, and salt. Bring to a simmer, stirring, and cook for 8–10 minutes until thickened and caramelized to a deep golden color. Remove from heat and stir in the vanilla extract, toasted coconut, and toasted pecans. Cool for 15–20 minutes until thickened to a spreadable consistency.
Top and serve. Spread the coconut pecan topping generously over the surface of the chilled cheesecake. Slice with a sharp knife dipped in hot water and wiped between cuts for the cleanest slices.
Pro Tips
Blend the cheesecake filling for the full 90 seconds — any graininess from the cashews is unacceptable in a finished cheesecake and requires thorough blending to eliminate.
Do not overbake the cheesecake — a slight wobble in the center is correct; the filling sets completely during chilling.
Chill for the full 6 hours minimum — ideally overnight — before adding the topping or slicing.
Cook the coconut pecan topping until properly thickened and caramelized; an undercooked topping will be too liquid to hold its shape on the cheesecake.
Dip the knife in hot water and wipe between slices for the most professional, clean presentation.
The Story Behind German Chocolate Cake and Cheesecake
As discussed in our Vegan German Chocolate Loaf Cake recipe, German chocolate cake is an American creation named after Samuel German, whose dark baking chocolate became the base for a now-iconic dessert featuring the signature coconut pecan frosting. This cheesecake adaptation takes that beloved flavor profile — chocolate base, creamy filling, sticky coconut pecan topping — and reimagines it in cheesecake form, which provides a richer, more velvety canvas for all three components than a traditional layer cake.
Flavor Variations
Espresso German Chocolate Cheesecake: Add 1 teaspoon of espresso powder to the cheesecake filling for a mocha depth that amplifies the chocolate flavor throughout.
No-Bake Version: Replace the cornstarch with agar agar and skip the baking — pour the filling over a no-bake crust and refrigerate until set for a lighter, simpler version.
Mini Cheesecakes: Divide the crust and filling between a lined muffin tin for individual portions that are particularly convenient for parties and celebrations.
Nutritional Highlights (Per Serving)
Calories
Protein
Carbs
Fiber
Fat
~520 kcal
8g
54g
4g
32g
Storage
Refrigerator: Store covered in the springform pan or in an airtight container for up to 5 days. The cheesecake actually improves on day 2 as the flavors deepen.
Freezer: Freeze individual slices wrapped tightly for up to 2 months. Thaw overnight in the refrigerator before serving.
Make ahead: This cheesecake is an ideal make-ahead dessert — the filling is best after overnight chilling, making it perfect for preparing the day before any celebration.
Frequently Asked Questions
Can I make this cheesecake without a springform pan?
A springform pan is strongly recommended for the cleanest release and most professional presentation. A deep cake tin lined with parchment paper can work as an alternative if needed.
Why did my cheesecake crack?
Cracking is usually caused by overbaking or cooling too quickly. Remove from the oven while the center still wobbles very slightly, and let cool gradually at room temperature before refrigerating.
Can I make this without cashews?
Cashews can be replaced with additional vegan cream cheese for a simpler filling, though the texture will be slightly different — less silky and more dense than the cashew version.
Tried this recipe? Leave a comment below and let us know how it turned out! Tag us on Instagram and Facebook — we love seeing your plant-powered creations. Looking for more showstopping vegan cheesecake and dessert recipes? Browse all recipes on Easy Vegan Recipes — new recipes posted every single week!
There are breakfasts you eat because mornings demand something. And then there are breakfasts like these Vegan Chocolate Cinnamon Rolls — the kind that fill the entire house with the smell of warm yeast dough and melting chocolate as they bake, that come out of the oven puffed and golden, pulling apart into soft, pillowy spirals with rivers of chocolate running through every single one. This is that breakfast. The one that turns an ordinary weekend morning into something genuinely special. The one people remember long after the plate is empty.
These rolls take the beloved technique of a classic cinnamon roll — a soft, enriched yeasted dough rolled around a generous filling, sliced into spirals, and baked until puffed and golden — and combine it with a rich chocolate and cinnamon filling that melts into gooey pockets throughout each roll. Finished with a simple vanilla glaze, they deliver everything wonderful about a classic cinnamon roll with the added indulgence of real melted chocolate.
What makes these rolls so outstanding is the double filling — a brown sugar cinnamon layer combined with a generous scattering of vegan chocolate chips that melts during baking into gooey, chocolatey pockets throughout the dough, ensuring every single bite delivers both the classic cinnamon roll flavor and a genuine chocolate experience.
This recipe is 100% vegan, ready in about two hours including rising time, and absolutely magnificent eaten warm, pulled apart by hand, with the chocolate still soft and the glaze just beginning to melt into the spirals.
Recipe Information
Prep Time
Rise Time
Cook Time
Total Time
Servings
Calories
20 mins
75 mins
25 mins
2 hrs
10
~390 kcal
Ingredients
For the Dough
3¼ cups (390g) all-purpose flour
2¼ tsp (7g) active dry yeast
¼ cup (50g) cane sugar
½ tsp fine salt
¾ cup (180ml) plant milk, warmed to 110°F (43°C)
¼ cup (55g) vegan butter, melted and slightly cooled
1 tsp pure vanilla extract
For the Filling
⅓ cup (75g) vegan butter, softened
½ cup (100g) brown sugar
1½ tbsp cinnamon
1 cup (170g) vegan chocolate chips
2 tbsp cocoa powder, mixed into the brown sugar
For the Vanilla Glaze
1 cup (120g) powdered sugar
2–3 tbsp plant milk
½ tsp pure vanilla extract
Pinch of salt
Instructions
Activate the yeast. Combine the warm plant milk, sugar, and yeast in a bowl and let sit for 5–10 minutes until foamy on the surface.
Make the dough. In a large bowl or stand mixer combine the flour and salt. Add the activated yeast mixture, melted vegan butter, and vanilla extract. Mix until a shaggy dough forms, then knead for 8–10 minutes by hand or 6 minutes in a stand mixer until smooth and elastic.
First rise. Place the dough in a lightly oiled bowl, cover, and let rise in a warm place for 60–75 minutes until doubled in size.
Make the filling. Mix the brown sugar with the cocoa powder and cinnamon in a small bowl.
Roll and fill. Turn the risen dough out onto a lightly floured surface and roll into a large rectangle, roughly 30 x 45cm. Spread the softened vegan butter evenly over the surface, then sprinkle the cinnamon cocoa sugar mixture evenly over the butter. Scatter the chocolate chips evenly across the entire surface.
Roll and slice. Starting from the long edge, roll the dough tightly into a log. Slice into 10 equal rolls using a sharp knife or unflavored dental floss for the cleanest cuts.
Second rise. Arrange the rolls in a greased baking dish with a little space between each. Cover and let rise for 30–40 minutes until visibly puffed.
Bake. Preheat the oven to 350°F (175°C) and bake for 22–26 minutes until deeply golden on top and cooked through in the center.
Glaze and serve. Whisk together the powdered sugar, plant milk, vanilla extract, and salt until smooth and pourable. Drizzle generously over the warm rolls before serving.
Pro Tips
Use a thermometer to check the milk temperature for activating the yeast — too hot will kill it, too cool will not activate it properly.
Roll the dough as evenly as possible to ensure consistent baking and uniform spirals.
Use unflavored dental floss to slice the rolled log for the cleanest cuts without squashing the spiral.
Do not skip the second rise — it is what produces the light, pillowy texture that makes these rolls so special.
Glaze while the rolls are still warm so the glaze melts slightly into the spirals rather than sitting on top as a thick layer.
Why This Combination Works
The classic cinnamon roll filling of butter, brown sugar, and cinnamon already creates a deeply caramelized, fragrant filling during baking. Adding cocoa powder to that sugar mixture and chocolate chips throughout introduces real chocolate flavor without disrupting the texture or rise of the dough, producing rolls that taste like a genuine hybrid between a classic cinnamon roll and a chocolate pastry.
Flavor Variations
Chocolate Orange Rolls: Add the zest of an orange to the dough and filling for a chocolate orange variation.
Peanut Butter Chocolate Rolls: Spread a thin layer of warmed peanut butter over the filling before adding the chocolate chips.
Espresso Chocolate Rolls: Add a teaspoon of instant espresso powder to the filling for a deeper, mocha-like flavor.
Nutritional Highlights (Per Serving)
Calories
Protein
Carbs
Fiber
Fat
~390 kcal
6g
54g
3g
16g
Storage
Room temperature: Store unglazed rolls in an airtight container for up to 2 days.
Refrigerator: Glazed rolls keep for up to 5 days; warm briefly before serving.
Freezer: Freeze baked, unglazed rolls for up to 2 months. Thaw and warm in the oven, then glaze fresh before serving.
Make ahead: Assemble and slice the rolls, then refrigerate overnight before the second rise; bring to room temperature for about an hour before baking.
Frequently Asked Questions
Can I make the dough the night before?
Yes — after the first rise, refrigerate the dough overnight, then roll, fill, and slice the next morning, allowing extra time for the second rise since the dough will be cold.
Why didn’t my dough rise properly?
This is usually caused by yeast that did not activate due to milk that was too hot or too cold, or expired yeast. Always check the milk temperature and yeast expiration date.
Can I make these gluten-free?
A dedicated gluten-free yeasted dough blend can work, though the texture will be denser than the traditional version.
Tried this recipe? Leave a comment below and let us know how it turned out! Tag us on Instagram and Facebook — we love seeing your plant-powered creations. Looking for more indulgent vegan breakfast and baking recipes? Browse all recipes on Easy Vegan Recipes — new recipes posted every single week!
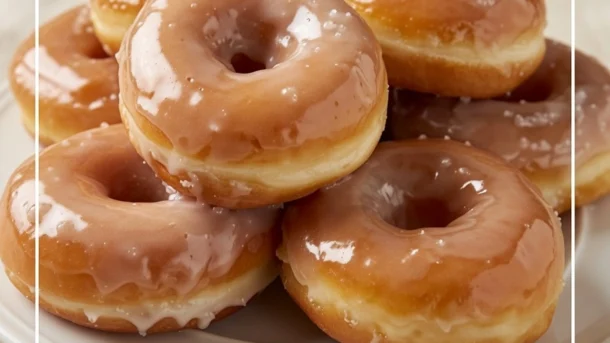
There are moments in baking that stop you completely. And then there are moments like pulling a batch of these Vegan Homemade Krispy Kremes from the hot oil — watching them emerge golden and impossibly light and already puffing up in that characteristic way that makes a great donut look like it is barely holding together from the inside out — dipping them immediately into the warm vanilla glaze and watching that glaze set to a barely-there, translucent, sweet coating that clings to the surface in a way that is so immediately, recognizably right that you understand in that moment exactly why Krispy Kreme became one of the most beloved donut brands in the entire world. These are those donuts. Light as air. Pillowy beyond belief. Glazed to perfection. And completely, entirely plant-based.
These donuts are built on a yeasted dough of extraordinary delicacy — enriched with oat milk, vegan butter, and just enough sugar to feed the yeast and create the characteristic sweetness that makes a great glazed donut so distinctive, and leavened with active dry yeast that produces a rise so dramatic and a crumb so impossibly light and airy that the finished donuts seem to weigh almost nothing despite their generous size. The secret to their legendary lightness is threefold — the enriched dough, the double rise that develops both flavor and structure, and the brief frying at the precise correct temperature that creates a barely-there crust and a completely, gloriously tender interior.
What makes this recipe so genuinely outstanding is its commitment to replicating not merely the flavor of a Krispy Kreme donut but its specific, extraordinary texture. The original Krispy Kreme donut is not merely sweet and fried — it is a specific textural experience of a crust so thin it is almost nonexistent, an interior so soft and pillowy it barely resists the bite, and a glaze so perfectly balanced between sweet and vanilla that it enhances rather than overwhelms everything beneath it. Achieving this in a plant-based version requires specific techniques — the right flour, the right liquid temperature for activating the yeast, the right oil temperature for frying, and the right glaze consistency for dipping — and this recipe delivers all of them.
This recipe is 100% vegan, ready in approximately 2 hours including rising time, and absolutely magnificent eaten warm — ideally within 30 seconds of being glazed, when the glaze is still slightly warm and the donut interior is at its most extraordinary.
Recipe Information
Prep Time
Rise Time
Cook Time
Total Time
Servings
Calories
20 mins
1.5 hours
20 mins
2 hrs 10 mins
12
~280 kcal
Ingredients
For the Donut Dough
3 cups (360g) all-purpose flour plus extra for dusting
2¼ tsp (7g) active dry yeast or instant yeast
¼ cup (50g) cane sugar
½ tsp fine salt
¾ cup (180ml) oat milk, warmed to 110°F (43°C)
¼ cup (55g) vegan butter, melted and slightly cooled
Chocolate glaze: Replace 3 tbsp powdered sugar with 3 tbsp cocoa powder and add 50g melted vegan dark chocolate
Strawberry glaze: Replace oat milk with fresh strawberry puree
Cinnamon sugar: Skip the glaze and roll warm donuts in cinnamon sugar
Filled donuts: Skip cutting the hole and fill with vegan vanilla cream or jam
To Serve
Warm from the fryer with fresh glaze
With a cup of coffee or oat milk latte
Stacked on a plate for the most beautiful presentation
With extra glaze for dipping alongside
Instructions
Activate the yeast. Warm the oat milk to exactly 110°F (43°C) — warm enough to activate the yeast but not so hot it kills it. A kitchen thermometer is ideal here. Add the sugar and yeast to the warm milk, stir gently, and leave for 5–10 minutes until the surface is foamy and the mixture smells distinctly yeasty. If no foam develops after 10 minutes the yeast is dead — start again with fresh yeast and correctly tempered milk.
Make the flax egg. Combine the flaxseed meal and water in a small bowl, stir, and rest for 5 minutes until gel-like.
Make the dough. In a large bowl or stand mixer bowl combine the flour and salt. Add the activated yeast mixture, melted vegan butter, flax egg, and vanilla extract. Mix with a wooden spoon or dough hook until a shaggy dough forms then knead for 8–10 minutes by hand on a lightly floured surface — or 6 minutes on medium speed in a stand mixer — until the dough is smooth, elastic, and slightly tacky but not sticky. It should spring back slowly when poked. This kneading develops the gluten structure that gives the donuts their characteristic chew and ability to hold the light, airy texture created by the yeast.
First rise. Place the dough in a lightly oiled bowl, cover with a clean damp kitchen towel or plastic wrap, and leave in a warm place for 60–75 minutes until doubled in size. The ideal proofing environment is a turned-off oven with just the light on — approximately 80°F (27°C) — which provides the consistent warmth that produces the most reliable, even rise.
Shape the donuts. Turn the risen dough out onto a lightly floured surface and roll to approximately 1.5cm (½ inch) thickness — not thinner or the donuts will be dense after frying. Use a 9cm (3½ inch) round cutter to cut out circles and a 3cm (1¼ inch) cutter or the cap of a bottle for the holes. Re-roll the scraps once to cut additional donuts. Place the cut donuts and holes on a parchment-lined baking sheet with space between each one.
Second rise. Cover the cut donuts loosely with a clean kitchen towel and allow to rise for a further 30–45 minutes until visibly puffed and pillowy — they will not double in size but should look noticeably lighter and more voluminous than when first cut. Do not skip this second rise — it is what produces the extraordinarily light, airy interior that defines a great glazed donut.
Make the glaze. While the donuts complete their second rise whisk together the sifted powdered sugar, warm oat milk, melted vegan butter, vanilla extract, and salt until completely smooth and flowing — the glaze should be thick enough to coat the back of a spoon but thin enough to drip slowly from it. If too thick add oat milk one teaspoon at a time. If too thin add powdered sugar one tablespoon at a time. Keep warm — a glaze that has cooled and thickened will not create the characteristic thin, translucent Krispy Kreme coating.
Fry the donuts. Heat the oil in a large deep pot to exactly 350°F (175°C) — use a thermometer and maintain this temperature throughout frying. Too cool and the donuts absorb oil and are greasy. Too hot and the exterior burns before the interior cooks. Carefully lower 2–3 donuts into the oil at a time — never crowd the pot. Fry for 60–90 seconds per side until deep golden on both sides. Remove with a slotted spoon and drain on a wire rack set over a baking sheet for 30 seconds — not paper towel which makes the bottom soggy.
Glaze immediately. Dip each warm donut into the glaze face down, hold for 3 seconds, lift and allow excess to drip off, then place glaze-side up on the wire rack. The glaze should be thin, translucent, and set within 60–90 seconds on the warm donut. Glaze the donut holes too — they are arguably the best part. Eat immediately for the most extraordinary experience.
Pro Tips for Perfect Vegan Krispy Kreme Style Donuts
Temperature is everything — measure it. The yeast activation temperature, the oil frying temperature, and the glaze temperature are all critical variables that significantly affect the finished result. A kitchen thermometer is not optional for this recipe — it is essential. The difference between oil at 340°F and 360°F produces a meaningfully different donut.
Do not skip the second rise. The first rise develops flavor. The second rise — after the donuts are cut and shaped — develops the specific lightness and airy texture that makes a great glazed donut so extraordinary. Donuts fried without the second rise will be noticeably denser and less pillow-like than those given the full proofing time.
Fry in small batches and maintain oil temperature. Adding too many donuts to the oil at once drops the oil temperature dramatically — causing the donuts to absorb oil before the exterior can set and producing greasy, dense results. Two to three donuts per batch with the oil returned to temperature between batches produces the best results.
Glaze while warm — not hot, not cool. The ideal glazing temperature is approximately 30–60 seconds after the donuts come out of the oil — warm enough that the glaze flows and adheres beautifully but not so hot it slides off before setting. A donut glazed when completely cool will have a thicker, more opaque glaze coating rather than the characteristic thin, translucent Krispy Kreme finish.
Eat within 30 minutes of glazing. Yeasted donuts deteriorate faster than almost any other baked good — the extraordinary lightness and pillowy texture that makes them so spectacular lasts for approximately 2 hours after frying, after which they begin to firm and toughen. Make them, glaze them, eat them immediately.
Use a wire rack not paper towel for draining. Paper towel creates a steam trap under the donut that makes the bottom soggy. A wire rack allows air to circulate completely around the donut and maintains the integrity of the exterior on all surfaces.
The Science of the Perfect Yeasted Donut
A yeasted donut is one of the most technically demanding preparations in all of home baking — and understanding the science behind why each step matters helps explain why these donuts are so extraordinary when the technique is followed precisely.
The yeast is the heart of the recipe. Saccharomyces cerevisiae — the species of yeast used in bread and donut making — consumes the sugars in the dough and produces carbon dioxide gas and ethanol as metabolic byproducts. The carbon dioxide becomes trapped in the gluten network developed during kneading and causes the dough to expand dramatically during both rising periods. The ethanol evaporates during frying and contributes to the characteristic flavor compounds that distinguish a yeasted donut from a cake donut.
The gluten network — developed during the 8–10 minutes of kneading — is what gives the donut its ability to stretch and expand as the yeast produces carbon dioxide without tearing. Insufficient kneading produces a weak gluten network that tears during rising and produces a dense, uneven crumb. Proper kneading produces an elastic, extensible network that stretches smoothly as the dough rises and then sets during frying into the characteristic light, pillowy structure of a great glazed donut.
The frying temperature is critical because of how the starch and protein in the dough respond to heat. At 350°F (175°C) the exterior of the donut sets almost immediately on contact with the oil — creating a thin, sealed crust that traps the moisture inside the donut and keeps the interior extraordinarily tender while the exterior turns golden. At lower temperatures the exterior takes too long to set and absorbs oil before the crust forms. At higher temperatures the exterior burns before the interior has time to cook through.
The glaze — so simple in its ingredients — achieves its characteristic thinness and translucency through the specific ratio of sugar to liquid and the temperature at which it is applied. Applied warm to a warm donut the glaze flows freely over the surface and sets to a thin, even film as both the glaze and the donut cool simultaneously. This simultaneous cooling is what creates the perfectly uniform, paper-thin coating that is the defining visual and textural characteristic of a Krispy Kreme glaze.
Flavor Variations
Chocolate Frosted: Dip in a chocolate glaze made from melted vegan dark chocolate, powdered sugar, oat milk, and vanilla for a rich, deeply chocolatey version that is particularly spectacular with rainbow sprinkles pressed into the surface while the chocolate is still wet.
Strawberry Glazed: Replace the oat milk in the glaze with fresh strawberry puree for a beautiful pink glaze with a natural, vibrant strawberry flavor and color that is particularly stunning in summer.
Cinnamon Sugar: Skip the glaze entirely and roll the warm fried donuts immediately in a generous mixture of cinnamon and caster sugar for a churro-inspired version that is particularly extraordinary with a dipping sauce of vegan chocolate ganache.
Filled Cream Donuts: Skip cutting the hole and fry as full circles. Once cooled use a piping bag to fill each donut with vegan vanilla pastry cream, vegan lemon curd, or strawberry jam for a filled donut that is an entirely different but equally spectacular experience.
Nutritional Highlights (Per Serving — 1 donut with glaze)
Calories
Protein
Carbs
Fiber
Fat
~280 kcal
4g
42g
1g
11g
These donuts are unambiguously an indulgence — and they are completely, unreservedly worth it. Made from real, whole, plant-based ingredients without artificial flavors, preservatives, or additives of any kind, they are a significantly cleaner version of the commercial original while delivering every element of the flavor and texture experience that makes glazed donuts so universally beloved. The flaxseed meal contributes ALA omega-3 fatty acids and lignans. The oat milk base provides beta-glucan fiber. The vegan butter contributes plant-based fats without the cholesterol of dairy butter. This is an indulgence with integrity.
Storage
Best eaten immediately: Yeasted glazed donuts are at their absolute, unequivocal peak within 30–60 minutes of being glazed. The texture deteriorates significantly after 2–3 hours as the yeast structure firms and the glaze absorbs into the surface. Make them and eat them immediately whenever possible.
Room temperature: Store unglazed fried donuts in an airtight container at room temperature for up to 1 day. Warm briefly in a 300°F (150°C) oven for 3–4 minutes before glazing and serving — this partially restores the fresh-fried texture.
Freezer — unfried dough: After cutting the donut shapes freeze them on a parchment-lined baking sheet until solid then transfer to a freezer bag for up to 1 month. Thaw overnight in the refrigerator, complete the second rise at room temperature for 45–60 minutes, then fry and glaze as directed.
Freezer — fried unglazed: Freeze fried unglazed donuts for up to 1 month. Thaw at room temperature for 30 minutes and warm in a 300°F (150°C) oven for 5 minutes before glazing and serving.
Frequently Asked Questions
Can I bake these instead of frying?
Yes — bake at 375°F (190°C) for 12–15 minutes until golden. Baked donuts have a more bread-like texture than fried ones and lack the characteristic thin, barely-there crust of a fried donut but are still delicious and significantly lower in fat. An air fryer at 350°F (175°C) for 5–6 minutes per side produces a result closer to fried than the oven.
Why didn’t my dough rise?
Failed dough rise is almost always caused by dead yeast or milk that was too hot and killed the yeast. Always check that your yeast is within its expiration date and that the milk temperature is between 105–115°F (40–46°C). If the yeast does not foam after 10 minutes in the warm milk it is dead — start again with fresh yeast.
Can I make the dough the night before?
Yes — after the first rise punch the dough down, wrap tightly in plastic wrap, and refrigerate overnight. The next morning remove from the refrigerator, roll and cut the donuts, and allow to complete the second rise at room temperature for 60–75 minutes before frying — the cold dough takes longer to proof than room temperature dough.
What oil is best for frying donuts?
A neutral oil with a high smoke point is essential — canola oil, sunflower oil, or refined coconut oil all work beautifully. Avoid olive oil which has too low a smoke point and too strong a flavor. The oil should be clean and fresh — reused oil with food particles produces off-flavors in the finished donuts.
How do I keep the glaze from being too thick?
The glaze thickens as it cools — reheat briefly in the microwave for 15 seconds and stir well to restore a flowing consistency. If making the glaze in advance keep it in a bowl set over warm water to maintain the ideal dipping temperature and consistency throughout the glazing process.
Can I make these donuts gluten-free?
Gluten-free yeasted donuts are significantly more challenging than regular ones — the gluten network is essential for trapping the carbon dioxide produced by the yeast. A dedicated gluten-free donut flour blend with added psyllium husk or xanthan gum produces the best results. Expect a slightly denser texture than the regular version but still genuinely delicious.
Tried this recipe? Leave a comment below and let us know how it turned out! Tag us on Instagram and Facebook — we love seeing your plant-powered creations. Looking for more indulgent vegan baking and dessert recipes? Browse all recipes on Easy Vegan Recipes — new recipes posted every single week!
There are desserts that combine two great things into something even greater. And then there are desserts like this Vegan Peach Cobbler Cheesecake — the kind that layers a buttery cobbler-style base, a silky, vanilla-scented cheesecake filling, and a bubbling, jammy peach topping into a single dessert so spectacular that it genuinely stops people mid-conversation when it is set on the table. This is that dessert. The one that combines the best of two beloved summer classics into something that is more extraordinary than either could be alone. The one that tastes like the finest summer dessert imaginable.
This cheesecake starts with a cobbler-inspired brown butter oat crust — richer and more textured than a standard cookie crust — filled with a smooth, creamy cashew and vegan cream cheese filling that bakes into a perfectly set, sliceable cheesecake, then crowned with a generous topping of fresh or frozen peaches cooked down with brown sugar and vanilla into a jammy, caramelized peach compote that pools beautifully over the surface of the finished cheesecake.
What makes this cheesecake so outstanding is the textural range — the crumbly, buttery crust, the smooth, creamy cheesecake interior, and the tender, syrupy peach topping all present simultaneously in every single slice, making it genuinely more interesting to eat than any of its three components would be separately.
This recipe is 100% vegan, ready in about 90 minutes of active preparation plus chilling time, and absolutely magnificent served slightly chilled with extra peach compote spooned generously over each slice.
Recipe Information
Prep Time
Cook Time
Chill Time
Total Time
Servings
Calories
25 mins
55 mins
6 hours
~8 hours
12
~440 kcal
Ingredients
For the Cobbler-Style Oat Crust
1½ cups (135g) rolled oats
½ cup (60g) all-purpose flour
⅓ cup (65g) brown sugar
½ tsp cinnamon
Pinch of salt
½ cup (115g) vegan butter, melted
For the Cheesecake Filling
1½ cups (195g) raw cashews, soaked in boiling water for 30 minutes then drained
400g vegan cream cheese, softened
½ cup (120ml) full-fat coconut cream
¾ cup (150g) cane sugar
2 tsp pure vanilla extract
2 tbsp cornstarch
2 tbsp lemon juice
Pinch of salt
For the Peach Cobbler Topping
4 medium peaches (about 600g), peeled and sliced, or 500g frozen peach slices
⅓ cup (65g) brown sugar
1 tbsp lemon juice
½ tsp cinnamon
1 tsp pure vanilla extract
1 tbsp cornstarch mixed with 2 tbsp water
Optional Garnish
Fresh peach slices arranged on top
A dusting of cinnamon
Toasted oat crumble scattered over
Instructions
Make the cobbler crust. Preheat the oven to 325°F (160°C). Combine the rolled oats, flour, brown sugar, cinnamon, and salt in a bowl. Add the melted vegan butter and mix until the mixture resembles wet, clumpy sand. Press firmly into the base and 2cm up the sides of a greased 23cm (9-inch) springform pan. Bake for 12 minutes until set and lightly golden. Cool slightly.
Make the cheesecake filling. Blend the drained cashews, vegan cream cheese, coconut cream, sugar, vanilla extract, cornstarch, lemon juice, and salt in a high-speed blender for 90 seconds until completely smooth and silky.
Bake the cheesecake. Pour the filling over the pre-baked crust and smooth the top. Bake at 325°F (160°C) for 45–50 minutes until the edges are set and the center has a very slight wobble. Cool completely at room temperature then refrigerate for a minimum of 6 hours.
Make the peach topping. Place the sliced peaches, brown sugar, lemon juice, and cinnamon in a saucepan over medium heat. Cook for 8–10 minutes, stirring occasionally, until the peaches have softened and released their juices. Add the vanilla extract and cornstarch slurry and stir for 1–2 minutes until the sauce thickens to a glossy, jammy consistency. Cool to room temperature.
Top and serve. Spoon the cooled peach topping generously over the chilled cheesecake. Garnish with fresh peach slices if desired. Slice with a sharp knife dipped in hot water between cuts.
Pro Tips
Blend the cheesecake filling for the full 90 seconds to ensure a completely smooth, lump-free result — any graininess will be visible in the finished cheesecake.
Cool the peach topping to room temperature before adding to the cheesecake to prevent it melting the surface of the filling.
Chill the cheesecake for the full 6 hours before adding the topping or slicing — the filling needs this time to set completely.
Press the oat crust firmly and evenly, including up the sides, to prevent it crumbling when sliced.
Why This Combination Works So Well
Cobbler and cheesecake pair naturally because they share complementary qualities — cobbler brings warmth, sweetness, and fruit-forward character, while cheesecake brings cool, tangy creaminess and rich substance. Together they balance each other perfectly, the acidity of the cheesecake cutting the sweetness of the peach topping, and the warmth of the cobbler spices contrasting with the cool, neutral vanilla of the cheesecake filling.
Flavor Variations
Blueberry Cobbler Cheesecake: Replace the peach topping with a blueberry compote for a different summer fruit combination.
Spiced Peach Cheesecake: Add a pinch of cardamom and ginger to the peach topping for a more warmly spiced version.
Strawberry Cobbler Cheesecake: Replace the peach topping with a strawberry compote for a brighter, more vibrant fruit variation.
Nutritional Highlights (Per Serving)
Calories
Protein
Carbs
Fiber
Fat
~440 kcal
7g
50g
3g
24g
Storage
Refrigerator: Store covered for up to 5 days. Add the peach topping fresh or store it separately and spoon over each slice as served.
Freezer: Freeze the cheesecake base (without the peach topping) for up to 2 months. Thaw overnight in the refrigerator and add fresh peach topping before serving.
Make ahead: The cheesecake base is ideal for making a day ahead — it improves with overnight chilling, and the peach topping can be made the same day.
Frequently Asked Questions
Can I use canned peaches instead of fresh?
Yes — drain canned peaches thoroughly and reduce the sugar in the topping as canned peaches are usually packed in syrup and already sweet.
Can I make this as a no-bake cheesecake?
Yes — use agar agar instead of cornstarch in the filling and refrigerate rather than baking. The texture will be slightly different but still creamy and sliceable.
Why did my cheesecake crack?
Cracking is caused by overbaking or cooling too rapidly. Remove from the oven while the center still wobbles slightly and cool gradually at room temperature before refrigerating.
Tried this recipe? Leave a comment below and let us know how it turned out! Tag us on Instagram and Facebook — we love seeing your plant-powered creations. Looking for more stunning vegan cheesecake and summer dessert recipes? Browse all recipes on Easy Vegan Recipes — new recipes posted every single week!
There are cakes that exist simply to be sweet. And then there are cakes like this Vegan Italian Cream Pound Cake — the kind that comes out of the oven dense, golden, and impossibly tender, studded throughout with toasted coconut and pecans, and finished with a tangy cream cheese frosting so rich and smooth that the first bite stops conversation completely. This is that cake. The one that turns an ordinary Sunday into an occasion. The one that makes people ask, twice, whether it could really be entirely plant-based.
Italian cream cake is a beloved Southern American dessert known for its incredibly moist, tender crumb studded with coconut and pecans, traditionally finished with a cream cheese frosting. This pound cake adaptation takes the same beloved flavor profile — coconut, pecans, vanilla, and tangy cream cheese — and bakes it into a dense, rich, buttery pound cake format that slices beautifully and keeps even better than a layer cake.
What makes this cake so outstanding is the crumb. Buttermilk-style plant milk, vegan butter, and a careful balance of leavening produce a pound cake that is dense without being heavy, rich without being greasy, and tender enough to almost melt on the tongue, while toasted coconut and pecans folded through the batter add texture and flavor in every single slice.
This recipe is 100% vegan, ready in about 90 minutes including baking and cooling, and absolutely stunning served sliced with a generous swipe of cream cheese frosting and an extra scattering of toasted coconut.
Recipe Information
Prep Time
Cook Time
Total Time
Servings
Calories
20 mins
65 mins
90 mins
12
~460 kcal
Ingredients
For the Cake
3 cups (360g) all-purpose flour
1 tsp baking powder
½ tsp baking soda
½ tsp fine salt
1 cup (225g) vegan butter, softened
1¾ cups (350g) cane sugar
1 cup (240ml) plant milk
1 tbsp apple cider vinegar
2 tsp pure vanilla extract
1 cup (85g) shredded coconut, toasted
1 cup (110g) pecans, toasted and roughly chopped
For the Cream Cheese Frosting
250g vegan cream cheese, softened
½ cup (115g) vegan butter, softened
3 cups (360g) powdered sugar, sifted
1½ tsp pure vanilla extract
Pinch of salt
For Garnish
Extra toasted coconut
Extra toasted pecans, chopped
Instructions
Toast the coconut and pecans. Spread the shredded coconut and chopped pecans separately on a baking sheet and toast at 325°F (160°C) for 5–7 minutes, watching closely, until lightly golden and fragrant. Set aside to cool.
Make the plant buttermilk. Combine the plant milk and apple cider vinegar in a small bowl and let sit for 5 minutes until slightly thickened.
Preheat and prepare the pan. Preheat the oven to 325°F (160°C). Grease a 10-inch bundt or tube pan thoroughly, including all crevices.
Mix dry ingredients. In a bowl whisk together the flour, baking powder, baking soda, and salt.
Cream butter and sugar. In a large bowl beat the vegan butter and sugar together for 3–4 minutes until pale and fluffy.
Combine wet and dry. Add the vanilla extract and plant buttermilk to the butter mixture and mix briefly. Add the flour mixture in two additions, folding gently until just combined — do not overmix.
Fold in coconut and pecans. Gently fold in the toasted coconut and pecans until evenly distributed throughout the batter.
Bake. Pour the batter into the prepared pan and smooth the top. Bake for 60–70 minutes until a skewer inserted in the center comes out clean and the top is deeply golden. Cool in the pan for 15 minutes before turning out onto a wire rack to cool completely.
Make the frosting. Beat the vegan cream cheese and vegan butter together until smooth. Add the powdered sugar gradually, beating between additions, then add the vanilla extract and salt. Beat until light and fluffy.
Frost and garnish. Once the cake is completely cool, spread or drizzle the cream cheese frosting generously over the top, allowing it to drip down the sides. Scatter with extra toasted coconut and pecans before slicing.
Pro Tips
Toast the coconut and pecans before adding to the batter — this dramatically deepens their flavor compared to using them raw.
Do not overmix the batter once the flour is added, or the dense, tender pound cake texture will become tough.
Cool the cake completely before frosting, or the frosting will melt and slide off.
Use room temperature butter and cream cheese for the smoothest, lump-free frosting.
The Story Behind Italian Cream Cake
Despite its name, Italian cream cake is widely believed to have Southern American origins rather than Italian ones, becoming a beloved celebration cake across the American South in the mid-twentieth century. Its signature combination of coconut, pecans, and tangy cream cheese frosting has made it a staple at birthdays, holidays, and potlucks ever since. This pound cake version brings the same beloved flavor combination into a denser, easier-to-slice, easier-to-store format.
Flavor Variations
Lemon Italian Cream Cake: Add lemon zest to the batter and frosting for a brighter, citrus-forward version.
Chocolate Drizzle: Drizzle melted vegan chocolate over the finished cake alongside the cream cheese frosting.
Spiced Version: Add a pinch of cinnamon and nutmeg to the batter for a warmer, more autumnal flavor.
Nutritional Highlights (Per Serving)
Calories
Protein
Carbs
Fiber
Fat
~460 kcal
5g
56g
2g
24g
Storage
Room temperature: Unfrosted cake keeps in an airtight container for up to 3 days.
Refrigerator: Frosted cake should be refrigerated and keeps for up to 5 days; bring to room temperature before serving for the best texture.
Freezer: Freeze unfrosted cake, well wrapped, for up to 2 months. Thaw completely before frosting.
Frequently Asked Questions
Can I make this as a layer cake instead?
Yes — divide the batter between two 9-inch round pans and bake for 30–35 minutes, then frost between layers and on top.
Can I make this gluten-free?
Yes, using a 1:1 gluten-free flour blend, though the crumb may be slightly more delicate.
Can I omit the pecans for a nut-free version?
Yes — simply omit the pecans or replace with sunflower seeds for crunch without nuts.
Tried this recipe? Leave a comment below and let us know how it turned out! Tag us on Instagram and Facebook — we love seeing your plant-powered creations. Looking for more indulgent vegan cake and dessert recipes? Browse all recipes on Easy Vegan Recipes — new recipes posted every single week!
There are chocolate cakes that simply satisfy a craving. And then there are cakes like this Vegan German Chocolate Loaf Cake — the kind that comes out of the oven deeply dark and tender, sliced into thick, generous pieces and topped with a sticky, caramelized coconut pecan frosting so rich and so deeply flavored that it threatens to steal the show from the chocolate cake beneath it. This is that cake. The one that turns a humble loaf pan into something genuinely celebratory. The one where every single bite delivers chocolate, caramel, toasted coconut, and pecans all at once.
German chocolate cake is a beloved American dessert known for its signature coconut pecan frosting — a cooked caramel-style topping studded with toasted coconut and pecans — layered over a tender, deeply chocolate cake. This loaf cake version takes the same iconic flavor combination and bakes it in a simple, easy-to-slice loaf format, finished with a generous spread of that same unmistakable frosting on top.
What makes this cake so outstanding is the coconut pecan frosting — a slow-cooked mixture of coconut sugar or brown sugar, plant milk, and vegan butter, simmered until thickened and caramel-like before toasted coconut and pecans are stirred in, producing a topping that is sticky, chewy, nutty, and deeply caramelized in a way that no simple buttercream could ever replicate.
This recipe is 100% vegan, ready in about 90 minutes including baking and cooling, and absolutely magnificent sliced thick and served with a strong cup of coffee.
Recipe Information
Prep Time
Cook Time
Total Time
Servings
Calories
20 mins
55 mins
90 mins
10
~440 kcal
Ingredients
For the Chocolate Loaf Cake
1¾ cups (210g) all-purpose flour
¾ cup (65g) cocoa powder
1 tsp baking soda
½ tsp baking powder
½ tsp fine salt
1¼ cups (250g) cane sugar
1 cup (240ml) plant milk
1 tbsp apple cider vinegar
½ cup (120ml) neutral vegetable oil
1 tsp pure vanilla extract
½ cup (120ml) hot strong coffee or hot water
For the Coconut Pecan Frosting
1 cup (200g) coconut sugar or brown sugar
1 cup (240ml) full-fat coconut cream
¼ cup (55g) vegan butter
1 tsp pure vanilla extract
Pinch of salt
1½ cups (130g) shredded coconut, toasted
1 cup (110g) pecans, toasted and roughly chopped
Instructions
Preheat and prepare the pan. Preheat the oven to 350°F (175°C). Grease and line a 23 x 13cm (9 x 5 inch) loaf pan with parchment paper.
Make the plant buttermilk. Combine the plant milk and apple cider vinegar in a small bowl and let sit for 5 minutes.
Mix dry ingredients. In a large bowl whisk together the flour, cocoa powder, baking soda, baking powder, salt, and sugar.
Combine wet ingredients. Add the plant buttermilk, oil, and vanilla extract to the dry ingredients and whisk until mostly combined. Slowly pour in the hot coffee or water, whisking until the batter is smooth — it will be quite thin, which is correct.
Bake. Pour the batter into the prepared pan. Bake for 50–58 minutes until a skewer inserted in the center comes out clean or with just a few moist crumbs. Cool in the pan for 15 minutes before turning out onto a wire rack to cool completely.
Make the frosting. While the cake cools, combine the coconut sugar, coconut cream, vegan butter, and salt in a saucepan over medium heat. Bring to a gentle simmer, stirring frequently, and cook for 8–10 minutes until thickened and darkened to a caramel color. Remove from heat and stir in the vanilla extract, toasted coconut, and toasted pecans. Let cool for 10–15 minutes until thickened to a spreadable consistency.
Frost and serve. Once the cake is completely cool, spread the coconut pecan frosting generously over the top, letting some drip down the sides. Slice thick and serve.
Pro Tips
Use hot coffee rather than water if possible — it intensifies the chocolate flavor noticeably without adding a coffee taste to the finished cake.
Cook the frosting until properly thickened and caramel-colored; an undercooked frosting will be loose and slide off the cake rather than holding its shape.
Toast the coconut and pecans before adding to the frosting for maximum flavor depth.
Let the cake cool completely before frosting to prevent the topping from melting and sliding off.
The Story Behind German Chocolate Cake
Despite the name, German chocolate cake did not originate in Germany. It is named after Samuel German, an American baker who developed a type of dark baking chocolate in the 1850s. A century later, a Texas homemaker’s recipe using “German’s Chocolate” was published in a newspaper, and the cake — with its now-iconic coconut pecan frosting — became a beloved American classic almost overnight. This loaf version brings that same nostalgic flavor combination into an easier, more everyday format.
Flavor Variations
Espresso Chocolate Loaf: Increase the coffee for a more pronounced mocha flavor throughout the cake.
Extra Chocolate Version: Fold vegan chocolate chips into the batter before baking for an even richer chocolate experience.
Salted Caramel Pecan: Add an extra pinch of flaky sea salt to the finished frosting for a more pronounced salted caramel character.
Nutritional Highlights (Per Serving)
Calories
Protein
Carbs
Fiber
Fat
~440 kcal
5g
54g
4g
23g
Storage
Room temperature: Store frosted cake in an airtight container for up to 2 days.
Refrigerator: Keeps well for up to 5 days; bring to room temperature before serving for the best texture.
Freezer: Freeze unfrosted cake, well wrapped, for up to 2 months. Thaw completely before frosting.
Frequently Asked Questions
Can I make this as a round layer cake instead?
Yes — divide the batter between two 8-inch round pans and bake for 28–32 minutes, then frost between layers and on top.
Why is my frosting too thin?
The frosting needs to cook long enough to reach a true caramel consistency. If it remains thin after 10 minutes, continue simmering for a few more minutes, stirring constantly, until properly thickened.
Can I make this nut-free?
Yes — omit the pecans from the frosting or replace with sunflower seeds for crunch without nuts.
Tried this recipe? Leave a comment below and let us know how it turned out! Tag us on Instagram and Facebook — we love seeing your plant-powered creations. Looking for more decadent vegan cake and dessert recipes? Browse all recipes on Easy Vegan Recipes — new recipes posted every single week!
There are pasta dinners that feel genuinely special. And then there are pasta dinners like this Vegan Cannelloni — the kind that comes out of the oven bubbling with rich tomato sauce, with pasta tubes so generously filled with creamy ricotta-style cashew and spinach filling that they have expanded slightly in the dish, their tops blistered and golden where the sauce has caramelized against them. This is that dinner. The one that looks like it took considerably more effort than it actually did. The one that makes a weeknight feel like a dinner party. The one that disappears from the baking dish before anyone realizes they have had seconds.
This recipe fills dried cannelloni tubes with a rich filling built on cashew ricotta, wilted spinach, and herbs — a filling so satisfying and so deeply flavored that it rivals any dairy-based ricotta in both texture and taste — then nestles them in a generous, garlicky tomato sauce and bakes until the pasta is perfectly tender, the filling is set, and the top is golden and slightly crisped at the edges.
What makes this cannelloni so outstanding is the cashew ricotta — blended from soaked cashews with lemon juice, nutritional yeast, and garlic into a smooth, creamy, subtly tangy filling that behaves identically to dairy ricotta in this application, holding its shape inside the pasta tubes while baking into a rich, satisfying filling of extraordinary flavor.
This recipe is 100% vegan, ready in about 65 minutes, and absolutely magnificent served directly from the baking dish at the table with a simple green salad alongside.
Recipe Information
Prep Time
Cook Time
Total Time
Servings
Calories
25 mins
40 mins
65 mins
4
~480 kcal
Ingredients
For the Cashew Ricotta Filling
1½ cups (195g) raw cashews, soaked in boiling water for 30 minutes then drained
3 tbsp nutritional yeast
2 tbsp lemon juice
1 clove garlic
½ tsp salt
¼ tsp black pepper
3 tbsp water, to reach consistency
For the Spinach Filling Mix-in
3 cups (90g) fresh spinach, wilted and squeezed very dry
½ cup (60g) vegan mozzarella, shredded (optional topping)
Fresh basil for garnish
Instructions
Make the cashew ricotta. Blend the drained cashews, nutritional yeast, lemon juice, garlic, salt, pepper, and water in a high-speed blender until smooth and creamy — similar in consistency to thick ricotta. Taste and adjust salt and lemon. Set aside.
Prepare the spinach. Wilt the spinach in a dry pan over medium heat for 2–3 minutes. Transfer to a clean towel and squeeze very thoroughly until almost completely dry. Roughly chop and mix into the cashew ricotta along with the nutmeg. Season generously.
Make the tomato sauce. Heat the olive oil in a wide pan over medium heat. Add the onion and cook for 5 minutes until softened. Add the garlic and cook for 60 seconds. Add both cans of tomatoes, oregano, basil, and sugar. Simmer for 10 minutes until slightly reduced. Season generously.
Preheat the oven. Preheat to 375°F (190°C). Spread a thin layer of tomato sauce across the base of a deep baking dish.
Fill the cannelloni. Transfer the spinach ricotta filling to a piping bag or a zip-lock bag with the corner snipped off. Pipe the filling into each dry cannelloni tube, filling generously from both ends if needed. Alternatively use a small spoon, though a piping bag is significantly faster and less messy.
Assemble. Nestle the filled cannelloni tubes in a single layer over the sauce base in the baking dish. Pour the remaining tomato sauce over the top, ensuring every tube is covered — exposed pasta will not soften properly during baking. Top with shredded vegan mozzarella if using.
Bake covered then uncovered. Cover tightly with foil and bake for 30 minutes. Remove the foil and bake for a further 10 minutes until the sauce is bubbling, the top is golden, and a knife inserted into the thickest tube meets no resistance.
Rest and serve. Let rest for 5 minutes before serving. Garnish with fresh basil and serve directly from the baking dish.
Pro Tips
Use a piping bag to fill the cannelloni — it is the single change that makes this recipe dramatically easier than using a spoon, which is slow and messy.
Ensure every tube is completely covered in tomato sauce before baking — any exposed pasta will remain hard and undercooked in the finished dish.
Squeeze the spinach until completely dry before adding to the ricotta — excess moisture makes the filling too wet and can cause the tubes to burst during baking.
Cover tightly with foil for the first 30 minutes — the steam trapped under the foil is what cooks the pasta through from the inside.
The History of Cannelloni
Cannelloni is one of the most beloved baked pasta dishes in Italian cooking, originating in the Southern Italian tradition of stuffed and baked pasta that also produced manicotti, lasagne, and stuffed shells. The name derives from the Italian word canna, meaning cane or tube, referring to the cylindrical pasta shape that characterizes the dish. Traditional fillings include ricotta and spinach, meat and béchamel, and various regional combinations, all united by the technique of filling the tubes before baking them in sauce until the pasta softens and the filling sets into a rich, unified whole. This vegan version is entirely faithful to the spinach ricotta tradition, producing a result indistinguishable in character from the dairy original.
Flavor Variations
Mushroom and Walnut Cannelloni: Replace half the spinach with finely chopped sautéed mushrooms and add crushed toasted walnuts to the filling for a richer, earthier version.
Pumpkin and Sage Cannelloni: Add roasted pumpkin puree to the cashew ricotta and season with sage for a beautiful autumn version.
Béchamel Topped Cannelloni: Make a simple vegan béchamel from plant milk and vegan butter to pour over the top of the cannelloni instead of or alongside the tomato sauce.
Nutritional Highlights (Per Serving)
Calories
Protein
Carbs
Fiber
Fat
~480 kcal
16g
58g
6g
20g
Storage
Refrigerator: Store covered in the baking dish or in an airtight container for up to 4 days. Reheat covered in the oven at 350°F (175°C) for 20 minutes.
Freezer: Assemble completely, cover tightly, and freeze for up to 2 months before baking. Bake from frozen at 375°F (190°C) covered for 50 minutes then uncovered for 15 minutes.
Make ahead: Assemble up to 24 hours before baking and refrigerate covered. Add 10 extra minutes to the covered baking time when cooking from cold.
Frequently Asked Questions
Can I use fresh pasta sheets instead of dried tubes?
Yes — blanch fresh lasagne sheets briefly, fill and roll them into tubes, then bake as directed. This produces a more delicate, silkier pasta layer than dried tubes.
Why are my cannelloni still hard after baking?
Hard cannelloni is caused by insufficient sauce coverage, under-baking, or foil that was not sealed tightly enough. Ensure every tube is submerged in sauce, bake for the full time, and seal the foil tightly to trap steam.
Can I make this nut-free?
Yes — replace the cashew ricotta with a mixture of firm tofu blended smooth with nutritional yeast, lemon juice, and salt for a nut-free filling with a similar texture.
Tried this recipe? Leave a comment below and let us know how it turned out! Tag us on Instagram and Facebook — we love seeing your plant-powered creations. Looking for more impressive vegan pasta and Italian dinner recipes? Browse all recipes on Easy Vegan Recipes — new recipes posted every single week!
There are side dishes that complete a meal. And then there are side dishes like these Vegan Scalloped Potatoes — the kind that become the meal, that make everything else on the table a pleasant supporting act to the real event happening in the baking dish, that come out of the oven bubbling and golden and smelling so extraordinarily of caramelized cream and garlic and herbs that people are already seated and ready before you have even called them to the table. This is that dish. The one that makes holiday tables feel genuinely special. The one that gets requested at every family gathering from the moment it first appears. The one that is so deeply, warmly, extravagantly comforting that eating it feels like being taken care of in the most fundamental and delicious way possible.
These are scalloped potatoes of extraordinary luxury and extraordinary deliciousness — thin, even slices of tender potato layered in a deep baking dish with a cashew cream sauce of such silky, garlic-scented richness that it is completely and utterly indistinguishable from the finest dairy cream, seasoned generously with fresh thyme, garlic, nutmeg, and an extraordinary amount of nutritional yeast that creates a deep, savory, almost cheesy depth throughout every layer, and baked until the top is deeply golden and slightly crisped while the layers beneath are completely yielding, perfectly tender, and bathed in a sauce that has thickened around them into something that is simultaneously sauce and custard and pure comfort.
What makes this recipe so genuinely outstanding is the cashew cream sauce. Raw cashews soaked briefly in boiling water and blended with garlic, nutritional yeast, lemon, and vegetable broth into the most velvety, dairy-free cream imaginable — a cream so rich, so silky, and so deeply flavored that it performs every function that dairy cream performs in scalloped potatoes, including the slow thickening during baking as its proteins and starches concentrate around the potato layers into a sauce of extraordinary body and richness. There is no compromise here. No thinness. No absence. Just a different and in many ways more interesting path to the same extraordinary result.
This recipe is 100% vegan, naturally gluten-free, ready in 75 minutes of largely unattended baking, and absolutely magnificent served as a holiday side dish, a weeknight comfort dinner, or the centrepiece of any gathering where you want to demonstrate beyond any possible doubt that plant-based cooking is not about deprivation but about genuine, luxurious abundance.
Recipe Information
Prep Time
Cook Time
Total Time
Servings
Calories
20 mins
55 mins
75 mins
6
~380 kcal
Ingredients
For the Cashew Cream Sauce
1½ cups (200g) raw cashews, soaked in boiling water for 20 minutes then drained
2 cups (480ml) vegetable broth
1 cup (240ml) unsweetened oat milk
6 tbsp nutritional yeast
4 cloves garlic, minced
2 tbsp lemon juice
1 tbsp white miso paste
1 tsp onion powder
½ tsp nutmeg
½ tsp salt
¼ tsp white pepper
For the Potato Layers
1.2kg (about 6 medium) Yukon Gold or Russet potatoes, peeled and very thinly sliced
1 medium white onion, very thinly sliced
4 cloves garlic, very thinly sliced
2 tbsp fresh thyme leaves (or 1 tsp dried thyme)
1 tbsp fresh rosemary, very finely chopped
Salt and black pepper for seasoning between layers
For the Top
½ cup (60g) vegan cheese, shredded (optional but spectacular)
1 tbsp vegan butter, cut into small pieces
Extra fresh thyme for garnish
Smoked paprika for color
Optional Add-ins Between Layers
1 cup (150g) frozen spinach, thawed and squeezed dry
1 cup (100g) mushrooms, thinly sliced and sautéed
½ cup (60g) sun-dried tomatoes, roughly chopped
1 medium leek, thinly sliced and softened in olive oil
To Serve
As a holiday side dish alongside roasted vegetables
With a simple green salad
As a main course with crusty bread
Alongside vegan roasts and mains
With steamed green beans or asparagus
At any gathering as the star side dish
Instructions
Preheat the oven and soak the cashews. Preheat your oven to 375°F (190°C) and grease a deep 23 x 33cm (9 x 13 inch) baking dish generously with vegan butter or olive oil. Place the cashews in a bowl, cover with boiling water, and soak for 20 minutes. This soaking time is essential — properly soaked cashews blend to a completely smooth, silky cream. Under-soaked cashews produce a grainy sauce.
Slice the potatoes. While the cashews soak slice the potatoes into very thin, even rounds — approximately 3mm (⅛ inch) thick. A mandoline produces the most consistently thin, even slices and is strongly recommended for this recipe. Consistent slice thickness is critical — uneven slices produce unevenly cooked layers with some pieces perfectly tender while others are still firm. Place the sliced potatoes in a bowl of cold water to prevent browning while you prepare the sauce.
Make the cashew cream sauce. Drain the soaked cashews and place in a high-speed blender with the vegetable broth, oat milk, nutritional yeast, minced garlic, lemon juice, white miso paste, onion powder, nutmeg, salt, and white pepper. Blend on the highest speed for 90 seconds until completely smooth, silky, and flowing with absolutely no graininess or texture remaining. Taste the sauce — it should be deeply savory, slightly tangy, richly flavored, and with a pronounced cheesy depth from the nutritional yeast. Adjust seasoning confidently — this sauce needs to season the entire dish.
Sauté the aromatics. Heat a small amount of olive oil in a skillet over medium heat. Add the thinly sliced onion and cook for 4–5 minutes until softened. Add the sliced garlic and cook for 60 seconds until fragrant. Set aside.
Begin layering. Drain the potato slices and pat dry with kitchen towels — removing surface moisture produces more even cooking and better absorption of the cream sauce. Begin building the layers in the prepared baking dish. Start with a thin layer of cashew cream sauce spread across the base of the dish. Add a single layer of overlapping potato slices — arrange them like overlapping scales, each slice covering approximately half of the previous one for the most even, beautiful presentation. Scatter some of the softened onion and garlic mixture over the potatoes. Season generously with salt and pepper. Scatter fresh thyme and rosemary. Pour a generous ladle of cashew cream sauce over the layer — enough to just cover the potatoes.
Continue layering. Repeat the layering process — potatoes, onion, herbs, seasoning, cream sauce — until all ingredients are used, finishing with a layer of potatoes on top. Pour the remaining cashew cream sauce over the final potato layer — it should come just to the top of the potatoes but not overflow. Press the top layer of potatoes gently into the sauce with the back of a spoon.
Top and cover. If using vegan cheese scatter it evenly over the top potato layer. Dot with the small pieces of vegan butter. Scatter extra thyme leaves and a light dusting of smoked paprika over the surface. Cover the baking dish tightly with aluminum foil — the steam trapped under the foil during the first stage of baking is what cooks the potatoes through to complete tenderness before the top is allowed to brown.
Bake covered then uncovered. Bake covered for 40 minutes until the potatoes are just tender when pierced through the foil with a thin knife — the knife should meet only slight resistance. Remove the foil and bake uncovered for a further 15–20 minutes until the top is deeply golden, slightly crisped at the edges, and the sauce is bubbling vigorously around the sides of the dish.
Rest before serving. Remove from the oven and allow to rest for 10 minutes before serving — this resting time allows the sauce to thicken and set slightly, producing cleaner, more beautiful servings rather than the flowing, loose result of a dish served immediately from the oven. Garnish with fresh thyme leaves and serve directly from the baking dish at the table.
Pro Tips for Perfect Vegan Scalloped Potatoes
Slice the potatoes on a mandoline. Consistent, paper-thin slices are the foundation of great scalloped potatoes — and consistent slices require a mandoline or extremely careful, skilled knife work. Uneven slices produce uneven cooking with some layers perfectly tender and others still firm when the dish is done. A mandoline set to 3mm produces the ideal slice for this recipe.
Season every layer generously. Scalloped potatoes require confident, layered seasoning — salt added only to the sauce will not penetrate every layer evenly. Season each potato layer with salt and pepper before adding the sauce for a dish that is uniformly, deeply seasoned throughout rather than well-seasoned on top and bland in the middle.
Use Yukon Gold potatoes. Yukon Gold potatoes have a naturally buttery flavor, a waxy texture that holds their shape during baking rather than dissolving, and a beautiful golden color that makes the finished dish look particularly appetizing. Russet potatoes also work well — they are starchier and produce a slightly softer result. Avoid red-skinned potatoes which stay too firm.
Blend the cashew sauce for the full 90 seconds. A perfectly smooth, completely lump-free cashew cream requires sustained high-speed blending. Any residual graininess in the sauce will be visible in the finished dish and will affect the texture of the cream as it thickens during baking. Blend until the sauce flows like thick dairy cream with absolutely no texture remaining.
Cover tightly for the first 40 minutes. The steam trapped under the foil during the first stage of baking is essential for cooking the potato layers through to complete tenderness. Uncovering too early produces undercooked potatoes beneath a beautifully browned top — a common and deeply frustrating mistake. Keep covered until the potatoes are just tender before removing the foil to brown the top.
Rest for 10 minutes before serving. The sauce in freshly baked scalloped potatoes is liquid and flowing — resting for 10 minutes allows it to thicken and set to the perfect consistency for serving. A dish served immediately from the oven produces servings that fall apart. A dish rested for 10 minutes produces beautiful, layered servings that hold their shape on the plate.
The History of Scalloped Potatoes
Scalloped potatoes — known in French culinary tradition as gratin dauphinois — is one of the most beloved and most enduringly popular potato preparations in the entire Western culinary canon. The dish originated in the Dauphiné region of southeastern France where it appears in cookbooks as early as the eighteenth century in a form that is essentially identical to the modern preparation — thinly sliced potatoes baked in cream and garlic until tender and golden.
The name scalloped derives from the old English culinary term to scallop — meaning to bake in a sauce in a shallow dish — which was applied to numerous preparations in nineteenth century American cooking. The French original uses nothing more than potatoes, cream, garlic, salt, and pepper — a preparation of such austere simplicity and such extraordinary result that it has remained largely unchanged for over two centuries.
What makes scalloped potatoes so enduringly beloved across cultures and generations is their extraordinary textural transformation during baking. Raw potato slices are firm, starchy, and relatively flavorless. After 55 minutes in a hot oven bathed in cream they become completely yielding, deeply flavored from the garlic and herbs that surround them, and coated in a sauce that has thickened around them during baking into something halfway between cream and custard — simultaneously rich and light, substantial and flowing, warming and luxurious.
This vegan version achieves exactly this transformation through the cashew cream sauce — which behaves during baking in a remarkably similar way to dairy cream, thickening slowly as its proteins concentrate and its starches absorb the moisture released by the potatoes, setting to the characteristic layered, custard-like consistency of the original.
Flavor Variations
Truffle Scalloped Potatoes: Add 2 tablespoons of truffle oil to the cashew cream sauce and finish with a drizzle of additional truffle oil before serving for an extraordinarily luxurious version that is particularly spectacular for holiday entertaining.
Spinach and Artichoke Scalloped Potatoes: Add layers of thawed frozen spinach and roughly chopped artichoke hearts between the potato layers for a version inspired by spinach artichoke dip that is extraordinarily rich and deeply satisfying.
Sweet Potato Scalloped Potatoes: Replace half the regular potatoes with thinly sliced sweet potato for a version with a beautiful orange-and-white layered appearance and a natural sweetness from the sweet potato that contrasts magnificently with the savory cream sauce.
Mushroom Scalloped Potatoes: Add layers of thinly sliced cremini mushrooms sautéed with garlic and thyme between the potato layers for a version with deep, earthy umami richness that makes the finished dish taste significantly more complex than the potato-only version.
Nutritional Highlights (Per Serving)
Calories
Protein
Carbs
Fiber
Fat
~380 kcal
12g
52g
5g
15g
At 380 calories per serving these scalloped potatoes deliver genuine indulgence alongside meaningful nutrition. Potatoes provide complex carbohydrates, Vitamin C, potassium, Vitamin B6, and resistant starch that supports gut microbiome health. The cashew cream sauce contributes 12 grams of plant-based protein per serving alongside heart-healthy monounsaturated fats, magnesium, phosphorus, and zinc. The nutritional yeast provides B vitamins including B12 in fortified varieties alongside all nine essential amino acids. Fresh thyme contributes thymol with potent antimicrobial and antioxidant properties. Garlic contributes allicin with cardiovascular protective and antimicrobial properties.
Storage
Refrigerator: Store cooled scalloped potatoes covered tightly in the baking dish or in an airtight container in the refrigerator for up to 4 days. The dish actually improves significantly on day 2 as the sauce continues to absorb into the potato layers and the flavors deepen and meld. Reheat covered with foil in a 350°F (175°C) oven for 20–25 minutes until heated through, removing the foil for the final 5 minutes to re-crisp the top.
Freezer: Scalloped potatoes freeze well for up to 2 months. Cool completely before covering tightly with plastic wrap and foil. Thaw overnight in the refrigerator and reheat covered in a 350°F (175°C) oven for 30–35 minutes. The texture of the potatoes changes slightly during freezing — they become slightly softer — but the flavor remains excellent.
Make ahead: This is an outstanding make-ahead dish for holidays and entertaining. Assemble completely, cover tightly, and refrigerate for up to 24 hours before baking. Add 10–15 minutes to the covered baking time when cooking from cold. The assembled unbaked dish can also be frozen for up to 1 month — thaw completely in the refrigerator before baking.
Individual portions: Reheat individual portions in a small oven-safe dish at 350°F (175°C) for 15 minutes or in the microwave for 2–3 minutes — adding a splash of plant milk if the sauce has become too thick during storage.
Frequently Asked Questions
What potatoes work best for scalloped potatoes?
Yukon Gold potatoes are the finest choice — their naturally buttery flavor, waxy texture, and beautiful golden color make them ideal for this preparation. They hold their shape during baking without dissolving and their inherent flavor complements the cashew cream sauce beautifully. Russet potatoes produce a slightly softer, starchier result that some people prefer. Avoid red-skinned potatoes which stay too firm even after extended baking.
Why are my scalloped potatoes still firm after baking?
Firm potatoes after the full baking time are caused by potato slices that are too thick, insufficient liquid in the sauce, or potatoes that were not covered tightly during the first stage of baking. Slice potatoes to a maximum of 3mm thickness, ensure the sauce comes just to the top of the final potato layer before baking, and keep the foil on tightly for the full first 40 minutes of baking.
Can I make this recipe without a blender?
Yes — use store-bought vegan cream cheese or vegan heavy cream as the base instead of the cashew cream. Combine 300g of vegan cream cheese with 2 cups of vegetable broth, the nutritional yeast, garlic, lemon juice, and seasonings and whisk vigorously until smooth. The result will be slightly different in flavor but still deeply creamy and delicious.
How thin should I slice the potatoes?
Approximately 3mm (⅛ inch) is the ideal thickness — thin enough to become completely tender during baking and to absorb the cream sauce fully, thick enough to retain some structure and integrity in the finished dish rather than dissolving into mush. A mandoline set to the thinnest setting and then backed up slightly produces the ideal slice consistently.
Can I add cheese to this recipe?
Yes — a generous layer of shredded vegan cheese on top before the final uncovered baking produces a beautiful golden, slightly crisped cheese topping that adds visual drama and additional savory depth. Vegan mozzarella, vegan cheddar, or vegan Gruyère style cheese all work beautifully. Add in the final 15–20 minutes of uncovered baking for the best melt and color.
Is this dish suitable for holiday entertaining?
This is one of the finest dishes available for holiday entertaining — it assembles in advance, bakes largely unattended, improves when made a day ahead, feeds a crowd generously from a single dish, and produces a presentation so beautiful and a flavor so extraordinary that it consistently becomes the most discussed dish at any gathering where it appears.
Tried this recipe? Leave a comment below and let us know how it turned out! Tag us on Instagram and Facebook — we love seeing your plant-powered creations. Looking for more indulgent vegan side dish and comfort food recipes? Browse all recipes on Easy Vegan Recipes — new recipes posted every single week!
There are desserts that define an occasion. And then there are desserts like this Vegan Vanilla Cheesecake — the kind that sets in the refrigerator into a perfectly smooth, ivory-white filling of such extraordinary creaminess and such pure, clean vanilla flavor that the first slice silences the table completely, producing the specific, reverent quiet that only a genuinely exceptional dessert can achieve. This is that cheesecake. The classic. The one without distractions — no fruit swirl, no chocolate topping, no flavored crust — just the purest possible expression of creamy, vanilla-scented cheesecake sitting on a buttery shortbread base, sliced cleanly and served cold. The one that proves sometimes the simplest version is the best version.
This cheesecake uses a silky combination of soaked cashews and vegan cream cheese blended with coconut cream, vanilla bean, and lemon juice into a filling of extraordinary smoothness and depth, baked until just set with a gentle wobble in the center, chilled overnight into a perfectly sliceable, luxuriously creamy result that is indistinguishable in texture from a premium dairy cheesecake.
What makes this cheesecake so outstanding is the vanilla — using both vanilla extract and scraped vanilla bean seeds produces a filling with the distinctive speckled appearance and deep, complex vanilla flavor of a professional cheesecake, incomparably more interesting and more beautiful than extract alone.
This recipe is 100% vegan, ready in about 90 minutes of active preparation plus overnight chilling, and absolutely magnificent served in clean, confident slices with nothing more than a fresh berry compote alongside if desired, or entirely plain to let the vanilla speak for itself.
Recipe Information
Prep Time
Cook Time
Chill Time
Total Time
Servings
Calories
25 mins
50 mins
8 hours
~10 hours
12
~420 kcal
Ingredients
For the Shortbread Crust
250g vegan vanilla sandwich cookies or digestive biscuits
5 tbsp vegan butter, melted
Pinch of salt
For the Vanilla Cheesecake Filling
1½ cups (195g) raw cashews, soaked in boiling water for 30 minutes then drained
400g vegan cream cheese, softened to room temperature
½ cup (120ml) full-fat coconut cream
¾ cup (150g) cane sugar
1 vanilla bean, split and seeds scraped
2 tsp pure vanilla extract
3 tbsp lemon juice
2 tbsp cornstarch
Pinch of fine salt
Optional Toppings
Fresh berry compote — strawberry, raspberry, or blueberry
A dusting of powdered sugar
Fresh berries arranged decoratively
A drizzle of mango coulis for a tropical contrast
Instructions
Make the crust. Preheat the oven to 325°F (160°C). Process the cookies in a food processor until fine crumbs form. Add the melted vegan butter and salt and pulse until the mixture holds together when pressed. Press firmly and evenly into the base of a greased 23cm (9-inch) springform pan. Bake for 8 minutes until set. Cool slightly while making the filling.
Make the cheesecake filling. Place the drained cashews, softened vegan cream cheese, coconut cream, sugar, vanilla bean seeds, vanilla extract, lemon juice, cornstarch, and salt in a high-speed blender. Blend for a full 2 minutes until completely smooth, silky, and lump-free. Stop and scrape down the sides twice during blending to ensure everything is fully incorporated.
Bake the cheesecake. Pour the filling over the pre-baked crust and smooth the top with an offset spatula. Tap the pan gently on the counter several times to release any air bubbles. Bake at 325°F (160°C) for 45–50 minutes until the edges are set and firm and the center has only a very slight, gentle wobble when the pan is nudged. Do not overbake — the filling continues to set significantly during chilling.
Cool gradually. Turn the oven off and leave the cheesecake inside with the door slightly ajar for 30 minutes — this gradual cooling prevents cracking. Then remove and cool completely at room temperature before refrigerating.
Chill overnight. Refrigerate for a minimum of 8 hours, ideally overnight, until completely firm throughout. This is the most important step — insufficient chilling produces a soft, slumping cheesecake that does not slice cleanly.
Slice and serve. Run a thin knife around the edge of the pan before releasing the springform. Slice with a sharp knife dipped in hot water and wiped clean between each cut for the sharpest, most professional slices. Serve cold.
Pro Tips
Blend the filling for the full 2 minutes — any remaining cashew graininess in a vanilla cheesecake has nowhere to hide against the pure, clean filling and will be noticeable in the finished texture.
Use both vanilla bean and vanilla extract — the bean provides the beautiful black specks and a deep, complex floral vanilla character; the extract amplifies and reinforces it. Together they produce a filling that tastes of genuinely premium vanilla rather than of artificial flavoring.
Cool gradually in the turned-off oven — sudden temperature changes cause cracking. A slow cool produces a smooth, uncracked surface.
Chill for the full 8 hours minimum — there is no shortcut to a properly set cheesecake. Cutting time short produces a soft, understructured filling.
Dip the knife in hot water between every slice — this is the difference between a clean, professional slice and a dragged, messy one.
Why This Is the Most Important Cheesecake Recipe to Master
Of all the flavored cheesecakes — chocolate, fruit-topped, spiced — vanilla is the one that reveals the most about the quality of the underlying technique and ingredients. A chocolate cheesecake can hide minor textural imperfections behind its dominant flavor. A fruit-topped cheesecake divides attention between the filling and the topping. A vanilla cheesecake has nowhere to hide — its flavor is pure and its texture is everything, which is precisely why mastering it produces a skill that transfers to every other cheesecake variation.
Once the technique in this recipe is fully understood — the proper blend time, the correct bake, the gradual cool, the overnight chill — every other cheesecake on this site becomes dramatically easier, because the foundational skill is in place.
Flavor Variations
Lemon Vanilla Cheesecake: Add the zest of 2 lemons to the filling and top with lemon curd for a brighter, more citrus-forward version.
Berry Swirl Cheesecake: Drop spoonfuls of berry compote onto the filling before baking and swirl with a toothpick for a marbled, fruit-swirled version.
Brown Sugar Vanilla Cheesecake: Replace the cane sugar with brown sugar for a deeper, more caramel-toned sweetness that pairs particularly beautifully with the vanilla.
Nutritional Highlights (Per Serving)
Calories
Protein
Carbs
Fiber
Fat
~420 kcal
7g
44g
1g
25g
Storage
Refrigerator: Store covered in the springform pan or transferred to an airtight container for up to 5 days. This cheesecake actually improves on day 2 as the vanilla flavor deepens.
Freezer: Freeze individual slices wrapped tightly for up to 2 months. Thaw overnight in the refrigerator before serving — the texture after thawing is excellent.
Make ahead: This is an ideal make-ahead dessert. The overnight chill required makes it perfectly suited to preparation the day before any celebration.
Frequently Asked Questions
Can I make this cheesecake without cashews?
Yes — replace the cashews with additional vegan cream cheese in the same weight. The texture will be slightly denser and less silky but still excellent.
Why did my cheesecake crack?
Cracking is caused by overbaking, cooling too rapidly, or insufficient fat in the filling. Remove from the oven while the center still wobbles gently, cool gradually in the turned-off oven with the door ajar, and ensure the coconut cream used is full-fat rather than reduced-fat.
Can I make this as individual mini cheesecakes?
Yes — divide the crust and filling between a lined 12-hole muffin tin and bake at 325°F (160°C) for 20–22 minutes until set. Chill for at least 4 hours before removing from the tin.
Tried this recipe? Leave a comment below and let us know how it turned out! Tag us on Instagram and Facebook — we love seeing your plant-powered creations. Looking for more addictive vegan snack and appetizer recipes? Browse all recipes on Easy Vegan Recipes — new recipes posted every single week!
We use cookies on our website to give you the most relevant experience by remembering your preferences and repeat visits. By clicking “Accept”, you consent to the use of ALL the cookies.
This website uses cookies to improve your experience while you navigate through the website. Out of these, the cookies that are categorized as necessary are stored on your browser as they are essential for the working of basic functionalities of the website. We also use third-party cookies that help us analyze and understand how you use this website. These cookies will be stored in your browser only with your consent. You also have the option to opt-out of these cookies. But opting out of some of these cookies may affect your browsing experience.
Necessary cookies are absolutely essential for the website to function properly. These cookies ensure basic functionalities and security features of the website, anonymously.
Cookie
Duration
Description
cookielawinfo-checkbox-analytics
11 months
This cookie is set by GDPR Cookie Consent plugin. The cookie is used to store the user consent for the cookies in the category "Analytics".
cookielawinfo-checkbox-functional
11 months
The cookie is set by GDPR cookie consent to record the user consent for the cookies in the category "Functional".
cookielawinfo-checkbox-necessary
11 months
This cookie is set by GDPR Cookie Consent plugin. The cookies is used to store the user consent for the cookies in the category "Necessary".
cookielawinfo-checkbox-others
11 months
This cookie is set by GDPR Cookie Consent plugin. The cookie is used to store the user consent for the cookies in the category "Other.
cookielawinfo-checkbox-performance
11 months
This cookie is set by GDPR Cookie Consent plugin. The cookie is used to store the user consent for the cookies in the category "Performance".
viewed_cookie_policy
11 months
The cookie is set by the GDPR Cookie Consent plugin and is used to store whether or not user has consented to the use of cookies. It does not store any personal data.
Functional cookies help to perform certain functionalities like sharing the content of the website on social media platforms, collect feedbacks, and other third-party features.
Performance cookies are used to understand and analyze the key performance indexes of the website which helps in delivering a better user experience for the visitors.
Analytical cookies are used to understand how visitors interact with the website. These cookies help provide information on metrics the number of visitors, bounce rate, traffic source, etc.
Advertisement cookies are used to provide visitors with relevant ads and marketing campaigns. These cookies track visitors across websites and collect information to provide customized ads.