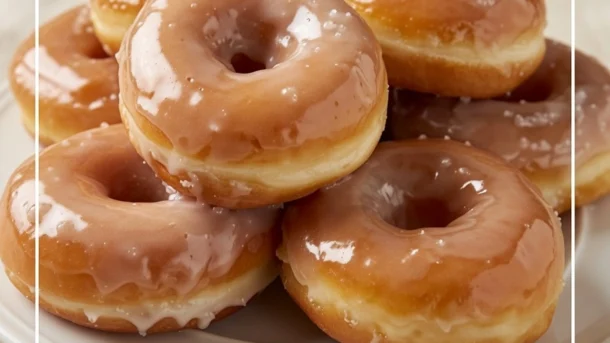
There are moments in baking that stop you completely. And then there are moments like pulling a batch of these Vegan Homemade Krispy Kremes from the hot oil — watching them emerge golden and impossibly light and already puffing up in that characteristic way that makes a great donut look like it is barely holding together from the inside out — dipping them immediately into the warm vanilla glaze and watching that glaze set to a barely-there, translucent, sweet coating that clings to the surface in a way that is so immediately, recognizably right that you understand in that moment exactly why Krispy Kreme became one of the most beloved donut brands in the entire world. These are those donuts. Light as air. Pillowy beyond belief. Glazed to perfection. And completely, entirely plant-based.
These donuts are built on a yeasted dough of extraordinary delicacy — enriched with oat milk, vegan butter, and just enough sugar to feed the yeast and create the characteristic sweetness that makes a great glazed donut so distinctive, and leavened with active dry yeast that produces a rise so dramatic and a crumb so impossibly light and airy that the finished donuts seem to weigh almost nothing despite their generous size. The secret to their legendary lightness is threefold — the enriched dough, the double rise that develops both flavor and structure, and the brief frying at the precise correct temperature that creates a barely-there crust and a completely, gloriously tender interior.
What makes this recipe so genuinely outstanding is its commitment to replicating not merely the flavor of a Krispy Kreme donut but its specific, extraordinary texture. The original Krispy Kreme donut is not merely sweet and fried — it is a specific textural experience of a crust so thin it is almost nonexistent, an interior so soft and pillowy it barely resists the bite, and a glaze so perfectly balanced between sweet and vanilla that it enhances rather than overwhelms everything beneath it. Achieving this in a plant-based version requires specific techniques — the right flour, the right liquid temperature for activating the yeast, the right oil temperature for frying, and the right glaze consistency for dipping — and this recipe delivers all of them.
This recipe is 100% vegan, ready in approximately 2 hours including rising time, and absolutely magnificent eaten warm — ideally within 30 seconds of being glazed, when the glaze is still slightly warm and the donut interior is at its most extraordinary.
Recipe Information
| Prep Time | Rise Time | Cook Time | Total Time | Servings | Calories |
|---|---|---|---|---|---|
| 20 mins | 1.5 hours | 20 mins | 2 hrs 10 mins | 12 | ~280 kcal |
Ingredients
For the Donut Dough
- 3 cups (360g) all-purpose flour plus extra for dusting
- 2¼ tsp (7g) active dry yeast or instant yeast
- ¼ cup (50g) cane sugar
- ½ tsp fine salt
- ¾ cup (180ml) oat milk, warmed to 110°F (43°C)
- ¼ cup (55g) vegan butter, melted and slightly cooled
- 1 flax egg (1 tbsp flaxseed meal + 3 tbsp water — rest 5 minutes)
- 1 tsp pure vanilla extract
For Frying
- 4 cups (960ml) neutral vegetable oil (canola, sunflower, or refined coconut)
For the Krispy Kreme Style Glaze
- 2 cups (240g) powdered sugar, sifted
- ¼ cup (60ml) oat milk, warmed
- 2 tbsp vegan butter, melted
- 1½ tsp pure vanilla extract
- Pinch of salt
Optional Variations
- Chocolate glaze: Replace 3 tbsp powdered sugar with 3 tbsp cocoa powder and add 50g melted vegan dark chocolate
- Strawberry glaze: Replace oat milk with fresh strawberry puree
- Cinnamon sugar: Skip the glaze and roll warm donuts in cinnamon sugar
- Filled donuts: Skip cutting the hole and fill with vegan vanilla cream or jam
To Serve
- Warm from the fryer with fresh glaze
- With a cup of coffee or oat milk latte
- Stacked on a plate for the most beautiful presentation
- With extra glaze for dipping alongside
Instructions
- Activate the yeast. Warm the oat milk to exactly 110°F (43°C) — warm enough to activate the yeast but not so hot it kills it. A kitchen thermometer is ideal here. Add the sugar and yeast to the warm milk, stir gently, and leave for 5–10 minutes until the surface is foamy and the mixture smells distinctly yeasty. If no foam develops after 10 minutes the yeast is dead — start again with fresh yeast and correctly tempered milk.
- Make the flax egg. Combine the flaxseed meal and water in a small bowl, stir, and rest for 5 minutes until gel-like.
- Make the dough. In a large bowl or stand mixer bowl combine the flour and salt. Add the activated yeast mixture, melted vegan butter, flax egg, and vanilla extract. Mix with a wooden spoon or dough hook until a shaggy dough forms then knead for 8–10 minutes by hand on a lightly floured surface — or 6 minutes on medium speed in a stand mixer — until the dough is smooth, elastic, and slightly tacky but not sticky. It should spring back slowly when poked. This kneading develops the gluten structure that gives the donuts their characteristic chew and ability to hold the light, airy texture created by the yeast.
- First rise. Place the dough in a lightly oiled bowl, cover with a clean damp kitchen towel or plastic wrap, and leave in a warm place for 60–75 minutes until doubled in size. The ideal proofing environment is a turned-off oven with just the light on — approximately 80°F (27°C) — which provides the consistent warmth that produces the most reliable, even rise.
- Shape the donuts. Turn the risen dough out onto a lightly floured surface and roll to approximately 1.5cm (½ inch) thickness — not thinner or the donuts will be dense after frying. Use a 9cm (3½ inch) round cutter to cut out circles and a 3cm (1¼ inch) cutter or the cap of a bottle for the holes. Re-roll the scraps once to cut additional donuts. Place the cut donuts and holes on a parchment-lined baking sheet with space between each one.
- Second rise. Cover the cut donuts loosely with a clean kitchen towel and allow to rise for a further 30–45 minutes until visibly puffed and pillowy — they will not double in size but should look noticeably lighter and more voluminous than when first cut. Do not skip this second rise — it is what produces the extraordinarily light, airy interior that defines a great glazed donut.
- Make the glaze. While the donuts complete their second rise whisk together the sifted powdered sugar, warm oat milk, melted vegan butter, vanilla extract, and salt until completely smooth and flowing — the glaze should be thick enough to coat the back of a spoon but thin enough to drip slowly from it. If too thick add oat milk one teaspoon at a time. If too thin add powdered sugar one tablespoon at a time. Keep warm — a glaze that has cooled and thickened will not create the characteristic thin, translucent Krispy Kreme coating.
- Fry the donuts. Heat the oil in a large deep pot to exactly 350°F (175°C) — use a thermometer and maintain this temperature throughout frying. Too cool and the donuts absorb oil and are greasy. Too hot and the exterior burns before the interior cooks. Carefully lower 2–3 donuts into the oil at a time — never crowd the pot. Fry for 60–90 seconds per side until deep golden on both sides. Remove with a slotted spoon and drain on a wire rack set over a baking sheet for 30 seconds — not paper towel which makes the bottom soggy.
- Glaze immediately. Dip each warm donut into the glaze face down, hold for 3 seconds, lift and allow excess to drip off, then place glaze-side up on the wire rack. The glaze should be thin, translucent, and set within 60–90 seconds on the warm donut. Glaze the donut holes too — they are arguably the best part. Eat immediately for the most extraordinary experience.
Pro Tips for Perfect Vegan Krispy Kreme Style Donuts
- Temperature is everything — measure it. The yeast activation temperature, the oil frying temperature, and the glaze temperature are all critical variables that significantly affect the finished result. A kitchen thermometer is not optional for this recipe — it is essential. The difference between oil at 340°F and 360°F produces a meaningfully different donut.
- Do not skip the second rise. The first rise develops flavor. The second rise — after the donuts are cut and shaped — develops the specific lightness and airy texture that makes a great glazed donut so extraordinary. Donuts fried without the second rise will be noticeably denser and less pillow-like than those given the full proofing time.
- Fry in small batches and maintain oil temperature. Adding too many donuts to the oil at once drops the oil temperature dramatically — causing the donuts to absorb oil before the exterior can set and producing greasy, dense results. Two to three donuts per batch with the oil returned to temperature between batches produces the best results.
- Glaze while warm — not hot, not cool. The ideal glazing temperature is approximately 30–60 seconds after the donuts come out of the oil — warm enough that the glaze flows and adheres beautifully but not so hot it slides off before setting. A donut glazed when completely cool will have a thicker, more opaque glaze coating rather than the characteristic thin, translucent Krispy Kreme finish.
- Eat within 30 minutes of glazing. Yeasted donuts deteriorate faster than almost any other baked good — the extraordinary lightness and pillowy texture that makes them so spectacular lasts for approximately 2 hours after frying, after which they begin to firm and toughen. Make them, glaze them, eat them immediately.
- Use a wire rack not paper towel for draining. Paper towel creates a steam trap under the donut that makes the bottom soggy. A wire rack allows air to circulate completely around the donut and maintains the integrity of the exterior on all surfaces.
The Science of the Perfect Yeasted Donut
A yeasted donut is one of the most technically demanding preparations in all of home baking — and understanding the science behind why each step matters helps explain why these donuts are so extraordinary when the technique is followed precisely.
The yeast is the heart of the recipe. Saccharomyces cerevisiae — the species of yeast used in bread and donut making — consumes the sugars in the dough and produces carbon dioxide gas and ethanol as metabolic byproducts. The carbon dioxide becomes trapped in the gluten network developed during kneading and causes the dough to expand dramatically during both rising periods. The ethanol evaporates during frying and contributes to the characteristic flavor compounds that distinguish a yeasted donut from a cake donut.
The gluten network — developed during the 8–10 minutes of kneading — is what gives the donut its ability to stretch and expand as the yeast produces carbon dioxide without tearing. Insufficient kneading produces a weak gluten network that tears during rising and produces a dense, uneven crumb. Proper kneading produces an elastic, extensible network that stretches smoothly as the dough rises and then sets during frying into the characteristic light, pillowy structure of a great glazed donut.
The frying temperature is critical because of how the starch and protein in the dough respond to heat. At 350°F (175°C) the exterior of the donut sets almost immediately on contact with the oil — creating a thin, sealed crust that traps the moisture inside the donut and keeps the interior extraordinarily tender while the exterior turns golden. At lower temperatures the exterior takes too long to set and absorbs oil before the crust forms. At higher temperatures the exterior burns before the interior has time to cook through.
The glaze — so simple in its ingredients — achieves its characteristic thinness and translucency through the specific ratio of sugar to liquid and the temperature at which it is applied. Applied warm to a warm donut the glaze flows freely over the surface and sets to a thin, even film as both the glaze and the donut cool simultaneously. This simultaneous cooling is what creates the perfectly uniform, paper-thin coating that is the defining visual and textural characteristic of a Krispy Kreme glaze.
Flavor Variations
- Chocolate Frosted: Dip in a chocolate glaze made from melted vegan dark chocolate, powdered sugar, oat milk, and vanilla for a rich, deeply chocolatey version that is particularly spectacular with rainbow sprinkles pressed into the surface while the chocolate is still wet.
- Strawberry Glazed: Replace the oat milk in the glaze with fresh strawberry puree for a beautiful pink glaze with a natural, vibrant strawberry flavor and color that is particularly stunning in summer.
- Cinnamon Sugar: Skip the glaze entirely and roll the warm fried donuts immediately in a generous mixture of cinnamon and caster sugar for a churro-inspired version that is particularly extraordinary with a dipping sauce of vegan chocolate ganache.
- Filled Cream Donuts: Skip cutting the hole and fry as full circles. Once cooled use a piping bag to fill each donut with vegan vanilla pastry cream, vegan lemon curd, or strawberry jam for a filled donut that is an entirely different but equally spectacular experience.
Nutritional Highlights (Per Serving — 1 donut with glaze)
| Calories | Protein | Carbs | Fiber | Fat |
|---|---|---|---|---|
| ~280 kcal | 4g | 42g | 1g | 11g |
These donuts are unambiguously an indulgence — and they are completely, unreservedly worth it. Made from real, whole, plant-based ingredients without artificial flavors, preservatives, or additives of any kind, they are a significantly cleaner version of the commercial original while delivering every element of the flavor and texture experience that makes glazed donuts so universally beloved. The flaxseed meal contributes ALA omega-3 fatty acids and lignans. The oat milk base provides beta-glucan fiber. The vegan butter contributes plant-based fats without the cholesterol of dairy butter. This is an indulgence with integrity.
Storage
- Best eaten immediately: Yeasted glazed donuts are at their absolute, unequivocal peak within 30–60 minutes of being glazed. The texture deteriorates significantly after 2–3 hours as the yeast structure firms and the glaze absorbs into the surface. Make them and eat them immediately whenever possible.
- Room temperature: Store unglazed fried donuts in an airtight container at room temperature for up to 1 day. Warm briefly in a 300°F (150°C) oven for 3–4 minutes before glazing and serving — this partially restores the fresh-fried texture.
- Freezer — unfried dough: After cutting the donut shapes freeze them on a parchment-lined baking sheet until solid then transfer to a freezer bag for up to 1 month. Thaw overnight in the refrigerator, complete the second rise at room temperature for 45–60 minutes, then fry and glaze as directed.
- Freezer — fried unglazed: Freeze fried unglazed donuts for up to 1 month. Thaw at room temperature for 30 minutes and warm in a 300°F (150°C) oven for 5 minutes before glazing and serving.
Frequently Asked Questions
Can I bake these instead of frying?
Yes — bake at 375°F (190°C) for 12–15 minutes until golden. Baked donuts have a more bread-like texture than fried ones and lack the characteristic thin, barely-there crust of a fried donut but are still delicious and significantly lower in fat. An air fryer at 350°F (175°C) for 5–6 minutes per side produces a result closer to fried than the oven.
Why didn’t my dough rise?
Failed dough rise is almost always caused by dead yeast or milk that was too hot and killed the yeast. Always check that your yeast is within its expiration date and that the milk temperature is between 105–115°F (40–46°C). If the yeast does not foam after 10 minutes in the warm milk it is dead — start again with fresh yeast.
Can I make the dough the night before?
Yes — after the first rise punch the dough down, wrap tightly in plastic wrap, and refrigerate overnight. The next morning remove from the refrigerator, roll and cut the donuts, and allow to complete the second rise at room temperature for 60–75 minutes before frying — the cold dough takes longer to proof than room temperature dough.
What oil is best for frying donuts?
A neutral oil with a high smoke point is essential — canola oil, sunflower oil, or refined coconut oil all work beautifully. Avoid olive oil which has too low a smoke point and too strong a flavor. The oil should be clean and fresh — reused oil with food particles produces off-flavors in the finished donuts.
How do I keep the glaze from being too thick?
The glaze thickens as it cools — reheat briefly in the microwave for 15 seconds and stir well to restore a flowing consistency. If making the glaze in advance keep it in a bowl set over warm water to maintain the ideal dipping temperature and consistency throughout the glazing process.
Can I make these donuts gluten-free?
Gluten-free yeasted donuts are significantly more challenging than regular ones — the gluten network is essential for trapping the carbon dioxide produced by the yeast. A dedicated gluten-free donut flour blend with added psyllium husk or xanthan gum produces the best results. Expect a slightly denser texture than the regular version but still genuinely delicious.
Tried this recipe? Leave a comment below and let us know how it turned out! Tag us on Instagram and Facebook — we love seeing your plant-powered creations. Looking for more indulgent vegan baking and dessert recipes? Browse all recipes on Easy Vegan Recipes — new recipes posted every single week!
