plant-based comfort food

Vegan Mushroom Topped Mini Meatloafs — The Most Comforting Plant-Based Dinner You Will Make All Week

vegan mushroom topped mini meatloafs

There are comfort foods that feel like home. And then there are dishes like these Vegan Mushroom Topped Mini Meatloafs — the kind that come out of the oven glazed and golden and fragrant with herbs, topped with a rich, savory mushroom gravy that pools around each individual loaf and makes the entire kitchen smell like the most satisfying Sunday dinner imaginable. This is that dish. The one that delivers every quality that makes meatloaf one of the great comfort foods — the tender, herb-flecked interior, the sticky-sweet glaze caramelized on the outside, the rich gravy spooned over the top — without a single gram of meat and with absolutely none of the compromise that sentence might suggest. The one that makes vegan cooking feel genuinely generous, deeply satisfying, and worthy of the most special occasions and the most ordinary weeknights in equal measure.

This recipe builds individual mini loafs from a savory base of lentils, walnuts, mushrooms, and oats — bound together with flaxseed and seasoned with soy sauce, Worcestershire, and smoked paprika into a mixture that is deeply umami, perfectly textured, and holds together beautifully when sliced. Each loaf is brushed with a tangy ketchup and maple glaze that caramelizes in the oven into a sticky, lacquered coating, then finished with a silky pan gravy of sautéed mushrooms, thyme, and vegetable stock that transforms the individual loafs into something spectacular.

What makes this recipe so outstanding is the individual sizing — mini loafs bake faster and more evenly than a single large one, develop more caramelized exterior per serving, and present with a plated elegance that a single large loaf cannot match. Every person gets their own perfectly glazed, perfectly portioned loaf.

This recipe is 100% vegan, naturally dairy-free, ready in about 55 minutes, and produces mini meatloafs so deeply satisfying and so thoroughly comforting that they work equally as a weeknight family dinner, a dinner party centerpiece, or a meal prep staple that reheats beautifully throughout the week.


Recipe Information

Prep TimeCook TimeTotal TimeServingsCalories
20 mins35 mins55 mins4 loafs~385 kcal

Ingredients

For the Mini Meatloafs

  • 1 cup (200g) brown or green lentils, cooked and drained (or 1 can, drained)
  • 200g cremini mushrooms, finely chopped
  • ½ cup (50g) walnuts, finely chopped
  • ½ cup (45g) rolled oats
  • 1 medium onion, finely diced
  • 3 cloves garlic, minced
  • 1 tbsp olive oil
  • 2 tbsp soy sauce or tamari
  • 1 tbsp vegan Worcestershire sauce
  • 1 tsp smoked paprika
  • 1 tsp dried thyme
  • ½ tsp dried sage
  • ½ tsp garlic powder
  • Salt and black pepper to taste
  • 2 flax eggs (2 tbsp ground flaxseed + 6 tbsp water, mixed and rested 5 minutes)
  • ½ cup (50g) breadcrumbs

For the Glaze

  • 3 tbsp tomato ketchup
  • 1 tbsp maple syrup
  • 1 tsp Dijon mustard
  • ½ tsp apple cider vinegar
  • ½ tsp smoked paprika

For the Mushroom Gravy

  • 300g cremini or mixed mushrooms, sliced
  • 1 tbsp olive oil
  • 2 cloves garlic, minced
  • 1 tsp fresh thyme leaves (or ½ tsp dried)
  • 2 tbsp soy sauce or tamari
  • 1 tbsp all-purpose flour (or cornstarch for gluten-free)
  • 1½ cups (360ml) vegetable stock
  • Salt and black pepper to taste
  • Fresh thyme or parsley to finish

Instructions

  1. Prepare the flax eggs. Mix the ground flaxseed with the water in a small bowl. Stir and set aside for 5 minutes to thicken into a gel — this acts as the binder.
  2. Sauté the base. Heat the olive oil in a large skillet over medium heat. Add the onion and cook for 6–8 minutes until soft and golden. Add the garlic, smoked paprika, thyme, and sage. Cook for 1 minute until fragrant. Add the finely chopped mushrooms and cook for 5–6 minutes, stirring occasionally, until the mushrooms have released their moisture and the mixture is dry. Add the soy sauce and Worcestershire sauce and stir to combine. Cook for 1 more minute. Remove from heat and allow to cool for 5 minutes.
  3. Make the meatloaf mixture. In a large bowl, roughly mash the cooked lentils — leave some texture, do not mash to a complete paste. Add the sautéed mushroom and onion mixture, chopped walnuts, rolled oats, breadcrumbs, flax eggs, garlic powder, salt, and pepper. Mix thoroughly until everything is evenly combined. The mixture should be thick enough to hold its shape when pressed. If too wet, add more breadcrumbs one tablespoon at a time.
  4. Preheat and prepare. Preheat the oven to 375°F (190°C). Line a baking sheet with parchment paper and lightly grease.
  5. Shape the loafs. Divide the mixture into 4 equal portions. Shape each into a compact oval loaf about 10cm long and 5cm wide. Place on the prepared baking sheet, spaced apart. Press firmly to ensure they hold their shape.
  6. Make and apply the glaze. Whisk together all glaze ingredients in a small bowl. Brush each mini loaf generously with the glaze, covering the top and sides.
  7. Bake. Bake for 30–35 minutes until the loafs are firm, set, and the glaze is caramelized and deeply golden. For an extra-lacquered finish, brush with a second coat of glaze halfway through baking.
  8. Make the mushroom gravy. While the loafs bake, heat the olive oil in a skillet over medium-high heat. Add the sliced mushrooms and cook without stirring for 3–4 minutes until golden and beginning to caramelize. Add the garlic and thyme and cook for 1 minute. Sprinkle over the flour and stir to coat the mushrooms. Add the soy sauce and then gradually pour in the vegetable stock, stirring constantly. Simmer for 4–5 minutes until the gravy has thickened to a rich, glossy consistency. Taste and adjust seasoning. Keep warm until the loafs are ready.
  9. Serve. Place each mini meatloaf on a plate or shallow bowl. Spoon the mushroom gravy generously over and around each loaf. Finish with fresh thyme or parsley. Serve immediately alongside mashed potato, roasted vegetables, or steamed green beans.

Pro Tips

  • Do not over-mash the lentils — leaving some texture in the lentils is what gives the loafs their satisfying, substantial bite. A full paste produces a mushy, dense result with no texture contrast.
  • Cook the mushrooms until completely dry — residual moisture in the mushroom and onion mixture will make the loaf mixture too wet and prevent it from holding its shape. The mixture should look and smell like a dry, browned sauté before adding to the bowl.
  • Pack the loafs firmly — press the shaped loafs down firmly with your hands before baking to eliminate air pockets and ensure the mixture sticks together. Loosely shaped loafs fall apart when sliced.
  • Apply the glaze twice — a second coat of glaze applied halfway through baking builds a thicker, more caramelized, more intensely flavored lacquer on the outside of each loaf.
  • Brown the mushrooms without stirring for the gravy — the initial 3–4 minutes of cooking the gravy mushrooms without stirring is what develops the golden, caramelized exterior that gives the gravy its deep color and flavor.

Why Mini Loafs Are Better Than One Large Loaf

The single greatest advantage of mini meatloafs over a traditional large loaf is the ratio of caramelized exterior to soft interior. A large loaf has a relatively small surface area compared to its volume, meaning the vast majority of each serving is the soft, unglazed interior. Divide the same mixture into four individual loafs and the exterior-to-interior ratio increases dramatically — every serving has far more of the caramelized, sticky-glazed crust that carries the deepest flavor. Individual loafs also bake more evenly, cook faster, and present with a plated elegance that a sliced portion of a large loaf simply cannot replicate. For weeknight cooking, mini loafs are also significantly easier to serve and store as individual portions throughout the week.


Flavor Variations

  • BBQ Glazed Mini Meatloafs: Replace the ketchup glaze with a smoky vegan BBQ sauce for a smokier, tangier version that is extraordinary served with corn and slaw.
  • Italian Herb Mini Meatloafs: Add 2 tablespoons of tomato paste and 1 teaspoon of Italian seasoning to the mixture and top with a simple marinara instead of mushroom gravy for an Italian-inspired version.
  • Stuffed Mini Meatloafs: Press a cube of vegan mozzarella into the center of each loaf before shaping for a molten cheese center that reveals itself when the loaf is cut open.

Nutritional Highlights (Per Loaf with Gravy)

CaloriesProteinCarbsFiberFat
~385 kcal18g42g9g16g

Storage

  • Refrigerator: Store baked mini meatloafs and gravy separately in airtight containers for up to 4 days. Reheat loafs in a 350°F (175°C) oven for 12–15 minutes until heated through, or in an air fryer at 350°F for 8 minutes. Reheat gravy in a small saucepan with a splash of stock if it has thickened.
  • Freezer: Freeze baked and cooled mini meatloafs (without gravy) for up to 2 months. Thaw overnight in the refrigerator and reheat in the oven until heated through and the glaze is re-caramelized. Make fresh gravy when serving from frozen.
  • Meal prep: The uncooked loaf mixture keeps covered in the refrigerator for up to 2 days — shape and bake when needed.

Frequently Asked Questions

Can I use canned lentils?

Yes — one 400g can of brown or green lentils, drained and rinsed well, works perfectly and saves significant time. Pat them dry with a paper towel after draining to remove excess moisture.

What can I serve alongside these?

Classic comfort food sides work best: creamy mashed potato, roasted garlic mashed sweet potato, steamed green beans, honey-glazed carrots, or a simple green salad. The mushroom gravy is enough sauce for the loafs themselves.

Can I make this gluten-free?

Yes — use certified gluten-free rolled oats, gluten-free breadcrumbs, tamari instead of soy sauce, and cornstarch instead of flour in the gravy. All other ingredients are naturally gluten-free.


Tried this recipe? Leave a comment below and let us know how it turned out! Tag us on Instagram and Facebook — we love seeing your plant-powered creations. Looking for more addictive vegan snack and appetizer recipes? Browse all recipes on Easy Vegan Recipes — new recipes posted every single week!

Vegan Stuffed Peppers — The Most Satisfying Most Colorful Plant-Based Dinner You Will Make All Week

vegan stuffed peppers

There are dinners that are wholesome and there are dinners that are wholesome and beautiful and deeply, completely satisfying all at once. And then there are dinners like these Vegan Stuffed Peppers — the kind you pull from the oven bubbling and golden and smelling of roasted pepper and spiced rice and caramelized tomato, and set on the table whole and vibrant and impossibly good-looking, and watch everyone reach for one immediately because they are so colorful, so substantial, and so unmistakably the real thing that they feel simultaneously like comfort food and like something you would order at a restaurant. This is that dinner. The one that turns a handful of pantry staples into something that looks and tastes like you spent far more time than you did. The one that makes bell peppers the hero of the meal rather than an afterthought.

These stuffed peppers are filled with a deeply savory, warmly spiced mixture of brown rice, black beans, corn, tomatoes, onion, garlic, cumin, smoked paprika, and chilli — a filling that is hearty enough to be a complete meal on its own, made even better by being packed into tender roasted peppers that sweeten and caramelize in the oven and hold everything together in a way that makes every bite a perfect combination of the filling and the pepper itself. Topped with a generous layer of melted vegan cheese and finished with fresh cilantro and lime, these stuffed peppers are the kind of meal that belongs in permanent rotation in every plant-based kitchen.

What makes this recipe so outstanding is the par-roasting technique — roasting the peppers briefly before filling them ensures they are perfectly tender all the way through by the time the filling is hot and the cheese is melted, eliminating the common problem of undercooked, crunchy peppers with an overcooked filling.

This recipe is 100% vegan, naturally gluten-free, ready in about an hour, highly customizable, excellent for meal prep, and one of those rare recipes that is simultaneously impressive enough for guests and simple enough for a weeknight.


Recipe Information

Prep TimeCook TimeTotal TimeServingsCalories
15 mins50 mins65 mins4~420 kcal

Ingredients

For the Stuffed Peppers

  • 4 large bell peppers (any color — red, yellow, and orange are sweetest)
  • 1 tbsp olive oil
  • Salt and black pepper

For the Filling

  • 1½ cups (240g) cooked brown rice (or white rice)
  • 1 can (400g) black beans, drained and rinsed
  • 1 cup (150g) corn kernels, fresh, frozen, or canned
  • 1 can (400g) diced tomatoes, drained
  • 1 small white onion, finely diced
  • 4 cloves garlic, finely minced
  • 1 tbsp olive oil
  • 1½ tsp cumin
  • 1 tsp smoked paprika
  • ½ tsp chilli powder or cayenne (adjust to heat preference)
  • ½ tsp oregano
  • Salt and black pepper to taste
  • 2 tbsp tomato paste
  • Juice of ½ lime

For the Topping

  • ¾ cup (85g) vegan cheddar or mozzarella, shredded
  • Fresh cilantro, roughly chopped
  • Lime wedges
  • Sliced jalapeño or pickled jalapeño (optional)
  • Vegan sour cream or avocado crema for serving (optional)

Instructions

  1. Preheat and par-roast the peppers. Preheat the oven to 400°F (200°C). Slice the tops off each bell pepper and remove the seeds and white membranes from the inside. Lightly brush the outside and inside of each pepper with olive oil and season the inside with a pinch of salt. Place the peppers cut-side down in a baking dish and roast for 15 minutes until just beginning to soften and the skin starts to blister. Remove from the oven and carefully flip the peppers cut-side up. Set aside.
  2. Make the filling. While the peppers par-roast, heat the olive oil in a large skillet over medium heat. Add the diced onion and cook for 5–6 minutes until soft and translucent. Add the garlic and cook for 1 minute until fragrant. Add the tomato paste, cumin, smoked paprika, chilli powder, and oregano. Stir and cook for 1–2 minutes until the spices are deeply fragrant and the tomato paste has darkened slightly.
  3. Add the remaining filling ingredients. Add the drained diced tomatoes and cook for 3–4 minutes until most of the liquid has evaporated. Add the cooked rice, black beans, and corn. Stir to combine everything evenly. Taste and adjust seasoning — more cumin for earthiness, more chilli for heat, more lime for brightness. Squeeze the lime juice over the filling and stir through.
  4. Fill the peppers. Spoon the filling generously into each par-roasted pepper, packing it in firmly and mounding it slightly above the rim. Top each pepper with a generous layer of shredded vegan cheese.
  5. Bake. Return the stuffed peppers to the oven and bake for 25–30 minutes until the peppers are completely tender and collapsing slightly at the sides, the filling is piping hot throughout, and the vegan cheese is melted and beginning to bubble and color at the edges.
  6. Finish and serve. Remove from the oven and allow to rest for 5 minutes. Top generously with fresh cilantro and serve with lime wedges, sliced jalapeño, and vegan sour cream or avocado crema alongside.

Pro Tips

  • Par-roast the peppers before filling — this single step is what separates good stuffed peppers from great ones. Peppers that go into the oven raw alongside the filling never soften properly by the time the filling is hot and the cheese is melted; par-roasting ensures perfectly tender peppers every time.
  • Drain the tomatoes well before adding them to the filling — excess liquid makes the filling wet and causes it to steam rather than caramelize. Press the diced tomatoes in a sieve if they are particularly liquid.
  • Pack the filling in firmly and mound it above the rim — the filling compacts as it bakes and a generously filled pepper is far more satisfying than one where the filling has shrunk away from the top.
  • Use red, orange, or yellow peppers for the sweetest result — green bell peppers are less ripe and significantly more bitter than their colored counterparts, which sweeten and caramelize beautifully in the oven.

Why Bell Pepper Color Matters

Bell peppers are all the same plant at different stages of ripeness. Green peppers are harvested young and have a sharp, slightly bitter flavor that intensifies under heat. Red, orange, and yellow peppers are the same variety left to ripen fully on the vine — they develop significantly higher sugar content, lose most of their bitterness, and develop a sweeter, more complex flavor that caramelizes beautifully when roasted. For stuffed peppers, where the pepper itself is half the dish, this difference is significant: a red or orange pepper filled with spiced rice and beans and roasted until tender is a genuinely sweet, deeply flavored vessel that enhances everything inside it, while a green pepper baked the same way remains noticeably sharper and less balanced. The color choice is not merely aesthetic — it materially changes the flavor of the finished dish.


Flavor Variations

  • Mexican Stuffed Peppers: Add a teaspoon of chipotle in adobo to the filling and top with pickled jalapeños, sliced avocado, and a drizzle of vegan crema for a fully loaded Mexican-inspired version.
  • Mediterranean Stuffed Peppers: Replace the black beans and corn with cooked lentils, sun-dried tomatoes, Kalamata olives, and fresh herbs — top with vegan feta for a bright, herby Mediterranean version.
  • Quinoa Stuffed Peppers: Replace the brown rice with cooked quinoa for a higher-protein, slightly lighter version with a pleasant nutty texture.

Nutritional Highlights (Per Serving)

CaloriesProteinCarbsFiberFat
~420 kcal16g62g12g12g

Storage

  • Refrigerator: Stuffed peppers keep in an airtight container for up to 4 days. Reheat in a 350°F (175°C) oven for 15–20 minutes until piping hot throughout, or microwave covered for 2–3 minutes.
  • Freezer: Freeze fully baked stuffed peppers individually in freezer-safe containers for up to 3 months. Thaw overnight in the refrigerator and reheat in the oven. The texture of the pepper softens slightly after freezing but remains excellent.
  • Meal prep: The filling can be made up to 3 days ahead and stored separately in the refrigerator — fill and bake the peppers fresh when needed.

Frequently Asked Questions

Can I use white rice instead of brown rice?

Yes — white rice works perfectly and produces a slightly lighter, less chewy filling. Use the same quantity of cooked white rice. Quinoa is also an excellent substitute.

Can I make stuffed peppers without vegan cheese?

Absolutely — the filling is delicious and complete without cheese. For a cheesy finish without vegan cheese, add 2 tablespoons of nutritional yeast to the filling for a savory, umami-rich flavor.

How do I know when the stuffed peppers are done?

The peppers should be completely tender when pierced with a knife — no resistance. The sides will be slightly collapsing and the skin will be wrinkled and lightly blistered. The filling should be steaming hot and the cheese melted and beginning to color. If the cheese is browning too quickly before the pepper is tender, cover loosely with foil and continue baking.

Can I prepare stuffed peppers ahead of time?

Yes — fill the par-roasted peppers with the filling and top with cheese, then cover and refrigerate for up to 24 hours before baking. Add 5–10 minutes to the baking time when cooking from cold.


Tried this recipe? Leave a comment below and let us know how it turned out! Tag us on Instagram and Facebook — we love seeing your plant-powered creations. Looking for more addictive vegan snack and appetizer recipes? Browse all recipes on Easy Vegan Recipes — new recipes posted every single week!

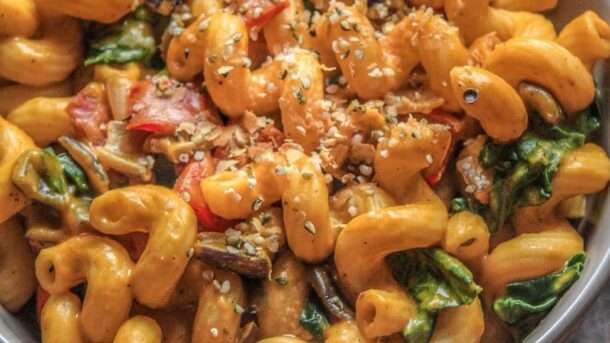
Cheesy Buttercup Squash Tortiglioni⁣

280351211 333299828933357 5526533945898962094 N.AVFI 610x343

There are pasta dishes that satisfy. And then there are pasta dishes like this Vegan Cheesy Buttercup Squash Tortiglioni — the kind that you pull from the oven golden and bubbling and smelling of roasted squash and nutmeg and caramelized edges, and carry to the table while everyone leans forward because whatever is in that dish is clearly extraordinary. This is that pasta. The one that makes buttercup squash into a silky, deeply savory cheese sauce that coats every ridge of every tortiglioni tube in a way that is so creamy, so rich, and so deeply satisfying that it becomes the pasta you make when autumn arrives and you want something that feels genuinely celebratory without requiring an unreasonable amount of effort.

This recipe roasts buttercup squash until it is caramelized and tender, then blends it with nutritional yeast, cashews, garlic, miso, and plant milk into a sauce that is simultaneously sweet and savory, rich and bright, with a depth of flavor that makes it taste far more complex than its ingredient list suggests. Tortiglioni — the thick, ridged tubes slightly larger than rigatoni — is the ideal pasta shape for this sauce: the ridges catch and hold the creamy squash sauce, the hollow centers fill with it, and every bite delivers the full, rich flavor of the sauce in a way that smoother pasta shapes simply cannot match.

What makes this recipe so outstanding is the roasting step — roasting the buttercup squash before blending it rather than simply steaming or boiling it concentrates its natural sugars, develops caramelized depth, and produces a sauce with a complexity that simply cannot be achieved with unroasted squash.

This recipe is 100% vegan, naturally dairy-free, ready in about an hour, and the kind of pasta that makes autumn feel like exactly the season it should be.


Recipe Information

Prep TimeCook TimeTotal TimeServingsCalories
15 mins45 mins60 mins4~520 kcal

Ingredients

For the Roasted Squash

  • 1 medium buttercup squash (about 900g), halved and deseeded
  • 1 whole head of garlic
  • 2 tbsp olive oil
  • Salt and black pepper

For the Cheesy Squash Sauce

  • Roasted squash flesh (from above, about 400g)
  • 6 cloves roasted garlic (from above)
  • ½ cup (70g) raw cashews, soaked in hot water for 30 minutes and drained
  • 1 cup (240ml) unsweetened plant milk
  • 3 tbsp nutritional yeast
  • 1 tbsp white miso paste
  • 1 tbsp lemon juice
  • ½ tsp smoked paprika
  • ¼ tsp nutmeg
  • Salt and white pepper to taste

For the Pasta

  • 400g (14oz) tortiglioni (or rigatoni)
  • 1 tbsp olive oil
  • 3 shallots, finely sliced
  • 1 tsp fresh thyme leaves
  • ½ cup (120ml) reserved pasta water
  • 30g vegan parmesan or breadcrumbs for topping
  • Fresh sage leaves, fried in olive oil to garnish

Instructions

  1. Roast the squash and garlic. Preheat the oven to 400°F (200°C). Place the squash halves cut-side up on a baking tray. Cut the top off the head of garlic to expose the cloves, drizzle with olive oil, wrap in foil, and place alongside the squash. Drizzle the squash with olive oil and season with salt and pepper. Roast for 40–45 minutes until the squash flesh is completely tender and caramelized at the edges. Allow to cool slightly.
  2. Cook the pasta. Bring a large pot of heavily salted water to a boil. Cook the tortiglioni according to package instructions until al dente. Reserve 1 cup of pasta water before draining.
  3. Make the sauce. Scoop the roasted squash flesh from the skin and squeeze the roasted garlic cloves from their papery shells. Place both in a high-speed blender along with the soaked and drained cashews, plant milk, nutritional yeast, miso, lemon juice, smoked paprika, and nutmeg. Blend on high for 2–3 minutes until completely smooth and silky. Taste and adjust seasoning — more nutritional yeast for cheesiness, more lemon for brightness, more miso for depth.
  4. Cook the shallots. Heat the olive oil in a large, wide pan over medium heat. Add the sliced shallots and thyme and cook for 8–10 minutes, stirring occasionally, until soft, golden, and caramelized.
  5. Combine. Pour the blended squash sauce into the pan with the shallots over low heat. Add the drained pasta and toss to coat, adding reserved pasta water a splash at a time until the sauce reaches a loose, creamy consistency that coats every piece of pasta. Taste and adjust seasoning.
  6. Finish and serve. Divide between bowls or transfer to a serving dish. Top with vegan parmesan or toasted breadcrumbs, crispy fried sage leaves, and a crack of black pepper. Serve immediately.

Pro Tips

  • Roast, do not steam or boil the squash — roasting concentrates the squash’s natural sugars and develops caramelization that creates a sauce with far more depth and complexity than any other cooking method.
  • Soak the cashews in hot water for at least 30 minutes — this is what produces the ultra-smooth, creamy sauce. Undersoaked cashews leave tiny grainy pieces that prevent the sauce from becoming truly silky.
  • Use pasta water generously — the starchy pasta water is what allows the thick squash sauce to coat every piece of pasta evenly without becoming gluey or clumping.
  • Fry fresh sage in olive oil until crispy — this takes 30 seconds and produces a garnish that is fragrant, crispy, and deeply savory in a way that elevates the finished dish significantly.

Why Buttercup Squash Makes the Best Pasta Sauce

Not all winter squashes are equal when it comes to sauce-making. Buttercup squash — a compact, dark green winter squash with a dense, dry, deeply orange flesh — has a significantly lower water content than butternut squash and a sweeter, nuttier, more complex flavor that produces a sauce with more body and more depth than butternut-based alternatives. Its flesh blends into an extraordinarily smooth, dense puree that needs less thickening and carries the flavors of nutritional yeast, miso, and garlic beautifully. If buttercup squash is unavailable, kabocha squash (Japanese pumpkin) is the closest substitute with a similarly dry, sweet flesh.


Flavor Variations

  • Spicy Squash Tortiglioni: Add a teaspoon of chilli flakes to the sauce and top with pickled jalapeños for a version with building heat that contrasts beautifully with the sweet squash.
  • Sage Brown Butter Squash Tortiglioni: Toss the pasta with vegan brown butter and extra fried sage before serving for a more classically Italian flavor profile.
  • Squash and Mushroom Tortiglioni: Add sautéed wild mushrooms to the finished pasta for an earthy, meaty dimension that pairs wonderfully with the sweet squash sauce.

Nutritional Highlights (Per Serving)

CaloriesProteinCarbsFiberFat
~520 kcal18g72g7g18g

Storage

  • Refrigerator: Store leftover pasta in an airtight container for up to 4 days. Reheat gently in a pan with a splash of plant milk or water to loosen the sauce, which thickens significantly when cold.
  • The squash sauce on its own: Keeps in a sealed jar in the refrigerator for up to 5 days or in the freezer for up to 3 months — make a double batch and freeze for a quick weeknight pasta sauce.

Frequently Asked Questions

Can I use butternut squash instead of buttercup?

Yes — butternut squash works well and is more widely available. The sauce will be slightly less dense and slightly less sweet, but still excellent. Kabocha squash is the closest in flavor and texture to buttercup.

Can I make this nut-free?

Yes — replace the cashews with ½ cup of silken tofu for a sauce that is still creamy and smooth without any nuts. The flavor will be slightly lighter but still very good.

Can I make the sauce ahead?

Yes — the squash sauce keeps in the refrigerator for up to 5 days and freezes beautifully. Make it ahead and simply cook the pasta fresh when needed.


Tried this recipe? Leave a comment below and let us know how it turned out! Tag us on Instagram and Facebook — we love seeing your plant-powered creations. Looking for more addictive vegan snack and appetizer recipes? Browse all recipes on Easy Vegan Recipes — new recipes posted every single week!