gluten-free vegan option

Vegan Blueberry Lemon Dutch Baby — The Most Spectacular Plant-Based Brunch You Will Make All Weekend

blueberry lemon dutch

There are weekend breakfasts that feel special. And then there are breakfasts like this Vegan Blueberry Lemon Dutch Baby — the kind that you pour into a screaming-hot cast iron skillet and slide into the oven and pull out eight minutes later so dramatically puffed and golden and billowing at the edges that everyone at the table actually gasps, and then you top it with jammy warm blueberries and a shower of lemon zest and powdered sugar and it deflates slightly as you carry it to the table but loses none of its magic, because what is left is a breakfast so beautiful and so deeply satisfying that it becomes the thing you make every weekend for the rest of your life. This is that breakfast.

A Dutch Baby — sometimes called a German pancake — is a single large baked pancake cooked in a hot oven in a preheated cast iron pan. The dramatic puffing is caused by steam: the hot pan flash-cooks the outside of the batter while the inside steam has nowhere to go but up, producing the spectacular billowing edges and sunken center that make a Dutch Baby one of the most visually dramatic things you can pull from an oven. In this vegan version, a chickpea flour and plant milk batter with aquafaba replaces the eggs traditionally used — producing a Dutch Baby that puffs beautifully, has a golden, slightly crispy exterior, and a soft, custardy interior that is everything a Dutch Baby should be.

What makes this recipe so outstanding is the lemon blueberry topping — fresh or frozen blueberries simmered briefly with lemon juice, lemon zest, and maple syrup into a sauce that is jammy and bright and intensely flavored, poured over the hot Dutch Baby where it pools in the sunken center and soaks into the edges in the most spectacular way.

This recipe is 100% vegan, naturally dairy-free, ready in under 30 minutes, and produces a brunch centerpiece so stunning and so delicious that it makes every other weekend breakfast feel unnecessary.


Recipe Information

Prep TimeCook TimeTotal TimeServingsCalories
10 mins18 mins28 mins4~310 kcal

Ingredients

For the Vegan Dutch Baby Batter

  • ½ cup (60g) all-purpose flour
  • ¼ cup (30g) chickpea flour
  • 1 cup (240ml) unsweetened oat milk or plant milk
  • 3 tbsp aquafaba (liquid from a can of chickpeas)
  • 2 tbsp maple syrup
  • 1 tbsp lemon juice
  • 1 tsp lemon zest
  • 1 tsp vanilla extract
  • ¼ tsp salt
  • 3 tbsp vegan butter (for the pan)

For the Blueberry Lemon Topping

  • 2 cups (300g) fresh or frozen blueberries
  • 2 tbsp maple syrup
  • 1 tbsp lemon juice
  • 1 tsp lemon zest
  • ½ tsp vanilla extract

To Serve

  • Powdered sugar for dusting
  • Extra lemon zest
  • Fresh blueberries
  • Vegan whipped cream (optional)

Instructions

  1. Preheat aggressively. Place a 10–12 inch (25–30cm) cast iron skillet in the oven and preheat to 450°F (230°C). The pan must be fully preheated and very hot before the batter goes in — this is non-negotiable for the dramatic puff.
  2. Make the batter. Blend all batter ingredients except the vegan butter in a blender until completely smooth — about 30 seconds. The batter should be thin, smooth, and slightly frothy from the aquafaba. Allow the batter to rest at room temperature while the oven preheats.
  3. Make the blueberry topping. Combine the blueberries, maple syrup, lemon juice, lemon zest, and vanilla in a small saucepan over medium heat. Cook for 5–7 minutes, stirring occasionally, until the blueberries have softened and burst and the sauce is jammy and slightly thickened. Keep warm.
  4. Cook the Dutch Baby. When the oven is fully preheated, carefully remove the screaming-hot skillet using heavy oven mitts. Add the vegan butter to the pan — it should melt and foam immediately. Quickly swirl to coat the entire pan including the sides. Immediately pour the batter into the center of the pan. It will sizzle.
  5. Bake. Return the pan to the oven immediately. Bake for 16–18 minutes — do not open the oven during baking. The Dutch Baby is done when the edges are dramatically puffed and deep golden brown and the center is set and golden.
  6. Top and serve. Remove from the oven. The Dutch Baby will begin to deflate within a minute — this is normal and expected. Immediately pour the warm blueberry lemon sauce into the center. Dust generously with powdered sugar and extra lemon zest. Serve directly from the pan at the table, cut into wedges.

Pro Tips

  • Preheat the pan for the full oven preheat time — a pan that is put in at the start of preheating and left for the full 15–20 minutes is dramatically hotter than one added at the last minute. The hotter the pan, the more dramatic the puff.
  • Use a blender for the batter — blending creates a smoother, more uniform batter and incorporates air from the aquafaba that contributes to the puff. A whisk leaves more flour clumps and produces less rise.
  • Do not open the oven — opening the oven door releases heat and steam and can cause the Dutch Baby to collapse before it has set. Set a timer and resist.
  • Serve immediately — a Dutch Baby waits for no one. Have everything ready — the topping made, the table set, everyone seated — before you pull it from the oven.

The Dutch Baby’s Distinctly American Origin

Despite its name, the Dutch Baby is not Dutch — it is American, and its name is almost certainly a corruption of “Deutsch” (German), referring to the German pancake (Pfannkuchen) that inspired it. The Dutch Baby as Americans know it was popularized in the early twentieth century by Manca’s Cafe in Seattle, Washington, where it was served as a signature dish and the name stuck. The original German pancake from which it descends has been made in German households for centuries — a simple oven-baked pancake enriched with eggs that puffs dramatically in the heat and is served sweet or savory. The American Dutch Baby evolved to emphasize the dramatic presentation — served in the cast iron pan it was cooked in, puffed and golden and spectacular — and became one of the defining brunch dishes of American cafe culture.


Flavor Variations

  • Strawberry Rhubarb Dutch Baby: Replace the blueberry topping with a strawberry rhubarb compote for a spring version that is tart and jammy and exceptional.
  • Cinnamon Apple Dutch Baby: Top with sautéed cinnamon apple slices and a drizzle of maple syrup for an autumnal version that smells extraordinary.
  • Savory Herb Dutch Baby: Omit the sweeteners from the batter and top with sautéed mushrooms, fresh herbs, and vegan cream cheese for an elegant savory version.

Nutritional Highlights (Per Serving)

CaloriesProteinCarbsFiberFat
~310 kcal7g50g4g9g

Storage

  • Dutch Baby is best eaten immediately — it deflates and softens as it cools and does not keep or reheat well. Make it and eat it.
  • The blueberry lemon topping keeps in a sealed jar in the refrigerator for up to 5 days and is excellent on toast, pancakes, oatmeal, and vegan yogurt throughout the week. Make a double batch.
  • The batter can be made up to 24 hours ahead and refrigerated — blend, cover, and refrigerate. Allow to come to room temperature for 15 minutes before baking and re-blend briefly.

Frequently Asked Questions

Why didn’t my Dutch Baby puff up?

The two most common causes are a pan that was not hot enough and batter that was poured into a cold or insufficiently preheated pan. The pan must be genuinely screaming hot — butter added to it should foam and melt immediately. The second cause is opening the oven during baking.

Can I use a different pan if I don’t have cast iron?

Yes — a heavy, oven-safe stainless steel or carbon steel pan works well. Avoid non-stick pans with low oven temperature ratings, as 450°F exceeds the safe limit for many non-stick coatings.

Can I make this gluten-free?

Yes — replace the all-purpose flour with a 1:1 gluten-free baking flour blend. The chickpea flour in the recipe already contributes to structure, so the swap works well.


Tried this recipe? Leave a comment below and let us know how it turned out! Tag us on Instagram and Facebook — we love seeing your plant-powered creations. Looking for more addictive vegan snack and appetizer recipes? Browse all recipes on Easy Vegan Recipes — new recipes posted every single week!
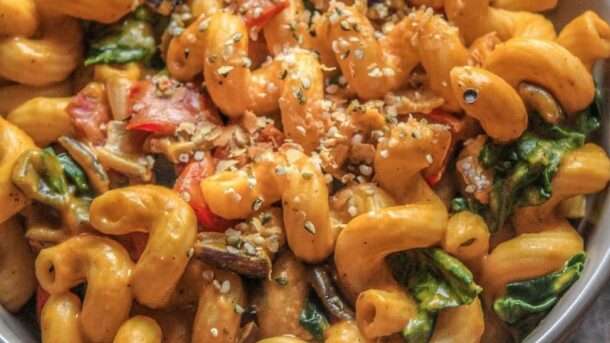
Cheesy Buttercup Squash Tortiglioni⁣

280351211 333299828933357 5526533945898962094 N.AVFI 610x343

There are pasta dishes that satisfy. And then there are pasta dishes like this Vegan Cheesy Buttercup Squash Tortiglioni — the kind that you pull from the oven golden and bubbling and smelling of roasted squash and nutmeg and caramelized edges, and carry to the table while everyone leans forward because whatever is in that dish is clearly extraordinary. This is that pasta. The one that makes buttercup squash into a silky, deeply savory cheese sauce that coats every ridge of every tortiglioni tube in a way that is so creamy, so rich, and so deeply satisfying that it becomes the pasta you make when autumn arrives and you want something that feels genuinely celebratory without requiring an unreasonable amount of effort.

This recipe roasts buttercup squash until it is caramelized and tender, then blends it with nutritional yeast, cashews, garlic, miso, and plant milk into a sauce that is simultaneously sweet and savory, rich and bright, with a depth of flavor that makes it taste far more complex than its ingredient list suggests. Tortiglioni — the thick, ridged tubes slightly larger than rigatoni — is the ideal pasta shape for this sauce: the ridges catch and hold the creamy squash sauce, the hollow centers fill with it, and every bite delivers the full, rich flavor of the sauce in a way that smoother pasta shapes simply cannot match.

What makes this recipe so outstanding is the roasting step — roasting the buttercup squash before blending it rather than simply steaming or boiling it concentrates its natural sugars, develops caramelized depth, and produces a sauce with a complexity that simply cannot be achieved with unroasted squash.

This recipe is 100% vegan, naturally dairy-free, ready in about an hour, and the kind of pasta that makes autumn feel like exactly the season it should be.


Recipe Information

Prep TimeCook TimeTotal TimeServingsCalories
15 mins45 mins60 mins4~520 kcal

Ingredients

For the Roasted Squash

  • 1 medium buttercup squash (about 900g), halved and deseeded
  • 1 whole head of garlic
  • 2 tbsp olive oil
  • Salt and black pepper

For the Cheesy Squash Sauce

  • Roasted squash flesh (from above, about 400g)
  • 6 cloves roasted garlic (from above)
  • ½ cup (70g) raw cashews, soaked in hot water for 30 minutes and drained
  • 1 cup (240ml) unsweetened plant milk
  • 3 tbsp nutritional yeast
  • 1 tbsp white miso paste
  • 1 tbsp lemon juice
  • ½ tsp smoked paprika
  • ¼ tsp nutmeg
  • Salt and white pepper to taste

For the Pasta

  • 400g (14oz) tortiglioni (or rigatoni)
  • 1 tbsp olive oil
  • 3 shallots, finely sliced
  • 1 tsp fresh thyme leaves
  • ½ cup (120ml) reserved pasta water
  • 30g vegan parmesan or breadcrumbs for topping
  • Fresh sage leaves, fried in olive oil to garnish

Instructions

  1. Roast the squash and garlic. Preheat the oven to 400°F (200°C). Place the squash halves cut-side up on a baking tray. Cut the top off the head of garlic to expose the cloves, drizzle with olive oil, wrap in foil, and place alongside the squash. Drizzle the squash with olive oil and season with salt and pepper. Roast for 40–45 minutes until the squash flesh is completely tender and caramelized at the edges. Allow to cool slightly.
  2. Cook the pasta. Bring a large pot of heavily salted water to a boil. Cook the tortiglioni according to package instructions until al dente. Reserve 1 cup of pasta water before draining.
  3. Make the sauce. Scoop the roasted squash flesh from the skin and squeeze the roasted garlic cloves from their papery shells. Place both in a high-speed blender along with the soaked and drained cashews, plant milk, nutritional yeast, miso, lemon juice, smoked paprika, and nutmeg. Blend on high for 2–3 minutes until completely smooth and silky. Taste and adjust seasoning — more nutritional yeast for cheesiness, more lemon for brightness, more miso for depth.
  4. Cook the shallots. Heat the olive oil in a large, wide pan over medium heat. Add the sliced shallots and thyme and cook for 8–10 minutes, stirring occasionally, until soft, golden, and caramelized.
  5. Combine. Pour the blended squash sauce into the pan with the shallots over low heat. Add the drained pasta and toss to coat, adding reserved pasta water a splash at a time until the sauce reaches a loose, creamy consistency that coats every piece of pasta. Taste and adjust seasoning.
  6. Finish and serve. Divide between bowls or transfer to a serving dish. Top with vegan parmesan or toasted breadcrumbs, crispy fried sage leaves, and a crack of black pepper. Serve immediately.

Pro Tips

  • Roast, do not steam or boil the squash — roasting concentrates the squash’s natural sugars and develops caramelization that creates a sauce with far more depth and complexity than any other cooking method.
  • Soak the cashews in hot water for at least 30 minutes — this is what produces the ultra-smooth, creamy sauce. Undersoaked cashews leave tiny grainy pieces that prevent the sauce from becoming truly silky.
  • Use pasta water generously — the starchy pasta water is what allows the thick squash sauce to coat every piece of pasta evenly without becoming gluey or clumping.
  • Fry fresh sage in olive oil until crispy — this takes 30 seconds and produces a garnish that is fragrant, crispy, and deeply savory in a way that elevates the finished dish significantly.

Why Buttercup Squash Makes the Best Pasta Sauce

Not all winter squashes are equal when it comes to sauce-making. Buttercup squash — a compact, dark green winter squash with a dense, dry, deeply orange flesh — has a significantly lower water content than butternut squash and a sweeter, nuttier, more complex flavor that produces a sauce with more body and more depth than butternut-based alternatives. Its flesh blends into an extraordinarily smooth, dense puree that needs less thickening and carries the flavors of nutritional yeast, miso, and garlic beautifully. If buttercup squash is unavailable, kabocha squash (Japanese pumpkin) is the closest substitute with a similarly dry, sweet flesh.


Flavor Variations

  • Spicy Squash Tortiglioni: Add a teaspoon of chilli flakes to the sauce and top with pickled jalapeños for a version with building heat that contrasts beautifully with the sweet squash.
  • Sage Brown Butter Squash Tortiglioni: Toss the pasta with vegan brown butter and extra fried sage before serving for a more classically Italian flavor profile.
  • Squash and Mushroom Tortiglioni: Add sautéed wild mushrooms to the finished pasta for an earthy, meaty dimension that pairs wonderfully with the sweet squash sauce.

Nutritional Highlights (Per Serving)

CaloriesProteinCarbsFiberFat
~520 kcal18g72g7g18g

Storage

  • Refrigerator: Store leftover pasta in an airtight container for up to 4 days. Reheat gently in a pan with a splash of plant milk or water to loosen the sauce, which thickens significantly when cold.
  • The squash sauce on its own: Keeps in a sealed jar in the refrigerator for up to 5 days or in the freezer for up to 3 months — make a double batch and freeze for a quick weeknight pasta sauce.

Frequently Asked Questions

Can I use butternut squash instead of buttercup?

Yes — butternut squash works well and is more widely available. The sauce will be slightly less dense and slightly less sweet, but still excellent. Kabocha squash is the closest in flavor and texture to buttercup.

Can I make this nut-free?

Yes — replace the cashews with ½ cup of silken tofu for a sauce that is still creamy and smooth without any nuts. The flavor will be slightly lighter but still very good.

Can I make the sauce ahead?

Yes — the squash sauce keeps in the refrigerator for up to 5 days and freezes beautifully. Make it ahead and simply cook the pasta fresh when needed.


Tried this recipe? Leave a comment below and let us know how it turned out! Tag us on Instagram and Facebook — we love seeing your plant-powered creations. Looking for more addictive vegan snack and appetizer recipes? Browse all recipes on Easy Vegan Recipes — new recipes posted every single week!