easy vegan side dish

Vegan Sumac Roasted Potatoes — The Most Addictive Crispy Potatoes You Will Make All Year

sumac roasted potatoes

There are roasted potatoes and then there are roasted potatoes like these Vegan Sumac Roasted Potatoes — the kind that come out of the oven with shatteringly crispy edges, fluffy interiors, and a coating of deep brick-red sumac that gives them a tangy, almost lemony sourness that is so unexpectedly brilliant and so completely addictive that you find yourself eating them straight off the baking sheet before they have even made it to a serving bowl, burning your fingers and not caring even slightly. This is that potato. The one that makes people ask what you did differently. The one that proves a single spice can be completely transformative. The one that turns the most ordinary vegetable in the world into something genuinely, memorably good.

Sumac is one of the great underused spices in Western cooking — a deep burgundy-red powder ground from dried sumac berries that delivers an intense, fruity tartness similar to lemon juice but with an earthy complexity that lemon could never replicate. When it coats potato wedges roasted at high heat, something remarkable happens: the edges crisp and caramelize while the sumac intensifies and darkens, its tartness mellowing slightly and developing a savory depth that makes every bite taste brighter, more interesting, and more alive than a plain roasted potato ever could.

What makes this recipe so outstanding is the technique — parboiling the potatoes before roasting creates the starchy, roughed-up surface that produces maximum crispiness, and adding the sumac in two stages (before and after roasting) ensures the flavor is both baked-in and fresh on the surface.

This recipe is 100% vegan, naturally gluten-free, ready in under an hour, and one of those side dishes that steals the show from whatever main course it is supposed to be accompanying.


Recipe Information

Prep TimeCook TimeTotal TimeServingsCalories
10 mins40 mins50 mins4~285 kcal

Ingredients

For the Potatoes

  • 1kg (about 2.2lb) Yukon Gold or Maris Piper potatoes, cut into wedges or chunks
  • 3 tbsp olive oil
  • 1½ tbsp sumac, divided
  • 1 tsp garlic powder
  • 1 tsp onion powder
  • ½ tsp smoked paprika
  • 1 tsp salt
  • ½ tsp black pepper

For Serving

  • 1 tbsp sumac (for finishing)
  • Fresh flat-leaf parsley, roughly chopped
  • Flaky sea salt
  • Lemon wedges
  • Vegan yogurt dip or tahini sauce alongside (optional)

Instructions

  1. Parboil the potatoes. Place the potato wedges in a large pot of well-salted cold water. Bring to a boil and cook for 8–10 minutes until just starting to soften at the edges but still firm in the center — they should not be cooked through. Drain well and return to the pot. Shake the pot vigorously with the lid on for 30 seconds to rough up the surface of the potatoes — this creates the texture that produces maximum crispiness in the oven.
  2. Preheat and prepare. Preheat the oven to 425°F (220°C). Place a large baking sheet in the oven while it preheats — a hot pan is essential for crispy bottoms.
  3. Season. Transfer the roughed-up potatoes to a large bowl. Drizzle with olive oil and toss to coat. Add 1 tablespoon of the sumac, garlic powder, onion powder, smoked paprika, salt, and pepper. Toss thoroughly until every piece is evenly coated.
  4. Roast. Carefully remove the hot baking sheet from the oven. Spread the potatoes in a single layer — do not crowd them. Roast for 35–40 minutes, flipping once halfway through, until deeply golden and crispy on the outside and fluffy within.
  5. Finish and serve. Transfer immediately to a serving dish. Dust generously with the remaining fresh sumac — adding it now keeps the flavor bright and punchy. Scatter with chopped parsley and flaky sea salt. Serve with lemon wedges and a yogurt dip or tahini sauce alongside.

Pro Tips

  • Parboil before roasting — this is the non-negotiable step that separates genuinely crispy roasted potatoes from merely golden ones. The parboiling cooks the interior; the oven crisps the exterior; the roughing-up creates maximum surface area for crunch.
  • Use a hot baking sheet — sliding potatoes onto a cold sheet produces soggy bottoms. The hot sheet sears the underside of the potato the moment it makes contact, starting the crisping process from the very first second.
  • Do not crowd the pan — potatoes need space around them to roast rather than steam. A crowded pan produces soft, pale, disappointing results. Use two pans if needed.
  • Add sumac in two stages — baked sumac has a deeper, mellower flavor; fresh sumac has a bright, sharp tartness. Using both gives the finished potatoes complexity and vibrancy simultaneously.

What Is Sumac and How to Use It

Sumac (Rhus coriaria) is a spice widely used across Middle Eastern, Mediterranean, and Central Asian cuisines, ground from the dried, crushed berries of the sumac shrub. Its flavor is tart, fruity, and slightly astringent — similar in its acidic brightness to lemon juice but earthier, more complex, and with a distinctive berry note that lemon cannot replicate. It has been used as a souring agent in cooking for thousands of years, predating the widespread use of citrus in many of the cuisines it belongs to. In Lebanese, Turkish, Iranian, and Palestinian cooking, sumac appears on virtually every table as a finishing spice, dusted over hummus, salads, grilled meats, and flatbreads. As an ingredient for roasting, it is revelatory — its tartness mellows under heat while its color deepens to a beautiful dark brick red that makes everything it touches look as spectacular as it tastes.


Flavor Variations

  • Sumac and Za’atar Potatoes: Add 1 tablespoon of za’atar alongside the sumac for a more herbal, thyme-forward version that is particularly good served with hummus.
  • Sumac and Harissa Potatoes: Add 1 tablespoon of harissa paste to the olive oil before tossing for a spicier, North African-inspired version with building heat.
  • Sumac Potatoes with Caramelized Onions: Scatter thinly sliced red onions over the potatoes for the final 15 minutes of roasting — the onions caramelize and the combination of sweet onion and tart sumac is outstanding.

Nutritional Highlights (Per Serving)

CaloriesProteinCarbsFiberFat
~285 kcal5g44g5g11g

Storage

  • Refrigerator: Store leftover potatoes in an airtight container for up to 4 days. They lose their crispiness when stored but are still delicious. Reheat in a hot oven (425°F) for 10 minutes or in an air fryer for 5 minutes to restore crunch.
  • Freezing: Not recommended — roasted potatoes do not freeze well and become waterlogged on thawing.

Frequently Asked Questions

Where can I buy sumac?

Sumac is widely available in Middle Eastern grocery stores, specialty food shops, and increasingly in the international aisle of larger supermarkets. It is also readily available online. Store in a sealed jar away from light — it keeps for up to a year.

Can I use sweet potatoes instead?

Yes — sweet potatoes work beautifully with sumac. Skip the parboiling step (sweet potatoes roast faster) and reduce the oven time to 25–30 minutes. The combination of sweet potato and tart sumac is particularly striking.

Can I make these in an air fryer?

Yes — cook at 400°F (200°C) for 20–25 minutes, shaking the basket halfway through. The air fryer produces excellent results without the need to parboil first, though parboiling still improves the texture.


Tried this recipe? Leave a comment below and let us know how it turned out! Tag us on Instagram and Facebook — we love seeing your plant-powered creations. Looking for more warming vegan curry and dinner recipes? Browse all recipes on Easy Vegan Recipes — new recipes posted every single week!

Vegan Cheesy Zucchini Bake

vegan cheesy zucchini bake

There are dishes that require careful layering and patience. And then there are dishes like this Vegan Cheesy Zucchini Bake — the kind that comes together in one bowl and one dish with no slicing into thin rounds, no draining for twenty minutes, no fussing over presentation, just grated zucchini stirred straight into a thick, cheesy batter and baked until golden, set, and deeply satisfying. This is that bake. The one you turn to on a night when the gratin feels like too much effort but you still want that same warm, cheesy zucchini comfort.

Where a gratin layers thin slices of zucchini between a poured sauce, this bake takes a completely different approach — zucchini is grated and squeezed dry, then mixed directly into a savory chickpea flour and cheese-style batter studded with herbs and garlic, poured into a dish, and baked until firm enough to slice into squares. The result is closer to a savory vegetable bread or dense frittata-style bake than a classical gratin, with a soft, custardy interior and a golden, slightly crisp top.

What makes this bake so outstanding is its simplicity — one bowl, one mixing step, one bake, with grated zucchini distributed evenly throughout rather than layered, giving every single square the same balance of cheesy batter and tender zucchini in every bite.

This recipe is naturally gluten-free when made with chickpea flour, ready in just 50 minutes, and absolutely wonderful served warm in squares, either as a side dish or a light vegetarian main with a salad alongside.


Recipe Information

Prep TimeCook TimeTotal TimeServingsCalories
15 mins35 mins50 mins6~210 kcal

Ingredients

For the Bake

  • 4 medium zucchini, grated and squeezed very dry
  • 1 cup (115g) chickpea flour
  • ½ cup (60g) vegan shredded mozzarella
  • ¼ cup (25g) nutritional yeast
  • 1 small onion, finely diced
  • 3 cloves garlic, minced
  • 2 tbsp olive oil
  • 1 tsp baking powder
  • ½ tsp dried oregano
  • ¼ tsp turmeric
  • ½ tsp salt
  • ¼ tsp black pepper
  • 2 tbsp fresh dill or parsley, chopped

For the Top

  • ¼ cup (30g) extra shredded vegan mozzarella
  • A light dusting of smoked paprika

Optional Add-ins

  • ¼ tsp chili flakes for gentle heat
  • 2 tbsp sun-dried tomatoes, finely chopped
  • ¼ cup (30g) vegan feta crumbled through the batter

To Serve

  • Fresh herbs
  • A simple side salad
  • Vegan yogurt or tahini drizzle

Instructions

  1. Preheat the oven and prepare the dish. Preheat the oven to 375°F (190°C). Grease a 20cm (8-inch) square or round baking dish.
  2. Squeeze the zucchini thoroughly. Grate the zucchini and place in a clean kitchen towel, squeezing firmly to remove as much liquid as possible — this step is essential for the bake to set properly.
  3. Sauté the onion and garlic. Heat the olive oil in a small skillet over medium heat. Add the onion and cook for 3–4 minutes until softened, then add the garlic and cook for 30 seconds more.
  4. Make the batter. In a large bowl whisk together the chickpea flour, baking powder, oregano, turmeric, salt, and pepper. Add the cooked onion and garlic, the squeezed zucchini, vegan mozzarella, nutritional yeast, and fresh herbs. Mix thoroughly until evenly combined into a thick batter.
  5. Pour and top. Pour the batter into the prepared dish, spreading it evenly. Scatter the extra shredded mozzarella over the top and dust lightly with smoked paprika.
  6. Bake. Bake for 30–35 minutes until the top is golden, the center is set, and a knife inserted comes out clean.
  7. Rest and serve. Let rest for 8–10 minutes before slicing into squares — this is essential for clean slices, as the bake firms up as it cools slightly.

Pro Tips

  • Squeeze the zucchini until truly dry — more thoroughly than seems necessary — or the bake will not set properly and will be soft and wet in the center.
  • Whisk the chickpea flour into the dry ingredients first to avoid lumps before adding the wet components.
  • Let the bake rest fully before slicing for clean, sliceable squares rather than a loose, crumbly result.
  • Use a square or rectangular dish for the most uniform slices.

How This Differs From a Classic Gratin

A gratin relies on thinly sliced vegetables layered beneath a poured sauce that thickens around them during baking, producing distinct visible layers. This bake instead mixes grated zucchini directly into a single batter, producing a uniform, sliceable texture throughout rather than separate layers — closer to a savory vegetable loaf than a traditional French-style gratin, and considerably faster to prepare.


Flavor Variations

  • Mediterranean Zucchini Bake: Add chopped sun-dried tomatoes and vegan feta to the batter for a Mediterranean-inspired version.
  • Spicy Zucchini Bake: Add chili flakes and a diced jalapeño for gentle building heat.
  • Herb Garden Bake: Increase the fresh herbs and add a tablespoon of fresh basil for a more herbaceous version.

Nutritional Highlights (Per Serving)

CaloriesProteinCarbsFiberFat
~210 kcal9g18g4g11g

Storage

  • Refrigerator: Store in an airtight container for up to 4 days. Reheat individual squares in a skillet or air fryer to restore some crispness on top.
  • Freezer: Freeze cooled squares wrapped individually for up to 2 months. Thaw in the refrigerator before reheating.
  • Meal prep: This bake is excellent for slicing into portions for lunches throughout the week.

Frequently Asked Questions

Can I use a different flour instead of chickpea flour?

Yes — a gluten-free all-purpose flour blend or regular all-purpose flour can be used, though the chickpea flour adds extra protein and a slightly firmer set.

Why is my bake too wet in the center?

This is almost always caused by insufficient squeezing of the zucchini. Squeeze it very thoroughly in a kitchen towel until no more liquid comes out before adding to the batter.

Can I add other vegetables to this bake?

Yes — grated carrot or finely chopped spinach can be added alongside the zucchini, just be sure to squeeze out any extra moisture they release as well.


Tried this recipe? Leave a comment below and let us know how it turned out! Tag us on Instagram and Facebook — we love seeing your plant-powered creations. Looking for more quick, comforting vegan side dish recipes? Browse all recipes on Easy Vegan Recipes — new recipes posted every single week!

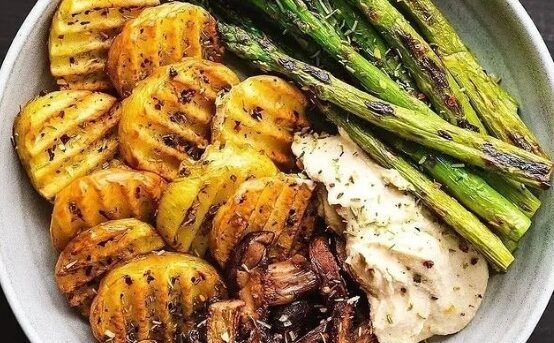
CHARRED ASPARAGUS

311786815 185569373977564 5940749530633623683 N 1 554x343

There are side dishes that arrive on the table and are eaten politely alongside whatever else is being served. And then there are dishes like this Vegan Charred Asparagus — the kind that arrives on the table and becomes the thing everyone is reaching for first, scraping the last stalks from the plate before the main course is even finished, because the charring transforms asparagus from a pleasant vegetable into something deeply savory, smoky, and complex in a way that is genuinely extraordinary for how little effort it requires. This is that dish. The one that makes asparagus the star of the meal rather than the supporting act.

Charring asparagus — cooking it at very high heat until the exterior blackens and blisters while the interior remains tender and sweet — concentrates its natural sugars, develops deep Maillard browning that produces savory, nutty, almost smoky flavor compounds that raw or gently roasted asparagus simply cannot achieve. It is the same principle that makes charred corn and blistered tomatoes so irresistible — high heat and direct contact with a hot surface unlocking a dimension of flavor that lower-temperature cooking entirely misses.

This recipe chars the asparagus in a screaming-hot cast iron pan or grill pan, then finishes it with a bright, punchy dressing of lemon, garlic, capers, and fresh herbs that cuts through the char and adds the acidity and freshness that makes each bite completely balanced. The result is a side dish that is impressive enough to serve at a dinner party but honest enough to make on a Tuesday night alongside whatever else you are having.

This recipe is 100% vegan, naturally gluten-free, ready in under 20 minutes, and one of those rare dishes that delivers genuinely spectacular flavor for almost no work at all.


Recipe Information

Prep TimeCook TimeTotal TimeServingsCalories
5 mins12 mins17 mins4~95 kcal

Ingredients

For the Charred Asparagus

  • 2 bunches (about 500g) thick asparagus spears, woody ends snapped off
  • 1 tbsp olive oil
  • ½ tsp salt
  • ¼ tsp black pepper

For the Lemon Caper Dressing

  • 3 tbsp olive oil
  • 2 tbsp lemon juice
  • 1 tsp lemon zest
  • 1 clove garlic, very finely minced or grated
  • 2 tbsp capers, roughly chopped
  • 1 tbsp fresh parsley, finely chopped
  • 1 tsp Dijon mustard
  • Salt and black pepper to taste

Optional Garnishes

  • Toasted pine nuts or slivered almonds
  • Fresh basil or tarragon
  • Flaky sea salt
  • Chilli flakes

Instructions

  1. Prepare the asparagus. Snap off the woody ends of each asparagus spear by holding the stalk at both ends and bending — it will naturally snap at exactly the right point. Pat the spears completely dry with paper towels — any surface moisture will steam rather than char, preventing the deep browning you are looking for. Toss with olive oil, salt, and pepper.
  2. Heat the pan. Place a cast iron skillet or heavy grill pan over the highest heat your stove can produce. Allow it to heat for at least 3 minutes until it is smoking hot — this is not optional. A pan that is not hot enough will steam the asparagus rather than char it.
  3. Char the asparagus. Place the asparagus in a single layer in the dry, screaming-hot pan. Do not move them for 2–3 minutes — let them sit undisturbed against the hot surface to develop genuine char marks and deep browning. Turn and char the other side for another 2–3 minutes. Work in batches if necessary to avoid overcrowding, which causes steaming. The asparagus should be blistered and blackened in spots on the outside while still retaining a slight bite in the center.
  4. Make the dressing. While the asparagus chars, whisk together the olive oil, lemon juice, lemon zest, minced garlic, chopped capers, parsley, and Dijon mustard. Season to taste with salt and pepper.
  5. Dress and serve. Transfer the charred asparagus to a serving plate. Spoon the lemon caper dressing generously over the hot spears. Finish with flaky sea salt, toasted pine nuts, and chilli flakes if using. Serve immediately.

Pro Tips

  • Dry the asparagus thoroughly before charring — surface moisture is the enemy of good char. Pat each spear dry with paper towels and if time allows, lay them out for 10 minutes before cooking.
  • Use thick asparagus for charring — thin asparagus overcooks and becomes limp before the exterior can develop proper char. Choose spears that are at least pencil-thick.
  • Get the pan truly, genuinely hot — hotter than feels comfortable. The pan should be smoking before the asparagus goes in. This is the single most important step in the recipe.
  • Do not overcrowd the pan — charring requires direct contact between each spear and the hot surface. Work in batches if needed.

The Science of Charring Vegetables

Charring is controlled burning — the deliberate application of enough heat to cause the outermost layer of a vegetable to undergo Maillard browning and, at the blackened spots, actual carbonization. This sounds alarming but produces something remarkable: the Maillard reactions create hundreds of new flavor compounds that are savory, nutty, and deeply complex; the slight carbonization at the blackened spots adds genuine smokiness and a slight bitterness that, in small amounts, makes the overall flavor dramatically more interesting. Asparagus is particularly well suited to charring because its natural sugars caramelize beautifully under high heat while its firm texture means the interior remains tender and sweet — the contrast between the charred exterior and the sweet, green interior is what makes charred asparagus so compulsively delicious.


Flavor Variations

  • Charred Asparagus with Romesco: Serve alongside a smoky vegan romesco sauce instead of the lemon caper dressing for a Spanish-inspired version.
  • Charred Asparagus with Tahini: Drizzle with lemon tahini and sprinkle with za’atar and toasted sesame seeds for a Middle Eastern version.
  • Charred Asparagus with Miso Butter: Toss the hot charred spears with a mixture of white miso and vegan butter for an umami-rich Japanese-inspired finish.

Nutritional Highlights (Per Serving)

CaloriesProteinCarbsFiberFat
~95 kcal3g6g3g7g

Storage

  • Best eaten immediately while hot — charred asparagus loses its textural contrast as it cools and the char softens.
  • Leftovers keep in the refrigerator for up to 3 days and are excellent served cold or at room temperature the next day as part of a grain bowl or salad.
  • The lemon caper dressing keeps separately in a sealed jar for up to 5 days in the refrigerator — shake well before using.

Frequently Asked Questions

Can I char asparagus on a BBQ grill instead?

Yes — a hot charcoal or gas grill is actually ideal for charring asparagus and produces an even better smoky flavor. Grill directly over high heat for 3–4 minutes per side.

Can I use thin asparagus?

Thin asparagus will cook much faster and is harder to char without overcooking the interior. If using thin spears, reduce the cooking time significantly and watch carefully.

What can I serve this with?

Charred asparagus pairs beautifully with pasta, grain bowls, roasted tofu, vegan risotto, or as part of a mezze spread. It also works wonderfully over hummus as a light meal.


Tried this recipe? Leave a comment below and let us know how it turned out! Tag us on Instagram and Facebook — we love seeing your plant-powered creations. Looking for more addictive vegan snack and appetizer recipes? Browse all recipes on Easy Vegan Recipes — new recipes posted every single week!