dinner party vegan

Vegan Artichoke White Bean Dip — The Most Elegant Plant-Based Dip You Will Make All Week

vegan artichoke white bean dip

There are dips you put out because something is needed on the table. And then there are dips like this Vegan Artichoke White Bean Dip — the kind that blends into a pale, creamy, deeply savory spread with a subtle, slightly briny artichoke character that is sophisticated in a way most dips simply are not, topped with a drizzle of herbed olive oil and a few artichoke hearts arranged over the surface that make it look as beautiful as it tastes. This is that dip. The one that elevates a simple gathering into something that feels genuinely considered. The one that disappears completely and gets asked about every single time.

Artichoke hearts — whether jarred or canned — have a tender, slightly tangy, subtly earthy flavor that pairs with white beans in an extraordinarily harmonious way, the mild creaminess of the bean providing body and richness while the artichoke brings its specific, complex, slightly briny character that makes this dip taste completely its own. Together with lemon, garlic, and good olive oil they produce a Mediterranean-inflected dip of genuine elegance and depth.

What makes this dip so outstanding is how the artichoke changes the character of an already excellent white bean dip — adding a layer of flavor complexity and a slightly savory, briny depth that makes this version more interesting and more distinctive than any plain white bean preparation.

This recipe is 100% vegan, naturally gluten-free, ready in just 15 minutes, and absolutely wonderful served with warm pita, flatbread, crudités, or crackers at any occasion from a casual weeknight to a formal dinner party.


Recipe Information

Prep TimeCook TimeTotal TimeServingsCalories
10 mins5 mins15 mins6~150 kcal

Ingredients

For the Dip

  • 1 can (400g) white beans (cannellini), drained and rinsed
  • 1 can (400g) artichoke hearts in water, drained and roughly chopped (reserve a few whole hearts for topping)
  • 3 tbsp extra virgin olive oil
  • 3 tbsp lemon juice
  • 2 cloves garlic
  • 2 tbsp nutritional yeast
  • ½ tsp salt
  • ¼ tsp white pepper
  • 3–5 tbsp ice cold water to reach consistency

For the Herbed Oil Topping

  • 3 tbsp extra virgin olive oil
  • 1 tbsp fresh parsley, very finely chopped
  • 1 tsp fresh lemon zest
  • ¼ tsp chili flakes (optional)
  • Pinch of salt

For Garnish

  • Reserved artichoke hearts, halved or quartered
  • Extra fresh parsley leaves
  • A pinch of smoked paprika
  • Lemon zest

To Serve

  • Warm pita or flatbread
  • Sliced baguette or sourdough
  • Vegetable crudités — cucumber, carrot, celery, radish
  • Crackers or breadsticks

Instructions

  1. Blend the dip. Place the drained white beans, chopped artichoke hearts, olive oil, lemon juice, garlic, nutritional yeast, salt, and white pepper in a high-speed blender or food processor. Blend for 60–90 seconds, scraping down the sides as needed. Add ice cold water one tablespoon at a time until the dip reaches a smooth, creamy, spreadable consistency. Continue blending for a full 2 minutes for the silkiest result.
  2. Taste and adjust. Taste the dip and adjust with additional lemon juice for brightness, salt for depth, or garlic for pungency. The artichoke flavor should be present but harmonious with the white bean base — not overpowering.
  3. Make the herbed oil. In a small bowl combine the olive oil, finely chopped parsley, lemon zest, chili flakes if using, and a pinch of salt. Stir to combine.
  4. Plate the dip. Transfer the dip to a wide, shallow serving bowl. Using the back of a spoon create a swirl starting from the center and sweeping outward. Arrange the reserved artichoke heart pieces over the surface. Drizzle the herbed oil generously over the top. Finish with fresh parsley leaves, a pinch of smoked paprika, and extra lemon zest.
  5. Serve immediately or refrigerate. Serve with warm bread and vegetables alongside, or cover and refrigerate for up to 5 days.

Pro Tips

  • Use artichoke hearts packed in water rather than marinated in oil for a cleaner, more balanced flavor — marinated artichokes introduce their own seasoning that can overwhelm the delicate white bean base.
  • Blend for the full 2 minutes for the smoothest, most elegant texture — white beans require sustained blending to achieve true silkiness.
  • Add ice cold water gradually — the exact amount varies by brand of bean and blending power. Stop adding when the dip is smooth and spreadable.
  • Reserve a few artichoke hearts before blending for the garnish — they make the finished presentation immediately identifiable and visually beautiful.
  • Serve at room temperature for the most vivid flavor — a refrigerator-cold dip mutes the lemon and artichoke character significantly.

How This Differs From Smoky White Bean Dip

While both recipes use white beans as their base, these two dips are genuinely different in character. The Smoky White Bean Dip is defined by its bold smoked paprika oil finish and crispy chickpea topping — warm, smoky, and dramatic in presentation. This Artichoke White Bean Dip is defined by the subtle, briny, Mediterranean character of the artichoke and the bright herbed oil — lighter, more elegant, and more complex in its underlying flavor. One is a statement dip; the other is a sophisticated accompaniment. Both belong on the same table for different occasions.


Flavor Variations

  • Roasted Garlic Artichoke Dip: Replace the raw garlic with a full head of roasted garlic for a sweeter, more deeply caramelized garlic character throughout.
  • Spinach Artichoke Dip: Add a handful of wilted, squeezed spinach to the blender for a version inspired by the classic spinach artichoke combination.
  • Sun-Dried Tomato Artichoke Dip: Add 2 tablespoons of sun-dried tomatoes to the blender for a more intensely savory, slightly sweet variation.

Nutritional Highlights (Per Serving)

CaloriesProteinCarbsFiberFat
~150 kcal6g15g5g8g

Storage

  • Refrigerator: Store the dip in an airtight container for up to 5 days. The flavor deepens during storage. Add the herbed oil and garnish fresh when serving.
  • Freezer: Freezes well for up to 2 months. Thaw overnight in the refrigerator and re-blend briefly to restore smoothness.
  • Make ahead: This dip is ideal for making a day ahead — the flavors meld beautifully overnight and the texture is excellent straight from the refrigerator once brought to room temperature.

Frequently Asked Questions

Can I use frozen artichoke hearts?

Yes — thaw completely and drain thoroughly before using. Frozen artichoke hearts often have a cleaner flavor than canned and work excellently in this recipe.

Can I make this without nutritional yeast?

Yes — the nutritional yeast adds savory depth but the dip is still delicious without it. An extra pinch of salt and a small additional amount of lemon juice compensates reasonably well.

What white bean variety works best?

Cannellini beans produce the creamiest, most neutral result. Butter beans work well for a slightly richer, more substantial dip. Great Northern beans are also excellent. All produce a good result with the same blending technique.


Tried this recipe? Leave a comment below and let us know how it turned out! Tag us on Instagram and Facebook — we love seeing your plant-powered creations. Looking for more addictive vegan snack and appetizer recipes? Browse all recipes on Easy Vegan Recipes — new recipes posted every single week!

Vegan Cannelloni Recipe

vegan cannelloni recipe

There are pasta dinners that feel genuinely special. And then there are pasta dinners like this Vegan Cannelloni — the kind that comes out of the oven bubbling with rich tomato sauce, with pasta tubes so generously filled with creamy ricotta-style cashew and spinach filling that they have expanded slightly in the dish, their tops blistered and golden where the sauce has caramelized against them. This is that dinner. The one that looks like it took considerably more effort than it actually did. The one that makes a weeknight feel like a dinner party. The one that disappears from the baking dish before anyone realizes they have had seconds.

This recipe fills dried cannelloni tubes with a rich filling built on cashew ricotta, wilted spinach, and herbs — a filling so satisfying and so deeply flavored that it rivals any dairy-based ricotta in both texture and taste — then nestles them in a generous, garlicky tomato sauce and bakes until the pasta is perfectly tender, the filling is set, and the top is golden and slightly crisped at the edges.

What makes this cannelloni so outstanding is the cashew ricotta — blended from soaked cashews with lemon juice, nutritional yeast, and garlic into a smooth, creamy, subtly tangy filling that behaves identically to dairy ricotta in this application, holding its shape inside the pasta tubes while baking into a rich, satisfying filling of extraordinary flavor.

This recipe is 100% vegan, ready in about 65 minutes, and absolutely magnificent served directly from the baking dish at the table with a simple green salad alongside.


Recipe Information

Prep TimeCook TimeTotal TimeServingsCalories
25 mins40 mins65 mins4~480 kcal

Ingredients

For the Cashew Ricotta Filling

  • 1½ cups (195g) raw cashews, soaked in boiling water for 30 minutes then drained
  • 3 tbsp nutritional yeast
  • 2 tbsp lemon juice
  • 1 clove garlic
  • ½ tsp salt
  • ¼ tsp black pepper
  • 3 tbsp water, to reach consistency

For the Spinach Filling Mix-in

  • 3 cups (90g) fresh spinach, wilted and squeezed very dry
  • ¼ tsp nutmeg
  • Salt and pepper

For the Tomato Sauce

  • 1 can (400g) crushed tomatoes
  • 1 can (400g) diced tomatoes
  • 4 cloves garlic, minced
  • 1 medium onion, finely diced
  • 2 tbsp olive oil
  • 1 tsp dried oregano
  • 1 tsp dried basil
  • 1 tsp sugar or maple syrup
  • Salt and pepper

For Assembly

  • 250g dried cannelloni tubes (approximately 16–18 tubes)
  • ½ cup (60g) vegan mozzarella, shredded (optional topping)
  • Fresh basil for garnish

Instructions

  1. Make the cashew ricotta. Blend the drained cashews, nutritional yeast, lemon juice, garlic, salt, pepper, and water in a high-speed blender until smooth and creamy — similar in consistency to thick ricotta. Taste and adjust salt and lemon. Set aside.
  2. Prepare the spinach. Wilt the spinach in a dry pan over medium heat for 2–3 minutes. Transfer to a clean towel and squeeze very thoroughly until almost completely dry. Roughly chop and mix into the cashew ricotta along with the nutmeg. Season generously.
  3. Make the tomato sauce. Heat the olive oil in a wide pan over medium heat. Add the onion and cook for 5 minutes until softened. Add the garlic and cook for 60 seconds. Add both cans of tomatoes, oregano, basil, and sugar. Simmer for 10 minutes until slightly reduced. Season generously.
  4. Preheat the oven. Preheat to 375°F (190°C). Spread a thin layer of tomato sauce across the base of a deep baking dish.
  5. Fill the cannelloni. Transfer the spinach ricotta filling to a piping bag or a zip-lock bag with the corner snipped off. Pipe the filling into each dry cannelloni tube, filling generously from both ends if needed. Alternatively use a small spoon, though a piping bag is significantly faster and less messy.
  6. Assemble. Nestle the filled cannelloni tubes in a single layer over the sauce base in the baking dish. Pour the remaining tomato sauce over the top, ensuring every tube is covered — exposed pasta will not soften properly during baking. Top with shredded vegan mozzarella if using.
  7. Bake covered then uncovered. Cover tightly with foil and bake for 30 minutes. Remove the foil and bake for a further 10 minutes until the sauce is bubbling, the top is golden, and a knife inserted into the thickest tube meets no resistance.
  8. Rest and serve. Let rest for 5 minutes before serving. Garnish with fresh basil and serve directly from the baking dish.

Pro Tips

  • Use a piping bag to fill the cannelloni — it is the single change that makes this recipe dramatically easier than using a spoon, which is slow and messy.
  • Ensure every tube is completely covered in tomato sauce before baking — any exposed pasta will remain hard and undercooked in the finished dish.
  • Squeeze the spinach until completely dry before adding to the ricotta — excess moisture makes the filling too wet and can cause the tubes to burst during baking.
  • Cover tightly with foil for the first 30 minutes — the steam trapped under the foil is what cooks the pasta through from the inside.

The History of Cannelloni

Cannelloni is one of the most beloved baked pasta dishes in Italian cooking, originating in the Southern Italian tradition of stuffed and baked pasta that also produced manicotti, lasagne, and stuffed shells. The name derives from the Italian word canna, meaning cane or tube, referring to the cylindrical pasta shape that characterizes the dish. Traditional fillings include ricotta and spinach, meat and béchamel, and various regional combinations, all united by the technique of filling the tubes before baking them in sauce until the pasta softens and the filling sets into a rich, unified whole. This vegan version is entirely faithful to the spinach ricotta tradition, producing a result indistinguishable in character from the dairy original.


Flavor Variations

  • Mushroom and Walnut Cannelloni: Replace half the spinach with finely chopped sautéed mushrooms and add crushed toasted walnuts to the filling for a richer, earthier version.
  • Pumpkin and Sage Cannelloni: Add roasted pumpkin puree to the cashew ricotta and season with sage for a beautiful autumn version.
  • Béchamel Topped Cannelloni: Make a simple vegan béchamel from plant milk and vegan butter to pour over the top of the cannelloni instead of or alongside the tomato sauce.

Nutritional Highlights (Per Serving)

CaloriesProteinCarbsFiberFat
~480 kcal16g58g6g20g

Storage

  • Refrigerator: Store covered in the baking dish or in an airtight container for up to 4 days. Reheat covered in the oven at 350°F (175°C) for 20 minutes.
  • Freezer: Assemble completely, cover tightly, and freeze for up to 2 months before baking. Bake from frozen at 375°F (190°C) covered for 50 minutes then uncovered for 15 minutes.
  • Make ahead: Assemble up to 24 hours before baking and refrigerate covered. Add 10 extra minutes to the covered baking time when cooking from cold.

Frequently Asked Questions

Can I use fresh pasta sheets instead of dried tubes?

Yes — blanch fresh lasagne sheets briefly, fill and roll them into tubes, then bake as directed. This produces a more delicate, silkier pasta layer than dried tubes.

Why are my cannelloni still hard after baking?

Hard cannelloni is caused by insufficient sauce coverage, under-baking, or foil that was not sealed tightly enough. Ensure every tube is submerged in sauce, bake for the full time, and seal the foil tightly to trap steam.

Can I make this nut-free?

Yes — replace the cashew ricotta with a mixture of firm tofu blended smooth with nutritional yeast, lemon juice, and salt for a nut-free filling with a similar texture.


Tried this recipe? Leave a comment below and let us know how it turned out! Tag us on Instagram and Facebook — we love seeing your plant-powered creations. Looking for more impressive vegan pasta and Italian dinner recipes? Browse all recipes on Easy Vegan Recipes — new recipes posted every single week!

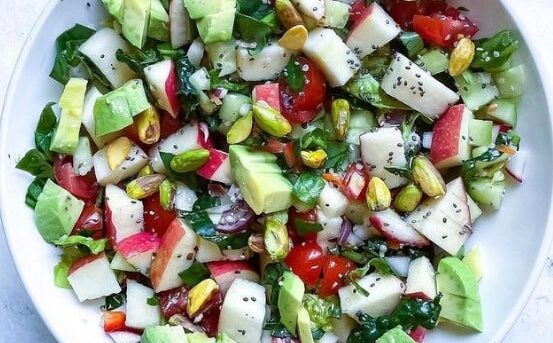
Vegan Apple and Pistachio Salad — The Most Elegant Plant-Based Salad You Will Make All Week

305109081 1263947554349097 4419161781738853231 N 1 553x343

There are salads you make because something light is needed. And then there are salads like this Vegan Apple and Pistachio Salad — the kind that combines crisp, thinly sliced apple with crunchy toasted pistachios, peppery arugula, shaved fennel, and a bright lemon maple dressing into something so elegant and so perfectly balanced between sweet, crunchy, bitter, and bright that it feels genuinely special from the very first forkful. This is that salad. The one that looks effortlessly beautiful on the table. The one that is as appropriate at a weeknight dinner as it is at a dinner party. The one that proves a salad made with care and the right combination of ingredients is one of the most satisfying things you can eat.

This recipe builds the salad around the contrast between sweet, crisp apple and rich, buttery pistachios — two ingredients that complement each other so naturally that their combination has appeared in cuisines from the Middle East to Italy for centuries. Peppery arugula provides a bitter counterpoint that keeps the sweetness of the apple in check, shaved fennel adds anise-scented crunch and a beautiful visual texture, and a simple lemon maple dressing ties every element together with bright acidity and gentle sweetness.

What makes this salad so outstanding is its textural range — every single forkful delivers something different: the snap of fresh apple, the crunch of toasted pistachio, the tender bite of arugula, the thin crispness of shaved fennel — all dressed in a light, bright dressing that enhances rather than overwhelms.

This recipe is 100% vegan, naturally gluten-free, ready in just 15 minutes, and absolutely wonderful served as a starter, a side salad, or a light lunch alongside crusty bread.


Recipe Information

Prep TimeCook TimeTotal TimeServingsCalories
15 mins0 mins15 mins4~220 kcal

Ingredients

For the Salad

  • 2 medium crisp apples (Honeycrisp, Pink Lady, or Granny Smith), cored and thinly sliced
  • ½ cup (65g) shelled pistachios, toasted
  • 4 cups (80g) baby arugula or mixed greens
  • 1 small fennel bulb, very thinly shaved (use a mandoline if available)
  • ¼ small red onion, very thinly sliced
  • ¼ cup (30g) vegan feta, crumbled (optional)
  • 2 tbsp fresh mint leaves

For the Lemon Maple Dressing

  • 3 tbsp extra virgin olive oil
  • 2 tbsp fresh lemon juice
  • 1 tsp maple syrup
  • 1 tsp Dijon mustard
  • 1 small clove garlic, very finely grated
  • Salt and black pepper to taste

Optional Add-ins

  • ¼ cup (30g) dried cranberries for extra sweetness
  • 2 tbsp toasted pumpkin seeds alongside the pistachios
  • Thinly sliced celery for extra crunch
  • A handful of fresh watercress in place of some of the arugula

Instructions

  1. Toast the pistachios. Place the pistachios in a dry skillet over medium heat and toast for 2–3 minutes, stirring frequently, until lightly golden and fragrant. Watch carefully as they burn quickly. Transfer immediately to a plate to cool.
  2. Make the dressing. In a small bowl whisk together the olive oil, lemon juice, maple syrup, Dijon mustard, and grated garlic until completely emulsified. Season generously with salt and pepper. Taste and adjust — it should be bright, slightly sweet, and well-rounded.
  3. Prepare the apple. Core and slice the apple as thinly as possible — ideally 2–3mm slices. If preparing ahead, toss lightly with a teaspoon of extra lemon juice to prevent browning.
  4. Assemble the salad. Spread the arugula across a large serving platter or in a wide bowl. Arrange the apple slices, shaved fennel, and red onion over the greens. Scatter the toasted pistachios, crumbled vegan feta if using, and fresh mint leaves over the top.
  5. Dress and serve. Drizzle the lemon maple dressing over the salad just before serving. Toss gently at the table or serve undressed with the dressing alongside. Serve immediately.

Pro Tips

  • Slice the apple as thinly as possible — thin apple slices integrate beautifully with the greens and dressing while thick slices dominate and feel heavy.
  • Shave the fennel on a mandoline if available — paper-thin fennel shavings have a completely different, far more elegant texture than thicker hand-cut pieces.
  • Dress the salad immediately before serving — dressed arugula wilts quickly and loses its peppery freshness within minutes of being dressed.
  • Toast the pistachios even if they are already roasted — a brief dry toast in a hot pan dramatically intensifies their flavor and adds a warmth that raw pistachios lack.

Why Apple and Pistachio Work So Well Together

Apple and pistachio is one of the great natural flavor pairings — the clean, slightly tart sweetness of crisp apple and the rich, buttery, slightly sweet nuttiness of pistachio complement each other in a way that highlights the best qualities of both. Apple’s high acidity and water content provide freshness and lift against the richness of the nut, while pistachio’s fat content and complex flavor add depth and satisfaction to what might otherwise be an overly light combination. Together they create a pairing that feels simultaneously indulgent and refreshing — a quality that is rare and genuinely compelling in salad making.


Flavor Variations

  • Pear and Pistachio Salad: Replace the apple with thinly sliced ripe pear for a sweeter, more floral version that pairs particularly beautifully with vegan blue cheese.
  • Apple Walnut Salad: Replace the pistachios with toasted walnuts for a more classic autumn flavor combination.
  • Citrus Apple Pistachio Salad: Add segments of blood orange or navel orange alongside the apple for a citrus version with extraordinary color.

Nutritional Highlights (Per Serving)

CaloriesProteinCarbsFiberFat
~220 kcal5g22g4g14g

Storage

  • Best fresh: This salad is best assembled and dressed immediately before serving. The apple browns and the arugula wilts quickly once dressed.
  • Components: Store all components separately — greens, apple (tossed with lemon juice), toasted pistachios, and dressing — for up to 2 days and assemble fresh when ready to serve.
  • Dressing: The dressing keeps in a sealed jar in the refrigerator for up to 1 week. Shake well before using as it will separate during storage.

Frequently Asked Questions

What apple variety works best?

Crisp, firm apples with a balance of sweet and tart work best — Honeycrisp, Pink Lady, and Granny Smith are all excellent choices. Avoid soft, floury varieties like Red Delicious which lack the crunch that makes the salad so texturally interesting.

Can I make this salad ahead for a dinner party?

Yes — prepare all components in advance and store separately. Toast the pistachios, make the dressing, and slice the apple (tossed in lemon juice) up to a day ahead. Assemble and dress the salad at the table just before serving for the freshest result.

Can I use a different nut instead of pistachios?

Yes — toasted walnuts, pecans, or almonds all work well. Pistachios are specifically recommended for their distinctive green color and buttery flavor but any well-toasted nut produces a delicious result.


Tried this recipe? Leave a comment below and let us know how it turned out! Tag us on Instagram and Facebook — we love seeing your plant-powered creations. Looking for more addictive vegan snack and appetizer recipes? Browse all recipes on Easy Vegan Recipes — new recipes posted every single week!