500g fresh udon noodles, cooked according to the package directions and set aside. 100g bok choy or choy sum, roughly chopped 100g napa cabbage, roughly chopped 100g firm tofu, cut into cubes 5-6 shiitake mushrooms, thinly chopped 2 cloves garlic, minced Water as required
Slurry: 2 tbsp cornstarch mixed with 4 tbsp water 3 tbsp oil for cooking
Condiments: 1 tbsp sesame oil 1 tbsp soy sauce 1 tbsp brown sugar Salt and pepper for seasoning Thick soy sauce as required
Method.
1. Cook the fresh udon noodles according to the package direction and set aside.
2. Heat 1 tbsp oil, fry the chopped shiitake mushrooms till crispy and set aside.
3. Fry the tofu till browned and set aside.
4. Sauté the garlic till fragrant. Add in the napa cabbage cook for 1 minute, then add in the tofu, bok choy, cooked udon and the condiments together.
5. Stir fry for 2-3 minutes, then add in the slurry, cook for another 1 minute or till the sauce is thickened. Remove from the heat and top with fried crispy mushrooms and enjoy.
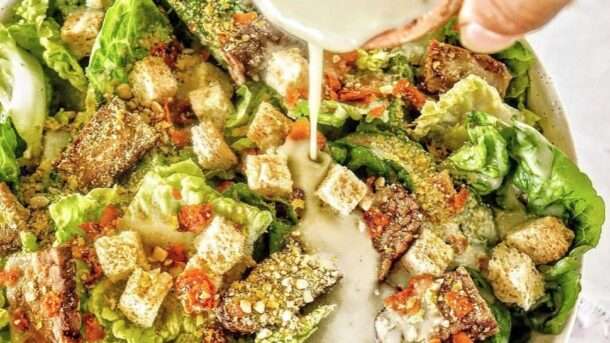
OTHER INGREDIENTS: 3 cups cos lettuce, chopped 2 cup croutons Nutritional yeast for sprinkling
Method.
1. Make the Tempeh Bacon: marinate the tempeh chunks in the soy sauce, maple syrup and optional liquid smoke. Pan-fry in a non-stick pan on medium high heat for 3-4 minutes on each side until caramelized. Remove from the heat and set aside
2. Make the Dressing: whisk together all the ingredients until thick and smooth.
3. Assemble the salad: Into a large bowl, add the lettuce, croutons and tempeh. Drizzle the dressing over the top. Sprinkle with vegan Parmesan or nutritional yeast! Serve!
There are cakes you bake because something sweet is needed. And then there are cakes like this Vegan Chocolate Marble Cake — the kind that makes people gasp when you slice it and reveal those extraordinary swirls of dark chocolate and vanilla weaving through each other in patterns so beautiful and so completely unrepeatable that every single slice is its own unique work of art. This is that cake. The one that looks impossibly impressive but requires nothing more than two bowls, one tin, and a single confident swirl of a skewer. The one that is simultaneously the most visually dramatic and the most deeply delicious thing to come out of your oven all season. The one that makes people assume you spent hours on it when you spent forty minutes.
This is a marble cake of genuine magnificence — a tender, perfectly moist vanilla sponge swirled through with a rich, deeply chocolatey batter that sets in the oven into those iconic, mesmerizing marble patterns that have made this cake one of the most beloved bakes in the entire history of home baking. The crumb is extraordinary — soft enough to compress slightly under the fork before springing back, moist enough to eat without a single drop of anything alongside, and rich enough with the flavor of real vanilla and real dark chocolate that every bite is a genuinely satisfying experience rather than merely a pleasant one.
What makes this recipe so genuinely outstanding is how it achieves such a tender, moist crumb without a single egg or gram of dairy. Flax eggs provide binding and structure. Apple cider vinegar reacts with baking soda to create lift. Plant milk enriched with a splash of oil replaces the fat and moisture that butter and eggs provide in conventional cakes. The result is a cake that is indistinguishable in texture, moisture, and flavor from the finest dairy version — and arguably more interesting for the complexity that these whole food ingredients contribute.
This recipe is 100% vegan, easily made gluten-free, ready in just 45 minutes, and absolutely spectacular served warm from the oven with a dusting of powdered sugar, a drizzle of chocolate glaze, or simply sliced and eaten immediately because the smell coming from the oven made waiting for anything else completely impossible.
1 tsp almond extract (adds beautiful depth to vanilla batter)
½ cup (85g) vegan chocolate chips folded into the batter
Zest of 1 orange added to the chocolate swirl batter
¼ tsp cinnamon in the chocolate batter
2 tbsp toasted chopped walnuts or hazelnuts in the batter
To Serve
Dusting of powdered sugar
Drizzle of chocolate glaze
Vegan vanilla ice cream alongside
Whipped coconut cream
Fresh berries and mint
Warm with a cup of coffee or tea
Instructions
Preheat and prepare the tin. Preheat your oven to 350°F (175°C). Grease a 23cm (9-inch) round cake tin or a standard loaf tin generously with coconut oil and line with parchment paper. For a loaf-shaped marble cake use a 23 x 13cm loaf tin — the rectangular shape produces the most dramatic, visible marble effect when sliced.
Make the flax eggs. In a small bowl combine the flaxseed meal and water, stir well, and rest for exactly 5 minutes until thickened to a gel-like consistency. Properly gelled flax eggs perform significantly better as a binder than those used immediately — the 5 minutes is important.
Mix the wet ingredients. In a large bowl whisk together the oat milk, vegetable oil, vanilla extract, apple cider vinegar, and prepared flax eggs until completely combined. The apple cider vinegar will react with the baking soda during baking to create additional lift — do not omit it.
Combine wet and dry. Sift the flour, sugar, baking powder, baking soda, and salt into the wet ingredients. Fold gently with a spatula using large, sweeping strokes until just combined — the batter should still look slightly rough and may have a few small lumps. Do not overmix — overworking the gluten produces a dense, tough cake rather than the light, tender crumb this recipe achieves.
Make the chocolate swirl batter. Transfer approximately one third of the vanilla batter — roughly 400g — to a separate bowl. Add the cacao powder, additional oat milk, maple syrup, and instant coffee if using to this portion and fold gently until completely incorporated and the batter is uniformly dark, glossy, and deeply chocolatey. The chocolate batter should be slightly thicker than the vanilla — if it seems too stiff add another teaspoon of oat milk.
Layer the batters in the tin. Pour half the vanilla batter into the prepared tin and spread to the edges in an even layer. Spoon the entire chocolate batter over the vanilla layer in large dollops distributed evenly across the surface. Pour the remaining vanilla batter over the chocolate layer and spread gently to cover.
Create the marble effect. Insert a thin skewer, chopstick, or butter knife into the batter and draw it through in a series of figure-of-eight or S-shaped movements — 6 to 8 sweeping strokes across the length of the tin and 3 to 4 across the width. Do not over-swirl — 10 to 12 total movements is enough to create beautiful marble patterns without blending the batters completely together. The restraint is what creates the dramatic, visible swirls rather than a uniform grey-brown mixture.
Bake to golden perfection. Place in the center of the preheated oven and bake for 32–38 minutes until deeply golden on top, pulling away slightly from the sides of the tin, and a skewer inserted in the center comes out clean or with just a few moist crumbs. Do not open the oven door before the 30-minute mark — a rush of cold air can cause the cake to sink in the center before it has set.
Cool and glaze. Remove from the oven and cool in the tin for 10 minutes before turning out onto a wire rack. If glazing allow to cool completely before drizzling — the glaze will slide off a warm cake rather than setting in beautiful ribbons. For the glaze melt the dark chocolate and coconut oil together, stir in the maple syrup, and drizzle generously over the cooled cake.
Slice and reveal. Use a sharp serrated knife to slice the cake and reveal the marble pattern within — each slice will be completely unique and completely beautiful. Serve immediately or store as directed below.
Pro Tips for the Most Beautiful Vegan Marble Cake
Do not overmix the batter. This is the most critical rule in cake baking and the one most frequently violated. Mix until just combined — lumps are acceptable and desirable. Overmixed batter develops gluten that produces a dense, rubbery crumb rather than the light, tender texture this recipe achieves.
Do not over-swirl the marble. Ten to twelve total movements of the skewer is the maximum for beautiful, distinct marble patterns. More swirling blends the batters together into a uniform grey-brown that looks nothing like marble. Less swirling produces large blocks of each color rather than the fine, intricate patterns that make marble cake so visually spectacular. Find the middle ground and have the confidence to stop.
Use Dutch-process cacao for the darkest chocolate color. Dutch-process cacao has been treated with an alkalizing agent that darkens its color significantly — producing an almost black chocolate batter that creates the most dramatic visual contrast with the pale vanilla batter. Natural cacao produces a lighter, more reddish-brown color with a slightly more acidic flavor.
Add instant coffee to the chocolate batter. A single teaspoon of instant coffee or espresso powder added to the chocolate swirl batter does not make the cake taste of coffee — it amplifies and deepens the chocolate flavor in a way that is subtle but completely significant. This is one of the most effective and least understood tricks in chocolate baking.
Line the tin with parchment paper always. A marble cake that sticks to the tin and breaks when turned out destroys the entire effort invested in creating the beautiful interior pattern. Line with parchment and grease generously — the cake should release cleanly and reveal its pattern in perfect condition.
Bring all ingredients to room temperature. Room temperature wet ingredients combine more easily and evenly with dry ingredients than cold ones, producing a more uniformly mixed batter and a more evenly textured finished cake. Remove the plant milk and oil from the refrigerator 30 minutes before baking.
The History of Marble Cake
Marble cake is one of the oldest and most beloved cakes in European baking history — a preparation with roots in nineteenth century German baking where it was known as Marmorkuchen. The technique of swirling two differently colored batters together to create the characteristic stone-like pattern was a revolutionary visual achievement in home baking at a time when the appearance of food was becoming increasingly important as a marker of domestic skill and social standing.
The original German marble cake used a sponge base divided into a vanilla portion and a portion flavored with cocoa, cinnamon, and sometimes rum — swirled together in a Bundt tin and baked until golden. The cake emigrated to America with German immigrants in the mid-nineteenth century where it became one of the most popular home-baked cakes in the country and eventually one of the most recognizable and beloved bakes in the entire English-speaking world.
What makes marble cake so enduringly popular across cultures and generations is its combination of visual drama and baking accessibility. The marble pattern — created with nothing more than a skewer and a few confident strokes — looks far more technically demanding than it actually is. Every baker who makes their first marble cake is surprised by how simple the technique is and how spectacular the result appears. This gap between apparent complexity and actual simplicity is the secret to the cake’s multigenerational appeal.
This vegan version honours every element of the classical preparation — the tender sponge, the rich chocolate swirl, the dramatic visual reveal when sliced — while replacing the dairy and eggs with plant-based alternatives that perform identically in every meaningful respect and add nutritional substance that the original lacks.
Flavor Variations
Lemon and Blueberry Marble: Replace the chocolate swirl with a lemon curd swirl made from vegan lemon curd and fold fresh blueberries into the vanilla batter for a bright, fruity version that is particularly spectacular in summer.
Peanut Butter Marble: Replace the chocolate swirl with warmed natural peanut butter thinned with a tablespoon of maple syrup for a peanut butter and vanilla marble that is one of the most addictive flavor combinations in baking.
Matcha Marble: Replace the cacao powder with 2 tablespoons of ceremonial grade matcha powder for a green tea and vanilla marble with a beautiful visual contrast and a sophisticated, slightly bitter matcha flavor that is particularly popular for special occasions.
Triple Chocolate Marble: Add 3 tablespoons of vegan dark chocolate chips to the vanilla batter and 3 tablespoons of vegan white chocolate chips to the chocolate batter for an extraordinarily indulgent triple chocolate version.
Nutritional Highlights (Per Serving)
Calories
Protein
Carbs
Fiber
Fat
~280 kcal
4g
42g
2g
11g
At 280 calories per serving this marble cake delivers genuine cake indulgence — the pleasure of a beautifully made, deeply flavorful slice of cake — alongside the reassurance that every ingredient is whole, real, and plant-based. The flaxseed meal contributes ALA omega-3 fatty acids and lignans with antioxidant properties. The cacao powder provides flavonoid antioxidants including epicatechin alongside magnesium, iron, and zinc. The oat milk base contributes beta-glucan fiber with documented cholesterol-lowering properties. This is a cake that celebrates rather than apologizes for itself.
Storage
Room temperature: Store in an airtight container at room temperature for up to 3 days. The cake actually improves on day 2 as the moisture redistributes throughout the crumb and the flavors deepen and meld. Place a piece of bread inside the container — the bread absorbs excess moisture and keeps the cake perfectly fresh longer.
Refrigerator: Store in an airtight container in the refrigerator for up to 6 days. Remove 20 minutes before serving to allow the cake to return to room temperature — refrigerator-cold cake has a denser, less appealing texture than room-temperature cake.
Freezer: This cake freezes beautifully for up to 3 months — slice before freezing for the most convenient individual-portion system. Wrap each slice in plastic wrap and place in a freezer bag. Thaw at room temperature for 1–2 hours or overnight in the refrigerator.
Glazed cake: If the cake has been glazed store in the refrigerator where the glaze will remain firm and glossy. Allow to come to room temperature before serving.
Frequently Asked Questions
Why did my marble cake sink in the middle?
A sunken center is almost always caused by one of three things — opening the oven door too early before the cake has set, underbaking, or too much leavening causing the cake to rise rapidly and then collapse. Do not open the oven before the 30-minute mark, bake until a skewer comes out clean, and measure the baking powder and soda precisely.
Can I make this cake gluten-free?
Yes — replace the all-purpose flour with a good quality 1:1 gluten-free flour blend. Add half a teaspoon of xanthan gum if your blend does not already contain it. The texture will be slightly different — gluten-free cakes tend to be slightly denser and more crumbly — but still delicious and with the same beautiful marble effect.
How do I get the most dramatic marble pattern?
The key is using the two batters in approximately equal volumes — too much of one color and the other barely registers. Layer them alternately in the tin before swirling rather than pouring one on top of the other. Use a thin skewer or chopstick rather than a thick knife for the finest, most intricate swirl patterns. And stop swirling after 10 to 12 movements.
Can I bake this in a Bundt tin?
Yes — a Bundt tin produces a spectacular marble cake with a beautiful shape that shows the swirl pattern on the outside as well as when sliced. Grease the Bundt tin very generously — every crevice — to ensure clean release. Increase the baking time to 45–50 minutes for a standard Bundt tin size.
Can I reduce the sugar in this recipe?
Yes — reduce the sugar to one cup for a less sweet cake that allows the chocolate flavor to dominate more prominently. Do not reduce below three quarters of a cup as sugar contributes to the moisture and texture of the cake as well as its sweetness — removing too much produces a dry, dense result.
Why is my cake dry?
A dry vegan cake is almost always the result of overbaking, using too much flour, or not enough fat. Check the cake 5 minutes before the stated baking time — ovens vary and a cake that is perfect at 32 minutes in one oven may be overbaked at 38 minutes in another. Measure the flour by spooning it into the measuring cup and leveling off rather than scooping directly which compacts the flour and adds up to 20% more than intended.
Tried this recipe? Leave a comment below and let us know how it turned out! Tag us on Instagram and Facebook — we love seeing your plant-powered creations. Looking for more stunning vegan baking and dessert recipes? Browse all recipes on Easy Vegan Recipes — new recipes posted every single week!
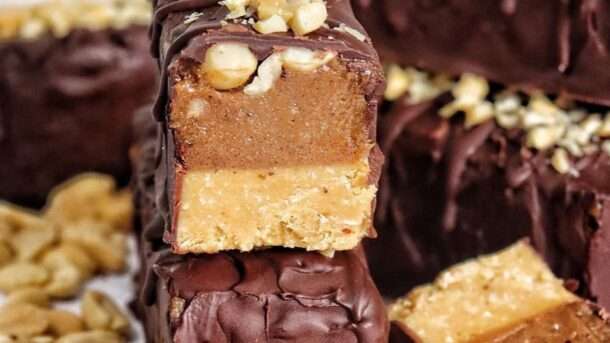
BASE: 1 1/2 cups almond meal 1/2 cup dessicated coconut 1/4 cup maple syrup 1 tablespoon coconut oil, melted 2 tablespoons smooth peanut butter 1/2 teaspoon salt
PEANUT CARAMEL: 3/4 cup dates, pitted & soaked 1/4 cup coconut cream 1/4 cup smooth peanut butter 1 tablespoon hulled tahini 1/2 teaspoon salt
COATING: 200g dairy-free chocolate, melted *Storage tips: in the freezer for months or in the fridge for a week!
Method.
1. Line a container with non-stick paper (mine was 8x 15cm )
2. Make the BASE: In a bowl, combine all the ingredients for the base until a cookie dough consistency. Press this into the lined container. Place in the fridge
3. Make the PEANUT CARAMEL: blend the dates & coconut cream in a food processor/blender until smooth. Add in the remaining ingredients. Transfer as an even layer over the base.
4. Sprinkle the roasted peanuts evenly over the caramel and press them into the mix
5. Freeze overnight until the caramel is set
6. Slice the slab into 6 logs.
7. Melt the chocolate and coat each bar in it. Sprinkle chopped peanuts over the top
8. Return to the freezer to let the chocolate set
*Storage tips: in the fridge for up to 1 week or in the freezer for months, allowing it to thaw at room temp for 5 minutes prior to eating Enjoy!
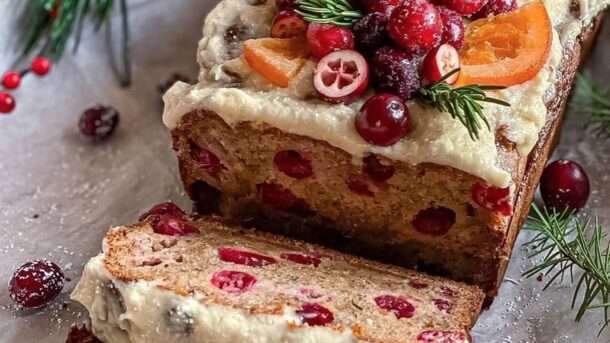
1 tsp baking powder 1 tsp baking soda 1/2 tsp salt 2 tsp pure vanilla extract 1 tbsp of flax meal 1 tbsp of apple cider vinegar 2 cups all-purpose flour 1/2 cups of almond flour 1/3 cup coconut oil melted 1/2 cup coconut sugar or brown sugar 1/2 cup apple sauce 2 cups mashed banana, about 3 large ripe bananas Juice from one large Orange and Orange zest 1 cup of cranberries plus more decorations.
Method.
1. Preheat oven to 350°F. Spray a 9×5 loaf pan with nonstick cooking spray and set aside.
2. In a large mixing bowl, whisk together the flour, almond flour, baking powder, baking soda, and salt.
3. In a large mixing bowl using mix together the coconut oil, coconut sugar until light and fluffy. Mix in apple sauce, flax meal, apple cider vinegar, orange juice, zest and vanilla. Then add the mashed banana and mix until fully combined.
4. Add the dry ingredients to the wet ingredients and mix until just combined, making sure not to overmix the batter. Add the 1/2 cup of cranberries then slowly mix to combine.
5. Scoop the batter into the prepared loaf pan and spread it around into one even layer. Bake at 350°F for 55-65 minutes or until a toothpick inserted into the center comes out clean. Remove from the oven and allow to cool in the loaf pan for 1 hour before frosting the loaf. For the frosting. Whip 1 stick of vegan butter with 1 cup of powder sugar and 1/3 cup of vegan coconut condensed milk until nice and fluffy.
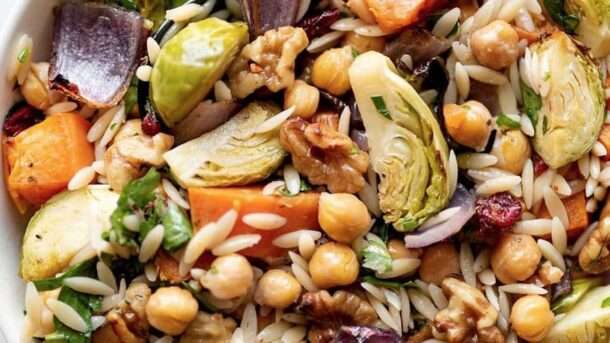
1 cup dried orzo 1 medium-large sweet potato, peeled, cut into ½-inch pieces (about 2 cups) ¾-pound Brussels sprouts, trimmed, and quartered (about 3 cups) 1 medium red onion, roughly chopped Drizzle of olive oil, plus more for dressing Salt to taste 1 (15-ounce) can chickpeas, drained and rinsed 2/3 cup walnuts
Dressing: ¼ cup extra-virgin olive oil 1 tablespoon maple syrup ¼ teaspoon dried basil ¼ teaspoon dried oregano ¼ teaspoon crushed red pepper 1 small garlic clove ¼ teaspoon salt, or to taste Freshly ground black pepper to taste 1/3 cup chopped fresh parsley 1/3 cup dried cranberries
Method.
1. Preheat the oven to 425ºF.
2. Cook the orzo according to the directions on the packet until al dente.
3. Place the sweet potato, Brussels sprouts, and red onion into a large bowl. Toss with a generous drizzle of olive oil and salt to taste. Transfer to a large nonstick rimmed baking sheet. Roast for about 20 minutes, or until the sweet potato is fork tender. Toss after 10 minutes so they cook evenly.
4. Place the chickpeas and walnuts into the same bowl. Toss with a drizzle of olive oil, and salt to taste. Transfer to a small rimmed baking sheet. Roast with the vegetables on a lower rack.
5. Remove the walnuts from the oven after about 7 minutes, or once they are golden brown. Continue cooking the chickpeas until the vegetables are ready.
6. Meanwhile, add the olive oil, maple syrup, basil, oregano, and crushed red pepper to a small jar with a lid. Grate the garlic into the jar using a microplane or fine grater. Add salt and pepper. Cover and shake until well combined. Set aside.
7. Transfer the orzo, sweet potato, Brussels sprouts, red onion, chickpeas, and walnuts to a large bowl. Add the dressing, parsley, and cranberries. Mix to combine. Season with salt and pepper.
8. Serve warm or refrigerate for later use and enjoy as a chilled.
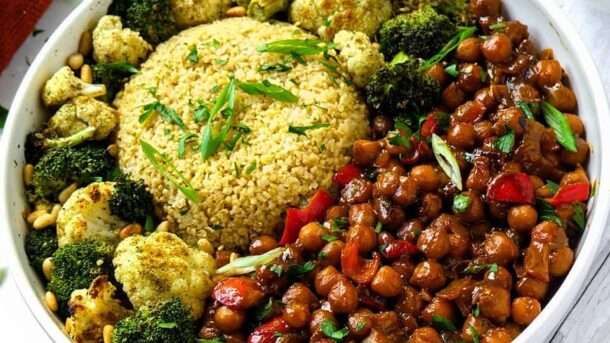
FOR THE CHICKPEAS 1½ cups chickpeas, cooked 1 medium onion, chopped 1 small red bell pepper, chopped 2 medium cloves garlic, minced 1 tbsp fresh ginger, grated 3 tbsp blackstrap molasses 1½ tbsp runny tahini 1½ tbsp lemon juice 1 tbsp avocado oil ⅓ cup water ½ tsp cumin ½ tsp cayenne 1 tsp sea salt Chopped flat leaf parsley and scallions to top
Method.
1. Heat up the oil then add the onion and cook 3 mins, until lightly golden at the edges.
2. Add the pepper, garlic and ginger and cook 2 more mins, stirring every now and then.
3. Add the chickpeas and cook 4-5 mins to crisp them up then add the spices and salt and cook 30 secs.
4. Stir in the molasses, water and tahini and stir until the sauce ingredients are well incorporated.
5. Let the sauce bubble 5-7 mins or until nice and sticky but still slightly runny. Remove from heat, add the lemon juice and serve topped with parsley and scallions.
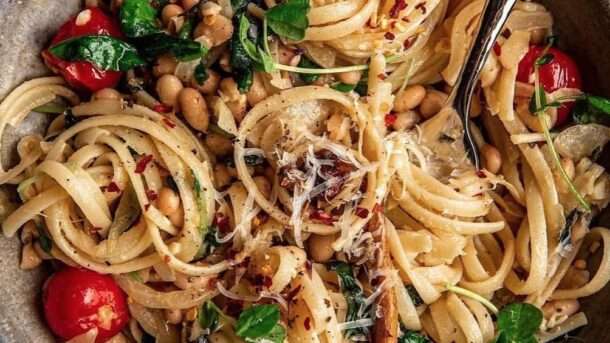
2 tbsp olive oil 2 medium yellow onions thinly sliced 1 cloves garlic minced Big pinch chili flakes Handful cherry tomatoes Handful chestnut mushrooms 1 can navy beans rinsed well Handful fresh basil roughly chopped Handful spinach Handful sprouts 1/2 cup vegan butter Seas salt and cracked pepper Vegan Parmesan
Method.
1. Cook pasta and reserve 1/2 cup water.
2. Add olive to a large pan over medium heat. Once oil is hot add onions. Cook over medium low heat for approx 30 minutes stirring frequently.
3. Boil water and cook pasta. Reserve 1/2 cup water. Add garlic to softened onions, and seasonwith salt and cracked pepper. Add mushrooms and 2 tbsp butter. Cook until mushrooms start to soften, add cherry tomatoes and beans.
4. Cook until heated through and add spinach, sprouts, pasta and remaining 2 tbsp butter. Season again and toss well. Serve with cheese, more sprouts and chili flakes.
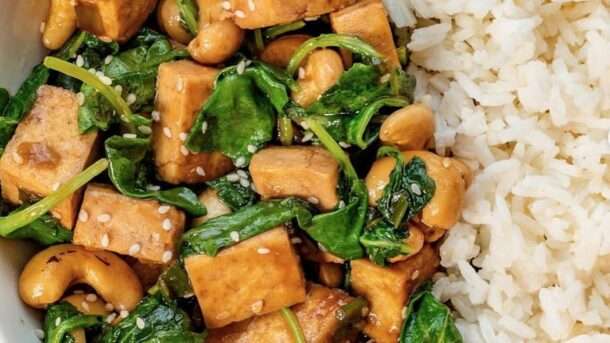
1 tsp sriracha 1 tsp maple syrup 1 tbsp neutral cooking oil 1 tbsp cornstarch, plus 1 tsp for sauce 2 tbsp vegan hoisin sauce 1 packet extra-firm tofu, pressed, cut into ¾-inch cubes ¼ cup tamari or soy sauce 6 scallions, chopped ¾-inch piece ginger 1 small garlic clove 1 cup cashews 3 cups baby spinach
Method.
1. Transfer the tofu to a large bowl. Toss with 1 tablespoon cornstarch until evenly coated.
2. In a medium bowl, mix the tamari, hoisin sauce, sriracha, maple syrup, 1 teaspoon cornstarch, and 2 tablespoons water. Stir well to combine.
3. Heat the oil in a large nonstick skillet over medium-high heat. Cook the tofu for about 5 minutes, or until golden brown, stirring regularly.
4. Add the scallions and cook one minute more. Grate the garlic and ginger into the skillet and cook for another 30 seconds.
5. Add the cashews and spinach. Cook for 1 minute, stirring constantly. Add the sauce plus 2 tablespoons water. Mix to combine. Cook for about 3 minutes, or until thickened enough to coat the tofu.
6. For oil-free: Bake the coated tofu at 425F. Grate the ginger and garlic into the sauce before adding. Add scallions with sauce.
1 head cauliflower, cut into medium florets, stems removed 3 Cup water 1 C brown rice flour or GF all purpose flour 1 tbsp liquid aminos 1 tsp garlic powder 1/2 C GF breadcrumbs
Sesame Sauce
1/4 Cup liquid aminos 1/4 Cup sweetener of choice 3 tbsp sesame seeds 1 tbsp sesame oil 1 tbsp ginger, minced 3 cloves garlic, minced 3 tbsp chili garlic sauce 1 tbsp tomato paste 2 tbsp rice vinegar 1/8 tsp salt and pepper 2 tsp tapioca flour, arrowroot powder, or corn starch
To Serve
1 bunch broccolini, steamed 2 C jasmine rice, cooked according to package 3 green onions, chopped 1 tbsp sesame seeds
Method.
1. Mix together all ingredients for batter in a bowl, except breadcrumbs. Should be slightly thinner than pancake batter. Add cauliflower florets and toss to coat.
2. One by one, remove cauliflower from batter with a fork, letting excess drip off, and transfer to an oiled parchment lined baking sheet, being sure not to overcrowd. Sprinkle with breadcrumbs.
3. Bake in 400 degree oven for 25 minutes until golden.
4. Make sauce by adding all ingredients except tapioca flour to a small saucepan. Simmer to thicken. Mix tapioca flour with water and stir into sauce until desired texture is achieved.
5. Remove cauliflower from oven and let cool for 3-5 min (prevents it from getting soggy!) Transfer to a bowl and toss gently with sauce. Sprinkle with sesame seeds and green onion.
We use cookies on our website to give you the most relevant experience by remembering your preferences and repeat visits. By clicking “Accept”, you consent to the use of ALL the cookies.
This website uses cookies to improve your experience while you navigate through the website. Out of these, the cookies that are categorized as necessary are stored on your browser as they are essential for the working of basic functionalities of the website. We also use third-party cookies that help us analyze and understand how you use this website. These cookies will be stored in your browser only with your consent. You also have the option to opt-out of these cookies. But opting out of some of these cookies may affect your browsing experience.
Necessary cookies are absolutely essential for the website to function properly. These cookies ensure basic functionalities and security features of the website, anonymously.
Cookie
Duration
Description
cookielawinfo-checkbox-analytics
11 months
This cookie is set by GDPR Cookie Consent plugin. The cookie is used to store the user consent for the cookies in the category "Analytics".
cookielawinfo-checkbox-functional
11 months
The cookie is set by GDPR cookie consent to record the user consent for the cookies in the category "Functional".
cookielawinfo-checkbox-necessary
11 months
This cookie is set by GDPR Cookie Consent plugin. The cookies is used to store the user consent for the cookies in the category "Necessary".
cookielawinfo-checkbox-others
11 months
This cookie is set by GDPR Cookie Consent plugin. The cookie is used to store the user consent for the cookies in the category "Other.
cookielawinfo-checkbox-performance
11 months
This cookie is set by GDPR Cookie Consent plugin. The cookie is used to store the user consent for the cookies in the category "Performance".
viewed_cookie_policy
11 months
The cookie is set by the GDPR Cookie Consent plugin and is used to store whether or not user has consented to the use of cookies. It does not store any personal data.
Functional cookies help to perform certain functionalities like sharing the content of the website on social media platforms, collect feedbacks, and other third-party features.
Performance cookies are used to understand and analyze the key performance indexes of the website which helps in delivering a better user experience for the visitors.
Analytical cookies are used to understand how visitors interact with the website. These cookies help provide information on metrics the number of visitors, bounce rate, traffic source, etc.
Advertisement cookies are used to provide visitors with relevant ads and marketing campaigns. These cookies track visitors across websites and collect information to provide customized ads.