Mains & Bowls

Chunky Asian Guacamole

chunky asian guacamole

There are dips you make because something needs to be on the table. And then there are dips like this Chunky Asian Guacamole — the kind that takes the beloved chunky texture and richness of classic guacamole and gives it an entirely new character with sesame oil, fresh ginger, lime, and a hit of soy sauce, finished with crunchy peanuts and fresh cilantro. This is that dip. The one that surprises people on the first bite and then has them reaching for chip after chip. The one that turns a familiar favorite into something genuinely new.

This recipe keeps the classic technique of a great chunky guacamole — ripe avocado mashed only partially, leaving plenty of texture rather than blending smooth — but builds the seasoning around an Asian-inspired flavor profile of toasted sesame oil, fresh ginger, garlic, lime, and soy sauce, finished with crunchy roasted peanuts and fresh herbs for texture and brightness.

What makes this guacamole so outstanding is the contrast between the rich, creamy avocado and the bright, savory, slightly nutty seasoning blend, finished with the satisfying crunch of peanuts that makes every single scoop genuinely interesting.

This recipe is 100% vegan, naturally gluten-free when made with tamari, ready in just 15 minutes, and absolutely wonderful served with tortilla chips, wonton crisps, or fresh cucumber slices alongside.


Recipe Information

Prep TimeCook TimeTotal TimeServingsCalories
15 mins0 mins15 mins4~210 kcal

Ingredients

For the Guacamole

  • 4 ripe avocados
  • 2 tbsp lime juice
  • 1 tbsp soy sauce or tamari
  • 1 tsp toasted sesame oil
  • 1 tbsp fresh ginger, finely grated
  • 2 cloves garlic, minced
  • 2 spring onions, thinly sliced
  • ¼ cup (15g) fresh cilantro, roughly chopped
  • ¼ cup (35g) roasted peanuts, roughly chopped
  • Salt to taste

Optional Add-ins

  • ½ small red chili, finely diced, for gentle heat
  • 1 tsp rice vinegar for extra brightness
  • 1 tbsp toasted sesame seeds scattered over the top
  • ¼ cup (40g) finely diced mango for a sweet contrast

To Serve

  • Tortilla chips
  • Wonton crisps
  • Sliced cucumber
  • Rice crackers

Instructions

  1. Prepare the avocado. Halve and pit the avocados, then scoop the flesh into a large bowl.
  2. Mash with texture. Using a fork, mash the avocado only partially, leaving plenty of chunky pieces rather than mashing completely smooth.
  3. Add the seasonings. Add the lime juice, soy sauce, sesame oil, grated ginger, and minced garlic to the bowl. Fold gently to combine without overmixing.
  4. Fold in the rest. Gently fold in the spring onions, cilantro, and chopped peanuts, reserving a small amount of each for garnish.
  5. Season and serve. Taste and add salt as needed. Transfer to a serving bowl, top with the reserved peanuts, cilantro, and spring onions, and serve immediately.

Pro Tips

  • Use ripe but firm avocados that yield gently to pressure for the best chunky texture.
  • Mash only partially, leaving visible chunks, for the most satisfying texture rather than a smooth puree.
  • Add the peanuts just before serving to keep them crunchy rather than softening in the mixture.
  • Taste before adding extra salt, as the soy sauce already contributes a fair amount of saltiness.

Why This Flavor Combination Works

Sesame oil and soy sauce bring deep, savory, slightly nutty notes that pair surprisingly well with the natural richness of avocado, while fresh ginger and garlic add brightness and depth that lime alone cannot achieve. The roasted peanuts echo the nuttiness of the sesame oil while adding essential crunch against the creamy avocado base.


Flavor Variations

  • Spicy Asian Guacamole: Add finely diced fresh chili or a drizzle of chili oil for building heat.
  • Mango Asian Guacamole: Fold in finely diced fresh mango for a sweet, tropical contrast.
  • Crispy Shallot Topping: Top with store-bought or homemade crispy fried shallots for extra crunch and flavor.

Nutritional Highlights (Per Serving)

CaloriesProteinCarbsFiberFat
~210 kcal4g12g7g18g

Storage

  • Refrigerator: Store in an airtight container with plastic wrap pressed directly onto the surface to limit browning, for up to 1 day.
  • Best fresh: Like all guacamole, this is best enjoyed the day it is made, as avocado browns over time even with proper storage.

Frequently Asked Questions

Can I make this without peanuts?

Yes — substitute toasted cashews or sunflower seeds for a similar crunch without peanuts.

How do I keep guacamole from browning?

Press plastic wrap directly onto the surface of the guacamole before refrigerating, and add a thin layer of extra lime juice on top before covering.

Can I make this ahead for a party?

Guacamole is best made as close to serving time as possible. If you need to prepare ahead, make it up to a few hours in advance and store with plastic wrap pressed directly on the surface.


Tried this recipe? Leave a comment below and let us know how it turned out! Tag us on Instagram and Facebook — we love seeing your plant-powered creations. Looking for more addictive vegan dip and appetizer recipes? Browse all recipes on Easy Vegan Recipes — new recipes posted every single week!

Crispy and juicy Sour Cream & Onion Chick’n Tofu Nuggets

crispy sour cream and onion chick'n tofu nuggets

There are snacks you make because something crispy is needed. And then there are snacks like these Crispy Sour Cream and Onion Chick’n Tofu Nuggets — the kind that come out of the oil or air fryer shatteringly golden, with a tangy, savory sour cream and onion coating that makes them taste like your favorite potato chip flavor transformed into the most satisfying bite-sized nugget imaginable. This is that snack. The one that disappears the moment it hits the plate. The one that has both kids and adults reaching for one more.

This recipe marinates pressed tofu in a tangy buttermilk-style brine flavored with onion and garlic powder, then double-coats it in a seasoned flour mixture loaded with sour cream and onion seasoning before frying or air frying to a deeply crispy, golden exterior with a tender, juicy interior. The result is a nugget that captures the iconic sour cream and onion flavor in genuinely crunchy, craveable form.

What makes these nuggets so outstanding is the marinating step — soaking the pressed tofu in a tangy, seasoned plant milk brine before coating allows the flavor to penetrate the tofu itself rather than sitting only on the surface, producing nuggets that taste deeply seasoned throughout rather than only on the crust.

This recipe is 100% vegan, ready in about 40 minutes including marinating time, and absolutely wonderful served hot with extra dipping sauce alongside.


Recipe Information

Prep TimeMarinate TimeCook TimeTotal TimeServingsCalories
15 mins15 mins12 mins42 mins4~310 kcal

Ingredients

For the Tofu and Marinade

  • 450g extra firm tofu, pressed and cut into nugget-sized pieces
  • 1 cup (240ml) plant milk
  • 1 tbsp apple cider vinegar
  • 1 tsp onion powder
  • ½ tsp garlic powder
  • ½ tsp salt

For the Sour Cream and Onion Coating

  • 1½ cups (180g) all-purpose flour
  • 2 tbsp cornstarch
  • 2 tbsp dried onion flakes, finely crushed
  • 1½ tsp onion powder
  • 1 tsp garlic powder
  • 1 tsp citric acid or 1 tbsp nutritional yeast (for the tangy “sour cream” note)
  • 1 tsp salt
  • ½ tsp black pepper

For Frying

  • 3 cups (720ml) neutral vegetable oil (for deep frying), or oil spray for air frying

For the Dipping Sauce

  • ½ cup (120g) vegan sour cream
  • 1 tbsp fresh chives, finely chopped
  • 1 tsp lemon juice
  • Pinch of salt

Instructions

  1. Press the tofu. Press the tofu for at least 15 minutes to remove as much water as possible — this is essential for the nuggets to absorb the marinade and crisp properly. Cut into bite-sized nugget shapes.
  2. Make the marinade and soak. Whisk together the plant milk, apple cider vinegar, onion powder, garlic powder, and salt in a shallow dish. Add the tofu pieces and let marinate for 15 minutes, turning once halfway.
  3. Make the coating. In a wide shallow dish whisk together the flour, cornstarch, crushed onion flakes, onion powder, garlic powder, citric acid or nutritional yeast, salt, and pepper.
  4. Coat the nuggets. Remove a tofu piece from the marinade, letting excess drip off, and dredge thoroughly in the seasoned flour, pressing to coat well on all sides. Repeat with all pieces, placing them on a wire rack as you go.
  5. Fry or air fry. For deep frying, heat the oil to 350°F (175°C) and fry the nuggets in batches for 3–4 minutes until deeply golden and crispy, draining on a wire rack. For air frying, spray the coated nuggets generously with oil and air fry at 390°F (200°C) for 10–12 minutes, shaking halfway, until golden and crispy.
  6. Make the dipping sauce. Whisk together the vegan sour cream, fresh chives, lemon juice, and salt until smooth.
  7. Serve immediately. Serve the hot nuggets with the dipping sauce while at their crispiest.

Pro Tips

  • Press the tofu thoroughly before marinating — well-pressed tofu absorbs the marinade more effectively and crisps better during cooking.
  • The citric acid or nutritional yeast in the coating is what mimics the tangy character of classic sour cream and onion seasoning — do not skip both.
  • Press the flour coating firmly onto each piece of tofu for the thickest, craggiest, most satisfying crust.
  • Maintain oil temperature throughout frying and work in small batches to avoid greasy results.

Why Sour Cream and Onion Flavor Works So Well Here

The classic sour cream and onion flavor profile relies on a balance of tangy acidity, savory onion, and a hint of garlic — a combination that has proven enduringly popular in snack foods for decades because it satisfies the palate’s craving for both tang and savory depth simultaneously. Applying this same flavor profile to a crispy fried nugget translates the appeal of a favorite chip flavor into a more substantial, satisfying format.


Flavor Variations

  • Spicy Sour Cream and Onion Nuggets: Add cayenne pepper and chili flakes to the coating for a spicy version.
  • BBQ Coated Nuggets: Replace the sour cream and onion coating with a smoky barbecue seasoning blend for a different flavor profile.
  • Ranch Tofu Nuggets: Replace the onion-forward seasoning with dried dill, parsley, and extra garlic for a ranch-flavored version.

Nutritional Highlights (Per Serving)

CaloriesProteinCarbsFiberFat
~310 kcal14g28g2g16g

Storage

  • Best fresh: These nuggets are at their crispiest within 10 minutes of cooking. Serve immediately whenever possible.
  • Refrigerator: Store cooked nuggets in an airtight container for up to 3 days. Reheat in an air fryer at 375°F (190°C) for 5 minutes to restore crispiness.
  • Freezer: Freeze cooked, cooled nuggets in a single layer for up to 1 month. Reheat from frozen in an air fryer or oven until crispy and heated through.

Frequently Asked Questions

Can I bake these instead of frying or air frying?

Yes — bake at 425°F (220°C) for 18–20 minutes, flipping halfway, on a wire rack set over a baking sheet for even crisping on both sides.

What is citric acid and where do I find it?

Citric acid is a sour, tangy powder available in the baking or canning section of most grocery stores, used to mimic the tangy “sour cream” flavor in seasoning blends. Nutritional yeast with a squeeze of extra lemon juice in the dipping sauce can be used as an alternative if citric acid is unavailable.

Can I make these gluten-free?

Yes — use a gluten-free flour blend with cornstarch for the coating, and check that the dried onion flakes have no gluten-containing additives.


Tried this recipe? Leave a comment below and let us know how it turned out! Tag us on Instagram and Facebook — we love seeing your plant-powered creations. Looking for more crispy, crave-worthy vegan snack recipes? Browse all recipes on Easy Vegan Recipes — new recipes posted every single week!

Spicy Tomato Sushi Rolls with Forbidden Rice — The Most Stunning Plant-Based Meal You Will Make All Week

stunning spicy tomato sushi rolls with forbidden rice

There are meals you make because dinner is needed. And then there are meals like these Spicy Tomato Sushi Rolls with Forbidden Rice — the kind that arrive on the board as sixteen dramatic, jewel-like rounds of deep purple-black forbidden rice wrapped around a vivid filling of spicy marinated tomato, creamy avocado, and fresh greens, so visually extraordinary that people stop and stare before they reach for one. This is that meal. The one that looks like it belongs on the table of a fine dining restaurant and is made entirely in your own kitchen. The one that proves plant-based cooking is not just nourishing but genuinely, breathtakingly beautiful.

These inside-out sushi rolls use cooked forbidden rice — the striking deep purple-black short grain rice that turns the entire roll into something visually dramatic — seasoned with rice vinegar, sugar, and salt in the traditional sushi rice manner, then rolled outside-in around a filling of roma tomatoes marinated in sesame oil, soy sauce, and chili until they take on a rich, deeply savory, slightly spicy character, with layers of ripe avocado and fresh greens that add creaminess and brightness to every single piece.

What makes these rolls so outstanding is the forbidden rice — its natural deep purple-black pigment from anthocyanins produces a color so dramatic against the vivid red tomato and green avocado filling that each sliced roll is a genuinely beautiful thing, making this one of the most visually impressive plant-based dishes in the entire collection.

This recipe is 100% vegan, naturally gluten-free when made with tamari, ready in about 60 minutes, and absolutely magnificent arranged on a board and served with pickled ginger, wasabi, and a small bowl of soy sauce alongside.


Recipe Information

Prep TimeCook TimeTotal TimeServingsCalories
30 mins30 mins60 mins4~380 kcal

Ingredients

For the Forbidden Rice

  • 1½ cups (300g) black forbidden rice
  • 2 cups (480ml) water
  • 3 tbsp rice vinegar
  • 1 tbsp sugar
  • 1 tsp salt

For the Spicy Marinated Tomato Filling

  • 4 roma tomatoes, deseeded and cut into long strips
  • 2 tbsp soy sauce or tamari
  • 1 tbsp sesame oil
  • 1 tbsp rice vinegar
  • 1 tsp sriracha or chili garlic sauce
  • 1 tsp maple syrup
  • ½ tsp smoked paprika

For the Roll Filling

  • 2 ripe avocados, sliced into long strips
  • 1 cup (30g) fresh spinach, watercress, or microgreens
  • ½ cucumber, cut into thin matchsticks
  • 4 nori sheets

For Serving

  • Soy sauce or tamari for dipping
  • Pickled ginger
  • Wasabi paste
  • Sesame seeds scattered over the finished rolls
  • Edible flowers for garnish (optional — as shown)

Instructions

  1. Cook the forbidden rice. Rinse the black rice thoroughly until the water runs less purple. Combine with 2 cups of water in a saucepan, bring to a boil, reduce to the lowest simmer, cover, and cook for 30–35 minutes until the water is absorbed and the rice is tender. Remove from heat and let steam covered for 10 minutes. Transfer to a wide bowl.
  2. Season the rice. In a small bowl dissolve the sugar and salt in the rice vinegar by whisking or warming briefly. Pour over the warm rice and fold through gently with a rice paddle or spatula until evenly seasoned. Fan the rice gently as you fold to help it cool — seasoned sushi rice should be used at body temperature, not hot. Cover with a damp towel while preparing the filling.
  3. Marinate the tomatoes. Combine the soy sauce, sesame oil, rice vinegar, sriracha, maple syrup, and smoked paprika in a shallow dish. Add the tomato strips and toss gently to coat. Marinate for 15 minutes — the tomatoes absorb the marinade and take on a deeply savory, spicy character that replicates the umami depth of traditional sushi fillings.
  4. Prepare the rolling station. Place a bamboo sushi mat on a clean surface and cover with plastic wrap — this prevents the rice from sticking to the mat during inside-out rolling. Fill a small bowl with water for wetting your hands.
  5. Build the inside-out roll. Place a sheet of nori shiny-side down on the plastic-wrapped mat. With wet hands, spread a thin, even layer of forbidden rice over the entire nori sheet, pressing gently to adhere. The rice layer should be approximately 5mm thick — thin enough to roll cleanly, thick enough to hold the filling.
  6. Flip the nori. Carefully flip the entire nori sheet rice-side down onto the plastic wrap so the rice is now on the outside and the nori is facing up. This is the inside-out configuration that puts the dramatic black rice on the exterior.
  7. Add the filling. Arrange a line of marinated tomato strips, avocado slices, fresh greens, and cucumber along the bottom third of the now-upward-facing nori.
  8. Roll tightly. Using the mat, lift the bottom edge and roll firmly and tightly over the filling, pressing as you go to maintain a compact, even cylinder. Continue rolling to the far edge, pressing firmly at the end to seal.
  9. Slice and serve. Using a very sharp knife dipped in water and wiped between each cut, slice each roll into 8 even pieces. Arrange on a board, scatter sesame seeds over the top, add edible flowers if using, and serve immediately with soy sauce, pickled ginger, and wasabi alongside.

Pro Tips

  • Wet your hands thoroughly before handling the rice — forbidden rice is stickier than white sushi rice and sticks to dry hands, tearing the nori and disrupting the even layer.
  • Use the rice at body temperature — hot rice tears the nori; cold rice does not adhere properly. Body temperature is the traditional sushi rice standard and produces the cleanest rolling experience.
  • Cover the mat with plastic wrap before rolling — this is essential for inside-out rolls and prevents the rice from sticking to the mat surface.
  • Use a very sharp knife and wipe between every cut — forbidden rice is stickier than white rice and requires a clean, sharp blade to slice without dragging the filling out of the roll.
  • Pat the marinated tomato strips gently dry before placing in the roll — excess marinade makes the roll too wet and can cause it to fall apart during slicing.

Why Forbidden Rice Makes This Dish So Spectacular

Forbidden rice — also known as black rice or purple rice — gets its dramatic deep purple-black color from anthocyanins, the same group of pigments that give blueberries, purple cabbage, and acai their distinctive colors. These pigments are powerful antioxidants, making forbidden rice not only visually extraordinary but also one of the most antioxidant-rich rice varieties available.

The name “forbidden” derives from ancient China, where black rice was so prized for its nutritional value and rarity that it was reserved exclusively for the Emperor and the imperial court — commoners who grew or consumed it faced severe punishment. Today it is widely available and its dramatic color, slightly nutty flavor, and firm, slightly chewy texture make it one of the most rewarding ingredients in plant-based cooking.

When used as the exterior rice in inside-out sushi rolls, the deep purple-black color creates a visual contrast against any filling that is genuinely dramatic — particularly against the vivid red of spicy marinated tomato and the bright green of avocado, producing rolls that look almost too beautiful to eat.


Flavor Variations

  • Mango and Avocado Forbidden Rice Rolls: Replace the spicy tomato filling with fresh mango strips and avocado for a sweeter, more tropical version with an equally beautiful color contrast.
  • Crispy Tofu Forbidden Rice Rolls: Add thin strips of sesame-crusted crispy tofu alongside the tomato filling for extra protein and texture.
  • Cucumber and Cream Cheese Rolls: Fill with vegan cream cheese and cucumber for a simpler, more accessible version that is particularly appealing as a first sushi-making project.

Nutritional Highlights (Per Serving — 8 pieces)

CaloriesProteinCarbsFiberFat
~380 kcal9g58g8g14g

Storage

  • Best fresh: These rolls are at their best within 1 hour of making — the rice begins to harden and the nori softens during storage.
  • Refrigerator: Store wrapped tightly in plastic wrap for up to 1 day. The texture will be slightly different but the flavor remains excellent.
  • Do not freeze: Sushi rolls do not freeze well — the rice becomes hard and grainy and the fillings lose their texture entirely.
  • Components: The marinated tomato filling and seasoned rice can be made ahead and stored separately — assemble the rolls fresh when ready to serve.

Frequently Asked Questions

Where do I find forbidden rice?

Black forbidden rice is available at Asian grocery stores, health food stores, and increasingly at mainstream supermarkets in the rice or health food aisle. It is also widely available online.

Can I use regular sushi rice instead of forbidden rice?

Yes — regular short grain white sushi rice works with the same technique and filling for a more classic visual result. The forbidden rice is specifically chosen for its dramatic color and slightly nuttier flavor.

Do I need a bamboo sushi mat?

A bamboo sushi mat makes rolling significantly easier and produces more even, professional rolls. A clean kitchen towel covered with plastic wrap can be used as a substitute, though the rolls may be slightly less even.


Tried this recipe? Leave a comment below and let us know how it turned out! Tag us on Instagram and Facebook — we love seeing your plant-powered creations. Looking for more addictive vegan snack and appetizer recipes? Browse all recipes on Easy Vegan Recipes — new recipes posted every single week!
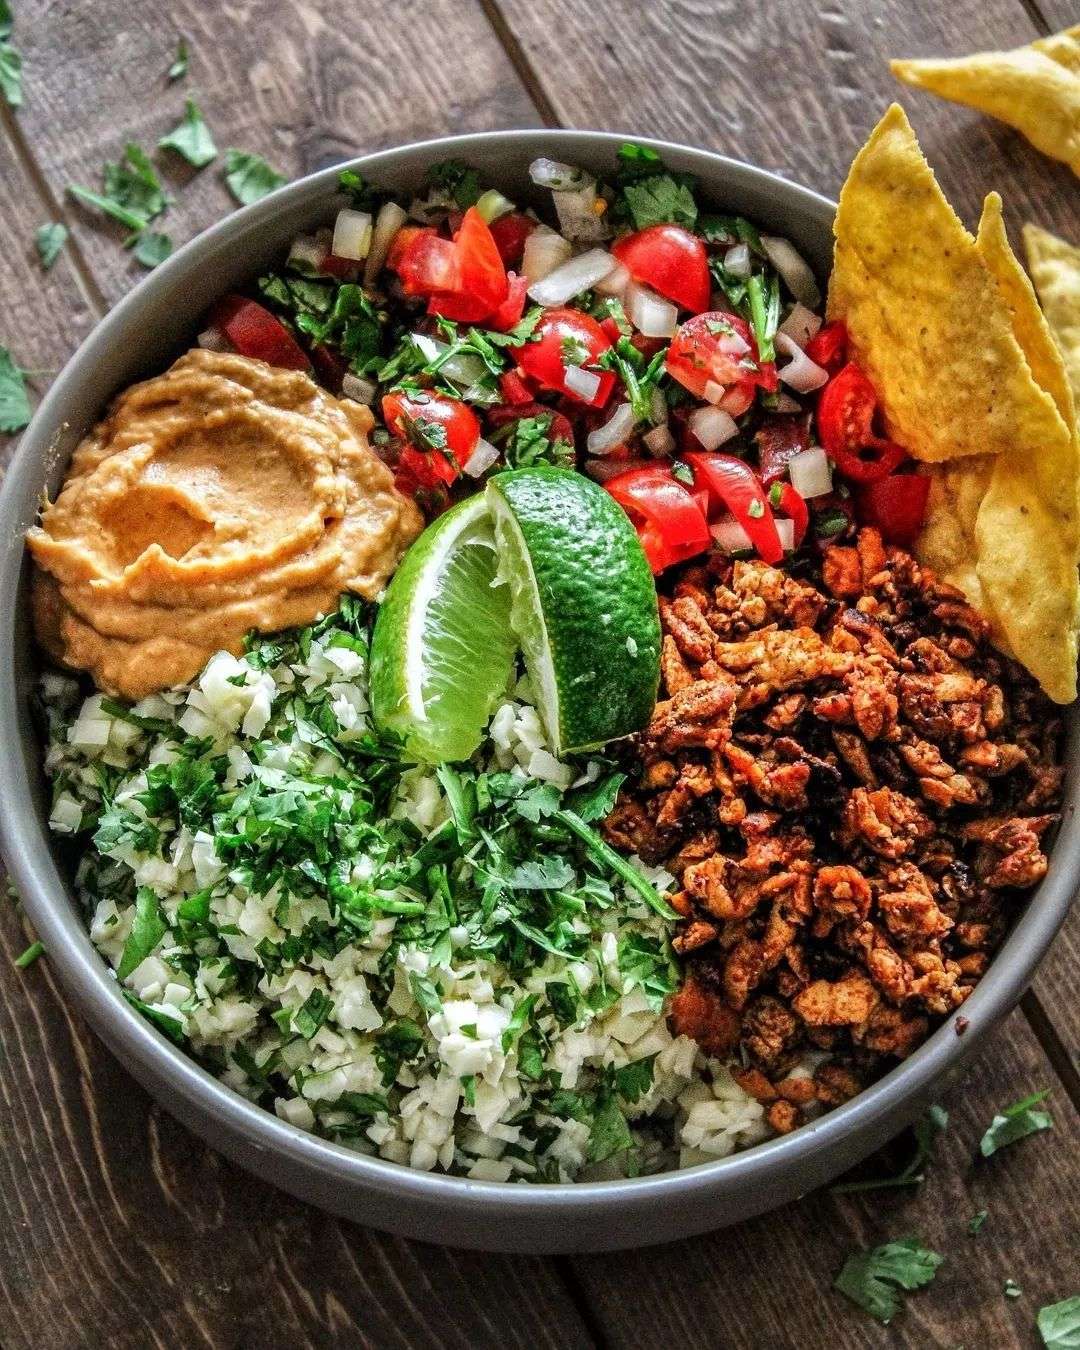
Cilantro Lime Nourish Bowl ⁣

285185076 1041090020167405 143703688329780258 N

There are bowls you make when you want to feel good. And then there are bowls like this Vegan Cilantro Lime Nourish Bowl — the kind that you assemble with layer after layer of vibrant, colorful, genuinely nourishing ingredients and then dress with a cilantro lime sauce so bright and so alive that it transforms everything it touches into something that tastes like the best version of itself. This is that bowl. The one that makes eating well feel like a genuine pleasure rather than a compromise. The one that you finish and feel energized by, satisfied by, and immediately want to make again.

This bowl stacks fluffy cilantro lime rice, roasted sweet potato, crispy spiced chickpeas, creamy sliced avocado, shredded red cabbage, corn, and cucumber in a wide bowl and then drowns everything in a blended cilantro lime dressing made from fresh cilantro, lime juice, garlic, jalapeño, olive oil, and a touch of maple syrup that is so vibrantly flavored and so effortlessly good that you will find yourself making extra to keep in the refrigerator for use on everything else you eat this week.

What makes this bowl so outstanding is the layering of textures — the fluffy rice, the soft roasted sweet potato, the crunchy chickpeas, the creamy avocado, and the crisp raw vegetables all working together to create a bowl that is interesting and satisfying in every single bite rather than uniform and monotonous.

This recipe is 100% vegan, naturally gluten-free, meal-prep friendly, ready in about 40 minutes, and one of those bowls that genuinely earns the word nourishing — not as a marketing term but as a description of how it makes you feel.


Recipe Information

Prep TimeCook TimeTotal TimeServingsCalories
15 mins30 mins40 mins4~480 kcal

Ingredients

For the Cilantro Lime Rice

  • 1½ cups (280g) long-grain white rice or jasmine rice
  • 2¾ cups (660ml) water
  • 1 tsp salt
  • ¼ cup (10g) fresh cilantro, finely chopped
  • 2 tbsp lime juice
  • 1 tsp lime zest

For the Crispy Spiced Chickpeas

  • 1 can (400g) chickpeas, drained, rinsed, and thoroughly dried
  • 1 tbsp olive oil
  • 1 tsp smoked paprika
  • ½ tsp cumin
  • ½ tsp garlic powder
  • ¼ tsp cayenne
  • ½ tsp salt

For the Roasted Sweet Potato

  • 2 medium sweet potatoes, peeled and diced into 2cm cubes
  • 1 tbsp olive oil
  • ½ tsp cumin
  • ½ tsp smoked paprika
  • Salt and pepper

For the Cilantro Lime Dressing

  • 1 cup (40g) fresh cilantro, leaves and tender stems
  • 3 tbsp lime juice
  • 1 tsp lime zest
  • 1 small jalapeño, deseeded (or keep seeds for more heat)
  • 1 clove garlic
  • 3 tbsp olive oil
  • 1 tbsp maple syrup
  • ¼ tsp salt
  • 2–3 tbsp water to thin

For the Bowl

  • 1 avocado, sliced
  • 1 cup (80g) red cabbage, finely shredded
  • ½ cup (80g) corn kernels, fresh or thawed
  • ½ cucumber, thinly sliced
  • Fresh cilantro and lime wedges to serve
  • Black sesame seeds or pepitas to garnish

Instructions

  1. Roast the sweet potato. Preheat the oven to 425°F (220°C). Toss the diced sweet potato with olive oil, cumin, smoked paprika, salt, and pepper. Spread in a single layer on a lined baking sheet and roast for 25–30 minutes, flipping halfway, until golden and caramelized at the edges.
  2. Make the crispy chickpeas. Pat the chickpeas completely dry with paper towels — this is the key to crispiness. Toss with olive oil, smoked paprika, cumin, garlic powder, cayenne, and salt. Spread on a separate lined baking sheet and roast alongside the sweet potato for 25–30 minutes, shaking the pan halfway, until deeply golden and crispy.
  3. Cook the cilantro lime rice. Combine the rice, water, and salt in a saucepan. Bring to a boil, then reduce to the lowest heat, cover, and cook for 15–18 minutes until the water is absorbed and the rice is fluffy. Remove from heat, fluff with a fork, then stir through the chopped cilantro, lime juice, and lime zest. Taste and adjust seasoning.
  4. Make the cilantro lime dressing. Combine all dressing ingredients in a blender or small food processor. Blend until smooth and vibrantly green. Taste and adjust — more lime for brightness, more maple for balance, more jalapeño for heat. Thin with water to a pourable consistency.
  5. Assemble the bowls. Divide the cilantro lime rice between four wide bowls. Arrange the roasted sweet potato, crispy chickpeas, sliced avocado, shredded red cabbage, corn, and cucumber over the rice. Drizzle generously with the cilantro lime dressing. Garnish with fresh cilantro, sesame seeds or pepitas, and serve with lime wedges alongside.

Pro Tips

  • Dry the chickpeas completely before roasting — any residual moisture steams rather than crisps the chickpeas. Pat them with paper towels and, if time allows, leave them uncovered on the tray for 10 minutes before seasoning.
  • Make the dressing first — it keeps in the refrigerator for up to a week and gets better as the flavors meld, so making it ahead saves time and improves the finished bowl.
  • Season the rice generously — cilantro lime rice should taste bright and zesty on its own; taste and add more lime juice and salt before serving as the flavors dull slightly as the rice cools.
  • Assemble just before eating — this bowl is at its best immediately assembled, when the chickpeas are still crispy and the avocado is freshly sliced.

What Makes a Nourish Bowl Different From a Regular Bowl

The word nourish in nourish bowl is not accidental — it describes a specific approach to bowl building that prioritizes nutrient density, balance, and variety rather than simply putting things in a bowl. A genuine nourish bowl contains a complex carbohydrate base (rice, quinoa, or grains), a protein source (chickpeas, tofu, tempeh, or beans), healthy fats (avocado, nuts, or seeds), a variety of both cooked and raw vegetables for different textures and nutrients, and a dressing that provides flavor while contributing its own nutritional value. This cilantro lime version hits every category — the rice and sweet potato provide complex carbohydrates and fiber, the chickpeas provide plant protein and more fiber, the avocado provides healthy monounsaturated fats, and the array of raw vegetables provides vitamins, minerals, and the digestive benefits of raw plant fiber. It is a bowl that is designed to make you feel as good as it tastes.


Flavor Variations

  • Mango Cilantro Lime Bowl: Add diced fresh mango for a tropical sweetness that is spectacular with the lime dressing and creamy avocado.
  • Spicy Cilantro Lime Bowl: Double the jalapeño in the dressing and add sriracha-roasted chickpeas for a version with genuine heat throughout.
  • Protein-Boosted Bowl: Add marinated and baked tofu or tempeh alongside the chickpeas for an extra-high-protein version ideal for post-workout recovery.

Nutritional Highlights (Per Serving)

CaloriesProteinCarbsFiberFat
~480 kcal14g68g12g18g

Storage & Meal Prep

  • Meal prep friendly: Store each component separately in airtight containers in the refrigerator for up to 4 days — assemble individual bowls throughout the week. The chickpeas lose their crispiness when refrigerated; re-crisp them in a hot oven or air fryer for 5 minutes before using.
  • Dressing: Keeps in a sealed jar for up to 7 days — the color stays vibrantly green and the flavor actually improves after the first day.
  • Avocado: Slice fresh when assembling — pre-sliced avocado browns quickly. If prepping ahead, toss slices in lime juice to slow oxidation.

Frequently Asked Questions

Can I use brown rice instead of white?

Yes — brown rice adds extra fiber and a nuttier flavor. Increase the cooking time to 40–45 minutes and add more water as needed. The cilantro lime seasoning works just as well with brown rice.

Can I substitute the chickpeas?

Yes — black beans, edamame, or baked tofu all work beautifully in this bowl. For the best texture contrast, keep something crunchy in the bowl alongside whatever protein you choose.

Is the dressing very spicy?

As written with a deseeded jalapeño, the dressing has a mild, fresh heat. For no heat, omit the jalapeño entirely. For significant heat, keep the seeds in or add an extra jalapeño.


Tried this recipe? Leave a comment below and let us know how it turned out! Tag us on Instagram and Facebook — we love seeing your plant-powered creations. Looking for more addictive vegan snack and appetizer recipes? Browse all recipes on Easy Vegan Recipes — new recipes posted every single week!

Asian-inspired Noodle Salad with Orange Miso Ginger Dressing

asian inspired noodle salad with orange miso ginger dressing

There are salads you make because something light is needed. And then there are salads like this Asian-Inspired Noodle Salad with Orange Miso Ginger Dressing — the kind that comes together in a single bowl of such extraordinary color and texture and flavor that it is simultaneously the most beautiful and the most delicious thing on the table. This is that salad. The one with ribbons of cool soba noodles, crunchy shredded cabbage, bright edamame, julienned carrot, and thinly sliced cucumber, all tossed in a dressing so deeply savory and so brightly citrusy and so perfectly balanced between sweet, salty, tangy, and umami that you will make a double batch of it immediately for use on everything else in the refrigerator.

This recipe combines soba noodles with a colorful array of crisp, fresh vegetables and a bold, complex dressing built on white miso paste, fresh orange juice and zest, grated ginger, sesame oil, rice vinegar, and a touch of maple syrup — a combination that produces a dressing of such extraordinary complexity from such simple ingredients that it tastes like something requiring considerably more effort than it actually demands.

What makes this salad so outstanding is the dressing — the orange miso ginger combination is one of the great underused flavor pairings in plant-based cooking, providing simultaneously the deep, savory, fermented character of miso, the bright, slightly sweet citrus of fresh orange, and the clean, warming punch of fresh ginger, all balanced into something that makes every ingredient it touches taste more vibrant and more interesting.

This recipe is 100% vegan, naturally gluten-free when made with gluten-free soba or rice noodles, ready in just 25 minutes, and absolutely spectacular served immediately or chilled, making it equally outstanding as a quick weeknight dinner and a make-ahead lunch.


Recipe Information

Prep TimeCook TimeTotal TimeServingsCalories
15 mins10 mins25 mins4~340 kcal

Ingredients

For the Noodle Salad

  • 300g soba noodles or rice noodles
  • 2 cups (160g) red or green cabbage, very thinly shredded
  • 2 medium carrots, julienned or grated
  • 1 medium cucumber, halved and thinly sliced
  • 1 cup (150g) frozen edamame, thawed
  • 3 spring onions, thinly sliced
  • ¼ cup (15g) fresh cilantro, roughly chopped
  • ¼ cup (35g) roasted peanuts or cashews, roughly chopped
  • 2 tbsp sesame seeds, toasted

For the Orange Miso Ginger Dressing

  • 3 tbsp white miso paste
  • 4 tbsp fresh orange juice
  • Zest of 1 large orange
  • 2 tbsp rice vinegar
  • 2 tbsp soy sauce or tamari
  • 1 tbsp sesame oil
  • 1 tbsp maple syrup
  • 1 tbsp fresh ginger, very finely grated
  • 1 clove garlic, finely grated
  • 2–3 tbsp water, to thin to desired consistency

Optional Add-ins

  • Thinly sliced red bell pepper for extra color
  • Sliced avocado added just before serving
  • Crispy tofu cubes for extra protein
  • Shredded purple cabbage alongside the green for a more dramatic color contrast

Instructions

  1. Cook the noodles. Cook the soba noodles according to package instructions — typically 4–6 minutes in boiling water. Drain and immediately rinse under cold running water to stop the cooking and prevent sticking. Toss with a small drizzle of sesame oil to keep separate. Set aside.
  2. Make the dressing. In a small bowl whisk together the white miso paste, orange juice, orange zest, rice vinegar, soy sauce, sesame oil, maple syrup, grated ginger, and grated garlic until completely smooth and emulsified. Add water one tablespoon at a time until the dressing reaches a pourable, drizzleable consistency. Taste and adjust — more orange juice for brightness, more soy sauce for saltiness, more maple syrup for sweetness.
  3. Prepare the vegetables. Shred the cabbage as thinly as possible, julienne or grate the carrots, slice the cucumber and spring onions, and thaw the edamame if needed.
  4. Assemble the salad. In a large bowl combine the cooked noodles, shredded cabbage, carrot, cucumber, edamame, and spring onions. Pour the dressing over and toss thoroughly until every component is evenly coated.
  5. Finish and serve. Transfer to a serving bowl or platter. Scatter the fresh cilantro, chopped peanuts or cashews, and toasted sesame seeds over the top. Serve immediately or refrigerate until ready to serve.

Pro Tips

  • Rinse the soba noodles in cold water immediately after cooking — this stops the cooking process, removes surface starch that would make them sticky and clumped, and cools them to the correct temperature for a cold noodle salad.
  • Make the dressing first and let it sit while preparing everything else — the flavors deepen and meld beautifully even in 10–15 minutes.
  • Taste the dressing before adding to the salad and adjust confidently — the dressing should taste noticeably bold as it will be diluted slightly by the noodles and vegetables.
  • Add the peanuts and sesame seeds just before serving to keep them crunchy rather than softening in the dressing.

Why This Dressing Is So Extraordinary

The orange miso ginger combination works at a deep flavor chemistry level because each ingredient contributes a distinct dimension that the others cannot provide. Miso provides fermented umami depth and saltiness. Orange provides natural sweetness, acidity, and aromatic citrus compounds. Ginger provides warming, slightly peppery pungency. Sesame oil provides richness and its characteristic nutty aroma. Rice vinegar provides sharpness and brightness. Together these five elements create a dressing that satisfies on every flavor dimension simultaneously — a quality that makes food genuinely addictive rather than merely pleasant.


Flavor Variations

  • Spicy Orange Miso Salad: Add a teaspoon of chili garlic sauce or a pinch of cayenne to the dressing for a version with building heat.
  • Tofu Noodle Salad: Add cubed, pan-fried crispy tofu to the assembled salad for a more substantial, higher-protein version.
  • Mango Noodle Salad: Add thinly sliced fresh mango to the salad for a sweeter, more tropical character that pairs particularly beautifully with the orange dressing.

Nutritional Highlights (Per Serving)

CaloriesProteinCarbsFiberFat
~340 kcal14g52g6g10g

Storage

  • Refrigerator: Store the assembled salad in an airtight container for up to 2 days, though the noodles will absorb more dressing over time. For the best texture, store the components separately and assemble just before serving.
  • Dressing: The dressing keeps in a sealed jar in the refrigerator for up to 1 week and is outstanding on virtually everything — grain bowls, roasted vegetables, steamed broccoli, lettuce wraps.
  • Meal prep: This salad is excellent for meal prep when the components are stored separately — noodles, vegetables, and dressing each stored apart and assembled fresh for each serving.

Frequently Asked Questions

Can I use a different noodle instead of soba?

Yes — rice noodles, udon, ramen, or glass noodles all work well in this salad. Rice noodles make it naturally gluten-free; udon produces a chewier, more substantial result.

Can I make this salad ahead for a party?

Yes — prepare all components up to 24 hours ahead and store separately. Toss with the dressing 15–30 minutes before serving for the best texture, allowing time for the flavors to meld without the noodles becoming soggy.

What can I substitute for white miso if I can’t find it?

Yellow miso works as a direct substitute with a slightly stronger, more robust flavor. Red miso produces a more intensely savory, less sweet dressing. If miso is unavailable, a mixture of tahini, soy sauce, and a pinch of salt provides a similar fermented depth.


Tried this recipe? Leave a comment below and let us know how it turned out! Tag us on Instagram and Facebook — we love seeing your plant-powered creations. Looking for more vibrant vegan noodle and bowl recipes? Browse all recipes on Easy Vegan Recipes — new recipes posted every single week!

Smoky White Bean Dip — The Most Silky Plant-Based Dip You Will Make All Week

smoky white bean

There are dips you make because something is needed on the table. And then there are dips like this Smoky White Bean Dip — the kind that blends into the most impossibly silky, creamy, pale ivory swirl, finished with a pool of deep red smoked paprika oil that bleeds slowly into the surface and creates one of the most beautiful presentations imaginable, crowned with crispy golden chickpeas or lentils that shatter on the first scoop. This is that dip. The one that looks like it belongs in a restaurant and takes fifteen minutes to make. The one that disappears before anything else on the table has been touched.

White beans are one of the most underused bases for dipping in plant-based cooking — their flavor is milder and more subtle than chickpeas, their texture blends smoother than almost any other legume, and their creamy richness carries the surrounding flavors of garlic, lemon, and smoked paprika with extraordinary elegance. Combined with a generous amount of good olive oil and blended for long enough to achieve a genuinely silky, whipped consistency, white beans produce a dip that rivals the finest hummus in both texture and flavor while tasting entirely its own.

What makes this dip so outstanding is the finishing oil — warm olive oil bloomed with smoked paprika and a touch of garlic, poured over the surface in a slow, deliberate pool that creates both a flavor element and a visual drama that makes the dip look genuinely spectacular from the moment it arrives at the table.

This recipe is 100% vegan, naturally gluten-free, ready in just 15 minutes, and absolutely magnificent served with warm pita, crusty bread, cucumber slices, or any vegetable that benefits from being dragged through something gloriously creamy and smoky.


Recipe Information

Prep TimeCook TimeTotal TimeServingsCalories
10 mins5 mins15 mins6~160 kcal

Ingredients

For the White Bean Dip

  • 2 cans (800g) white beans (cannellini or butter beans), drained and rinsed
  • 3 tbsp good quality extra virgin olive oil
  • 2 tbsp lemon juice
  • 2 cloves garlic
  • 1 tsp smoked paprika
  • ½ tsp salt
  • ¼ tsp white pepper
  • 3–5 tbsp ice cold water (for blending to silky consistency)

For the Smoky Paprika Oil

  • 3 tbsp extra virgin olive oil
  • 1 tsp smoked paprika
  • ¼ tsp chili flakes (optional)
  • 1 small clove garlic, very finely minced

For the Crispy Topping

  • ½ cup (80g) canned chickpeas or cooked lentils, drained and patted dry
  • 1 tsp olive oil
  • ¼ tsp smoked paprika
  • Pinch of salt

For Garnish

  • Fresh parsley or cilantro, finely chopped
  • Extra drizzle of olive oil
  • A final pinch of smoked paprika

To Serve

  • Warm pita bread or flatbread
  • Crusty sourdough or baguette
  • Sliced cucumber and celery
  • Radishes and carrot sticks
  • Crackers or rice cakes

Instructions

  1. Make the crispy topping. Pat the drained chickpeas or lentils completely dry with kitchen towels — this is essential for crispiness. Heat the olive oil in a small skillet over medium-high heat. Add the chickpeas or lentils and cook, stirring occasionally, for 6–8 minutes until deeply golden and crispy. Add the smoked paprika and salt in the final minute. Transfer to a paper towel to drain and set aside.
  2. Blend the white beans. Place the drained white beans, olive oil, lemon juice, garlic, smoked paprika, salt, and white pepper in a high-speed blender or food processor. Blend for 60 seconds, then with the motor running add ice cold water one tablespoon at a time until the dip is completely smooth, silky, and flowing like thick cream. Continue blending for a full 2–3 minutes — white beans require sustained blending to achieve genuine silkiness. Taste and adjust with additional lemon juice, salt, or garlic.
  3. Make the smoky paprika oil. In a small saucepan or skillet heat the olive oil over medium-low heat. Add the minced garlic and cook for 30 seconds until fragrant but not browned. Add the smoked paprika and chili flakes if using. Remove from heat immediately — the residual heat blooms the paprika without burning it, producing a deep red, intensely fragrant oil.
  4. Plate and finish. Transfer the blended white bean dip to a wide, shallow serving bowl. Using the back of a spoon, create a large swirl starting from the center and sweeping outward to the edges — this classic dip presentation creates a natural well in the center for the oil. Pour the warm smoky paprika oil into the center and let it pool and spread naturally. Scatter the crispy chickpeas or lentils over the surface. Finish with fresh herbs and a final pinch of smoked paprika.
  5. Serve immediately. Serve with warm bread and vegetables alongside while the oil is still warm and fragrant.

Pro Tips

  • Blend for longer than you think is necessary. The difference between a 60-second blend and a 3-minute blend is dramatic with white beans — the longer blend breaks down the bean cell walls more completely and produces a genuinely silky, smooth consistency rather than a grainy, slightly textured one.
  • Use ice cold water when blending. Cold water helps emulsify the olive oil and bean mixture into a smoother, lighter dip than room temperature water produces. Add it gradually — the exact amount needed varies by bean brand and blending power.
  • Make the paprika oil warm, not hot. Oil that is too hot burns the smoked paprika and produces a bitter, acrid flavor. Remove from the heat the moment the paprika goes in and let the residual warmth do the blooming.
  • Pat the crispy topping completely dry before frying. Any surface moisture prevents proper crisping and produces soft, chewy chickpeas rather than the shatteringly crunchy topping the finished dip deserves.
  • Use a wide, shallow bowl for serving. The swirl pattern and the beautiful red paprika oil are the visual drama of this dish — a wide shallow bowl displays them. A deep bowl hides them.

Why White Beans Make Such a Beautiful Dip Base

White beans — whether cannellini, butter beans, or Great Northern beans — have a flavor profile that is simultaneously more subtle and more sophisticated than chickpeas in a dip context. Their flavor is mild, slightly nutty, and almost sweet, which allows the surrounding seasonings — smoked paprika, garlic, lemon — to come forward more prominently than they do in a chickpea hummus where the chickpea flavor competes. Their texture, when blended properly, is also notably smoother than chickpeas — their thinner skins and softer flesh break down more completely during blending, producing a creaminess that requires considerably less tahini or fat to achieve than an equivalent chickpea preparation.

The smoked paprika is the defining flavor element of this dip — used both within the blend and in the finishing oil for a layered smokiness that is present throughout rather than only on the surface. Smoked paprika provides a depth of flavor that transforms the clean, mild white bean base into something genuinely complex and memorable.


Flavor Variations

  • Roasted Garlic White Bean Dip: Replace the raw garlic with a full head of roasted garlic for a sweeter, more mellow, deeply caramelized garlic flavor throughout.
  • Lemon and Herb White Bean Dip: Add extra lemon zest and a generous handful of fresh basil to the blend for a brighter, more herbaceous Mediterranean version.
  • Chipotle White Bean Dip: Replace the smoked paprika with chipotle powder and add a tablespoon of adobo sauce for a spicier, smokier version with a distinctly Mexican character.

Nutritional Highlights (Per Serving)

CaloriesProteinCarbsFiberFat
~160 kcal7g18g5g7g

Storage

  • Refrigerator: Store the dip in an airtight container for up to 5 days. Store the paprika oil and crispy topping separately and add fresh when serving — the oil absorbs into the dip during storage and the crispy topping softens.
  • Freezer: The white bean dip base freezes well for up to 2 months. Thaw overnight in the refrigerator and re-blend briefly before serving to restore smoothness.
  • Make ahead: This dip is ideal for making ahead — the flavor deepens overnight in the refrigerator. Add the smoky oil and crispy topping fresh when ready to serve.

Frequently Asked Questions

Can I use dried white beans instead of canned?

Yes — cook 400g of dried cannellini beans until very tender, then drain and use in the same quantity as canned. Home-cooked beans often produce a slightly smoother dip than canned as they can be cooked to a softer consistency.

Can I make this dip without a high-speed blender?

A food processor works but requires significantly longer processing and may not achieve the same silky texture. A regular blender works better than a food processor. For the smoothest possible result, peel the skins from the white beans before blending — tedious but produces an exceptionally smooth result.

What can I use instead of smoked paprika?

Regular paprika combined with a tiny drop of liquid smoke produces a similar flavor profile. Chipotle powder provides smokiness with additional heat. Neither is a perfect substitute but both produce a delicious result.


Tried this recipe? Leave a comment below and let us know how it turned out! Tag us on Instagram and Facebook — we love seeing your plant-powered creations. Looking for more addictive vegan snack and appetizer recipes? Browse all recipes on Easy Vegan Recipes — new recipes posted every single week!

Nut-free Whipped Tofu Cream Cheese

nut free whipped tofu cream cheese

There are spreads you buy because making your own seems complicated. And then there are spreads like this Nut-Free Whipped Tofu Cream Cheese — the kind that blends in minutes into something genuinely creamy, tangy, and spreadable, completely free of any nuts, and tasting remarkably close to traditional cream cheese without a trace of dairy. This is that spread. The one that solves the problem of finding a nut-free vegan cream cheese option. The one that ends up on toast, bagels, and crackers all week long.

This recipe uses silken tofu as its base rather than the cashews found in most vegan cream cheese recipes, blended with a touch of coconut oil for richness, lemon juice for tang, and a pinch of salt, whipped until completely smooth and light. It is an ideal option for anyone avoiding nuts while still wanting a genuinely creamy, spreadable plant-based cream cheese.

What makes this spread so outstanding is how convincingly tofu replicates cream cheese here — its naturally mild flavor and smooth texture, combined with the right ratio of fat and acid, produce a result that is genuinely creamy and tangy rather than tasting distinctly of tofu.

This recipe is 100% vegan, completely nut-free, ready in just 10 minutes, and absolutely wonderful spread generously on bagels, toast, or crackers, or used as a base for dips and sauces.


Recipe Information

Prep TimeCook TimeTotal TimeServingsCalories
10 mins0 mins10 mins6~90 kcal

Ingredients

For the Cream Cheese

  • 350g silken tofu, drained
  • 2 tbsp coconut oil, melted
  • 2 tbsp lemon juice
  • 1 tbsp nutritional yeast
  • ½ tsp salt
  • ½ tsp onion powder
  • ¼ tsp garlic powder

Optional Add-ins

  • 2 tbsp fresh chives, finely chopped, for a chive version
  • 1 tbsp roasted red pepper, finely chopped, for a savory version
  • 1 tbsp maple syrup and ¼ tsp cinnamon for a sweet version
  • 2 tbsp finely diced sun-dried tomatoes

To Serve

  • Toasted bagels
  • Crackers
  • Fresh vegetables for dipping
  • Toast with sliced cucumber and herbs

Instructions

  1. Drain the tofu. Press the silken tofu gently between paper towels or a clean kitchen towel to remove any excess surface liquid, being careful not to break it apart too much.
  2. Blend until smooth. Place the tofu, melted coconut oil, lemon juice, nutritional yeast, salt, onion powder, and garlic powder in a food processor or high-speed blender. Blend until completely smooth, scraping down the sides as needed.
  3. Taste and adjust. Taste the mixture and adjust with additional lemon juice for tang or salt as needed.
  4. Chill before serving. Transfer to an airtight container and refrigerate for at least 1 hour to firm up to a spreadable consistency.
  5. Add mix-ins if desired. Once chilled, fold in any optional add-ins such as chives or roasted red pepper before serving.

Pro Tips

  • Use silken tofu specifically, as firm or extra firm tofu will not blend to the same smooth, creamy consistency.
  • Blend thoroughly, scraping down the sides multiple times, to eliminate any graininess.
  • Chill the mixture before serving, as it firms up considerably and becomes more spreadable once cold.
  • Adjust lemon juice gradually to taste, as the right amount of tang is key to making this taste convincingly like cream cheese.

Why Silken Tofu Works So Well Here

Silken tofu has a naturally smooth, custard-like texture and very mild flavor, making it an excellent neutral base for a creamy spread. Combined with a small amount of fat from coconut oil and acidity from lemon juice, it takes on a texture and tang remarkably similar to dairy cream cheese, all without using any nuts, which are the typical base for most vegan cream cheese alternatives.


Flavor Variations

  • Chive Cream Cheese: Fold in finely chopped fresh chives for a classic herbed version.
  • Sweet Cinnamon Cream Cheese: Add maple syrup and cinnamon for a sweet spread perfect for bagels.
  • Sun-Dried Tomato Cream Cheese: Fold in finely diced sun-dried tomatoes and a pinch of dried basil for a savory, Mediterranean-inspired version.

Nutritional Highlights (Per Serving)

CaloriesProteinCarbsFiberFat
~90 kcal5g3g1g6g

Storage

  • Refrigerator: Store in an airtight container for up to 5 days.
  • Freezer: Freezing is not recommended, as the texture can become grainy and separate upon thawing.

Frequently Asked Questions

Can I use a different oil instead of coconut oil?

A neutral, solid fat works best for achieving the right texture; coconut oil is recommended, though refined coconut oil can be used for a more neutral flavor without coconut taste.

Why is my mixture too thin?

This is usually caused by tofu with excess water content. Press the tofu more thoroughly before blending and ensure the mixture has fully chilled, as it firms up significantly once cold.

Can I use this in baking?

Yes — this spread can be used in recipes calling for vegan cream cheese, such as frostings or cheesecake fillings, though results may vary slightly depending on the recipe.


Tried this recipe? Leave a comment below and let us know how it turned out! Tag us on Instagram and Facebook — we love seeing your plant-powered creations. Looking for more versatile vegan spread and dip recipes? Browse all recipes on Easy Vegan Recipes — new recipes posted every single week!