Dinner

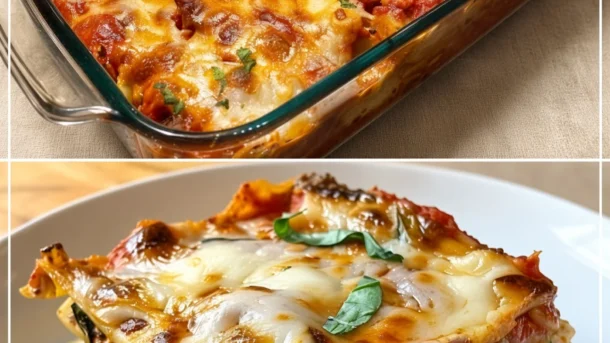
Vegan Ricotta and Spinach Lasagna — The Layered, Bubbling, Deeply Satisfying Bake That Converts Everyone at the Table

vegan ricotta and spinach lasagna

A great lasagna is one of the most purely satisfying things that can come out of a home kitchen — the kind of dish that fills the house with an aroma for an hour before it is ready, that arrives at the table still bubbling at the edges, that holds together in a clean, layered slice that reveals sheets of pasta, a rich tomato sauce, and a creamy, herb-flecked filling, and that produces a specific kind of table silence that only deeply good food can produce. Vegan Ricotta and Spinach Lasagna delivers exactly that experience — without a drop of dairy, without an egg, and without any compromise on the qualities that make lasagna the definitive comfort bake. The tomato sauce is a slow-cooked, deeply savory marinara made with tinned tomatoes, garlic, onion, and a generous quantity of herbs, cooked long enough for the tomato’s acidity to mellow and the sauce to become thick, clinging, and intensely flavored. The ricotta layer is made from firm tofu blended with lemon juice, nutritional yeast, garlic, and fresh basil, producing a creamy, slightly grainy, herb-forward filling that is remarkably close to the texture and flavor of dairy ricotta — particularly after baking, when the tofu proteins set slightly and the filling holds its shape between the pasta layers. The spinach is wilted, squeezed dry, and folded into the ricotta so that its flavor and color are present in every slice without its moisture making the lasagna wet. The top layer is a cashew béchamel — a silky, creamy white sauce made from blended cashews and plant milk, enriched with nutritional yeast and nutmeg — that bubbles and browns during baking and forms the golden, slightly crispy top crust that is the crowning achievement of a well-made lasagna. It is 100% vegan, dairy-free, and egg-free. It serves 8 generously. It is better the next day. The technique is the reason each layer holds its distinct character in the finished bake rather than collapsing into an undifferentiated mass.

The technique is the layer-moisture-balance method. The fundamental structural problem in a baked lasagna is moisture management across three distinct layers — the tomato sauce, the ricotta filling, and the béchamel — each of which has a different moisture content and a different behavior during the 45–55 minutes of baking. If the tomato sauce is too wet, it saturates the pasta sheets from below, producing a soft, formless base layer; if the ricotta filling retains its full moisture (from the spinach, from the tofu), it releases water during baking that pools between the pasta layers and pushes them apart; if the béchamel is too thin, it runs off the top layer and puddles at the edges rather than forming the golden crust. The layer-moisture-balance method addresses each layer’s moisture independently, at the preparation stage, so that when the lasagna is assembled and baked, each layer contributes exactly the right amount of moisture to cook the dry pasta sheets to al dente without making any individual layer wet. Stage one — concentrate the tomato sauce: the marinara is cooked for a full 25–30 minutes uncovered until it reaches a consistency significantly thicker than a serving pasta sauce — it should mound slightly on a spoon rather than running off it. This concentrated sauce releases moisture during baking as it heats, which is absorbed by the dry pasta sheets; if the sauce were at a normal serving consistency at the point of assembly, the combined moisture from the sauce and the other layers would over-saturate the pasta. Stage two — squeeze the spinach: the wilted spinach is squeezed as firmly as possible before being incorporated into the ricotta, eliminating the free water from the spinach cells that would otherwise release into the ricotta layer during baking. Stage three — calibrate the béchamel: the cashew béchamel is made to a consistency that is thick enough to coat the back of a spoon heavily but still pourable — it should flow slowly across the top layer when poured, not run off the edges, and not need to be spread with a spatula. This consistency means it stays where it is placed during baking rather than redistributing into the lower layers. The three calibrations together produce a lasagna that is moist throughout without being wet, where each layer retains its distinct texture and the pasta is cooked through and al dente rather than either undercooked or sodden.

This recipe serves 8.


Recipe Information

Prep TimeCook TimeTotal TimeServingsCalories
35 mins55 mins90 mins8~390 kcal

Ingredients

For the Tomato Marinara Sauce

  • 2 × 400g (14oz) tins of crushed tomatoes
  • 1 × 400g (14oz) tin of whole peeled tomatoes, crushed by hand
  • 1 large onion, finely diced
  • 6 cloves garlic, minced
  • 2 tbsp olive oil
  • 3 tbsp tomato paste
  • 1 tsp dried oregano
  • 1 tsp dried basil
  • 1 tsp sugar
  • 1 tsp fine salt
  • ½ tsp black pepper
  • ½ tsp chilli flakes (optional)
  • A small handful of fresh basil, torn — added at the very end of cooking, off the heat; fresh basil added during cooking loses its aromatic brightness; added at the end, it perfumes the sauce without being cooked out

For the Spinach

  • 300g (10½oz) fresh baby spinach
  • 1 tbsp olive oil
  • 2 cloves garlic, minced
  • Salt to taste

For the Vegan Ricotta

  • 600g (21oz) firm tofu — pressed for 20 minutes to remove excess water (wrap in a clean kitchen towel and place a heavy book or pan on top; the pressing step is important — unpressed tofu retains too much water and makes the filling wet)
  • 3 tbsp nutritional yeast
  • 2 tbsp lemon juice (fresh)
  • 2 cloves garlic, minced or finely grated
  • 1 tsp fine salt
  • ½ tsp black pepper
  • ½ tsp onion powder
  • A large handful of fresh basil leaves, roughly torn (or 1 tsp dried basil)
  • 2 tbsp olive oil

For the Cashew Béchamel

  • 150g (1 cup) raw cashews, soaked in boiling water for 30 minutes and drained
  • 600ml (2½ cups) unsweetened oat milk or soy milk
  • 3 tbsp nutritional yeast
  • 2 cloves garlic
  • 1 tsp fine salt
  • ¼ tsp ground nutmeg (freshly grated nutmeg is noticeably more aromatic and pungent than pre-ground — if using freshly grated, a small amount goes a long way)
  • ½ tsp white pepper or black pepper
  • 1 tbsp lemon juice

For the Lasagna

  • 12–15 dried lasagna sheets (no-boil/oven-ready sheets are ideal for this recipe — they absorb moisture from the surrounding sauces during baking and finish cooking in the oven, eliminating a separate boiling step and reducing the risk of over-soft pasta; standard lasagna sheets that require pre-boiling can be used but should be boiled for 4–5 minutes only — slightly undercooked — before layering)
  • 100g (3½oz) vegan mozzarella-style cheese, grated (optional but excellent — scattered over the béchamel before baking, it adds a melted, slightly stretchy layer on top; use a melting-style vegan mozzarella)
  • Fresh basil and a drizzle of good olive oil, to finish

Equipment

  • A 33 × 23cm (9 × 13 inch) deep baking dish

Instructions

  1. Press the tofu. Wrap the firm tofu in a clean kitchen towel, place on a plate, and set a heavy weight on top. Press for 20 minutes. This step cannot be skipped — the moisture removed during pressing is what allows the ricotta to be firm and spreadable rather than wet and loose.
  2. Make the marinara — Stage 1. Heat the olive oil in a large saucepan over medium heat. Add the diced onion and cook for 8–10 minutes until soft and slightly golden. Add the garlic and cook for 1 minute until fragrant. Add the tomato paste and stir for 2 minutes until it darkens slightly. Add the crushed tomatoes and hand-crushed whole peeled tomatoes, dried oregano, dried basil, sugar, salt, pepper, and chilli flakes if using. Stir well, bring to a gentle simmer, and cook uncovered over medium-low heat for 25–30 minutes, stirring occasionally, until the sauce is thick, reduced, and mounds on a spoon. Remove from the heat, stir in the fresh basil, taste and adjust seasoning. Set aside.
  3. Wilt and squeeze the spinach — Stage 2. Heat 1 tablespoon of olive oil in a wide skillet over high heat. Add the garlic and stir for 20 seconds. Add all the spinach and toss constantly for 60–90 seconds until fully wilted. Remove from heat, season with salt. Transfer to a clean kitchen towel, wrap tightly, and squeeze firmly over the sink until no more liquid runs out. Open the towel: the spinach should be a compact, nearly dry ball. Roughly chop and set aside.
  4. Make the vegan ricotta. Crumble the pressed tofu into a large bowl. Add the nutritional yeast, lemon juice, minced garlic, salt, pepper, onion powder, olive oil, and fresh basil. Using a fork, mash and mix everything together until the mixture resembles a slightly chunky ricotta — not completely smooth, with small irregular pieces remaining (a few pulses in a food processor works well too, if a smoother texture is preferred; do not over-process to a paste). Fold the squeezed, chopped spinach into the ricotta mixture until evenly distributed. Taste and adjust salt and lemon.
  5. Make the cashew béchamel — Stage 3. Drain the soaked cashews. Combine in a high-speed blender with the oat milk, nutritional yeast, garlic, salt, nutmeg, pepper, and lemon juice. Blend on high for 60–90 seconds until completely smooth. The béchamel should be thick enough to coat the back of a spoon heavily and flow slowly when poured — if it seems very thin, add 2 tablespoons more cashews and blend again; if very thick, add a splash of plant milk. Do not cook this béchamel — the blended version is used raw; it will thicken and set during baking.
  6. Assemble. Preheat the oven to 190°C (375°F). Spread a thin layer of marinara sauce across the base of the baking dish — just enough to prevent the first pasta layer from sticking. Lay 3–4 lasagna sheets over the sauce in a single layer (overlap slightly if needed to cover the base). Spread one-third of the ricotta-spinach mixture evenly over the pasta sheets. Spoon one-third of the remaining marinara over the ricotta layer and spread gently. Add another layer of pasta sheets. Repeat: ricotta, marinara, pasta. Repeat once more for a third time, ending with a final layer of pasta sheets on top. Pour all of the cashew béchamel evenly over the top pasta layer. Scatter the grated vegan mozzarella over the béchamel if using.
  7. Bake. Cover the baking dish tightly with foil (tent the foil slightly so it does not touch the béchamel surface — contact between foil and a dairy-free béchamel can cause the surface to tear when the foil is removed). Bake at 190°C for 35 minutes. Remove the foil and bake uncovered for a further 15–20 minutes until the top is golden-brown and bubbling at the edges, and the pasta can be pierced easily with a thin knife through the center of the lasagna (resistance means the pasta needs more time; no resistance means it is done).
  8. Rest and serve. Remove from the oven and leave to rest for 15 minutes before slicing — this resting time is essential for a clean slice; a lasagna cut immediately from the oven is still liquid at the center and will collapse into a heap. After 15 minutes, the layers will have settled and set enough to hold their shape when portioned. Use a sharp spatula to lift clean portions. Finish with torn fresh basil and a drizzle of olive oil.

Pro Tips

  • The 25–30-minute sauce reduction is the most important step in the recipe for structural integrity — a well-reduced, thick marinara is what gives the lasagna its body and prevents a wet, soupy bottom layer. Test the sauce by drawing a spoon through it; the parted sauce should hold its edges briefly rather than immediately flowing back together. If in doubt, cook for 5 more minutes — an over-reduced sauce that becomes too thick can always be loosened with a splash of water; a too-thin sauce that makes the lasagna wet cannot be fixed after assembly.
  • Use no-boil lasagna sheets — they are not just a convenience shortcut; they produce a better result in a layered lasagna than pre-boiled sheets because they absorb moisture from the surrounding sauces as they cook, pulling flavor from the sauce into the pasta itself. Pre-boiled sheets, which are already hydrated before entering the oven, cannot absorb sauce in the same way and sit as a more neutral layer. The no-boil technique requires the layer-moisture-balance method above to be followed correctly — without sufficient moisture from the surrounding layers, no-boil sheets will be undercooked and tough.
  • The 15-minute rest is non-negotiable — every minute of resting time produces a noticeably cleaner slice. A lasagna rested for only 5 minutes will still be liquid at the center; at 10 minutes the edges hold but the center slides; at 15 minutes the whole lasagna is stable and sliceable. For an even cleaner slice (particularly useful for a dinner party), allow to rest for 20–25 minutes — the lasagna remains perfectly warm throughout.
  • Make the béchamel last — the cashew béchamel thickens as it sits at room temperature after blending. Make it as close to assembly as possible. If made too far in advance and it has thickened to an unspreadable consistency, blend briefly with a splash of plant milk to return it to the correct pouring consistency.

Lasagna’s Italian Heritage: Layers, Regions, and a Dish That Predates Italy Itself

Lasagna is one of the oldest named dishes in the European culinary record — the word appears in a 14th-century Italian cookbook (the Liber de Coquina, believed to have been written at the Angevin court in Naples) in a form recognizably related to the dish we know today, making it among the first pasta dishes in any written European source. The name itself is older still: the Latin “lasanum” referred to a cooking pot, and the Greek “lasanon” to a chamber pot — both referring to the vessel rather than the food it cooked, in the same way that “casserole” describes both the dish and the vessel in modern English. The modern layered lasagna as we know it — flat pasta sheets alternating with sauce and filling, baked in a deep pan — was codified as a regional dish of Emilia-Romagna in northern Italy, specifically the city of Bologna, where the canonical recipe (lasagne verdi al forno, made with green spinach-infused pasta, a slow-cooked Bolognese meat ragù, and a béchamel sauce made with butter and whole milk) has been officially registered with the Bologna Chamber of Commerce since 1982, a depositing of a recipe with a civic institution that reflects the fierce regional pride Italians attach to their traditional dishes. Southern Italian and Neapolitan lasagna traditions are entirely different — richer, often made with ricotta rather than béchamel, sometimes incorporating hard-boiled eggs, meatballs, and layers of salumi, and associated particularly with festive occasions such as Carnevale and Easter rather than everyday cooking. The ricotta-and-spinach combination in this recipe draws from the southern Italian tradition rather than the Bolognese one, and its vegan adaptation — substituting tofu for dairy ricotta and a cashew cream for the béchamel — follows the same structural logic of the original while replacing only the dairy components that make the traditional version non-vegan.


Flavor Variations

  • Roasted Vegetable Lasagna: Add a layer of roasted vegetables between the ricotta and marinara layers — thinly sliced zucchini, bell peppers, and eggplant roasted at 220°C for 20 minutes until caramelized work beautifully. The roasted vegetables add textural variety, additional flavor depth from the caramelization, and make the lasagna even more substantial. Roast the vegetables in advance (the day before, if desired) and layer them cold — they will heat through during baking.
  • Lentil Bolognese Lasagna: Replace the plain marinara with a lentil Bolognese — add 1 × 400g tin of drained green lentils and 200g (7oz) of finely diced cremini mushrooms to the marinara sauce during the final 10 minutes of cooking. The lentils and mushrooms add a meaty, substantial texture and a significantly deeper umami flavor. Use this with the ricotta layer as directed, or omit the ricotta entirely for a simpler two-component lasagna.
  • White Lasagna (No Tomato): Replace the marinara entirely with an extra batch of cashew béchamel, seasoned more assertively with garlic, white wine (add 60ml of dry white wine to the blender), and lemon. Layer as directed but using only béchamel between the pasta layers rather than alternating béchamel and marinara. Add the spinach-ricotta layer as directed. The all-white lasagna (lasagna bianca) is a dramatically different dish — richer, creamier, more delicate in flavor — and shows how completely the same structural approach produces a different result depending on the sauce.

Nutritional Highlights (Per Serving — Based on 8 Servings)

CaloriesProteinCarbsFiberFat
~390 kcal18g45g6g14g

Storage

  • Refrigerator: Keeps extremely well in a covered baking dish or sealed container for up to 5 days. Lasagna is one of the definitive make-ahead dishes — the flavors meld significantly overnight and the layers set more firmly, producing a cleaner, more cohesive slice on the second and third days than on the day of baking. Reheat individual portions in the microwave for 2–3 minutes, or reheat the whole dish covered with foil in a 180°C (355°F) oven for 25–30 minutes.
  • Freezer: Freezes exceptionally well for up to 3 months. Freeze the unbaked assembled lasagna (before it goes into the oven) for the best results — assembled but unbaked lasagna freezes and reheats more evenly than baked-and-frozen lasagna, and produces a fresher-tasting result. To bake from frozen: add 20–25 minutes to the covered baking time and check doneness with a knife through the center. Alternatively, freeze baked lasagna in individual portions — an excellent meal prep strategy.
  • Meal prep: Assemble the entire lasagna up to 24 hours in advance, cover tightly, and refrigerate before baking. This makes the lasagna an excellent dinner-party dish — all the work is done the day before, and the lasagna goes into the oven 90 minutes before serving. Add 10 extra minutes to the covered baking time to account for the cold starting temperature.
  • The next day: Leftover lasagna slices, reheated in a skillet with a small splash of water and a lid on, achieve a particularly good result — the underside re-crisps against the pan while the interior heats through, producing a texturally superior result to microwave reheating.

Frequently Asked Questions

My lasagna came out watery with liquid pooling at the bottom. What went wrong?

A watery lasagna is almost always caused by one or more of three things: the marinara was not reduced enough before assembly (the most common cause); the spinach was not squeezed sufficiently dry before adding to the ricotta; or the tofu was not pressed before making the ricotta. For the next bake, focus on Stage 1 (sauce thickness) and Stage 2 (spinach squeeze) of the technique — these two steps together account for approximately 80% of the moisture management in the recipe.

Can I use store-bought vegan ricotta instead of making it from tofu?

Yes — store-bought vegan ricotta (several good brands are widely available) can replace the tofu ricotta entirely. Season it with a small amount of additional lemon juice, nutritional yeast, and salt to taste, as commercial vegan ricotta is often under-seasoned. Fold the squeezed spinach in as directed. The texture will be slightly different from the tofu version depending on the brand, but the overall result is very good and significantly faster.

The pasta sheets are still tough in the center after the recommended baking time. What should I do?

Tough pasta after the full baking time means either the no-boil sheets were not adequately surrounded by moisture (the sauces were too thick at assembly and could not hydrate the sheets during baking), or the sheets were stacked too thickly in places, creating a section that the oven heat and moisture could not penetrate. Re-cover with foil, add 2–3 tablespoons of water or vegetable stock around the edges of the dish, and return to a 190°C oven for 10–15 more minutes.

Can I make this gluten-free?

Yes — use certified gluten-free lasagna sheets (widely available in most supermarkets) in place of standard sheets. The rest of the recipe is naturally gluten-free. Gluten-free lasagna sheets may behave slightly differently in terms of moisture absorption — check doneness at 45 minutes of covered baking and extend if the sheets are still firm.


Tried this recipe? Leave a comment below and let us know how it turned out! Tag us on Instagram and Facebook — we love seeing your plant-powered creations. Looking for more addictive vegan snack and appetizer recipes? Browse all recipes on Easy Vegan Recipes — new recipes posted every single week!

Vegan Spinach Basil Tomato Pasta — The Bright, Garlicky Weeknight Dinner That Tastes Like Summer

vegan spinach basil tomato pasta

Some of the best pasta dishes are also the simplest — the ones where a small number of excellent ingredients, treated correctly, produce a result that is so much more than the sum of its parts that it seems almost implausible. Vegan Spinach Basil Tomato Pasta is exactly this kind of dish. It is made from ingredients that most kitchens keep on hand at all times — pasta, tinned tomatoes, fresh spinach, garlic, basil, olive oil — but the method transforms them into a sauce that is bright, intensely flavored, glossy, and deeply satisfying: a sauce with real tomato acidity and sweetness, the gentle bitterness of wilted spinach, the perfume of fresh basil stirred through at the last moment off the heat, and a depth from the garlic that comes not from long cooking but from an initial bloom in good olive oil that develops the garlic’s sweetness while preserving its pungency. It is ready in 25 minutes from start to finish. It is naturally vegan, naturally dairy-free, and naturally egg-free — there is no substitution happening here, no dairy being replaced by something vegan; the dish is simply made from plants in the way it has always been made in the parts of Italy where tomatoes, spinach, and basil grow side by side from April through September. The pasta water starch is incorporated deliberately into the sauce, not discarded, and this single technique step is what gives the sauce its body, its glossiness, and its ability to cling to the pasta rather than sitting as a separate pool at the base of the bowl. The technique is what separates a genuinely good pasta al pomodoro from a tin of tomatoes poured over boiled pasta.

The technique is the pasta-water emulsification method. The fundamental quality difference between a restaurant-quality tomato sauce and a home version that looks and tastes noticeably thinner is almost always pasta water. Pasta cooking water is not plain water — after 8–10 minutes of cooking, it contains a high concentration of dissolved starch from the pasta surface, transforming it from a neutral liquid into a light, starchy liquid that acts as an emulsifier and thickener when incorporated into a sauce. The pasta-water emulsification method uses this starch-enriched water in two specific stages. Stage one — intentionally starchy water: at the start of cooking, the pasta water is seasoned generously with salt (pasta water should taste like mild sea water — approximately 1 tablespoon of fine salt per 4 litres of water) and the pasta is cooked in the minimum amount of water that allows the pasta to move freely, rather than in a large pot of water; the smaller volume of water becomes proportionally more starch-concentrated during cooking. Stage two — sauce finish with pasta water and reserved pasta: the pasta is pulled from the water 1 minute before its package-directed al dente time (it will finish cooking in the sauce), transferred directly into the tomato sauce using tongs or a spider strainer (not drained through a colander, which discards all the pasta water and removes the pasta’s surface starch), and 80–100ml of the reserved pasta cooking water is added to the sauce immediately. The pan is then tossed vigorously over medium-high heat for 60–90 seconds — this agitation emulsifies the starch, olive oil, and tomato liquid into a cohesive, glossy sauce that coats every strand of pasta. The spinach is wilted directly in the sauce during this final toss, the basil is added off the heat, and the result is a pasta whose sauce has body, shine, and grip rather than the flat, watery quality of a sauce assembled without this step.

This recipe serves 4.


Recipe Information

Prep TimeCook TimeTotal TimeServingsCalories
5 mins20 mins25 mins4~420 kcal

Ingredients

For the Pasta and Sauce

  • 400g (14oz) dried pasta — spaghetti, linguine, or rigatoni work best; long pasta (spaghetti, linguine) benefits most from the tossing technique as the strands distribute the sauce evenly; short pasta with ridges (rigatoni, penne rigate) traps sauce in its tubes and grooves; smooth penne is the least effective shape for a cling-style sauce
  • 1 tbsp fine salt — for the pasta water; this amount is correct and not excessive; properly salted pasta water is the single most impactful seasoning step in the recipe
  • 2 × 400g (14oz) tins of whole peeled tomatoes or crushed tomatoes — whole peeled tomatoes crushed by hand during cooking produce a slightly more textured, less uniform sauce; crushed tomatoes produce a smoother result; both are excellent and the choice is personal
  • 5 tbsp good extra-virgin olive oil — divided; 3 tablespoons for cooking, 2 tablespoons stirred through at the end off the heat; the finishing olive oil is important and should be a good-quality, flavorful oil, as it is uncooked and its character comes through clearly
  • 6 cloves garlic, thinly sliced — sliced rather than minced; thin slices cook more gently than finely minced garlic, develop a slightly sweeter, more mellow flavor, and remain visible in the finished sauce as tender, translucent slivers
  • ½ tsp chilli flakes (optional — use peperoncino if available; standard dried chilli flakes work perfectly)
  • 1 tsp sugar — balances the acidity of the tinned tomatoes; taste the sauce after 10 minutes of simmering and add a second teaspoon if the tomatoes taste particularly acidic
  • 1 tsp fine salt — for the sauce; add gradually and taste as you go
  • ½ tsp black pepper

For the Spinach and Basil

  • 150g (5oz) fresh baby spinach — added directly to the sauce in the final toss; baby spinach wilts in 30–60 seconds in a hot sauce and requires no pre-cooking
  • A large bunch of fresh basil (approximately 25–30 leaves) — torn, not cut; a knife bruises basil and causes the cut edges to blacken; torn basil retains its aroma and color; added entirely off the heat — basil added to a hot pan loses its aromatic brightness almost immediately
  • 2 tbsp finishing extra-virgin olive oil (from the 5 tbsp measured above)

Optional Finishing

  • Vegan Parmesan (nutritional yeast, cashew parmesan, or a commercial vegan Parmesan), to serve
  • Toasted pine nuts, scattered over the finished pasta
  • A squeeze of fresh lemon juice — a small squeeze (¼ lemon) stirred through the finished pasta brightens the entire dish; highly recommended

Instructions

  1. Start the pasta water. Fill a large saucepan with water and bring to a boil over high heat. Add 1 tablespoon of fine salt once boiling. Use a slightly smaller pot than you might normally use for pasta — the more concentrated starch water is intentional.
  2. Make the garlic oil base. While the water comes to a boil, heat 3 tablespoons of the olive oil in a large, wide saucepan or deep skillet over medium-low heat. Add the sliced garlic and chilli flakes if using. Cook gently for 3–4 minutes, stirring occasionally, until the garlic is softened, fragrant, and just barely golden at the edges — the goal is slow, gentle cooking that develops sweetness, not quick browning that develops bitterness. The oil should be gently bubbling around the garlic, not spitting.
  3. Add the tomatoes. Add the tinned tomatoes to the garlic oil. If using whole peeled tomatoes, crush each one in your hand over the pan as you add it (or use a fork to break them up once they are all in the pan). Season with the sugar, 1 teaspoon of salt, and black pepper. Stir well, increase heat to medium, and bring to a gentle simmer. Cook uncovered for 12–15 minutes, stirring occasionally, until the sauce has reduced slightly and deepened in color. Taste and adjust salt and sugar.
  4. Cook the pasta. Add the pasta to the boiling salted water and cook for 2 minutes less than the package’s al dente direction. Before draining, reserve 200ml (¾ cup) of the pasta cooking water in a heatproof jug or mug — this is more than you will need, but having extra is better than not having enough.
  5. Finish the sauce with pasta water emulsification — Stage 1 and 2. Using tongs or a spider strainer, transfer the pasta directly from the cooking water into the tomato sauce — do not drain through a colander. Add 80ml of the reserved pasta water to the sauce immediately. Increase the heat to medium-high. Toss the pasta vigorously in the sauce for 60–90 seconds — lift and fold repeatedly so every strand is coated and the sauce visibly thickens and becomes glossy. If the sauce looks too thick at any point, add a splash more pasta water and toss again. The pasta will finish cooking in this stage.
  6. Add the spinach. Add the baby spinach to the pan in large handfuls, tossing as you add it. The spinach will wilt and reduce dramatically in 30–60 seconds of tossing in the hot sauce. Continue tossing until all the spinach is just wilted and evenly distributed.
  7. Finish and serve. Remove from the heat. Add the remaining 2 tablespoons of finishing olive oil, the torn basil leaves, and a squeeze of lemon juice if using. Toss once more off the heat — the basil will release its aroma into the warm pasta without cooking. Taste and add a final pinch of salt if needed. Divide between four bowls. Finish with vegan Parmesan and toasted pine nuts if desired. Serve immediately — pasta is best eaten the moment it is ready.

Pro Tips

  • Never discard the pasta water before you have transferred the pasta to the sauce — this is the single most common pasta-cooking mistake at home, and it is irreversible. Keep the pasta water in the pot until the pasta is safely transferred. A ladle or heatproof jug next to the hob is the simplest system: scoop out 200ml of pasta water before you even think about removing the pasta from the pot.
  • The pasta finishes cooking in the sauce — this is intentional, not undercooking. Pasta pulled 2 minutes early from the boiling water and tossed for 60–90 seconds in a hot sauce arrives at al dente exactly. Pasta cooked to al dente in the water and then tossed in a hot sauce becomes overcooked. Trust the timing.
  • Use the best olive oil you can afford for the finishing drizzle — finishing olive oil is uncooked and its flavor comes through directly and completely. A peppery, grassy, high-quality extra-virgin olive oil elevates the finished dish dramatically. The cooking olive oil (used for the garlic base) can be a less expensive variety since cooking diminishes its character; the finishing oil should be the good bottle.
  • Basil blackens on contact with a knife blade — use your hands to tear it into rough pieces of roughly the same size. Torn basil stays green and aromatic for much longer than cut basil, and the irregular torn edges are visually more appealing in the finished bowl than uniform knife-cut pieces.

The Tomato’s Unlikely Journey to the Center of Italian Cuisine

The idea that Italian cooking is inseparable from the tomato is so deeply embedded in global culinary culture that it comes as a genuine surprise to most people to learn that tomatoes arrived in Italy less than 500 years ago, and that for at least a century after their arrival they were regarded with deep suspicion rather than culinary enthusiasm. Tomatoes are native to western South America — the wild ancestor of the cultivated tomato (Solanum pimpinellifolium) originated in the Andes, and the first cultivated tomatoes were developed by pre-Columbian civilizations in Mexico and Central America, possibly as early as 500 BCE. Spanish conquistadors carried tomato seeds back to Europe from Mexico in the early 16th century, and the plant reached Italy — where the warm Mediterranean climate suited it perfectly — by approximately 1548, when the first documented Italian mention of tomatoes appears in a letter noting that “some large golden apples” had been grown in the garden of Cosimo de’ Medici’s Tuscan estate. The name “pomodoro” (golden apple) — rather than the Spanish “tomate” — suggests that the earliest Italian tomatoes were yellow-fleshed varieties rather than the red ones that would dominate later. Despite growing well in the Italian climate, tomatoes were initially treated as ornamental curiosities rather than food: they are members of the Solanaceae family, which includes deadly nightshade and mandrake, and European botanists categorized them as potentially poisonous (the leaves and stems of tomato plants are indeed mildly toxic, containing solanine). The first Italian recipe using tomatoes as a culinary ingredient dates to a 1692 Neapolitan cookbook, and even then tomatoes remained primarily a southern Italian ingredient for another century. The mass adoption of tomatoes in Italian cooking — the development of the ragù, the pizza marinara, the simple pasta al pomodoro — happened during the late 18th and 19th centuries, and was driven as much by the tomato’s productivity, cheapness, and versatility as by any particular culinary insight. The dish that seems most quintessentially Italian — pasta tossed in a bright, fresh tomato sauce with olive oil and basil — is, historically, barely two centuries old.


Flavor Variations

  • Puttanesca Style: Add 60g (¼ cup) of pitted kalamata olives (roughly chopped), 2 tablespoons of capers (rinsed), and an additional ½ teaspoon of chilli flakes to the tomato sauce along with the tinned tomatoes. Omit the basil and finish with fresh flat-leaf parsley instead. Puttanesca is a sauce of contrasts — briny, spicy, sweet, and deeply savory — and the spinach folds in beautifully, its mildness balancing the assertive flavors of the olives and capers.
  • Creamy Tomato and Spinach: After the pasta-water toss, stir in 3 tablespoons of full-fat coconut cream or cashew cream (cashews blended with water to a thick cream) and toss until the cream is fully incorporated into the sauce. The result is a blush-pink, silky, slightly richer sauce that softens the tomato’s acidity and produces a dish closer in character to a vegan pasta rosa or a vodka sauce (without the vodka). Finish with basil as directed.
  • White Bean and Tomato Pasta: Add 1 × 400g tin of drained cannellini beans or butter beans to the tomato sauce along with the tinned tomatoes and cook for the full 15 minutes. The beans break down slightly at the edges during cooking and thicken the sauce naturally while adding protein and a creamy, starchy texture. This variation is substantially more filling than the base recipe and makes an excellent complete meal. Finish with a drizzle of chilli oil in addition to the finishing olive oil.

Nutritional Highlights (Per Serving — Based on 4 Servings)

CaloriesProteinCarbsFiberFat
~420 kcal13g65g6g13g

Storage

  • Refrigerator: Store leftover pasta in a sealed container for up to 3 days. The pasta will absorb the remaining sauce during storage and may look dry when reheated. To reheat: place in a saucepan with a splash of water over medium heat, tossing as it heats, until the sauce loosens and the pasta is warmed through. Do not microwave if possible — it heats unevenly and tends to make the pasta gummy; stovetop reheating with a splash of water is consistently better.
  • The sauce (separate from the pasta): The tomato sauce freezes beautifully for up to 3 months. If you want to meal-prep this dish, cook the sauce in advance and freeze it; cook the pasta fresh when serving and finish with pasta water emulsification using fresh pasta water each time. A frozen sauce portion thawed and finished with fresh pasta water produces a result indistinguishable from freshly made.
  • Not ideal for advance assembly: unlike a baked pasta, this dish is best assembled at the moment of serving — the pasta-water emulsification technique that gives the sauce its glossiness and body works optimally when the pasta, hot pasta water, and sauce are all hot simultaneously. A pasta assembled in advance and reheated will be good but will not have the same glossy, cohesive sauce of a freshly made batch.
  • Leftover tip: cold leftover pasta, eaten directly from the container, is a genuine pleasure and an Italian domestic tradition — many people find it more satisfying than the reheated version, as the sauce has fully absorbed into the pasta overnight.

Frequently Asked Questions

The sauce tastes acidic. How do I fix it?

Tinned tomatoes vary significantly in acidity depending on brand, variety, and harvest season. The two tools for correcting acidity are sugar and salt — add ½ teaspoon of sugar and a pinch of salt, stir, and taste again after 2 minutes of simmering; repeat if needed. A longer cooking time also mellows acidity — 5 more minutes of gentle simmering will noticeably reduce the sharp edge. A small knob of vegan butter stirred through at the end (the “mantecatura” technique) also rounds acidity and adds gloss, and is fully vegan with plant-based block butter.

Can I use fresh tomatoes instead of tinned?

Yes — ripe, in-season fresh tomatoes produce a brighter, lighter sauce than tinned, while out-of-season fresh tomatoes produce a flat, disappointing sauce that tinned tomatoes will always surpass. Use approximately 800g (1¾ lb) of ripe tomatoes, roughly chopped. Add them to the garlic oil and cook for 20–25 minutes, slightly longer than the tinned version, until they have broken down and reduced to a thick sauce. Pass through a fine mesh sieve if you want a smooth sauce, or leave with the skins and seeds for a more rustic result.

My pasta is sticking together after I transferred it to the sauce. How do I prevent this?

Pasta sticks together when it sits in its own heat without moisture after being removed from the cooking water. The solution is to move quickly — transfer the pasta to the sauce within 30 seconds of pulling it from the water, and add the pasta water immediately. If pasta has already stuck, the pasta water added to the hot pan will loosen it within 30 seconds of vigorous tossing. Do not add oil to the pasta after draining to prevent sticking — oil coats the pasta surface and prevents the sauce from adhering, directly undermining the emulsification technique.

How do I make this gluten-free?

Use certified gluten-free pasta in place of standard pasta. The pasta-water emulsification technique works identically with gluten-free pasta — gluten-free pasta releases similar amounts of starch into the cooking water, sometimes more, which can actually produce a particularly glossy sauce. Note that gluten-free pasta tends to become gummy more quickly than wheat pasta after cooking, so the timing of pulling it 2 minutes before al dente and finishing in the sauce is even more important for gluten-free varieties.


Tried this recipe? Leave a comment below and let us know how it turned out! Tag us on Instagram and Facebook — we love seeing your plant-powered creations. Looking for more addictive vegan snack and appetizer recipes? Browse all recipes on Easy Vegan Recipes — new recipes posted every single week!

Zucchini Fries — The Crispy, Golden, Oven-Baked Side That Disappears Before It Reaches the Table

zucchini fries

There is a particular challenge in making a vegetable behave like a fry — producing the golden, crispy exterior and tender interior that makes a fry so satisfying — when that vegetable is zucchini, which is approximately 95% water and actively resists the kind of surface drying that crispiness requires. When it works, zucchini fries are extraordinary: long, slender sticks of zucchini encased in a shatteringly crisp, golden breadcrumb crust, yielding to a tender, barely-cooked interior that still has a slight bite, seasoned with garlic, herbs, and a hit of nutritional yeast that gives the crust a savory, faintly cheesy depth without any dairy. When it doesn’t work — when the zucchini releases its water into the breadcrumb coating during baking — the result is a soggy, pale, dispiriting vegetable stick that collapses when lifted. Zucchini Fries made with the correct technique land firmly in the first category, every time. The coating is a three-stage process — flour dredge, aquafaba wash, panko breadcrumb press — that builds a crust thick enough to stay crispy even as the zucchini beneath it softens. The seasoning is generous: garlic powder, smoked paprika, dried Italian herbs, nutritional yeast, and salt, all worked into the breadcrumb layer where they perfume the crust from the inside during baking. They are baked at high heat on a wire rack set over a baking tray, which allows hot air to circulate beneath each stick and crisp the underside simultaneously with the top — the single most important equipment choice for oven-baked fries of any kind. They are served with a vegan dipping sauce — a smoky, garlicky aioli made from aquafaba mayonnaise — that is ready in 5 minutes and essential. They are 100% vegan, dairy-free, and egg-free. They serve 4. They are gone in minutes. The technique is the reason they are crispy rather than soggy.

The technique is the moisture-purge-and-rack-bake method. The two technical problems that produce soggy zucchini fries — excess surface moisture in the zucchini before coating, and trapped steam beneath the fries during baking — are solved sequentially in this method. Stage one — moisture purge: the zucchini sticks are cut, salted, and left to rest on a clean kitchen towel for 15 minutes. Salt draws water from the zucchini cells through osmosis; the drawn moisture wicks into the towel. After 15 minutes, the towel is pressed firmly over the sticks to remove all remaining surface moisture. The purged zucchini is drier at the moment of coating than unprocessed zucchini, which means the flour dredge adheres more cleanly (wet surfaces cause the flour to clump and create an uneven, patchy coating base rather than a uniform one), and critically, the cells have already partially released their free moisture before the oven heat triggers a second moisture release — reducing the total moisture available to steam and soften the coating during baking. Stage two — rack bake: the coated zucchini sticks are placed on a wire rack set over a rimmed baking tray rather than directly on a tray lined with parchment. Direct contact between the coated fry and the tray surface creates a barrier that traps steam released from the zucchini during baking; without an escape route, this steam condenses against the coating from below, softening it from the inside. On a rack, the released steam falls through the wire mesh and away from the fry’s surface, and the hot circulating oven air reaches all sides of the fry simultaneously, drying the coating uniformly. The combination of a moisture-purged zucchini interior and a rack-baked exterior produces the kind of crispiness in an oven-baked fry that is otherwise only achievable through deep frying.

This recipe serves 4.


Recipe Information

Prep TimeCook TimeTotal TimeServingsCalories
20 mins (inc. salt rest)22 mins42 mins4~210 kcal

Ingredients

For the Zucchini Fries

  • 3 medium zucchini (courgettes), approximately 600g (21oz) total — cut into sticks approximately 1cm × 1cm × 8–10cm (roughly the dimensions of a thick-cut chip/fry); uniform size is important for even baking; too thin and the sticks will dry out and become hard rather than crispy-with-a-tender-interior; too thick and the coating will brown before the interior is cooked through
  • ½ tsp fine salt — for the moisture purge stage

For the Three-Stage Coating

  • Stage 1 — Flour dredge: 60g (½ cup) all-purpose flour (plain flour); the flour creates the dry base that the aquafaba wash adheres to, which the breadcrumbs then grip; without the flour dredge, the aquafaba wash runs off the zucchini surface and the breadcrumbs do not adhere evenly
  • Stage 2 — Aquafaba wash: 6 tbsp aquafaba (the liquid from a tin of chickpeas — drain a 400g / 14oz tin and reserve the liquid; save the chickpeas for another use); aquafaba replaces egg wash precisely: its proteins and starches cause it to become sticky when applied to a flour-dredged surface, creating the binding layer that locks the breadcrumbs in place; season with a pinch of salt
  • Stage 3 — Seasoned panko breadcrumbs: 100g (1½ cups) panko breadcrumbs (Japanese-style breadcrumbs that are coarser, flakier, and lighter in texture than regular breadcrumbs — they produce a dramatically crispier coating and are worth seeking out; most large supermarkets stock them); 2 tbsp nutritional yeast; 1 tsp garlic powder; 1 tsp smoked paprika; 1 tsp dried Italian herbs (or a mixture of dried oregano and dried basil); ½ tsp fine salt; ½ tsp black pepper; all mixed together thoroughly before coating

For the Vegan Smoky Aioli

  • 4 tbsp vegan mayonnaise (store-bought, or homemade aquafaba mayo)
  • 1 clove garlic, finely grated or pressed
  • ½ tsp smoked paprika
  • 1 tsp lemon juice
  • A pinch of salt
  • Mix together and refrigerate until serving

Equipment

  • Wire rack (a cooling rack works perfectly) set inside a rimmed baking tray — this is not optional; baking directly on a tray produces soggy undersides

Instructions

  1. Moisture purge — Stage 1. Cut the zucchini into sticks approximately 1cm × 1cm × 8–10cm. Lay on a clean kitchen towel in a single layer. Sprinkle the fine salt evenly over all the sticks. Leave to rest for 15 minutes. After 15 minutes, fold the towel over the sticks and press firmly to absorb all surface moisture. The towel will be noticeably damp. The zucchini sticks should feel dry to the touch. Pat any remaining surface moisture with a second dry towel if needed. Set aside.
  2. Set up the coating stations. Preheat the oven to 220°C (425°F) with the fan/convection setting if available — fan assists even heat circulation and accelerates surface crisping. Set up three shallow bowls in a row: Bowl 1 — the flour; Bowl 2 — the aquafaba with a pinch of salt, briefly whisked; Bowl 3 — the panko breadcrumb mixture, thoroughly combined. Set the wire rack inside the rimmed baking tray and spray or brush lightly with neutral oil.
  3. Coat the zucchini sticks — three-stage process. Working with one stick at a time: drop into Bowl 1 (flour) and toss to coat completely, shaking off any excess; transfer to Bowl 2 (aquafaba wash) and turn to coat evenly, allowing any excess to drip off; transfer to Bowl 3 (seasoned panko) and press the breadcrumbs firmly onto all sides of the stick — pressing rather than simply rolling is the key step, as pressed breadcrumbs grip the aquafaba layer and adhere through baking whereas lightly applied breadcrumbs fall off. Place on the prepared wire rack. Repeat with all remaining sticks.
  4. Rack bake — Stage 2. Bake at 220°C for 18–22 minutes until the coating is deep golden, crispy all over, and the zucchini beneath is tender when pierced with a thin knife or skewer. Do not turn the fries during baking — the rack allows all-round heat circulation and turning risks disturbing the crust; if your oven has uneven heat, rotate the tray (not the individual fries) at the 12-minute mark.
  5. Make the aioli. While the fries bake, combine the vegan mayonnaise, grated garlic, smoked paprika, lemon juice, and salt in a small bowl. Stir until smooth. Taste and adjust seasoning — the aioli should taste assertively garlicky and smoky to stand up to the boldly seasoned fries. Refrigerate until serving.
  6. Serve immediately. Transfer the baked zucchini fries to a serving plate or board. Serve immediately with the smoky aioli alongside — like all oven-baked fries, these are at their crispiest within the first 5 minutes of leaving the oven and soften gradually as they cool.

Pro Tips

  • The moisture purge is the make-or-break step — do not abbreviate it below 15 minutes, and do press the towel firmly rather than just patting gently. The difference between a 15-minute, firmly-pressed purge and no purge at all is the difference between crispy and soggy. If you have time, the purge can be extended to 30 minutes for even better results.
  • Press the breadcrumbs — really press them. The most common reason oven-baked breadcrumb coatings fall off during baking is insufficient pressure at the coating stage. Pick up each stick after pressing in the panko and squeeze gently but firmly so the crumbs are compressed into the aquafaba layer. The coating should feel solid and dense on the surface, not loose and flaky.
  • The wire rack is the most important equipment upgrade for oven-baked fries of any kind — zucchini, sweet potato, regular potato. If you do not own a wire rack that fits inside a baking tray, any oven-safe rack placed in a tray works. In the absence of any rack, elevate the fries slightly by placing them over two parallel skewers laid across the tray edges — imperfect but better than tray-direct.
  • Serve within 5 minutes of baking — these fries, like all oven-baked breadcrumb-coated vegetables, are at their crispiest immediately from the oven. Do not hold in a warm oven for extended periods, as the steam from the cooling zucchini softens the coating from within. Have the aioli ready before the fries go in.

Zucchini’s Rapid Rise: A Vegetable That Conquered Western Kitchens in Less Than a Century

Zucchini (known as courgette in British English, from the French diminutive of “courge” meaning gourd) is a member of the Cucurbita pepo species — the same species as pumpkin, yellow squash, and acorn squash — and like all squashes is native to the Americas, domesticated in Mesoamerica approximately 8,000–10,000 years ago. What is remarkable about zucchini’s modern history, however, is not its ancient origin but its extraordinary recent proliferation: zucchini as it is recognized today — the dark green, cylindrical, thin-skinned summer squash harvested young and small — was developed by Italian farmers in the late 19th and early 20th centuries in the region around Milan in Lombardy, where centuries of selective cultivation of the Cucurbita pepo squash introduced to Europe via the Columbian Exchange had produced a distinct variety suited to Italian growing conditions and culinary preferences. The word “zucchini” is itself Italian — the plural diminutive of “zucca” (gourd), meaning “little gourds” — reflecting the Italian preference for harvesting the squash very young, before the flesh becomes watery and the seeds large. Zucchini’s adoption in British and American kitchens was startlingly recent: despite its European cultivation history, zucchini was virtually unknown as a food ingredient in Britain until the 1960s and 1970s, when Italian immigration, the Mediterranean diet movement, and the influence of food writers including Elizabeth David introduced Italian vegetable cookery to British home kitchens at scale. In the United States, zucchini followed a similar trajectory — present in Italian-American communities from the early 20th century but not widely adopted in mainstream American cooking until the 1970s, when its productivity as a garden vegetable (it produces prolifically and quickly, leading to the famous American summer problem of zucchini abundance) made it a staple of the home garden and, by extension, the home kitchen. From near-total obscurity in Anglo-American kitchens in 1950 to one of the most widely grown and cooked vegetables in the world by 2000 represents one of the fastest adoptions of any food ingredient in modern culinary history.


Flavor Variations

  • Parmesan-Style Herb Zucchini Fries: Add 3 tablespoons of finely ground cashew parmesan (cashews, nutritional yeast, garlic powder, and salt blended to a fine powder) to the panko breadcrumb mixture in place of the nutritional yeast, and increase the dried Italian herbs to 1½ teaspoons. The cashew parmesan adds a richer, more complex savory depth to the coating that closely approximates the flavor of a Parmesan-breaded fry. Serve with a marinara dipping sauce (warmed tomato sauce with garlic and basil) in place of the aioli.
  • Spicy Sriracha Zucchini Fries: Add ½ teaspoon of cayenne pepper and ½ teaspoon of chilli powder to the panko breadcrumb mixture. Add 1 teaspoon of sriracha sauce to the aquafaba wash and whisk to combine. The sriracha in the aquafaba wash seasons the binding layer directly and produces a fry with heat layered through the entire coating rather than just on the surface. Serve with a cooling dipping sauce — vegan yogurt with lime juice and coriander, or a simple vegan ranch.
  • Lemon Herb Zucchini Fries: Replace the smoked paprika in the panko mixture with 1 teaspoon of lemon zest (finely grated and mixed into the breadcrumbs) and increase the dried herbs to 1½ teaspoons. Finish the fries immediately from the oven with a squeeze of fresh lemon juice and a scatter of fresh flat-leaf parsley. The lemon-herb version is lighter and brighter in flavor than the smoky version — excellent alongside grilled vegetables, grain bowls, or a simple pasta.

Nutritional Highlights (Per Serving — Based on 4 Servings, Without Aioli)

CaloriesProteinCarbsFiberFat
~210 kcal7g38g3g3g

Storage

  • Best eaten fresh — oven-baked zucchini fries are at their best within 10 minutes of baking and soften progressively as they cool. Like all breadcrumb-coated oven fries, they do not hold well and are not a make-ahead dish; plan to serve immediately from the oven.
  • Leftovers: Store cooled leftovers in a sealed container in the refrigerator for up to 2 days. To re-crisp: place on a wire rack on a baking tray in a 200°C oven for 8–10 minutes, or in an air fryer at 200°C for 4–5 minutes. Do not microwave — microwaving produces a completely soggy coating that cannot be recovered.
  • Air fryer option: These fries cook beautifully in an air fryer — the circulating hot air of an air fryer is even more effective than a conventional oven at producing crisp coatings on breadcrumbed vegetables. Prepare as directed, place in a single layer in the air fryer basket (work in batches), and air fry at 200°C for 10–12 minutes until deeply golden. No rack is needed as the air fryer basket already provides all-round circulation.
  • The coating can be prepared in advance: mix the seasoned panko mixture and store in a sealed jar for up to 1 week; set up the coating stations fresh when ready to cook.

Frequently Asked Questions

My zucchini fries came out soggy. What went wrong?

Soggy fries are caused by one or more of three things: insufficient moisture purging before coating (the salt rest was too short or the towel press too gentle); baking on a flat tray rather than a wire rack (trapped steam softens the coating from below); or the oven temperature was too low (below 200°C the moisture released during baking evaporates too slowly). Check all three for the next batch — the rack and the temperature are the fastest corrections if the moisture purge was followed correctly.

Can I make these gluten-free?

Yes — substitute gluten-free plain flour for the all-purpose flour in the dredge, and use certified gluten-free panko breadcrumbs (widely available in most supermarkets). All other ingredients are naturally gluten-free. The result is indistinguishable from the wheat version in both texture and flavor.

The breadcrumbs are falling off during baking. How do I prevent this?

Falling breadcrumbs are caused by insufficient pressure when coating (the breadcrumbs were not pressed firmly into the aquafaba layer), or the aquafaba layer was too thin (too much was allowed to drip off before the panko stage). Press each stick firmly in the panko after rolling — the breadcrumbs should feel compressed and solid, not loose. If breadcrumbs continue to fall off, dip each coated stick briefly back into the aquafaba wash and re-press into the panko for a second coat.

Can I deep-fry these instead of baking?

Yes — deep frying produces an even crispier result in less time. Heat neutral oil to 180°C (350°F) in a deep saucepan (use a cooking thermometer). Fry the coated zucchini sticks in small batches (4–5 at a time) for 2–3 minutes until deeply golden. Drain on a wire rack rather than paper towels (paper towels trap steam; a rack allows steam to escape). The moisture purge is still recommended for deep-fried zucchini fries — it reduces oil splatter and produces a crisper result than unprocessed zucchini.


Tried this recipe? Leave a comment below and let us know how it turned out! Tag us on Instagram and Facebook — we love seeing your plant-powered creations. Looking for more addictive vegan snack and appetizer recipes? Browse all recipes on Easy Vegan Recipes — new recipes posted every single week!

Vegan Spinach And Lentil Soup

vegan spinach and lentil soup

There are soups you make because the weather turned cold and something warm is needed. And then there are soups like this Vegan Spinach and Lentil Soup — the kind that fills the kitchen with the most extraordinary aroma of toasted cumin and caramelized onion and garlic as it simmers, that pours into the bowl a deep, burnished amber-gold with vivid emerald spinach folded through it in a way that makes it look genuinely, beautifully alive, and that delivers with every single spoonful a warmth and nourishment so profound and so genuine that you feel it in your body as much as you taste it on your tongue. This is that soup. The one that has become a weekly ritual in households across the world. The one that is simultaneously the most effortless and the most deeply satisfying thing you will cook all week. The one that is so packed with plant-based protein, iron, fiber, and an almost overwhelming concentration of vitamins and minerals that eating it feels like a genuinely restorative act.

This is a soup of extraordinary simplicity and extraordinary depth — red lentils that cook down into a silky, naturally thickened base of remarkable richness and body, aromatic onion and garlic and ginger caramelized slowly into sweetness, a carefully chosen spice blend of cumin, turmeric, coriander, and smoked paprika that fills the soup with warmth and complexity without overwhelming the clean, earthy character of the lentils, bright lemon that lifts and sharpens everything in the bowl at the very last moment, and generous handfuls of fresh spinach stirred in at the end and wilted just enough to remain vivid and nutritionally intact while contributing their characteristic earthy mineral freshness to every spoonful.

What makes this soup so genuinely outstanding is how much it achieves from so little. Red lentils — one of the most affordable, most accessible, and most nutritionally impressive ingredients available anywhere in the world — dissolve partially during cooking to create a naturally thick, creamy, hearty soup base that requires no cream, no blending, and no thickening agents of any kind. The lentils do all the work themselves, releasing their natural starches into the broth and creating a consistency and body that feels deeply substantial and satisfying despite requiring nothing more than a pot, some water, and time.

This recipe is 100% vegan, naturally gluten-free, extraordinarily high in plant-based protein and iron, ready in just 35 minutes, made in a single pot, and absolutely spectacular served with warm crusty bread, a squeeze of fresh lemon, a swirl of good olive oil, and nothing else required because the soup itself is complete and magnificent exactly as it is.


Recipe Information

Prep TimeCook TimeTotal TimeServingsCalories
10 mins25 mins35 mins6~280 kcal

Ingredients

For the Soup

  • 2 cups (400g) red lentils, rinsed thoroughly until water runs clear
  • 6 cups (1.4 litres) good quality vegetable broth
  • 1 can (400g) crushed tomatoes
  • 5 cups (150g) fresh spinach, roughly chopped (or 250g frozen spinach, thawed and squeezed)
  • 1 large white or yellow onion, finely diced
  • 6 cloves garlic, minced
  • 1 tbsp fresh ginger, peeled and finely grated
  • 3 tbsp olive oil
  • Juice of 1 large lemon
  • 1 tsp salt, plus more to taste
  • Black pepper to taste

The Spice Blend

  • 2 tsp ground cumin
  • 1½ tsp turmeric
  • 1 tsp ground coriander
  • 1 tsp smoked paprika
  • ½ tsp chili powder or cayenne (adjust to heat preference)
  • ¼ tsp cinnamon
  • ¼ tsp black pepper

Optional Add-ins

  • 1 medium sweet potato, peeled and diced (adds beautiful sweetness)
  • 1 can (400g) chickpeas, drained (adds extra protein and texture)
  • 1 medium carrot, diced (adds sweetness and body)
  • 2 stalks celery, diced (adds depth)
  • 1 medium zucchini, diced
  • ¼ cup (15g) fresh cilantro, roughly chopped (stir in at end)
  • 1 tbsp tahini (swirl in at end for creaminess)

For the Crispy Spiced Oil Topping (Optional but Extraordinary)

  • 3 tbsp olive oil
  • 1 tsp cumin seeds
  • ½ tsp smoked paprika
  • ¼ tsp chili flakes
  • 2 cloves garlic, thinly sliced

To Serve

  • Warm crusty sourdough or flatbread
  • A generous squeeze of fresh lemon
  • Drizzle of best quality extra virgin olive oil
  • Fresh cilantro or parsley, roughly chopped
  • Chili flakes for heat and color
  • Vegan yogurt or coconut cream swirled on top
  • The crispy spiced oil drizzled over the surface

Instructions

  1. Rinse the lentils thoroughly. Place the red lentils in a fine mesh sieve and rinse under cold running water for a full 2 minutes, stirring with your fingers, until the water runs completely clear. Rinsing removes surface starches and any dust or debris and produces a cleaner-tasting, clearer finished soup. Red lentils cook very quickly and do not require soaking — they are ready to cook immediately after rinsing.
  2. Build the aromatic base. Heat the olive oil in a large heavy-bottomed pot or Dutch oven over medium heat until shimmering. Add the finely diced onion and a generous pinch of salt and cook for 6–8 minutes, stirring regularly, until the onion is deeply golden, soft, and beginning to caramelize at the edges. This step cannot be rushed — properly caramelized onion is the flavor foundation of the entire soup and the depth of sweetness it provides is completely irreplaceable. Add the minced garlic and grated ginger and cook for a further 2 minutes until incredibly fragrant.
  3. Bloom the spice blend. Add all the spices — cumin, turmeric, coriander, smoked paprika, chili powder, cinnamon, and black pepper — to the caramelized onion and stir continuously for 60–90 seconds until the spices are deeply fragrant, darkened slightly, and coating everything in the pot in a rich, aromatic paste. Blooming the spices in the hot oil activates their essential oils and deepens their flavor dramatically — this single step is responsible for a significant portion of the extraordinary depth of the finished soup.
  4. Add tomatoes and cook down. Pour in the crushed tomatoes and stir well to combine with the spiced onion base. Cook over medium-high heat for 3–4 minutes, stirring frequently, until the tomatoes have darkened slightly and the oil begins to separate around the edges of the mixture — this brief cooking concentrates the tomato flavor and removes any raw, acidic taste that would otherwise carry through to the finished soup.
  5. Add lentils and broth. Add the rinsed red lentils and stir to coat thoroughly in the spiced tomato base. Pour in the vegetable broth and stir well to combine. Bring to a vigorous boil over high heat then reduce to a steady simmer. Cook uncovered for 18–22 minutes, stirring occasionally, until the lentils have completely dissolved and the soup has thickened to a rich, creamy, naturally thick consistency. Red lentils break down completely during cooking — there should be virtually no whole lentil pieces remaining in the finished soup.
  6. Add the spinach. Reduce the heat to medium and add the fresh spinach in three or four large handfuls, stirring between each addition to allow the spinach to wilt into the soup before adding more. Cook for 2–3 minutes until all the spinach is wilted and incorporated. Do not overcook the spinach — it should remain bright green and slightly textured rather than turning grey and mushy. The vivid green of the spinach against the golden soup is one of the most beautiful visual qualities of this dish.
  7. Finish with lemon and adjust seasoning. Remove from heat and squeeze in the lemon juice — this final addition is non-negotiable. The acid from the lemon lifts and brightens the entire flavor profile of the soup dramatically, cutting through the richness of the lentils and amplifying every spice note simultaneously. Taste and adjust the seasoning generously with additional salt, black pepper, lemon juice, or chili powder. The finished soup should taste deeply savory, warmly spiced, slightly tangy from the lemon, and intensely satisfying.
  8. Make the crispy spiced oil topping. If using heat the olive oil in a small skillet over medium heat. Add the cumin seeds and cook for 30 seconds until they begin to pop and are fragrant. Add the sliced garlic and cook for 60–90 seconds until golden at the edges — watching carefully as garlic can burn quickly. Remove from heat and add the smoked paprika and chili flakes — the residual heat will bloom the spices without burning them. Drizzle immediately over the served soup for an extraordinary finishing touch.
  9. Serve beautifully and generously. Ladle the soup into warmed bowls and finish each serving with a generous squeeze of additional lemon juice, a drizzle of best quality extra virgin olive oil or the crispy spiced oil, a scattering of fresh cilantro or parsley, chili flakes for color, and a swirl of vegan yogurt or coconut cream if desired. Serve immediately with warm bread alongside for the most complete and satisfying meal imaginable.

Pro Tips for the Most Extraordinary Vegan Lentil Soup

  • Caramelize the onion fully and without rushing. The single most important step in this soup is cooking the onion to genuine caramelization — deep golden, soft, and sweet rather than merely translucent. This takes 6–8 minutes at medium heat and produces a depth of sweetness and complexity that is the defining flavor characteristic of a truly great lentil soup. A hurried, undercooked onion produces a flat, one-dimensional soup. A properly caramelized onion produces something genuinely extraordinary.
  • Bloom the spices in hot oil before adding liquid. This is the technique that separates a great spiced soup from an ordinary one. The fat-soluble flavor compounds in spices are activated and intensified by contact with hot oil in a way that contact with water cannot replicate. 60–90 seconds of continuous stirring in hot oil before adding any liquid produces spice flavors of dramatic depth and complexity.
  • Cook the tomatoes until the oil separates. The brief period of cooking the tomatoes until the oil visibly separates and pools around the edges signals that the tomato base is properly cooked — sweet, concentrated, and free of the raw, tinny flavor that undercooked tomato contributes. This takes 3–4 minutes of active cooking and is completely worth the time.
  • Add the lemon juice off the heat at the very end. Lemon juice added during cooking loses its brightness and fresh citrus character during simmering. Added at the very end off the heat it retains its full, vibrant acidity and transforms the flavor of the entire bowl — cutting through the earthiness of the lentils and lifting every spice note simultaneously. Never add it earlier than the final moment.
  • Make the crispy spiced oil topping. This optional but extraordinary finishing step — warm olive oil infused with cumin seeds, golden garlic, smoked paprika, and chili flakes drizzled over the bowl at the moment of serving — adds a layer of aromatic warmth, visual drama, and textural interest that elevates a very good soup into something genuinely spectacular. It takes less than three minutes and makes an enormous difference to the finished result.
  • Season in layers throughout cooking. Adding all the salt at the end of cooking produces a one-dimensional, surface seasoning. Adding a pinch with the onion, seasoning again after the tomatoes, and tasting and adjusting throughout produces a soup where the seasoning is integrated into every layer of flavor — deeply and uniformly seasoned rather than merely salty on the surface.

The Extraordinary Nutritional Power of Red Lentils

Red lentils are one of the most nutritionally impressive foods available anywhere in the plant kingdom — and the casual accessibility and extraordinary affordability of this ingredient makes them one of the most important foods in plant-based cooking.

A single serving of this soup provides approximately 18 grams of plant-based protein from the lentils alone — equivalent to a significant portion of the daily protein requirement for most adults and comparable to the protein content of a substantial serving of chicken or fish. Lentils achieve this remarkable protein density while simultaneously providing virtually no saturated fat — making them nutritionally superior to animal protein sources for cardiovascular health in every meaningful metric.

The iron content of red lentils is one of their most important and most underappreciated qualities. A single serving of this soup provides approximately 6–8mg of non-heme iron — representing 30–45% of the daily recommended intake for adult women and up to 75% for adult men. The addition of lemon juice at the end of cooking is not merely a flavor decision — the Vitamin C in lemon juice dramatically increases the bioavailability of the non-heme iron in the lentils through a specific chemical interaction that converts the iron to its more absorbable ferrous form. This is why the lemon juice is non-negotiable in this recipe from a nutritional as well as a culinary perspective.

The fiber content of this soup is equally extraordinary. A single serving provides approximately 12 grams of dietary fiber — nearly half the daily recommended intake — including both soluble fiber that feeds beneficial gut bacteria and reduces cholesterol absorption, and insoluble fiber that promotes healthy digestive transit and reduces the risk of colorectal cancer.

Turmeric — used generously in the spice blend — provides curcumin with its well-documented anti-inflammatory properties. Cumin contributes thymoquinone with antioxidant and anti-inflammatory properties alongside enhanced iron absorption from its naturally occurring compounds. Ginger provides gingerols and shogaols with potent anti-nausea, anti-inflammatory, and immune-supporting properties. Spinach provides Vitamins K, A, C, and folate alongside iron and calcium. Together these ingredients create a soup of extraordinary medicinal as well as culinary value.


Flavor Variations

  • Coconut Lentil Soup: Replace one cup of the vegetable broth with full-fat coconut cream and add a teaspoon of curry powder to the spice blend for a richer, creamier, more tropical version with a beautiful golden color and a subtle sweetness from the coconut that is particularly extraordinary with fresh cilantro and toasted coconut flakes on top.
  • Moroccan Lentil Soup: Add half a teaspoon of ras el hanout, a pinch of saffron dissolved in hot water, and a quarter cup of dried apricots roughly chopped to the soup for a Moroccan-inspired version with extraordinary complexity and a beautiful sweet-savory balance that is spectacular with warm flatbread and a dollop of harissa.
  • Lemon and Herb Finished: Stir in a generous handful of fresh cilantro, fresh parsley, and fresh mint at the very end alongside the lemon juice for a brighter, more herbaceous version with a beautiful freshness that lifts the earthy lentil base into something lighter and more vibrant — particularly beautiful in spring and summer.
  • Chunky Vegetable Version: Add diced sweet potato, carrot, and celery with the lentils for a chunkier, more substantial version with additional sweetness from the vegetables and a more complex textural experience — perfect for anyone who prefers a heartier soup with more body and variety in every spoonful.

Nutritional Highlights (Per Serving)

CaloriesProteinCarbsFiberFat
~280 kcal18g40g12g6g

At just 280 calories per serving this soup delivers one of the most impressive nutritional profiles of any single dish in plant-based cooking — 18 grams of plant-based protein, 12 grams of dietary fiber, and an extraordinary concentration of iron, folate, potassium, magnesium, and B vitamins from the red lentils alongside Vitamins K, A, and C from the spinach, powerful anti-inflammatory compounds from the turmeric and ginger, and meaningful antioxidant protection from the smoked paprika and tomatoes. This is food that heals as it nourishes — a soup of genuine medicinal character that happens also to be one of the most deeply comforting and satisfying bowls imaginable.


Storage

  • Refrigerator: Store cooled soup in an airtight container in the refrigerator for up to 6 days. This soup is one of those genuinely extraordinary recipes that improves significantly with every passing day — the spices deepen and bloom further during storage and the lentils continue to absorb the surrounding flavors producing an even richer, more complex soup by day 3 than on the day it was made. Add a splash of vegetable broth when reheating as the soup thickens considerably during refrigeration.
  • Freezer: This soup freezes beautifully for up to 4 months — making it one of the finest batch-cooking recipes available. Cool completely before transferring to freezer-safe containers in individual or family-sized portions. Thaw overnight in the refrigerator and reheat gently in a pot over medium heat, stirring frequently and adding vegetable broth or water to restore the original consistency. The flavor is virtually indistinguishable from freshly made after freezing and thawing.
  • Meal prep: This soup is one of the most outstanding meal prep recipes available — make a full pot on Sunday and have genuinely nourishing, deeply satisfying lunches and dinners available for the entire week with zero additional cooking effort. Portion into individual containers, refrigerate, and reheat as needed throughout the week.
  • Reheating: Reheat over medium heat in a pot with a generous splash of vegetable broth or water, stirring regularly. The soup will be significantly thicker after refrigeration — thin to the desired consistency with additional liquid before serving. Do not boil aggressively during reheating as this can affect the texture of the lentils.

Frequently Asked Questions

Can I use green or brown lentils instead of red?

Yes — green and brown lentils produce a different but equally delicious soup. They do not dissolve during cooking the way red lentils do — they retain their shape and produce a chunkier, more textured soup with a slightly earthier, more robust flavor. Green and brown lentils also take longer to cook — approximately 35–40 minutes rather than the 18–22 minutes needed for red lentils. Both are nutritionally outstanding choices.

Why did my lentil soup turn out too thick?

Red lentils absorb liquid voraciously during cooking and particularly during storage — a soup that seems perfectly consistency when cooked can become very thick indeed after refrigeration. Add additional vegetable broth or water in generous splashes during cooking or reheating and stir well to incorporate until the desired consistency is achieved. The soup will continue to thicken as it cools — aim for a slightly thinner consistency than desired when hot.

Can I make this soup in an Instant Pot?

Yes — this soup adapts beautifully to pressure cooker preparation. Sauté the aromatics and bloom the spices using the sauté function then add the rinsed lentils, broth, and tomatoes. Cook on high pressure for 12 minutes followed by a natural pressure release of 10 minutes. Add the spinach and lemon juice after releasing pressure and stir until the spinach wilts. The result is a soup of identical flavor to the stovetop version produced in significantly less time.

Is this soup suitable for freezing with the spinach already added?

Yes — spinach freezes well in this soup without any significant degradation in flavor or texture after thawing. The spinach will be slightly softer after freezing and reheating than when freshly added but still delicious and nutritionally intact. For the most vibrant color and freshest flavor in a reheated frozen soup stir in a fresh handful of spinach during reheating rather than relying on the spinach that was frozen with the soup.

How do I make this soup more filling?

For a more substantial meal stir in a drained can of chickpeas in the final 5 minutes of cooking — the combination of red lentils and chickpeas produces a soup of extraordinary protein density and incredible staying power. Serving with a thick slice of seeded sourdough bread adds complex carbohydrates and additional fiber. A swirl of tahini stirred in at the end adds healthy fats that promote satiety and give the soup a beautiful creamy richness.

Can I make this soup without tomatoes?

Yes — replace the crushed tomatoes with an additional cup of vegetable broth and add a tablespoon of tomato paste for concentrated flavor without the bulk of canned tomatoes. The soup will be lighter in color and slightly less complex in flavor but still deeply delicious. Alternatively replace the tomatoes with a cup of roasted red pepper purée for a sweeter, more vibrant version with a beautiful color and a different but equally appealing flavor character.


Tried this recipe? Leave a comment below and let us know how it turned out! Tag us on Instagram and Facebook — we love seeing your plant-powered creations. Looking for more warming, nourishing vegan soup and dinner recipes? Browse all recipes on Easy Vegan Recipes — new recipes posted every single week!

Vegan Pesto Sauce — The Bright, Garlicky, Restaurant-Quality Basil Sauce Ready in 10 Minutes

vegan pesto sauce

There is a case to be made that pesto is the most efficient sauce in existence — a preparation that requires no heat, no long simmering, no reduction, and no technique more demanding than the operation of a food processor or the rhythmic motion of a pestle in a mortar, and yet produces something with a flavor intensity and complexity that most cooked sauces take an hour to develop. Fresh basil pesto — pesto alla genovese, the original and still the definitive version — is made from five ingredients: fresh basil, garlic, pine nuts, Parmesan cheese, and olive oil. Four of these five are already vegan. The fifth, Parmesan, performs a specific role in the sauce: it provides salt, umami depth, and a fine, granular texture that gives pesto its slightly grainy, substantial consistency. In this vegan pesto, the Parmesan is replaced with a combination of nutritional yeast and finely ground cashew nuts — nutritional yeast for the savory, cheese-adjacent depth; cashews for the fat, creaminess, and granular texture that Parmesan provides. The result is a pesto that tastes like pesto — vibrantly green, aggressively herby, garlicky, rich with olive oil — rather than a pale approximation that signals its substitution in every mouthful. This vegan pesto is 100% plant-based, dairy-free, and egg-free. It takes 10 minutes from start to finish and makes approximately 200ml (¾ cup) — enough to dress pasta for 4, spread generously on a flatbread for 6, or use as a sauce, dip, or condiment in any preparation where pesto is called for. The technique is the reason the pesto stays brilliantly green rather than oxidizing to an unappetizing brown within minutes of being made.

The technique is the blanch-and-ice shock method. Basil’s brilliant green color comes from chlorophyll in the leaf cells. The moment basil is cut, torn, or blended, the cell walls rupture and release enzymes (polyphenol oxidases) that react with oxygen in the air to oxidize the chlorophyll — a process that turns the vivid green pigment into dark brown pheophytin within minutes. In a standard pesto made at room temperature from raw basil leaves, this oxidation is visible within 5–10 minutes of blending: the sauce begins to darken from the surface inward, losing its visual appeal and developing a slightly bitter, grassy note as the chlorophyll degrades. The blanch-and-ice shock method halts this process before it begins by deactivating the oxidizing enzymes through a brief heat treatment. The basil leaves are blanched in boiling water for exactly 15 seconds — long enough to denature the polyphenol oxidase enzymes (which are heat-sensitive proteins) but not long enough to cook the basil or compromise its fresh flavor — then immediately transferred to a bowl of ice water to stop all heat carry-over instantly. The ice shock sets the chlorophyll in its brilliant green state. The blanched, ice-shocked basil leaves are then gently squeezed dry and processed into pesto in the usual way. The result is a pesto that holds its vivid, electric green color for up to a week in the refrigerator and for months in the freezer — a color-stable pesto that looks as good on day five as it does on day one.

This recipe makes approximately 200ml (¾ cup) of pesto.


Recipe Information

Prep TimeCook TimeTotal TimeServingsCalories
8 mins2 mins10 mins4 (as pasta sauce)~210 kcal

Ingredients

  • 60g (2oz / approximately 2 large handfuls) fresh basil leaves — weighed after removing from stems; the stems can be included sparingly (the thin inner stems have good flavor; the thick outer stems are woody and bitter); the quantity of basil here is the anchor of the sauce — do not reduce it
  • 40g (⅓ cup) raw cashew nuts — ground to a fine powder in the food processor before the other ingredients are added; this produces a more uniform, Parmesan-like fine granular texture than adding whole cashews; do not use roasted cashews, which will overwhelm the basil
  • 3 tbsp nutritional yeast — the savory, umami-depth component replacing Parmesan; use a brand with a good cheese-like flavor (many nutritional yeasts vary significantly in their cheesiness); taste and adjust upward by 1 tablespoon if a more intensely cheesy flavor is desired
  • 2 cloves garlic — raw garlic provides the sharp, pungent heat characteristic of a well-made pesto; for a milder result, use 1 clove or briefly blanch the garlic alongside the basil in the blanching step; the blanching neutralizes the most aggressive sharpness of raw garlic while retaining garlic flavor
  • 80ml (⅓ cup) good-quality extra-virgin olive oil — olive oil is the fat base of pesto and its flavor is prominent; use the best extra-virgin olive oil you have; a fruity, peppery Ligurian or Italian olive oil is ideal; a flat, flavorless cheap olive oil produces a noticeably inferior pesto
  • 30g (¼ cup) pine nuts — lightly toasted in a dry pan for 2–3 minutes over medium heat until golden; toasting pine nuts deepens their flavor from mild and creamy to nutty and warm; watch carefully — pine nuts burn within seconds of turning golden; alternatively, blanched almonds or walnuts can be substituted (walnuts produce a slightly more bitter, earthy result; almonds produce a cleaner, more neutral flavor)
  • 2 tbsp lemon juice — brightens and balances the richness of the olive oil and cashews, and the acidity helps maintain the green color alongside the blanching step
  • ½ tsp fine salt — adjust to taste; the salt level of pesto should be assertive, as it will season the pasta or dish it is added to
  • Ice water — for the blanch-and-ice shock step: a large bowl filled with cold water and a generous handful of ice cubes

Instructions

  1. Toast the pine nuts. Heat a small dry skillet over medium heat. Add the pine nuts and toast, stirring frequently, for 2–3 minutes until golden and fragrant. Transfer immediately to a plate to cool — do not leave in the hot pan as they will continue to darken. Set aside.
  2. Blanch the basil — Stage 1. Bring a small saucepan of water to a rolling boil. Prepare the ice water bowl. Drop all the basil leaves into the boiling water and submerge immediately with a spoon. Blanch for exactly 15 seconds — count it; longer and the basil begins to cook and soften; shorter and the enzymes may not be fully denatured. Using a slotted spoon or small sieve, transfer the blanched basil immediately to the ice water bowl.
  3. Ice shock — Stage 2. Leave the basil in the ice water for 30 seconds until fully chilled. Remove and squeeze firmly between your palms or in a clean tea towel to remove as much water as possible. The blanched basil should be vibrantly green, compressed into a small ball, and very dry. Set aside.
  4. Grind the cashews. Place the raw cashews in a food processor and process for 30–45 seconds until ground to a fine powder. Do not over-process or the natural oils will be released and the cashews will begin to clump.
  5. Build the pesto. Add the blanched and squeezed basil, toasted pine nuts, nutritional yeast, garlic cloves, lemon juice, and salt to the food processor with the ground cashews. Pulse 8–10 times to break everything down. With the motor running, drizzle the olive oil in a slow, steady stream through the feed tube. Process until the pesto reaches your preferred consistency — 20–30 seconds for a slightly chunky, textured pesto (traditional); 45–60 seconds for a smoother, more uniform sauce. Scrape down the sides once or twice during processing.
  6. Taste and adjust. Transfer to a bowl and taste. Adjust salt, lemon juice, and nutritional yeast as needed. The pesto should taste vibrant, herby, garlicky, and well-seasoned — slightly more salt and lemon than seems right when tasted alone, as it will be diluted when tossed with pasta or spread on bread. If the pesto seems too thick, add olive oil one tablespoon at a time and stir to incorporate.
  7. Use immediately or store. Use right away, or transfer to a jar, press a layer of olive oil over the surface (this seals the pesto from air contact and further prevents oxidation), and refrigerate.

Pro Tips

  • The blanch-and-ice shock is a 2-minute investment that transforms a pesto that browns within the hour into one that stays vivid green for a week — do not skip it if you plan to store the pesto or serve it to guests where appearance matters. If you are making pesto to eat immediately and will use all of it within 30 minutes, the blanching step can be omitted.
  • Seal with oil in the jar — whenever storing pesto, press the surface smooth and drizzle a thin layer (2–3mm) of olive oil over the top before sealing. Oxygen causes oxidation; the oil layer prevents air from reaching the pesto surface. This single step extends refrigerator life significantly and maintains the color.
  • Toast the pine nuts — raw pine nuts have a mild, pleasant flavor but toasted pine nuts have a deeply nutty warmth that elevates the entire sauce. Two minutes of your attention at the stove is the difference. The same rule applies if substituting almonds or walnuts.
  • Make a large batch for the freezer — pesto freezes exceptionally well and is one of the most practical items to batch-make during summer when fresh basil is abundant and inexpensive. Freeze in ice cube trays, then transfer the frozen cubes to a sealed bag. Each cube is approximately one serving; drop directly into hot pasta from frozen.

Pesto alla Genovese: The Sauce That Liguria Fought to Protect

Pesto is one of the most widely replicated and most frequently adulterated sauces in the world — appearing in versions ranging from its authentic Ligurian original to sun-dried tomato pesto, kale pesto, spinach pesto, and the industrial jar product that shares a name while sharing almost nothing else — and the effort to protect its original form has produced one of the more contentious geographical indication disputes in European food law. The word “pesto” is simply the past participle of the Italian verb “pestare” — to pound, to crush — and it describes a method (pounding in a mortar) rather than a specific set of ingredients; there are pestos made from other herbs, nuts, and vegetables throughout Italy and beyond. The specific preparation known as pesto alla genovese — basil, pine nuts, garlic, Parmesan and Pecorino Sardo, and Ligurian extra-virgin olive oil, made by hand in a marble mortar with a wooden pestle — was codified and registered as a Protected Geographical Indication (PGI) product by the European Union, meaning that only pesto made in Liguria from the designated ingredients can legally be marketed as “pesto alla genovese” in EU markets. The Ligurian argument for protection is botanical as much as culinary: the basil grown in the Ligurian microclimate — particularly around Prà, a suburb of Genoa — is argued to have a distinctly sweet, floral character with less of the anise or menthol note present in basil grown in hotter, drier conditions elsewhere. The mortar-and-pestle preparation is also defended on flavor grounds: food scientists have confirmed that pounding tears the basil’s cell walls differently than a rotating blade, releasing the aromatic compounds more completely and with less oxidation than machine blending. Home cooks without a large marble mortar and 15 minutes of pounding time are forgiven by most Ligurians for using a food processor — though the results are considered by purists to be a related but distinct preparation. The vegan version in this recipe is, by these definitions, not pesto alla genovese — but it is made with the same respect for the original and with the same ambition to produce a sauce of genuine quality.


Flavor Variations

  • Walnut and Rocket Pesto: Replace the basil with 50g of rocket (arugula) and 10g of basil; replace the pine nuts with 40g of walnuts (lightly toasted). Rocket’s peppery bitterness and walnuts’ earthy astringency produce a pesto that is more robust and assertive than the classic basil version — excellent with robust pasta shapes (rigatoni, penne), roasted root vegetables, or grilled bread. The blanch-and-ice shock step is not needed for rocket, which does not oxidize as rapidly as basil.
  • Sun-Dried Tomato and Basil Pesto: Add 60g of drained, oil-packed sun-dried tomatoes to the food processor along with the basil. Reduce the olive oil to 60ml as the sun-dried tomatoes contribute their own oil. The result is a richer, more deeply flavored, red-tinged pesto with a concentrated sweetness from the tomatoes that balances the sharp garlic and acidic lemon. Use on pasta, pizza bases, or as a sandwich spread.
  • Mint and Pistachio Pesto: Replace half the basil with fresh mint leaves (30g basil, 30g mint) and replace the pine nuts with 40g of shelled unsalted pistachios (very lightly toasted). Increase the lemon juice to 3 tablespoons. The mint and pistachio combination produces a Sicilian-inflected pesto that is brighter, more aromatic, and distinctly different in character from the Ligurian original — excellent with pasta, new potatoes, roasted courgette, or grilled fish substitutes.

Nutritional Highlights (Per Serving — Based on 4 Servings as Pasta Sauce)

CaloriesProteinCarbsFiberFat
~210 kcal5g6g2g19g

Storage

  • Refrigerator: Store in a sealed jar with a thin layer of olive oil pressed over the surface for up to 7 days. The color-stable blanched pesto will remain bright green throughout; the flavor is best on days 1–3 and remains excellent through day 7.
  • Freezer: Freeze in ice cube trays (each cube approximately 2 tablespoons / one serving) until solid, then transfer to a sealed freezer bag. Keeps for up to 3 months with minimal flavor loss. Frozen pesto can be added directly to hot pasta — it melts into the pasta within 30 seconds. Alternatively, thaw overnight in the refrigerator and use as fresh.
  • Do not refrigerate in a wide-mouth open container — maximum surface area exposure to air accelerates oxidation even in blanched pesto; use a narrow jar and seal with oil.
  • Pesto pasta leftovers: Cooked pasta dressed with pesto can be refrigerated for up to 2 days. Add a small splash of olive oil when reheating (in a pan over low heat, not a microwave) to loosen the sauce, which thickens as it cools.

Frequently Asked Questions

Why does my pesto turn brown so quickly?

Browning is caused by oxidation — the same process that browns a cut apple or avocado. Without the blanch-and-ice shock step, pesto made from raw basil will begin to oxidize within 10–15 minutes of blending, as the blending ruptures the cells and releases the oxidizing enzymes. Follow the blanching step in this recipe to prevent it. Even with blanching, minimize air exposure during storage by sealing with a layer of olive oil and using a tightly sealed jar.

Can I make this pesto in a mortar and pestle instead of a food processor?

Yes, and many purists argue the mortar-and-pestle method produces a superior pesto with a more complex aroma, because pounding tears rather than cuts the cell walls and releases the aromatic oils differently. To make by hand: grind the garlic to a paste with the salt first; add the pine nuts and pound to a rough paste; add the blanched basil in batches and pound until smooth; work in the cashews and nutritional yeast; drizzle in the olive oil gradually, stirring to emulsify. The process takes 10–15 minutes by hand versus 2 minutes in a processor — the flavor reward is real but the time commitment is significant.

Can I use a different nut instead of pine nuts?

Yes — pine nuts are the traditional choice but they are also one of the most expensive nuts. Blanched almonds produce the cleanest, most neutral-flavored substitution. Walnuts produce a slightly more bitter, earthy result. Sunflower seeds (lightly toasted) are the most affordable substitute and produce a mild, creamy pesto. Cashews (additional, beyond the Parmesan-substitute portion) produce a very creamy, rich pesto. Each substitution changes the flavor character slightly; all are valid.

My pesto tastes flat and lacks punch. How do I fix it?

Flat pesto is almost always a seasoning issue — pesto needs more salt, more lemon, and more garlic than feels instinctively right when tasted alone, because it will be thinned and balanced by the pasta or bread it accompanies. Add salt in ¼ teaspoon increments, lemon juice in teaspoon increments, and taste after each addition. A flat pesto also benefits from increasing the nutritional yeast by 1 tablespoon. If the basil flavor seems weak, the basil may have been blanched for too long (over 20 seconds) — reduce blanching time in future batches.


Tried this recipe? Leave a comment below and let us know how it turned out! Tag us on Instagram and Facebook — we love seeing your plant-powered creations. Looking for more addictive vegan snack and appetizer recipes? Browse all recipes on Easy Vegan Recipes — new recipes posted every single week!

Vegan Air Fryer Zucchini — The Crispy, Golden Side Dish Ready in 12 Minutes Flat

vegan air fryer zucchini

The air fryer has earned its place in the modern kitchen by doing one specific thing better than any other domestic appliance: it produces the dry, high-heat, circulating environment that makes vegetables crispy — genuinely crispy, with a golden, slightly caramelized surface and a tender interior — with minimal oil, minimal effort, and in a fraction of the time a conventional oven requires. Air fryer zucchini is one of the simplest and most satisfying demonstrations of this capability. Sliced into coins or half-moons, seasoned generously, and cooked in a single layer at high heat, zucchini transforms in the air fryer from a pale, soft vegetable that tends toward sogginess into something that is golden and slightly crisped at the edges, tender and yielding in the center, and deeply savory from the combination of garlic, smoked paprika, nutritional yeast, and Italian herbs that coat each piece before cooking. This vegan air fryer zucchini is ready in 12 minutes. It requires 5 minutes of prep. It uses 1 tablespoon of olive oil for the entire batch. It is one of the fastest and most versatile side dishes in this collection — equally at home alongside pasta, grain bowls, tacos, flatbreads, or eaten straight from the basket with a dipping sauce. It is 100% vegan, naturally dairy-free, egg-free, and gluten-free. It serves 4 as a side dish. The technique is the reason the zucchini crisps rather than steaming into softness.

The technique is the single-layer dry-coat method. Zucchini is approximately 95% water, and this water content is the primary obstacle to achieving a crispy surface in any cooking method, including the air fryer. When too many pieces are placed in the air fryer basket at once, the released moisture from each piece cannot escape the confined space of the basket quickly enough — the humidity rises, the hot circulating air becomes saturated with steam, and the zucchini steams in its own moisture rather than crisping. The single-layer dry-coat method addresses this through two simultaneous principles. Principle one — single layer: the zucchini pieces are arranged in a single, non-overlapping layer in the air fryer basket with small gaps between each piece. This sounds obvious but is frequently ignored in practice; stacking or crowding the basket is the single most common reason air fryer vegetables come out soft rather than crispy. Any moisture released from a piece in a single-layer arrangement drops immediately through the basket into the drip tray below and is carried away by the circulating air; no piece is trapping the steam of another piece above it. Principle two — dry coat: before seasoning, the zucchini slices are patted thoroughly dry with paper towels, removing as much surface moisture as possible. The oil and dry seasoning mixture is then tossed through the dried zucchini — dry seasonings adhere cleanly to dry, oil-coated surfaces; wet surfaces cause the seasoning to clump and distribute unevenly, leaving some pieces over-seasoned and others bland. The combination of dry surfaces, even seasoning distribution, and single-layer spacing creates the conditions for the air fryer’s circulating heat to work on all surfaces of each piece simultaneously — crisping, not steaming.

This recipe serves 4 as a side dish.


Recipe Information

Prep TimeCook TimeTotal TimeServingsCalories
5 mins12 mins17 mins4 (side)~75 kcal

Ingredients

  • 3 medium zucchini (courgettes), approximately 600g (21oz) total — cut into coins approximately 8mm (⅓ inch) thick, or into half-moons if the zucchini are large; uniform thickness is important for even cooking — thinner slices (under 5mm) will crisp quickly but become dehydrated and tough; thicker slices (over 1.5cm) will be soft in the center when the outside is done
  • 1 tbsp olive oil or neutral oil — just enough to coat each piece lightly; the oil helps the seasoning adhere and promotes browning without making the zucchini greasy
  • 2 tbsp nutritional yeast — adds a savory, cheese-like umami depth and helps the surface brown; also provides a slight stickiness that holds the other seasonings in place
  • 1 tsp garlic powder
  • 1 tsp smoked paprika — the smokiness adds complexity and warmth; regular sweet paprika can be substituted for a milder flavor
  • ½ tsp dried Italian herbs (or a mix of dried oregano and dried basil)
  • ½ tsp fine salt — adjust to taste; zucchini is a mild vegetable and needs assertive seasoning
  • ¼ tsp black pepper
  • Optional: ¼ tsp onion powder, ¼ tsp chilli flakes for heat

For Serving (Optional)

  • Vegan tzatziki or garlic yogurt dip — plant-based yogurt, grated cucumber (squeezed dry), minced garlic, lemon juice, fresh dill, salt
  • Vegan aioli — vegan mayonnaise, grated garlic, lemon juice, smoked paprika
  • Fresh lemon wedges
  • Fresh flat-leaf parsley or basil, roughly chopped

Instructions

  1. Prepare the zucchini — dry-coat method, Stage 1. Slice the zucchini into coins approximately 8mm thick. Spread on a clean kitchen towel or lay on paper towels. Pat firmly dry on both sides, removing as much surface moisture as possible. The drier the surface, the crispier the result — do not skip this step.
  2. Season. Transfer the dried zucchini to a large bowl. Drizzle over the olive oil and toss to coat every piece evenly. In a small bowl, combine the nutritional yeast, garlic powder, smoked paprika, dried herbs, salt, pepper, and any optional seasonings. Sprinkle the seasoning mixture over the oiled zucchini and toss thoroughly until every piece is evenly coated on all sides.
  3. Preheat the air fryer. Preheat your air fryer to 200°C (400°F) for 3 minutes. Preheating is important — placing zucchini into a cold air fryer means the first several minutes of cook time are spent heating the appliance rather than cooking the food, and the zucchini releases moisture during this slow warm-up that begins softening rather than crisping it.
  4. Air fry — single-layer method, Stage 2. Arrange the seasoned zucchini in the air fryer basket in a single layer with small gaps between the pieces. Do not stack or overlap. If your air fryer is small, work in two batches — a second perfect batch is better than one crowded, steamed batch. Air fry at 200°C for 10–12 minutes, shaking the basket once at the 6-minute mark, until the zucchini is golden at the edges, slightly caramelized, and tender when pierced with a fork. The exact time will vary by 1–2 minutes depending on your air fryer model and the thickness of the slices; watch the first batch closely to calibrate your appliance.
  5. Serve immediately. Transfer to a serving plate and serve at once. Air fryer zucchini is at its crispiest within 5 minutes of leaving the basket; it softens gradually as it cools and sits. Finish with fresh parsley, a squeeze of lemon, and a dipping sauce alongside if desired.

Pro Tips

  • Never crowd the basket — the single-layer rule is not optional; it is the entire technique. If all the zucchini won’t fit in one layer, cook in batches and hold the first batch in a warm oven (120°C) on a wire rack (not a tray — the rack prevents the bottom from softening) while the second batch cooks.
  • Pat the zucchini dry before oiling — a wet surface causes the oil to slide off rather than coating evenly, and wet oil coatings produce steaming rather than crisping. The 30-second pat-dry step is the highest-return preparation investment in this recipe.
  • Nutritional yeast is not optional in this recipe — it is what distinguishes air fryer zucchini that tastes like a seasoned, savory side dish from zucchini that tastes like seasoned zucchini. Its umami depth, slight stickiness, and browning promotion are the three qualities that elevate the result. If you don’t have nutritional yeast, substitute 1 tablespoon of finely ground cashews plus ½ teaspoon of extra salt — it approximates the texture contribution but not the umami.
  • Adjust the thickness to your preference — 8mm coins produce the best balance of crispy edges and tender center for most palates; 5mm coins produce a crispier, drier result closer to a chip; 12mm half-moons produce a more substantial, fork-tender piece with less crispiness. All three work — choose by what you’re serving them alongside.

Zucchini in the Age of the Air Fryer: How a High-Water Vegetable Found Its Ideal Appliance

The air fryer — introduced commercially in 2010 by Philips, based on Rapid Air Technology initially developed for the consumer market by engineer Fred van der Weij — was designed with a specific culinary problem in mind: replicating the crispy, browned surface of deep-fried food using a fraction of the oil, by replacing immersion in hot oil with rapid circulation of intensely hot air around the food. The technology is, in mechanical terms, a compact convection oven with a more powerful fan and a smaller chamber than a standard oven — the smaller chamber concentrates the heat and the more powerful fan circulates it faster, producing surface browning and dehydration that a standard oven achieves less efficiently. For high-water vegetables like zucchini, the air fryer’s advantage over a conventional oven is substantial: the higher air velocity removes moisture from the vegetable’s surface more rapidly than a standard oven’s gentler air circulation, creating the dry surface conditions that browning requires before the interior of the vegetable has had time to overcook. A zucchini that takes 25–30 minutes to achieve any browning in a conventional oven — and often steams in its own moisture for the first 15 minutes before the moisture evaporates — achieves the same browning in 10–12 minutes in an air fryer. The air fryer has been particularly transformative for plant-based cooking, where the challenge of creating satisfying textural contrast without the fat-delivery of meat and dairy is constant: roasted chickpeas, crispy tofu, air-fried cauliflower, and vegetables like zucchini, broccoli, and green beans all achieve textures in the air fryer that were previously difficult to achieve at home without deep-frying or a professional combi oven. The vegan air fryer zucchini in this recipe is a direct beneficiary of this technology — a side dish that achieves restaurant-quality browning and texture in a domestic kitchen in under 15 minutes.


Flavor Variations

  • Lemon Herb Air Fryer Zucchini: Replace the smoked paprika with 1 teaspoon of lemon zest (worked into the seasoning mix) and increase the dried Italian herbs to 1 teaspoon. After air frying, squeeze fresh lemon juice generously over the hot zucchini and scatter with fresh flat-leaf parsley. The lemon-herb version is lighter and brighter than the smoky original — excellent alongside pasta, grain bowls, or grilled flatbread.
  • Chilli Garlic Air Fryer Zucchini: Double the garlic powder to 2 teaspoons and add ½ teaspoon of chilli flakes and ½ teaspoon of cayenne pepper to the seasoning mix. Finish with a drizzle of chilli oil after air frying and a scatter of sesame seeds. The chilli garlic version is bolder and more assertive — excellent as part of an Asian-inspired bowl alongside rice and edamame, or served as a starter with a cooling dipping sauce.
  • Parmesan-Style Air Fryer Zucchini: Replace the nutritional yeast with 3 tablespoons of cashew parmesan (blend 60g raw cashews, 2 tablespoons nutritional yeast, ½ teaspoon garlic powder, ½ teaspoon salt to a fine powder). The cashew parmesan forms a slightly thicker, more substantial coating than nutritional yeast alone and produces a result that closely resembles Parmesan-roasted zucchini in both flavor and appearance. Serve with a warm marinara dipping sauce.

Nutritional Highlights (Per Serving — Based on 4 Servings as a Side)

CaloriesProteinCarbsFiberFat
~75 kcal4g9g2g4g

Storage

  • Best eaten immediately — air fryer zucchini is at its crispiest within 5 minutes of cooking and softens progressively as it cools. Plan to serve straight from the basket.
  • Leftovers: Store in a sealed container in the refrigerator for up to 3 days. Re-crisp in the air fryer at 200°C for 3–4 minutes — the air fryer restores most of the crispiness lost during refrigeration. Do not microwave leftovers; microwaving produces a completely soft, wet result.
  • Make-ahead prep: The zucchini can be sliced and the seasoning mix made up to 24 hours in advance; keep them separate in the refrigerator and toss together just before air frying.
  • Batch cooking: For a larger group, air fry in sequential batches and hold each batch in a 120°C oven on a wire rack (not a flat tray) until all batches are done. Serve together; the first batch will lose some crispiness during the hold but will still be excellent.

Frequently Asked Questions

My air fryer zucchini came out soft and soggy. What went wrong?

Soft, soggy air fryer zucchini has one of three causes: the basket was overcrowded (pieces stacked or touching prevented air circulation and caused steaming); the zucchini was not patted dry before seasoning (surface moisture steamed the vegetable from the outside); or the air fryer was not preheated (the zucchini sat in a warming appliance rather than a hot one and released moisture before crisping could begin). Correct all three for the next batch.

Can I use frozen zucchini?

Frozen zucchini is not recommended for this recipe — freezing ruptures the cell walls and causes the zucchini to release significantly more water on thawing than fresh zucchini, making crispiness very difficult to achieve even with the single-layer dry-coat method. For best results, use fresh zucchini. If frozen is the only option, thaw completely, squeeze firmly in a clean towel to remove as much water as possible, and expect a less crispy result.

What temperature is best for air fryer zucchini?

200°C (400°F) is the optimum temperature for this recipe — high enough to brown and crisp the surface before the interior overcooks, but not so high that the seasoning burns before the zucchini is cooked through. If your air fryer runs hot and the zucchini is browning too quickly, reduce to 190°C. At temperatures below 180°C the zucchini will cook but not crisp — it will be roasted rather than air fried in character.

Can I season these differently for a child-friendly version?

Yes — omit the smoked paprika and chilli flakes and replace with ½ teaspoon of mild sweet paprika and 1 teaspoon of dried mixed herbs. Increase the nutritional yeast to 3 tablespoons for a milder, cheesier flavor that children typically enjoy. A light drizzle of vegan ranch dressing as a dipping sauce alongside is usually very popular with younger eaters.


Tried this recipe? Leave a comment below and let us know how it turned out! Tag us on Instagram and Facebook — we love seeing your plant-powered creations. Looking for more addictive vegan snack and appetizer recipes? Browse all recipes on Easy Vegan Recipes — new recipes posted every single week!

Vegan Thai Basil Pancakes — The Crispy, Herb-Packed Savoury Pancakes Ready in 20 Minutes

vegan thai basil pancakes

There is a specific kind of pleasure in a savoury pancake — thin, crispy-edged, folded or stacked and eaten with a dipping sauce — that is quite different from the pleasure of a sweet breakfast pancake, and Thai-style savoury pancakes deliver that pleasure in a way that is entirely their own. These vegan Thai basil pancakes are built around the bold, anise-forward flavour of fresh Thai basil, which is folded generously into a light, thin rice flour batter alongside finely sliced spring onions, minced lemongrass, fresh chilli, and a seasoning base of tamari, lime juice, and toasted sesame oil. The result is a pancake with crispy, lacy edges, a tender but structured centre, and a herb fragrance that fills the kitchen as soon as the batter hits the hot pan — intensely aromatic, deeply savoury, and unmistakably Thai in character. These pancakes are 100% vegan, naturally dairy-free, egg-free, and gluten-free (rice flour has no gluten). They are ready in 20 minutes from start to first pancake on the table. They serve 4 as a light dinner or starter, or 2 as a main course. They are equally at home as a weeknight dinner with a quick dipping sauce, as a weekend brunch dish with pickled vegetables, or as a starter at a dinner party where something unexpected is wanted. The technique is the reason the pancakes achieve the thin, lacy, crispy edges that define a well-made savoury rice pancake.

The technique is the rest-and-thin method. Rice flour behaves differently from wheat flour in a batter — it does not contain gluten, which means it has no elasticity and no tendency to tighten or become tough when mixed; but it also means the starch granules need time to fully hydrate in the liquid before the batter is cooked. A rice flour batter cooked immediately after mixing often produces pancakes that are slightly gritty or uneven in texture, with a tendency to crack at the edges as the incompletely hydrated starch expands unevenly in the pan. The rest-and-thin method addresses this through two sequential steps. Step one — rest: once the batter is mixed, it is set aside for exactly 10 minutes at room temperature. During this rest, the rice flour starch granules absorb the water in the batter fully and evenly, producing a smooth, homogenous batter with no gritty particles. Step two — thin: after resting, the batter is thinned with a small additional quantity of cold water (2–3 tablespoons, stirred in just before cooking) until it reaches the consistency of single cream. This two-stage hydration approach — full rest at a thicker consistency, then thinning just before cooking — produces a batter that flows easily into a thin, even layer in the pan and cooks into a pancake with crispy, lacy edges and a tender, structured interior. The herbs and aromatics added to the batter cook within the thin pancake layer rather than sitting on top of it, which means every bite contains the full flavour of the Thai basil, lemongrass, and chilli distributed evenly through the pancake rather than concentrated in patches.

This recipe serves 4 as a starter or light dinner.


Recipe Information

Prep TimeCook TimeTotal TimeServingsCalories
10 mins10 mins20 mins4 (starter/light dinner)~185 kcal

Ingredients

For the Batter

  • 150g (1 cup + 2 tbsp) rice flour — white rice flour produces the crispiest, most delicate result; brown rice flour can be substituted for a slightly nuttier, more wholesome flavour and a marginally less crispy edge
  • 250ml (1 cup) cold water, plus 2–3 tbsp extra for thinning after the rest — cold water slows hydration slightly and helps produce a smoother batter; do not use hot water
  • 1 tbsp tamari or soy sauce — tamari is gluten-free and recommended for a fully GF dish; soy sauce can be substituted if gluten is not a concern; this provides the salt and umami base of the batter
  • 1 tsp toasted sesame oil — adds a warm, nutty depth to the batter; a little goes a long way; do not substitute with regular sesame oil, which is untoasted and much milder
  • 1 tsp lime juice — brightens the batter and balances the tamari

For the Herbs and Aromatics (Folded into Batter)

  • 30g (1 large handful) fresh Thai basil leaves — Thai basil (horapa) has a stronger, more anise-forward flavour than Italian basil and holds up better to heat; if Thai basil is unavailable, a combination of Italian basil (20g) and fresh mint (10g) approximates the flavour character; do not use dried basil
  • 3 spring onions (scallions), finely sliced — both white and green parts; they cook within the thin pancake and add a mild, sweet onion flavour and visual green speckling
  • 1 stalk lemongrass — outer layer removed, very finely minced (only the pale inner 10cm / 4 inches); lemongrass adds a citrus-floral aroma to the pancake; if unavailable, substitute 1 teaspoon of finely grated lime zest
  • 1–2 red bird’s eye chillies, very finely sliced — adjust to heat preference; 1 chilli produces mild warmth; 2 produces noticeable heat; deseed for a milder result
  • 2 cloves garlic, very finely minced
  • 1 tsp fresh ginger, finely grated

For Cooking

  • 2 tbsp neutral oil (vegetable, sunflower, or coconut) — for frying; a thin, even coating of oil in the pan is essential for the crispy edges

For the Dipping Sauce

  • 3 tbsp tamari or soy sauce
  • 2 tbsp lime juice
  • 1 tbsp rice vinegar
  • 1 tsp toasted sesame oil
  • 1 tsp maple syrup or agave
  • 1 small garlic clove, finely minced
  • ½ tsp fresh ginger, finely grated
  • 1 bird’s eye chilli, finely sliced (optional)
  • 1 tbsp water to balance

For Serving (Optional)

  • Fresh Thai basil leaves or mint leaves
  • Toasted sesame seeds
  • Lime wedges
  • Pickled cucumber or quick-pickled carrots

Instructions

  1. Mix the dipping sauce. Combine all dipping sauce ingredients in a small bowl and stir to dissolve the sweetener. Taste and adjust — it should be sharp, salty, slightly sweet, and fragrant. Set aside while you make the pancakes; the flavours deepen as it sits.
  2. Mix the batter — rest-and-thin method, Stage 1. In a mixing bowl, whisk together the rice flour, 250ml cold water, tamari, toasted sesame oil, and lime juice until completely smooth with no lumps. Set aside for 10 minutes at room temperature. Do not skip or shorten the rest — it is the first stage of the technique.
  3. Prepare the aromatics. While the batter rests, finely slice the spring onions, mince the lemongrass, slice the chillies, mince the garlic, and grate the ginger. Roughly tear or leave whole any large Thai basil leaves; small leaves can go in whole.
  4. Thin the batter — Stage 2. After the 10-minute rest, stir the batter. It will have thickened slightly as the starch hydrates. Add 2–3 tablespoons of cold water and stir to thin to the consistency of single cream — it should flow easily off a spoon in a thin, unbroken stream. If it falls in thick drops, add a little more water. Fold in all the prepared aromatics and Thai basil leaves.
  5. Cook the pancakes. Heat a non-stick or well-seasoned cast iron pan (approximately 20–22cm / 8–9 inches) over medium-high heat until hot. Add ½ teaspoon of neutral oil and swirl to coat the entire pan surface, including the sides. Pour in approximately 60–70ml (¼ cup) of batter and immediately tilt the pan to spread the batter into a thin, even round. The batter should sizzle on contact and the edges should begin to set within 30 seconds. Cook for 2–3 minutes until the edges are golden and slightly crisped and the surface of the pancake is no longer wet. Flip carefully with a thin spatula and cook for a further 1–1.5 minutes on the second side. Transfer to a warm plate. Repeat with the remaining batter, adding a small amount of oil before each pancake. The batter makes 8–10 pancakes.
  6. Serve. Stack or fold the pancakes and serve immediately with the dipping sauce alongside. Scatter with extra Thai basil, toasted sesame seeds, and a lime wedge.

Pro Tips

  • The 10-minute rest is the technique — do not shorten it or skip it. A batter cooked immediately from mixing produces slightly gritty, fragile pancakes; a rested batter produces smooth, cohesive pancakes with clean, crispy edges. Use the rest time to prepare the aromatics so no time is wasted.
  • Thin the batter after resting, not before — the two-stage hydration approach (rest at a thicker consistency, thin just before cooking) produces a more stable, homogenous batter than mixing to the final consistency from the start, which can result in uneven hydration of the starch.
  • Get the pan properly hot before the first pancake — a pan that is not hot enough when the batter goes in produces pale, soft pancakes that stick and tear. The batter should sizzle audibly on contact with the pan. If it doesn’t sizzle, the pan needs another 30–60 seconds over the heat.
  • Use Thai basil, not Italian — the flavour difference is significant. Thai basil (horapa) has a strong, almost liquorice-forward aroma that is central to the character of these pancakes; Italian basil has a softer, more floral flavour that produces a pleasant but distinctly different result. Most Asian grocery shops stock Thai basil fresh and inexpensively.

Thai Basil and the Herb That Built a Cuisine

Thai basil — horapa (โหระพา) in Thai — is one of three distinct basil varieties used in Thai cooking, each with a different flavour profile and culinary role that are not interchangeable in the way that European basil varieties largely are. Horapa (sweet Thai basil) has the anise-forward, slightly spicy flavour most familiar to Western palates from Thai restaurant dishes such as pad krapow (stir-fried basil) and Thai green curry, where the herb is added at the end of cooking and wilts into the dish, releasing its volatile aromatic oils. Bai krapow (holy basil) is a different variety with a more peppery, clove-like flavour used specifically in the iconic pad krapow — it is more difficult to find outside Thailand and Southeast Asia. Bai manglak (lemon basil) has a lighter, citrus-forward aroma used primarily in soups and salads. The dominance of Thai basil in global Thai cuisine is partly a result of availability — horapa travels and stores better than the more delicate holy basil — and partly a result of the simplification of Thai cuisine as it spread internationally through the 1970s and 1980s, when Thai immigrant communities and restaurant owners adapted dishes to the ingredients available in Western markets. Thai cuisine itself draws on centuries of influence from Chinese, Indian, Khmer, and Malay cooking traditions, with the herb-forward, aromatic quality of Thai basil representing the distinctly Southeast Asian character that differentiates Thai cooking from its culinary neighbours. In Thailand, Thai basil grows prolifically as a garden herb, and its use in pancakes, fritters, and stuffed preparations — as in this recipe — is an extension of the broader Thai culinary philosophy of using fresh herbs not as a garnish but as a primary flavour component with structural presence in a dish.


Flavor Variations

  • Coconut and Galangal Thai Basil Pancakes: Replace 100ml of the water in the batter with 100ml of full-fat coconut milk and add ½ teaspoon of finely grated galangal (or fresh ginger if galangal is unavailable) to the aromatics. The coconut milk adds a rich, slightly sweet creaminess to the batter that balances the sharp aromatics; the galangal adds a citrusy, medicinal depth characteristic of Thai curry pastes. The coconut version is richer and more filling — excellent as a main course with a simple cucumber salad.
  • Turmeric and Corn Thai Basil Pancakes: Add 1 teaspoon of ground turmeric to the batter (it turns the pancakes a vivid golden yellow) and fold in 80g of fresh or frozen sweetcorn kernels alongside the aromatics. The sweetcorn adds pops of sweetness that contrast with the sharp, aromatic herbs; the turmeric adds an earthy warmth and a striking visual quality. Serve with a sweet chilli dipping sauce rather than the tamari-lime version in the base recipe.
  • Mushroom and Thai Basil Pancakes: Sauté 150g of finely sliced shiitake mushrooms in 1 tablespoon of oil with 1 teaspoon of tamari and a pinch of white pepper until deeply golden, approximately 5 minutes. Cool completely and fold into the batter alongside the aromatics. The mushrooms add an earthy, meaty depth that makes these pancakes substantial enough to serve as a main course without accompaniment other than the dipping sauce.

Nutritional Highlights (Per Serving — Based on 4 Servings)

CaloriesProteinCarbsFiberFat
~185 kcal3g28g2g7g

Storage

  • Best eaten fresh — these pancakes are at their best straight from the pan; the crispy edges soften within 10–15 minutes as the pancake cools and the herbs release moisture. Plan to cook and serve in batches if possible, keeping diners waiting only minutes.
  • Leftovers: Store cooked pancakes in a sealed container in the refrigerator for up to 2 days. Re-crisp in a dry non-stick pan over medium heat for 1–2 minutes per side, or in the air fryer at 180°C for 3 minutes. Do not microwave — microwaving produces a completely soft, limp result.
  • Batter: The rested, thinned batter (without herbs folded in) can be refrigerated for up to 24 hours. Stir before using — the starch may have settled; add a tablespoon of water if it has thickened beyond single-cream consistency. Fold the herbs in just before cooking, not in advance, as the herbs will discolour and release moisture into the batter over time.
  • Dipping sauce: The dipping sauce keeps in the refrigerator for up to 5 days in a sealed jar; the flavour deepens over the first 24 hours. Make a large batch and keep it on hand for noodle salads, spring rolls, or as a general dipping sauce.

Frequently Asked Questions

Can I make these pancakes without rice flour?

Rice flour is specifically recommended because its lack of gluten produces the thin, delicate, crispy-edged texture that defines this style of savoury pancake. Plain wheat flour can be substituted — the pancakes will be thicker, softer, and less crispy but still very flavourful. If using wheat flour, reduce the water by 30ml (the batter should still be thin and pourable) and expect a result closer to a thin crêpe than a lacy rice pancake.

My pancakes are tearing when I flip them. What went wrong?

Tearing usually has one of two causes. First, the batter was cooked before the full 10-minute rest, meaning the starch was incompletely hydrated and the pancake has less cohesion. Second, the pancake was flipped before it was ready — the surface should be completely set and dry (no wet batter visible) before flipping, and the edges should be pulling slightly away from the pan. Wait a full 2–3 minutes on the first side before attempting to flip.

Can I use Italian basil instead of Thai basil?

Italian basil produces a pleasant but distinctly different pancake — softer in flavour, more floral, less anise-forward. If Thai basil is unavailable, the closest approximation is a combination of Italian basil (20g) and fresh mint (10g), which together produce something closer to the complex, aromatic character of Thai basil than Italian basil alone. Fresh holy basil, if available, is a closer substitute than Italian basil.

Can these be made ahead for a dinner party?

Yes, with caveats. Cook all the pancakes up to 2 hours in advance and keep warm in a single layer on a wire rack in an oven set to 100°C — the rack prevents the bottoms from steaming and softening. The pancakes will lose some of their initial crispiness but will still be excellent. For a dinner party, cooking the pancakes in a pan visible to guests (at a kitchen island or pass-through) often works better than making them fully ahead — the aromas are part of the experience, and each pancake takes only 4 minutes total to cook.


Tried this recipe? Leave a comment below and let us know how it turned out! Tag us on Instagram and Facebook — we love seeing your plant-powered creations. Looking for more addictive vegan snack and appetizer recipes? Browse all recipes on Easy Vegan Recipes — new recipes posted every single week!

Vegan Zucchini Clouds — The Light, Fluffy Savoury Fritters That Melt in Your Mouth

vegan zucchini clouds

The name is not an exaggeration. Zucchini clouds are savoury fritters so light and airy that they genuinely seem to have more in common with a soufflé than with a standard vegetable fritter — pale golden on the outside, impossibly tender within, dissolving on the tongue with a flavour that is mild, herbaceous, and deeply savoury from the combination of zucchini, fresh dill, spring onion, garlic, nutritional yeast, and lemon. They are called clouds because of what happens when aquafaba — the liquid from a tin of chickpeas — is whipped to stiff peaks and folded into the zucchini batter just before cooking: the whipped aquafaba introduces thousands of tiny air bubbles into the mixture, and when the fritters hit the hot pan, those bubbles expand in the heat and push the batter upward and outward, creating a fritter that puffs, rises, and sets with an almost ethereal lightness that no conventional fritter batter can replicate. These vegan zucchini clouds are 100% plant-based, dairy-free, egg-free, and can be made gluten-free with a simple flour swap. They are ready in 30 minutes. They serve 4 as a light dinner or starter, or 2 as a main course. They are equally at home as a weekend brunch dish with a yogurt dipping sauce, as a light weeknight dinner with a simple salad, or as a starter at a dinner party where something elegant and unexpected is called for. The technique is what separates a cloud from an ordinary fritter.

The technique is the whipped-aquafaba-fold method. Standard vegan fritter batters are dense and flat by default — without eggs to provide leavening, structure, and aeration, a fritter batter mixed from flour, grated vegetables, and seasonings produces a heavy, compact fritter with a thick, stodgy interior. Baking powder provides some lift but its action is chemical rather than mechanical and produces a coarser, more bready texture rather than the light, dissolving quality of a truly airy fritter. The whipped-aquafaba-fold method achieves genuine lightness through mechanical aeration. Aquafaba — the viscous liquid from a tin of chickpeas — contains a mixture of proteins, starches, and saponins that mimic the foaming and stabilising properties of egg white when whipped. Whipped to stiff peaks in a clean bowl with a pinch of cream of tartar (which stabilises the foam by lowering the pH and preventing the protein network from collapsing), aquafaba forms a dense, stable foam with millions of tiny trapped air bubbles. This foam is then folded — not stirred or beaten — into the prepared zucchini batter in three additions, using a large metal spoon or spatula in a gentle, scooping motion that preserves as many air bubbles as possible. The fritter batter, once the aquafaba foam is incorporated, is visibly lighter and more voluminous than it was before — it holds its shape in the pan rather than spreading flat, and the heat of the oil causes the air bubbles to expand, giving the fritter its characteristic puffed, cloud-like appearance and melt-in-the-mouth texture.

This recipe serves 4 as a starter or light dinner.


Recipe Information

Prep TimeCook TimeTotal TimeServingsCalories
20 mins10 mins30 mins4 (starter/light dinner)~155 kcal

Ingredients

For the Zucchini Base

  • 3 medium zucchini (courgettes), approximately 500g (18oz) — grated on the large holes of a box grater; do not peel
  • ½ tsp fine salt — for drawing moisture from the zucchini before mixing
  • 3 spring onions (scallions), finely sliced — both white and green parts
  • 2 cloves garlic, very finely minced
  • 3 tbsp fresh dill, roughly chopped — dill is the defining herb in this recipe; its bright, slightly anise-like flavour is the primary aromatic note of the cloud; fresh dill only — dried dill has a dusty, diminished flavour that does not work here
  • 2 tbsp fresh flat-leaf parsley, roughly chopped
  • 3 tbsp nutritional yeast — umami depth and a cheese-adjacent savouriness
  • 1 tsp lemon zest — brightness and fragrance
  • 1 tbsp lemon juice
  • 4 tbsp plain flour or rice flour (for gluten-free) — the structural binder; just enough to hold the fritter together; do not add more or the clouds will become dense
  • ¼ tsp black pepper
  • ¼ tsp fine salt (seasoning — in addition to the drawing salt above)

For the Whipped Aquafaba

  • 120ml (½ cup) aquafaba — from a tin of chickpeas; the liquid should be at room temperature, not cold (cold aquafaba takes significantly longer to whip and produces a less stable foam); shake the tin before opening
  • ¼ tsp cream of tartar — stabilises the aquafaba foam; do not omit; white wine vinegar (¼ tsp) can be substituted

For Cooking

  • 2 tbsp neutral oil per batch — enough for a thin, even coating of the pan

For Serving

  • Vegan yogurt dipping sauce: 150ml plant-based yogurt, 1 clove garlic (minced), 1 tbsp lemon juice, 1 tbsp fresh dill, salt and pepper to taste — stir together and refrigerate until serving
  • Fresh dill sprigs
  • Lemon wedges

Instructions

  1. Draw moisture from the zucchini. Grate the zucchini on the large holes of a box grater into a large bowl. Add ½ teaspoon of fine salt, toss to combine, and leave for 10 minutes. Transfer in batches to a clean tea towel and squeeze firmly to remove as much liquid as possible. The squeezed zucchini should feel dry and slightly compressed. Transfer to a clean large bowl.
  2. Make the zucchini base. Add the spring onions, garlic, dill, parsley, nutritional yeast, lemon zest, lemon juice, flour, black pepper, and seasoning salt to the squeezed zucchini. Mix thoroughly until all ingredients are evenly distributed. The mixture will be slightly sticky and cohesive but not a pourable batter — it should hold its shape loosely when scooped. Set aside.
  3. Make the dipping sauce. Combine all dipping sauce ingredients in a small bowl, stir well, and refrigerate until serving.
  4. Whip the aquafaba — whipped-aquafaba-fold method, Stage 1. Ensure your mixing bowl and whisk/beaters are completely clean and dry — any trace of fat or oil will prevent the aquafaba from foaming. Place the room-temperature aquafaba and cream of tartar in the bowl. Whip with an electric hand mixer or stand mixer on high speed for 4–6 minutes until the aquafaba forms stiff, glossy peaks — the foam should stand upright on the beaters without drooping and should not move when the bowl is tilted. The foam will be significantly stiffer and more voluminous than it appears possible from the thin liquid it began as.
  5. Fold the aquafaba — Stage 2. Add one-third of the whipped aquafaba foam to the zucchini mixture. Using a large metal spoon or rubber spatula, fold gently using a scooping motion from the bottom of the bowl upward and over — do not stir, do not beat. The first addition is the loosening addition; it does not need to be perfectly folded. Add the second third and fold again, more carefully this time, preserving the air bubbles. Add the final third and fold with the greatest care until just incorporated — a few streaks of white foam remaining is preferable to overmixing. The finished batter should be noticeably lighter, more voluminous, and slightly pillowy compared to the zucchini base alone.
  6. Cook the clouds. Heat 2 tablespoons of neutral oil in a large non-stick frying pan over medium heat — not high heat; the clouds need gentler heat than a standard fritter to allow the interior to set before the exterior over-browns. Spoon heaped tablespoons of the batter into the pan, spacing them generously — they will puff and spread slightly. Cook undisturbed for 3–4 minutes until the bases are golden and the edges are visibly set. Flip gently with a thin spatula — the clouds are more delicate than standard fritters; handle with care. Cook for a further 2–3 minutes on the second side. Transfer to a warm plate lined with paper towels. Cook in batches, adding fresh oil between batches.
  7. Serve immediately. These clouds are at their most ethereal within minutes of leaving the pan — the air bubbles that give them their lightness gradually escape as the fritters cool, and the texture becomes progressively denser and more conventional over time. Serve at once with the yogurt dipping sauce, fresh dill, and lemon wedges.

Pro Tips

  • Serve immediately and without compromise — zucchini clouds begin to deflate and densify within 10–15 minutes of cooking as the trapped air bubbles escape and the structure relaxes. They are at their peak in the first 5 minutes out of the pan. Plan to cook and serve in rapid succession; do not hold them in the oven or stack them on a plate.
  • Room-temperature aquafaba whips faster and more stably than cold — remove the tin from the refrigerator (if stored cold) 30 minutes before whipping, or stand the open tin in warm water for 5 minutes. Cold aquafaba can whip but takes longer and produces a less stable foam that collapses more quickly during folding.
  • Medium heat is correct — the temptation is to use high heat for a crisper exterior, but the aquafaba foam in the batter requires time at moderate temperature to expand gently and set. High heat browns the exterior before the air bubbles inside have expanded and set, producing a flat, dense fritter rather than a cloud.
  • Fold in three additions — the three-addition fold is not pedantry; the first addition loosens the dense zucchini base enough for the subsequent additions to be folded in without deflating the foam entirely. Adding all the foam at once to a dense base requires so much mixing to incorporate it that most of the air is lost.

Aquafaba: The Accidental Egg White

The discovery that aquafaba — the viscous liquid drained from a tin of chickpeas and historically discarded as kitchen waste — could be whipped into a stable foam indistinguishable in function from egg white is one of the most significant recent developments in vegan cooking, and its origin is both recent and precisely documented. In 2014, French tenor and amateur cook Joël Roessel began experimenting with various legume cooking liquids as potential egg white substitutes, publishing his findings on his blog and noting that certain bean liquids could be whipped to a meringue-like foam. His findings were picked up by software engineer Goose Wohlt in early 2015, who specifically identified tinned chickpea liquid as producing the most stable and reliable foam and coined the term “aquafaba” (from the Latin “aqua” for water and “faba” for bean) for it. Wohlt’s post to a vegan Facebook group in March 2015 demonstrating aquafaba meringues produced an immediate and widespread reaction in the vegan cooking community — within weeks, bakers and cooks worldwide were testing aquafaba in macarons, mousses, pavlovas, marshmallows, mayonnaise, and batters, and finding that it functioned effectively in every egg-white application they tried. The scientific explanation for aquafaba’s foaming properties was confirmed by food scientists subsequently: the liquid contains a mixture of starches (which contribute viscosity and foam stability), proteins (which unfold at the air-liquid interface to form the foam structure, exactly as egg white proteins do), and saponins (plant compounds that act as natural surfactants, lowering surface tension and facilitating foam formation). The chickpea happens to produce a particularly effective combination of these compounds — other legume cooking liquids work to varying degrees, but chickpea liquid remains the most reliable and most widely used. Aquafaba’s discovery transformed vegan baking from a discipline defined by compromise into one with genuine technical solutions: the zucchini clouds in this recipe would be impossible without it.


Flavor Variations

  • Feta-Style and Mint Zucchini Clouds: Replace the dill with 3 tablespoons of fresh mint, and add 80g of crumbled vegan feta-style cheese (or firm tofu marinated in lemon juice, salt, and a pinch of dried oregano) to the zucchini base before folding in the aquafaba. The mint and vegan feta combination gives the clouds a Greek-inflected character — bright, tangy, and fragrant.
  • Corn and Chilli Zucchini Clouds: Replace 100g of the grated zucchini with 100g of fresh or frozen sweetcorn kernels (thawed if frozen) and add 1 finely sliced red chilli and ½ teaspoon of ground cumin to the base. Replace the dill with fresh coriander (cilantro). The corn adds sweetness and texture; the chilli and cumin add warmth. Serve with a lime and avocado dipping sauce.
  • Japanese-Inspired Zucchini Clouds: Replace the dill and parsley with 3 finely sliced spring onions (extra) and 1 tablespoon of white miso paste worked into the base (reduce the salt accordingly). Add 1 teaspoon of toasted sesame oil and 1 tablespoon of finely sliced pickled ginger. Serve with a dipping sauce of tamari, rice vinegar, and a drop of toasted sesame oil. The miso adds a deep, fermented savouriness that transforms the clouds into something distinctly umami-forward.

Nutritional Highlights (Per Serving — Based on 4 Servings)

CaloriesProteinCarbsFiberFat
~155 kcal6g17g3g7g

Storage

  • Best eaten immediately — zucchini clouds are specifically designed around the ephemeral quality of a freshly cooked whipped-aquafaba fritter. They are best within 5 minutes of cooking and should be served directly from the pan. This is not a make-ahead dish.
  • Leftovers: Store in a sealed container in the refrigerator for up to 2 days. The clouds will have deflated and densified by this point and are no longer light in the original sense — they become more like a conventional courgette fritter. Re-warm in a dry non-stick pan over medium heat for 2 minutes per side. They remain tasty but the cloud quality is not recoverable after refrigeration.
  • The uncooked batter does not store — the whipped aquafaba foam collapses over time. Cook the batter immediately after folding in the aquafaba; do not make the full batter in advance.
  • Dipping sauce: The yogurt dipping sauce keeps in the refrigerator for up to 3 days and improves in flavour over the first 24 hours as the garlic infuses.

Frequently Asked Questions

My aquafaba won’t whip to stiff peaks. What’s wrong?

The most common causes of aquafaba failing to whip: the bowl or beaters had traces of fat or oil (fat destabilises the foam protein network — wash and dry everything thoroughly); the aquafaba was too cold (bring to room temperature before whipping); the cream of tartar was omitted (it stabilises the foam by lowering pH); or the aquafaba was too dilute (some brands are more concentrated than others — if the liquid is very thin and watery, reduce it by simmering for 5 minutes and cooling before whipping). Some brands produce a thicker, more protein-rich liquid than others; if one brand consistently fails, try another.

Can I make these in the oven instead of a pan?

Baked aquafaba fritters do not achieve the same lightness as pan-fried ones — the oven’s indirect heat causes the foam to collapse more slowly and unevenly than a hot pan, and the fritters spread and flatten rather than puffing. Pan frying with medium heat is the correct method for this recipe. If baking is necessary, preheat a greased baking tray in the oven at 200°C before spooning the batter on — the hot tray provides the immediate bottom heat that helps the fritters hold their shape.

Can I substitute the chickpea liquid with a different bean liquid?

Other white bean cooking liquids (cannellini, butter beans) can be substituted — they have similar protein and starch compositions to chickpea liquid and whip reasonably well. Black bean liquid works but imparts a slight colour. Chickpea liquid remains the most reliable and most neutral-flavoured option and is the specific recommendation for this recipe.

How do I know when to flip the clouds?

The clouds are ready to flip when the base is golden (visible by lifting one edge gently with a spatula), the edges are set and no longer wet-looking, and the top surface is no longer completely liquid — there will still be a slight wobble in the centre, which is correct. If the cloud moves as a single, cohesive unit when you slide the spatula under it, it is ready. If it is still adhering to the pan and resisting the spatula, leave it for another 60 seconds.


Tried this recipe? Leave a comment below and let us know how it turned out! Tag us on Instagram and Facebook — we love seeing your plant-powered creations. Looking for more addictive vegan snack and appetizer recipes? Browse all recipes on Easy Vegan Recipes — new recipes posted every single week!

Vegan Lentil and Vegetable Stew — The Hearty, Deeply Flavoured One-Pot Ready in 45 Minutes

vegan lentil and vegetable stew

There is a category of cooking that requires no special skill, no unusual equipment, and no expensive ingredients, and yet produces food that is deeply satisfying in a way that more technically demanding dishes sometimes fail to achieve — and a great lentil and vegetable stew is one of the finest examples of that category. Lentils are among the most ancient of cultivated foods, one of the earliest crops domesticated by human agriculture, and they have been turned into stews, soups, and porridges across every culture that has grown them for good reason: they are nutritionally dense, inexpensive, filling, and — when cooked correctly — deeply flavourful in a way that belies their simplicity. This vegan lentil and vegetable stew is built around green or brown lentils (which hold their shape through cooking rather than dissolving into a purée, giving the stew body and texture), a base of onion, celery, carrot, and garlic cooked until deeply soft and sweet, a spice blend of smoked paprika, ground cumin, ground coriander, and turmeric that adds warmth and depth without overwhelming the natural earthiness of the lentils, and a finishing element of leafy greens and lemon juice that lifts the entire dish from hearty and comforting into something also bright and fresh. This vegan lentil and vegetable stew is 100% plant-based, dairy-free, egg-free, naturally gluten-free, and high in plant protein and dietary fibre. It serves 6 generously. It is ready in 45 minutes. It improves overnight, making it an ideal meal-prep dish, and it freezes flawlessly — one of the most practical recipes in this collection. The technique is the reason the stew achieves a depth of flavour in 45 minutes that a less disciplined approach might take twice as long to develop.

The technique is the spice-temper-and-deglaze method. The flavour depth of a great lentil stew comes not from the lentils themselves — which are earthy and pleasant but relatively mild on their own — but from the way the aromatics and spices are treated in the early stages of cooking. The spice-temper-and-deglaze method builds this depth through two sequential steps that most quick stew recipes skip entirely. Step one — spice temper: once the mirepoix (onion, carrot, celery) has been cooked in olive oil until soft and beginning to turn golden (approximately 10 minutes over medium heat), the minced garlic is added and cooked for 60 seconds until fragrant, and then the whole spice blend is added directly to the oil in the pan and toasted for exactly 90 seconds, stirring constantly. This dry-toasting of the spices in the residual oil of the softened vegetables activates the fat-soluble aromatic compounds in the spices — compounds that cannot dissolve in the water-based stock that will be added later — releasing their full fragrance and flavour potential before the liquid arrives. The spice-tempered base smells dramatically more complex and developed than a base in which the spices are simply added with the liquid. Step two — deglaze: immediately after the spice toast, a splash of red wine vinegar (or the juice of half a lemon, or a small amount of stock) is added to the pan and the base is deglazed — the liquid is used to scrape up and dissolve all the flavourful browned bits (fond) that have accumulated on the base of the pan during the mirepoix and spice stages. This fond is concentrated flavour; incorporating it into the stew base via deglazing significantly deepens the overall flavour of the finished dish. The lentils and stock are then added to this deeply flavoured, deglazed base, and the stew simmers to completion.

This recipe serves 6.


Recipe Information

Prep TimeCook TimeTotal TimeServingsCalories
10 mins35 mins45 mins6~340 kcal

Ingredients

  • 2 tbsp olive oil
  • 2 medium onions, finely diced
  • 3 stalks celery, finely sliced
  • 3 medium carrots, peeled and cut into 1cm dice
  • 6 cloves garlic, finely minced
  • 2 tsp smoked paprika
  • 1½ tsp ground cumin
  • 1 tsp ground coriander
  • ½ tsp ground turmeric
  • ½ tsp chilli flakes (adjust to taste)
  • ¼ tsp black pepper
  • 2 tbsp tomato purée (tomato paste)
  • 2 tbsp red wine vinegar — for deglazing; apple cider vinegar or lemon juice can be substituted
  • 300g (1½ cups) green or brown lentils — rinsed thoroughly under cold water; do not use red lentils (they dissolve into a purée rather than holding their shape); pick through for any small stones before rinsing
  • 400g (14oz) tin chopped tomatoes
  • 1.2 litres (5 cups) vegetable stock — good-quality stock makes a significant difference; use a low-sodium stock and adjust seasoning at the end
  • 2 medium waxy potatoes (approximately 300g), peeled and cut into 2cm dice — optional but recommended; they add substance and absorb the spiced stock beautifully
  • 1 medium courgette (zucchini), cut into 2cm dice — added in the last 10 minutes to retain some texture
  • 100g (3½oz) kale or spinach — kale stirred in 5 minutes before the end; spinach wilted in right at the end; both add colour, nutrition, and freshness
  • 1 tsp fine salt — adjust to taste; the final seasoning should be assertive
  • Juice of 1 lemon — added at the end; the acidity brightens the entire stew and is not optional

For Serving (Optional)

  • Crusty bread or flatbread
  • Vegan yogurt or sour cream
  • Fresh flat-leaf parsley or coriander, roughly chopped
  • Extra lemon wedges
  • Chilli oil or harissa

Instructions

  1. Build the mirepoix. Heat the olive oil in a large, heavy-based pot or Dutch oven over medium heat. Add the diced onion, celery, and carrot. Cook, stirring occasionally, for 10–12 minutes until the vegetables are completely soft, translucent, and beginning to turn golden at the edges. Do not rush this step by raising the heat — properly softened mirepoix is the flavour foundation of the entire stew.
  2. Add garlic and tomato purée. Add the minced garlic and tomato purée to the softened mirepoix. Cook, stirring constantly, for 2 minutes until the garlic is fragrant and the tomato purée has darkened slightly in colour from red to a deeper brick red — this brief caramelisation of the tomato purée adds sweetness and depth.
  3. Spice temper — Stage 1. Add the smoked paprika, ground cumin, ground coriander, turmeric, chilli flakes, and black pepper directly to the oil in the pan. Stir vigorously and constantly for exactly 90 seconds, coating the vegetables in the spice blend and toasting the spices in the residual oil. The pan should smell intensely fragrant — warm, smoky, and deeply savoury. Do not leave unattended; the spices will burn in seconds if the heat is too high.
  4. Deglaze — Stage 2. Pour the red wine vinegar into the pan and use a wooden spoon to scrape up all the browned bits from the base of the pan. The vinegar will sizzle on contact and the fond will dissolve into the base within 30 seconds. This is the deglaze; it incorporates all the concentrated flavour from the bottom of the pan.
  5. Add lentils, tomatoes, and stock. Add the rinsed green lentils, tinned chopped tomatoes, and vegetable stock. Stir to combine. If using potatoes, add them now. Increase the heat to bring the stew to a boil, then reduce to a steady simmer. Cook uncovered for 20 minutes, stirring occasionally.
  6. Add the courgette. After 20 minutes, add the diced courgette. Continue to simmer for a further 10 minutes until the lentils are completely tender (they should be soft but still holding their shape — not mushy) and the potatoes are cooked through. If the stew has thickened more than desired, add a splash of stock or water to reach your preferred consistency.
  7. Add the greens and finish. Stir in the kale (if using) and cook for 4–5 minutes until tender. Or, if using spinach, remove from the heat and stir the spinach through — it will wilt in the residual heat within 60 seconds. Add the lemon juice and taste for seasoning. Adjust salt, pepper, and lemon juice — the stew should be well-seasoned and bright.
  8. Serve. Ladle into bowls and finish with fresh parsley or coriander, a dollop of vegan yogurt if desired, and crusty bread alongside for mopping.

Pro Tips

  • Do not rush the mirepoix — 10 minutes of patient cooking at medium heat produces an onion, carrot, and celery base that is sweet, deeply soft, and beginning to caramelise at the edges. Five minutes produces a base that is half-cooked and sharp. The mirepoix is the flavour foundation; the quality of the finished stew is determined largely by how well this first step is executed.
  • Toast the spices in the oil, not the water — this is the heart of the spice-temper step and the single most important technique in this recipe. Fat-soluble aromatic compounds in spices (the compounds responsible for their complex flavour and fragrance) cannot dissolve in water; they can only dissolve in fat. Adding spices with the liquid means only the water-soluble compounds extract into the stew; adding them to the oil first extracts the fat-soluble compounds that give the spice blend its full character.
  • Add lemon juice at the end, not the beginning — acid added early in cooking dissipates during the long simmer; acid added at the end remains bright and sharp. The lemon juice in this recipe is a finishing element that balances the earthiness of the lentils and the richness of the olive oil and spices; it should taste fresh and present in the finished stew.
  • Make it ahead — this stew is genuinely better on day two. The lentils continue to absorb the spiced stock overnight, and the flavours deepen and meld significantly. Make a large batch, refrigerate overnight, and reheat gently the following day; add a small splash of water or stock when reheating as the stew thickens considerably when cold.

Lentils and the Oldest Agricultural Bargain

Lentils occupy a unique position in the human food story — they are among the first crops that Neolithic human communities chose to cultivate rather than simply gather, and the evidence for their domestication in the Fertile Crescent (the arc of agriculturally productive land running through modern Turkey, Syria, Lebanon, Israel, Jordan, and Iraq) dates to approximately 8000–7000 BCE, making them contemporaries of early wheat and barley cultivation and among the oldest deliberately grown foods in the human record. Archaeological lentil seeds — carbonised and preserved — have been found at sites including Tell Aswad in Syria, Çayönü in Turkey, and the Franchthi Cave in Greece, representing continuous human cultivation across thousands of years. The attraction of lentils to early farmers was immediate and practical: they are fast-growing (ready in approximately 80–110 days), nitrogen-fixing (they return nitrogen to the soil, improving yields for subsequent crops — one of the earliest understood applications of crop rotation), drought-tolerant, easily stored, and extraordinarily nutritious — a combination of protein (approximately 25% of dry weight), complex carbohydrates, fibre, iron, and folate that made them a reliable staple food in regions where animal protein was scarce or expensive. The reference to lentils in Genesis 25 — the “mess of pottage” (red lentil stew) for which Esau trades his birthright — represents one of the earliest literary appearances of a specific cooked food, which gives some indication of how central lentil stew was to the diet and culture of the ancient Near East. In contemporary plant-based cooking, lentils have reclaimed the nutritional and culinary centrality they held in the ancient world — they are, by any measure, among the most practical, nutritious, and flavourful ingredients available to the vegan cook.


Flavor Variations

  • Moroccan-Spiced Lentil Stew: Replace the smoked paprika and cumin with 2 teaspoons of ras el hanout and add ½ teaspoon of ground cinnamon and ¼ teaspoon of ground ginger to the spice blend. Add 80g of dried apricots (roughly chopped) with the lentils. Finish with fresh coriander and a swirl of harissa. The warm, sweet spicing of ras el hanout and the apricots produce a stew that is distinctly North African in character — serve with flatbread or couscous.
  • Tuscan-Style Lentil and Cavolo Nero Stew: Replace the courgette with 200g of cavolo nero (Tuscan kale), shredded and added in the last 8 minutes. Add a Parmesan rind (omit for strict vegan) or a piece of kombu seaweed to the stock for additional depth. Finish with a generous drizzle of the best extra-virgin olive oil you have and a heavy crack of black pepper. The Tuscan version is more austere and deeply savoury than the base recipe — serve with grilled sourdough bread rubbed with garlic.
  • Coconut and Spinach Lentil Stew: Replace 400ml of the vegetable stock with one tin (400ml) of full-fat coconut milk, added with the remaining stock. Replace the red wine vinegar in the deglaze with lime juice. Replace the kale with 150g of baby spinach added at the very end. The coconut version is creamier, richer, and slightly sweet — excellent served over rice or with roti.

Nutritional Highlights (Per Serving — Based on 6 Servings)

CaloriesProteinCarbsFiberFat
~340 kcal18g52g14g7g

Storage

  • Refrigerator: Store in a sealed container for up to 5 days. The stew thickens as it sits — add a splash of water or stock when reheating. Reheat gently on the hob over medium-low heat, stirring occasionally. The flavour improves significantly over the first 24–48 hours.
  • Freezer: This stew freezes exceptionally well. Cool completely before portioning into freezer-safe containers or bags. Freeze for up to 3 months. Thaw overnight in the refrigerator or from frozen in a saucepan over gentle heat with a splash of water. Add the lemon juice fresh after thawing rather than before freezing — frozen acid can taste sharper than intended when defrosted.
  • Meal prep: This recipe scales effortlessly — double the quantities for a large batch to portion and refrigerate or freeze for the week ahead. It reheats beautifully in a microwave (3–4 minutes on high, stirring halfway) or on the hob.
  • The potatoes: Potato-containing stew freezes slightly less cleanly than potato-free stew — potato texture can become slightly mealy after freezing. For a stew intended for the freezer, omit the potatoes or substitute with white beans (add a drained tin of cannellini beans with the lentils).

Frequently Asked Questions

Can I use red lentils instead of green or brown?

Red lentils will work but produce a fundamentally different dish — they dissolve into the stock during cooking, producing a thick, creamy, purée-like stew rather than one with distinct lentil pieces and body. This is not a bad result — it is more similar to a dal — but it is a different dish from the chunky, textured stew this recipe intends. If you prefer a creamy, purée-style lentil stew, red lentils are excellent; reduce the cooking time to 25 minutes total.

Do I need to soak the lentils before cooking?

Green and brown lentils do not require soaking — they cook from dry in approximately 25–30 minutes at a simmer. Rinsing before cooking (to remove any surface starch and debris) is sufficient preparation. Red lentils also do not require soaking. The only lentils that benefit from soaking are the larger French Puy lentils, which cook slightly more evenly after an hour of cold-water soaking, though they can also be cooked from dry.

My stew is too thick. How do I fix it?

Add vegetable stock or water, a splash at a time, stirring between additions, until the consistency is right. Green lentils absorb liquid progressively during cooking and continue to absorb it during storage — a stew that is the correct consistency when first made will be significantly thicker the following day; this is normal and desirable. Always add liquid when reheating.

Can I make this in a slow cooker?

Yes — complete steps 1 through 4 (the mirepoix, spice temper, and deglaze) in a frying pan on the hob, then transfer everything to a slow cooker. Add the lentils, tomatoes, stock, and potatoes. Cook on low for 6–8 hours or high for 3–4 hours. Add the courgette and greens in the last 30 minutes on high. Finish with lemon juice and seasoning before serving.


Tried this recipe? Leave a comment below and let us know how it turned out! Tag us on Instagram and Facebook — we love seeing your plant-powered creations. Looking for more addictive vegan snack and appetizer recipes? Browse all recipes on Easy Vegan Recipes — new recipes posted every single week!

Vegan Buttery Skillet Corn — The Caramelised, Creamy Side Dish Ready in 15 Minutes

vegan buttery skillet corn

There is a category of side dish — simple, fast, deeply satisfying — that earns its place on the table not through complexity or technical difficulty but through the quality of a single cooking decision well executed. Vegan buttery skillet corn is exactly that kind of dish. Sweet corn kernels, cut fresh from the cob or used from frozen, cooked in a very hot cast iron or heavy-bottomed skillet with vegan block butter, a pinch of sugar, and a confident hand, emerge from the pan golden and caramelised at the edges, with a concentrated sweetness that bears very little resemblance to the steamed or boiled corn it replaces. The addition of a small amount of plant-based cream, stirred in at the end of cooking, creates a light, glossy, butter-enriched sauce that coats each kernel — not a heavy cream sauce, but a barely-there coating that ties the kernels together and gives the dish a richness and lusciousness that is the signature quality of the classic American skillet corn preparation. This vegan buttery skillet corn is 100% plant-based, dairy-free, and egg-free. It is ready in 15 minutes. It serves 4 as a side dish. It is equally at home alongside grilled tofu or tempeh, as a filling for tacos or burritos, spooned over rice, tucked into a grain bowl, or served straight from the skillet as a standalone snack. The technique is the reason the corn caramelises and chars rather than steaming in its own liquid.

The technique is the dry-skillet-and-deglaze method. Corn kernels carry a significant amount of natural moisture — juice released from the cut kernel walls — and this moisture is the primary obstacle to achieving caramelisation and char in a skillet. If corn kernels are added to a pan that is insufficiently hot, or in too large a quantity for the pan, or with butter or oil added before the corn is in contact with the hot surface, the released moisture creates a steaming environment in the pan rather than a frying one. The corn softens and heats through but does not brown; it tastes pleasant but flat, without the caramelised depth that makes skillet corn genuinely addictive. The dry-skillet-and-deglaze method solves this through two stages. Stage one — dry skillet: the skillet is preheated over high heat for 2–3 minutes until smoking hot — considerably hotter than most sauté recipes call for — before anything is added to it. When the corn kernels are added directly to the dry, smoking-hot skillet (no oil, no butter at this stage), they make immediate contact with the hot metal and begin to char and caramelise on their surface before the released moisture has time to accumulate and steam. The kernels are pressed down lightly and left completely undisturbed for 90 seconds, allowing the contact side to develop a deep golden, slightly charred surface. Stage two — deglaze: after the initial char, the heat is reduced to medium, the vegan block butter is added to the pan, and the corn is tossed to coat. The butter melts rapidly and the sugars in the corn continue to caramelise in the now-buttery heat. After 2–3 minutes, a small amount of plant-based cream is poured into the hot pan to deglaze — the liquid lifts all the caramelised, browned bits from the base of the pan, dissolving them into a glossy, intensely flavoured sauce that coats every kernel. The result is corn that is simultaneously charred, sweet, buttery, and sauced — the full range of the dish achieved in under 15 minutes.

This recipe serves 4 as a side dish.


Recipe Information

Prep TimeCook TimeTotal TimeServingsCalories
5 mins10 mins15 mins4 (side dish)~195 kcal

Ingredients

  • 600g (approximately 4 cups) fresh or frozen corn kernels — fresh corn cut from 4–5 cobs is strongly preferred for the best flavour and texture; if using frozen, do not thaw before cooking (thawed frozen corn releases too much water into the pan); frozen corn used straight from frozen works very well as a convenient alternative
  • 2 tbsp vegan block butter — block butter (not tub-style spread) is essential; the higher fat content and lower water content of block butter produces the correct golden, buttery coating without the excess moisture that a spread introduces; added after the initial dry char, not before
  • ½ tsp caster sugar — small quantity; accelerates caramelisation of the corn’s natural sugars without making the dish taste sweet; do not increase
  • ½ tsp fine salt — adjust to taste; the corn should be well-seasoned
  • ¼ tsp black pepper
  • 3 tbsp plant-based single cream or full-fat oat cream — for the deglaze; the cream creates the glossy, light sauce that coats the kernels; full-fat coconut cream (from a tin, not a carton, shaken well) can be substituted though it adds a faint coconut background note; soy cream or oat cream are the most neutral options
  • 2 cloves garlic, very finely minced — added with the butter after the initial char; garlic added to the dry, smoking skillet would burn instantly
  • ¼ tsp smoked paprika — a background note of warmth; can be omitted for a more classic, straightforward skillet corn

Optional Garnishes

  • Fresh chives or flat-leaf parsley, finely chopped
  • Squeeze of fresh lemon juice — brightens the finished dish; highly recommended
  • Pinch of chilli flakes — for heat
  • Nutritional yeast (1 tbsp) — for a faint cheesy note and additional umami depth

Instructions

  1. Prepare the corn. If using fresh corn, stand each cob upright in a large bowl and cut the kernels from the cob using a sharp chef’s knife, working downward from top to base. The bowl catches the kernels and the juice. Pat the kernels dry with a clean paper towel — removing surface moisture improves the initial char. If using frozen, measure straight from the freezer without thawing.
  2. Heat the dry skillet. Place a large cast iron skillet or heavy-bottomed frying pan over high heat. Leave to preheat for 2–3 minutes until the pan is smoking hot — this is significantly hotter than a standard sauté; the pan should feel visibly hot when you hold your hand 10cm above the surface. Do not add any fat at this stage.
  3. Char the corn — dry skillet stage. Add the corn kernels to the dry, smoking-hot skillet in a single, even layer. They will spit and hiss dramatically on contact — this is correct. Do not stir. Press the kernels lightly with a spatula to maximise contact with the hot pan surface. Leave completely undisturbed for 90 seconds. The base of the kernels in contact with the pan should develop a deep golden to slightly charred colour; some light char is desirable and contributes the distinctive smoky-sweet depth of great skillet corn.
  4. Toss and add butter. After 90 seconds, toss the corn and reduce the heat to medium. Add the vegan block butter, minced garlic, sugar, salt, pepper, and smoked paprika. Toss to coat all the kernels in the melting butter. Cook, stirring occasionally, for 2–3 minutes until the garlic is fragrant and the corn is thoroughly coated and golden.
  5. Deglaze with cream. Pour the plant-based cream into the hot pan — it will bubble and steam immediately. Stir vigorously, scraping up all the caramelised bits from the base of the pan. Cook for 60–90 seconds, stirring, until the cream has reduced and coats the corn in a light, glossy sauce rather than a visible pool of liquid. The corn should glisten and be lightly sauced, not swimming.
  6. Taste and finish. Taste for seasoning and adjust salt, pepper, and — if using — a squeeze of fresh lemon juice. Add any optional garnishes. Serve immediately, straight from the skillet.

Pro Tips

  • The skillet must be genuinely smoking hot before the corn goes in — not warm, not medium-hot, but smoking. Test by holding your palm 10cm above the surface; it should feel uncomfortably hot within 2 seconds. A pan that is merely warm produces steamed corn; a pan that is smoking produces caramelised corn. The 2–3 minute preheat over high heat is not approximate.
  • Do not crowd the pan — corn kernels need space to char rather than steam. 600g of corn kernels is close to the maximum for a 30cm (12-inch) skillet; if you have a smaller pan, cook in two batches rather than crowding. A crowded pan drops in temperature rapidly when the cold corn is added, and the released moisture steams the whole batch rather than evaporating quickly.
  • Frozen corn straight from the freezer works, but pat fresh corn dry — the key difference between frozen and fresh in this recipe is not flavour (frozen sweet corn is frozen at peak ripeness and is excellent) but surface moisture. Fresh corn kernels carry cut-surface juice that benefits from patting dry before cooking; frozen corn enters the pan cold and dry, and the high heat flash-evaporates the surface moisture almost immediately.
  • The cream deglaze is the final flavour step, not an afterthought — stir it in while the pan is still hot and on the heat, not after removing from the flame. The cream needs to bubble and reduce in the hot pan to form a sauce; added to a cool pan it merely pools and does not integrate with the corn.

Corn in the Americas: 9,000 Years of the World’s Most Productive Crop

Maize — known as corn in North America and in common English usage — is one of the most consequential plants in human history, and its domestication represents one of the most remarkable achievements of ancient agricultural science. The wild ancestor of modern maize is a grass called teosinte (Balsas teosinte, Zea mays subsp. mexicanus), native to the Balsas River valley of southwestern Mexico, and the transformation of teosinte — which bears small, hard, widely spaced seeds on a tiny, multi-branched plant — into the large-cobbed, densely kernelled maize we recognise today took indigenous farmers in the region approximately 9,000 years, beginning around 7000 BCE and involving thousands of generations of selective breeding for larger cobs, greater kernel density, and higher starch content. The archaeological and genetic evidence for this transformation, pieced together through studies of maize cob fossils and teosinte genomics over the past three decades, represents one of the most detailed pictures of ancient plant domestication available to science. Maize spread from its Mexican origin throughout North and South America over subsequent millennia — reaching the American Southwest by approximately 2000 BCE and the eastern woodlands of North America by 200 BCE — and was so central to the food cultures, economies, and cosmologies of the civilisations that depended on it (Aztec, Maya, Inca, Iroquois, and hundreds of others) that it featured as a divine gift or creation element in the origin stories of many of them. European colonisers encountered maize throughout the Americas from 1492 onward and carried it back to Europe and subsequently to Africa and Asia, where it became a staple food crop in many regions within a century of first contact. Today, maize is the most produced grain crop on Earth by total tonnage — approximately 1.1 billion metric tonnes annually — and the sweet corn varieties that reach our tables (selected for high sugar content and eaten before the sugars convert to starch) represent a relatively recent development within this vast agricultural tradition, bred and popularised in the United States from the 19th century onward. In the skillet corn preparation, what is being celebrated is the Maillard reaction and caramelisation of the kernel’s natural sugars — a cooking chemistry that would have been deeply familiar to every culture that has cooked corn over open fire for the past several thousand years.


Flavor Variations

  • Mexican Street Corn (Elote) Style: After the deglaze, stir in 1 teaspoon of chilli powder, ½ teaspoon of ground cumin, and a squeeze of lime juice. Transfer to a serving bowl and top with crumbled vegan feta-style cheese (or a firm salted tofu), finely chopped fresh coriander (cilantro), an additional squeeze of lime, and a drizzle of vegan mayonnaise thinned with lime juice. The elote variation transforms the side dish into something festive and bold — excellent served in cups as a street-food-style starter.
  • Herb and Lemon Skillet Corn: Omit the smoked paprika and chilli flakes. After the deglaze, stir in 2 tablespoons of finely chopped fresh tarragon or chervil, the zest of 1 lemon, and an additional tablespoon of vegan block butter. The herb-and-lemon version is fresher, brighter, and more elegantly restrained than the base recipe — excellent alongside a simple grilled main.
  • Miso Butter Skillet Corn: Replace 1 tablespoon of the vegan block butter with 1 tablespoon of white (shiro) miso, stirred together with the remaining butter into a miso butter paste before adding to the pan. Omit the smoked paprika; add 1 teaspoon of toasted sesame oil with the cream deglaze. Finish with toasted sesame seeds and finely sliced spring onion. The miso butter version is deeply umami-forward and savoury — less sweet than the base recipe and excellent alongside rice or noodles.

Nutritional Highlights (Per Serving — Based on 4 Servings)

CaloriesProteinCarbsFiberFat
~195 kcal4g30g3g8g

Storage

  • Best eaten fresh — skillet corn is at its best straight from the pan, when the char is at peak flavour and the cream sauce is at the right consistency. Like most quickly cooked vegetable sides, it deteriorates in quality if held for more than 20–30 minutes.
  • Refrigerator: Store leftovers in a sealed container for up to 3 days. The cream sauce thickens significantly when cold. Reheat in a skillet over medium heat with a small splash of plant milk or water to loosen the sauce; stir frequently. Do not microwave if char quality is important — the microwave softens the kernels and the char flavour dissipates.
  • Freezer: Not recommended for the finished dish — cream sauces separate when frozen and the char texture is lost completely on thawing. Uncooked frozen corn is already the most convenient storage format; there is no advantage to freezing the cooked dish.
  • Make-ahead for meal prep: The dry-charred corn (step 3 only, before the butter and cream) can be made ahead, cooled, and refrigerated for up to 2 days. Finish with the butter-and-deglaze steps from cold in a reheated skillet when ready to serve; the char will still be present and the final cooking takes under 5 minutes.

Frequently Asked Questions

Can I use tinned sweetcorn instead of fresh or frozen?

Tinned sweetcorn is not ideal for this recipe — the canning process pre-cooks the kernels and they carry significantly more water than fresh or frozen, making it very difficult to achieve char in the dry-skillet stage. If tinned corn is the only option, drain it thoroughly, then spread on a clean tea towel and press dry before using; expect a less pronounced char and a slightly softer, less textured result. Frozen sweetcorn used straight from frozen is the recommended convenience substitute — it performs nearly as well as fresh.

Do I need a cast iron skillet or will any pan work?

A cast iron skillet or a heavy stainless-steel pan (not non-stick) is strongly recommended for the dry-char stage — these pans can be heated to very high temperatures safely and retain heat when the cold corn is added. A non-stick pan should not be heated dry to smoking temperatures, as this damages the coating and produces harmful fumes at very high heat. If a non-stick pan is the only option, add a small amount of oil before the corn and accept that the char will be less aggressive.

My corn released a lot of water and steamed instead of charring. What went wrong?

The three most common causes: the pan was not hot enough before the corn was added (preheat for the full 2–3 minutes over high heat until genuinely smoking); too much corn was added at once (crowding drops the pan temperature sharply — cook in batches); or the corn was thawed before adding (thawed corn has surface moisture that steams before evaporating — use frozen corn straight from the freezer or pat fresh corn dry before cooking).

Can I make this dish without the cream?

Yes — omit the cream and instead deglaze with 2 tablespoons of vegetable stock or water, which picks up the pan fond and lightly sauces the corn without the richness of cream. The result is lighter and slightly less indulgent but still excellent, and the char flavour comes through more clearly without the cream coating. Add an extra half tablespoon of vegan block butter at the deglaze stage to compensate for the missing richness.


Tried this recipe? Leave a comment below and let us know how it turned out! Tag us on Instagram and Facebook — we love seeing your plant-powered creations. Looking for more addictive vegan snack and appetizer recipes? Browse all recipes on Easy Vegan Recipes — new recipes posted every single week!