Desserts

Vegan Butter Pecan Fudge — The Richest Most Indulgent Plant-Based Candy You Will Ever Make

vegan butter pecan fudge

There are confections that feel like an occasion. And then there are sweets like this Vegan Butter Pecan Fudge — the kind that you cut into squares and set on a plate and watch disappear in minutes because each piece is so extraordinarily rich, so deeply buttery, so loaded with toasted pecans and caramel warmth that it is genuinely impossible to eat just one. This is that fudge. The one that makes people ask for the recipe before they have finished chewing. The one that proves definitively that vegan candy can be every bit as indulgent, every bit as luxurious, and every bit as memorable as anything made with dairy.

This recipe combines vegan butter, coconut cream, maple syrup, and brown sugar into a smooth, creamy fudge base that sets beautifully and melts on the tongue in exactly the way the finest fudge should — not gritty, not grainy, not waxy, but smooth and dense and deeply, luxuriously flavored. Toasted pecans folded through the warm fudge add crunch, nuttiness, and a toasty warmth that is the defining characteristic of butter pecan as a flavor — that combination of rich fat, caramelized sugar, and toasted nut that makes butter pecan one of the most beloved dessert flavors in American cooking.

What makes this recipe so outstanding is the toasting step — toasting the pecans in vegan butter before folding them into the fudge takes them from simply crunchy to deeply nutty and fragrant in a way that transforms the entire flavor profile of the finished candy.

This recipe is 100% vegan, naturally gluten-free, requires no candy thermometer, sets beautifully in the refrigerator, and produces a fudge so rich and so deeply flavored that it is genuinely worthy of gifting, serving at celebrations, or simply keeping in the refrigerator for when the mood for something spectacular strikes.


Recipe Information

Prep TimeCook TimeSet TimeTotal TimeServingsCalories
10 mins15 mins2 hours2 hrs 25 mins20 pieces~180 kcal

Ingredients

For the Toasted Pecans

  • 1½ cups (150g) raw pecan halves
  • 1 tbsp vegan butter
  • ¼ tsp salt

For the Fudge Base

  • ½ cup (115g) vegan butter
  • 1 cup (200g) brown sugar, packed
  • ½ cup (120ml) full-fat coconut cream
  • 2 tbsp maple syrup
  • 1 tsp vanilla extract
  • ¼ tsp salt
  • 2½ cups (300g) powdered sugar, sifted

Instructions

  1. Toast the pecans. Melt the tablespoon of vegan butter in a skillet over medium heat. Add the pecan halves and salt and cook, stirring frequently, for 4–5 minutes until the pecans are golden, fragrant, and lightly toasted. Watch carefully as they can go from perfectly toasted to burnt very quickly. Transfer immediately to a plate and allow to cool. Roughly chop once cooled.
  2. Line and prepare. Line an 8×8 inch (20x20cm) square baking pan with parchment paper, leaving overhang on two sides for easy removal. Set aside.
  3. Make the fudge base. In a medium saucepan over medium heat, combine the vegan butter, brown sugar, coconut cream, maple syrup, and salt. Stir constantly until the butter has melted and the sugar has dissolved. Bring to a gentle boil, then cook for exactly 4 minutes while stirring constantly. Remove from the heat immediately.
  4. Add vanilla and powdered sugar. Stir the vanilla extract into the hot fudge base. Add the sifted powdered sugar one cup at a time, beating vigorously with a wooden spoon or hand mixer after each addition until completely smooth and no lumps remain. Work quickly as the fudge will begin to thicken as it cools.
  5. Fold in the pecans. Fold three quarters of the toasted chopped pecans into the fudge mixture, reserving the remainder for topping.
  6. Pour and top. Pour the fudge into the prepared pan and spread into an even layer with a spatula. Scatter the remaining toasted pecans over the top and press gently to adhere.
  7. Set and slice. Refrigerate for at least 2 hours until completely firm. Lift out using the parchment overhang and slice into approximately 20 squares with a sharp knife warmed under hot water for clean cuts.

Pro Tips

  • Sift the powdered sugar before adding it — unsifted powdered sugar contains lumps that are difficult to beat out once added to the hot fudge base, resulting in a grainy texture.
  • Work quickly once the powdered sugar is incorporated — the fudge sets as it cools and becomes harder to spread smoothly if it is left to sit for too long before pouring into the pan.
  • Toast the pecans — this step takes only 5 minutes but makes an enormous difference to the final flavor. Raw pecans in fudge taste flat; toasted pecans in fudge taste extraordinary.
  • Use full-fat coconut cream, not coconut milk — the fat content of full-fat coconut cream is what gives the fudge its richness and smooth, melt-in-the-mouth texture.

The Story Behind Butter Pecan

Butter pecan as a flavor combination has deep roots in the American South, where pecans have been cultivated and prized since the nineteenth century. The pairing of rich butter and toasted pecans emerged as a natural combination in Southern baking — both ingredients celebrated for their richness and the way heat transforms them from simply good to deeply complex and caramelized. Butter pecan ice cream became one of the most popular ice cream flavors in America in the mid-twentieth century, cementing the combination’s beloved status. Butter pecan fudge followed naturally as a confection that captured the same flavor profile in a dense, rich candy form — and it remains a staple of holiday candy-making and gift boxes across the American South to this day.


Flavor Variations

  • Bourbon Butter Pecan Fudge: Add one tablespoon of bourbon to the fudge base along with the vanilla for a sophisticated, warming depth that pairs beautifully with the toasted pecans.
  • Chocolate Butter Pecan Fudge: Swirl two tablespoons of melted dark chocolate through the finished fudge before it sets for a chocolate-pecan combination that is spectacular.
  • Maple Butter Pecan Fudge: Replace the brown sugar with additional maple syrup and reduce the coconut cream slightly for a more intensely maple-forward version.

Nutritional Highlights (Per Piece)

CaloriesProteinCarbsFiberFat
~180 kcal1g22g1g10g

Storage

  • Refrigerator: Store in an airtight container, layers separated by parchment paper, for up to 2 weeks. The fudge is best served slightly chilled or at room temperature — allow pieces to sit out for 5 minutes before eating for the best texture.
  • Freezer: Freeze in an airtight container for up to 3 months. Thaw in the refrigerator overnight. Ideal for making ahead for holidays or gifting.
  • Gifting: This fudge makes an outstanding edible gift — layer pieces in a box lined with parchment and tie with a ribbon. It travels well when kept cool.

Frequently Asked Questions

Why did my fudge turn out grainy?

Grainy fudge is almost always caused by unsifted powdered sugar or by undissolved brown sugar in the base. Make sure the sugar is fully dissolved before boiling, and always sift the powdered sugar before adding.

Can I use a different nut?

Yes — walnuts, cashews, or macadamia nuts all work well with this fudge base. Toast any nut substitution in the same way for the best flavor.

Do I need a candy thermometer?

No — this recipe uses powdered sugar rather than a cooked sugar syrup, which means it sets through a different mechanism and does not require reaching a specific temperature. The 4-minute boil of the base is the only timed step.


Tried this recipe? Leave a comment below and let us know how it turned out! Tag us on Instagram and Facebook — we love seeing your plant-powered creations. Looking for more addictive vegan snack and appetizer recipes? Browse all recipes on Easy Vegan Recipes — new recipes posted every single week!

Vegan Almond Joy Cookies — The Chewiest Most Indulgent Plant-Based Cookies You Will Make All Season

vegan almond joy cookies

There are cookies and then there are cookies like these Vegan Almond Joy Cookies — the kind that come out of the oven so thick and so chewy and so deeply fragrant with toasted coconut and dark chocolate and whole roasted almonds that you pull the tray from the oven and the smell alone is enough to bring everyone into the kitchen, and then you let them cool for the mandatory ten minutes and someone breaks and takes one early and the look on their face — the immediate, involuntary closing of the eyes that happens when something is better than expected — tells you everything you need to know about what you have just made. This is that cookie. The one that tastes exactly like an Almond Joy bar but better, because it is warm and chewy and the coconut is toasted and the chocolate is melted and the almond sits on top of everything like it has always belonged there. The one that disappears from the cooling rack before they are fully cool. The one that gets requested by name at every gathering from the moment you first make it.

The secret is the coconut integration — not coconut extract, which produces a synthetic, one-dimensional sweetness, but full-fat coconut cream added directly to the dough alongside shredded sweetened coconut that is briefly toasted before mixing. The coconut cream adds fat and moisture that produces the extraordinary chewiness this cookie is known for — the pull, the give, the thick-centered, slightly crisp-edged bite that defines the perfect cookie — while the toasted shredded coconut adds a concentrated, nutty, caramelized coconut flavor that runs through every bite rather than appearing only in the occasional fleck of dry coconut. Together they produce a cookie that is coconut not as accent but as foundation.

What makes this recipe so outstanding is the press-in almond technique — a whole roasted almond pressed gently into the top of each cookie ball just before baking sits proud of the surface throughout the bake, toasting further in the oven heat while remaining firmly embedded in the finished cookie. The almond’s crunch against the soft, chewy cookie and the bittersweet chocolate creates the full Almond Joy experience in every bite without the artificial flavoring of the original.

This recipe is 100% vegan, ready in about 35 minutes plus chill time, deeply satisfying to make and even more satisfying to eat, and the kind of recipe that renders all other chocolate coconut cookies immediately insufficient.


Recipe Information

Prep TimeCook TimeTotal TimeServingsCalories
15 mins12 mins27 mins + 30 min chill18 cookies~210 kcal

Ingredients

For the Cookie Dough

  • 1¾ cups (220g) all-purpose flour
  • ½ tsp baking soda
  • ½ tsp baking powder
  • ½ tsp salt
  • ½ cup (115g) vegan butter, softened to room temperature
  • ½ cup (100g) granulated sugar
  • ½ cup (110g) packed light brown sugar
  • 3 tbsp full-fat coconut cream (from the top of a chilled can of full-fat coconut milk)
  • 2 tbsp ground flaxseed + 5 tbsp water, mixed and rested 5 minutes (2 flax eggs)
  • 1½ tsp pure vanilla extract
  • 1 cup (85g) shredded sweetened coconut, toasted (see instructions)

For the Mix-Ins and Topping

  • 1 cup (170g) vegan dark chocolate chips or chopped dark chocolate (70% cacao)
  • 18–20 whole roasted almonds (one per cookie, for pressing in before baking)
  • ¼ cup (20g) additional shredded coconut for rolling (optional, for extra coconut coating)

Instructions

  1. Toast the coconut. In a dry skillet over medium heat, toast the shredded sweetened coconut, stirring constantly, for 3–4 minutes until golden and fragrant. Watch carefully — coconut goes from golden to burnt in under a minute. Transfer immediately to a plate to cool. The toasting transforms the coconut from sweet and moist to nutty, caramelized, and deeply flavored. Set aside to cool completely before adding to the dough.
  2. Make the flax eggs. In a small bowl, combine the ground flaxseed and water. Stir well and set aside for 5 minutes until the mixture has thickened to a gel-like consistency. This is the binding agent that replaces eggs in the dough.
  3. Cream the butter and sugars. In a large bowl, beat the softened vegan butter with the granulated sugar and brown sugar using a hand mixer or stand mixer on medium speed for 2–3 minutes until light, pale, and fluffy. The creaming step is important — properly creamed vegan butter and sugar creates air pockets in the dough that give the cookie its lift and chew. Do not rush this step.
  4. Add wet ingredients. Add the coconut cream, flax eggs, and vanilla extract to the creamed butter and sugar. Beat on medium speed for 1 minute until fully incorporated and smooth. The dough may look slightly broken — this is normal and will come together when the flour is added.
  5. Add the dry ingredients. Sift the flour, baking soda, baking powder, and salt directly over the wet mixture. Fold in with a spatula until just combined — do not overmix. Overmixing develops gluten and produces a tough, dense cookie rather than a chewy one. Stop mixing as soon as no dry flour streaks remain.
  6. Fold in the coconut and chocolate. Add the cooled toasted coconut and dark chocolate chips to the dough and fold through with a spatula until evenly distributed. The dough will be thick and slightly sticky — this is correct.
  7. Chill the dough. Cover the bowl with plastic wrap and refrigerate for at least 30 minutes (up to 48 hours for a deeper flavor). Chilling firms the dough, which prevents the cookies from spreading too flat in the oven and concentrates the flavors. Do not skip the chill; room-temperature dough produces flat cookies that spread before they can set.
  8. Preheat and portion. Preheat the oven to 350°F (175°C) and line two baking sheets with parchment paper. Using a cookie scoop or two spoons, portion the chilled dough into balls approximately 2 tablespoons in size. If rolling in extra shredded coconut, roll each ball briefly through the coconut before placing on the sheet. Space the cookies 5cm apart.
  9. Press in the almonds. Press one whole roasted almond firmly into the top of each cookie ball, pushing it in just enough to be secure but leaving most of it sitting proud of the surface. The almond should be visible, not buried.
  10. Bake. Bake for 11–13 minutes until the edges are set and lightly golden and the centers look just barely underdone — they will continue to cook on the hot pan after removal. Do not overbake; an overdone Almond Joy cookie is dry and crumbly rather than chewy and rich. The centers should look soft at 12 minutes; they firm as they cool.
  11. Cool and serve. Leave the cookies on the baking sheet for 10 minutes before transferring to a wire rack. This resting time on the hot pan finishes the bake and allows the cookies to set completely without crumbling. Eat warm for maximum chocolate melt and chew, or at room temperature for a firmer, more structured cookie.

Pro Tips

  • Toast the coconut before adding to the dough — raw shredded coconut in a baked cookie produces a texture that is sweet and slightly chewy but lacks the caramelized, nutty depth that makes this cookie extraordinary. Three to four minutes in a dry pan transforms the coconut into something intensely flavored that runs through the entire cookie. This single step is the difference between a good coconut cookie and an exceptional one.
  • Chill the dough — chilled cookie dough bakes into thicker, chewier, more flavorful cookies than room-temperature dough, for two reasons. First, cold fat spreads more slowly in the oven, giving the cookie time to set its structure before it spreads flat. Second, the rest time allows the flour to fully hydrate and the sugar to begin to break down, producing a deeper, more complex flavor. Thirty minutes is the minimum; overnight is ideal.
  • Pull them out when they look underdone — the most common mistake with vegan cookies is overbaking. Vegan cookies without eggs are more susceptible to drying out in the oven, and a cookie that looks perfectly done at 12 minutes will be overdone by 14. Pull them when the centers look soft and barely set — they will firm completely as they cool and will be exactly right at room temperature.
  • Use full-fat coconut cream, not coconut milk — the fat content of full-fat coconut cream is what gives this cookie its extraordinary chewiness. Light coconut milk or coconut milk from a carton does not have sufficient fat content to replicate the effect. Use the thick cream from the top of a chilled can of full-fat coconut milk.

The Almond Joy: An American Original

The Almond Joy was introduced by the Peter Paul Candy Company in 1946, two years after the Mounds bar — its coconut-only predecessor — had already established itself as one of America’s most popular candy bars. The addition of the whole almond and the shift from dark to milk chocolate created a candy bar whose name captured its identity perfectly: the “joy” of the almond against the sweet coconut and chocolate was a combination that struck American candy consumers as something new and immediately right. The bar’s signature advertising tagline — “Sometimes you feel like a nut, sometimes you don’t” (Almond Joy’s got nuts, Mounds don’t) — became one of the most recognized jingles in American candy history and ran for decades from its 1970s introduction. The combination it celebrated — chocolate, coconut, and almond — is one of the genuinely great flavor triads of confectionery: the chocolate provides bitterness and depth, the coconut provides sweetness and chew, and the almond provides crunch and a nutty richness that rounds every sharp edge. In cookie form, the combination is if anything more satisfying than the original bar, because the cookie’s own chewiness amplifies the coconut and the warmth of baking deepens the chocolate. These cookies are not a tribute to an Almond Joy. They are an Almond Joy made better.


Flavor Variations

  • Double Chocolate Almond Joy Cookies: Replace ¼ cup of the flour with unsweetened cocoa powder for a deeply chocolatey, fudge-like cookie base that intensifies the chocolate element of the Almond Joy combination and produces a cookie that is as much a brownie as a cookie.
  • Dark Cherry Almond Joy Cookies: Add ½ cup of dried tart cherries to the dough alongside the chocolate chips for a chocolate-cherry-coconut-almond combination that is simultaneously more sophisticated and more indulgent than the original.
  • Almond Joy Cookie Bars: Press the full batch of dough into a parchment-lined 9×13 inch baking pan, stud the top with almonds at regular intervals, and bake at 350°F (175°C) for 20–22 minutes for Almond Joy cookie bars — easier to make for a crowd than individual cookies and just as good.

Nutritional Highlights (Per Cookie)

CaloriesProteinCarbsFiberFat
~210 kcal3g26g2g11g

Storage

  • Room temperature: Store in an airtight container at room temperature for up to 5 days. Place a piece of bread in the container alongside the cookies — the cookies will draw moisture from the bread and remain soft and chewy for longer.
  • Freezer (baked): Freeze baked, cooled cookies in a single layer until solid, then transfer to a freezer-safe bag or container for up to 3 months. Thaw at room temperature for 20 minutes or warm in a 300°F (150°C) oven for 5 minutes for a just-baked texture.
  • Freezer (unbaked dough): Portion the chilled dough into balls, press in the almonds, and freeze on a sheet pan until solid. Transfer to a freezer bag and freeze for up to 3 months. Bake directly from frozen at 350°F (175°C) for 14–15 minutes — no thawing required.

Frequently Asked Questions

Can I use unsweetened coconut instead of sweetened?

Yes — unsweetened shredded coconut works well and produces a less sweet, more naturally coconut-flavored cookie. The texture will be slightly drier, so add an extra tablespoon of coconut cream to the dough to compensate. Toasting unsweetened coconut is even more important than sweetened, as the toasting process adds the caramelization that sweetened coconut gets partly from its sugar content.

Can I use almond butter instead of whole almonds?

Yes — 2 tablespoons of almond butter stirred into the wet ingredients adds a subtler, more integrated almond flavor throughout the entire cookie rather than the dramatic crunch of a whole almond on top. For the full Almond Joy experience, however, the whole pressed almond on top is the technique that replicates the bar most faithfully.

Why are my cookies spreading too flat?

Three causes: the dough was not chilled sufficiently (chill for at least 30 minutes, up to overnight); the vegan butter was too soft or partially melted when creamed (it should be softened but not melted — firm enough to hold its shape when pressed); or the oven temperature was too low (use an oven thermometer to verify).

Can I make these nut-free?

Yes — omit the whole almonds and replace the almond press-in with a whole macadamia nut, a whole pecan, or simply extra chocolate chips pressed into the top. The cookie without the almond is a chocolate coconut cookie — still excellent, just without the nut element.


Tried this recipe? Leave a comment below and let us know how it turned out! Tag us on Instagram and Facebook — we love seeing your plant-powered creations. Looking for more addictive vegan snack and appetizer recipes? Browse all recipes on Easy Vegan Recipes — new recipes posted every single week!

Vegan Chocolate Avocado Mousse — The Silkiest Most Decadent Plant-Based Dessert You Will Make All Week

vegan chocolate avocado mousse

There are desserts that surprise you and then there are desserts like this Vegan Chocolate Avocado Mousse — the kind that you make in ten minutes and spoon into chilled glasses and set in the refrigerator and when you bring them out and set them on the table and someone takes the first spoonful they pause, and then they look at you, and then they say: what is in this, because it is the richest, creamiest, most deeply chocolatey mousse I have ever eaten, and you tell them it is avocado and they don’t believe you, and you tell them again, and they take another spoonful instead of responding, which is the only answer that matters. This is that dessert. The one that converts every skeptic in the room. The one that is simultaneously the simplest thing you have made all week and the most impressive thing on the table. The one that makes avocado — already one of the most versatile ingredients in the plant-based kitchen — reveal a side of itself that has nothing to do with guacamole and everything to do with the velvet texture of the finest French chocolate mousse.

The secret is the avocado’s fat structure. Ripe avocados contain a high proportion of monounsaturated fats — the same category of fat found in olive oil — that, when blended at high speed, produce a smooth, emulsified base that is genuinely, texturally indistinguishable from the whipped cream foundation of a classical mousse. The avocado contributes no flavor of its own when paired with sufficient cocoa and chocolate — its mild, buttery taste is completely overwhelmed and absorbed by the bitterness of good-quality dark cocoa and the complexity of melted dark chocolate — but its fat content and its smooth, creamy texture translate directly into the mousse’s extraordinary body. What the avocado cannot provide on its own — the slight aeration and lift of a true mousse — is supplied by the blending process itself, which incorporates enough air to give the finished dessert a lightness that prevents it from tasting like chocolate pudding or chocolate ganache, for all its richness.

What makes this recipe so outstanding is the double chocolate technique — both unsweetened cocoa powder and melted dark chocolate are used in combination, giving the mousse a depth and complexity that neither ingredient alone can produce. The cocoa powder provides intensity and a slight dryness that grounds the richness of the avocado; the melted dark chocolate provides a silky, flowing fat that loosens the mousse and gives it a finish that is simultaneously bitter and smooth. Together they produce a chocolate flavor with genuine complexity — the kind of depth you taste in small increments, each spoonful revealing something the last one didn’t.

This recipe is 100% vegan, naturally gluten-free, refined sugar-free when sweetened with maple syrup, ready in 10 minutes plus chilling, and the kind of dessert that makes you genuinely rethink what plant-based cooking is capable of.


Recipe Information

Prep TimeCook TimeTotal TimeServingsCalories
10 mins0 mins10 mins + 1 hr chill4~310 kcal

Ingredients

For the Mousse

  • 3 large ripe avocados (about 450g / 1 lb of flesh) — they must be fully ripe: dark-skinned, yielding gently to pressure, with no firm spots
  • ½ cup (50g) unsweetened cocoa powder (Dutch-process for the deepest color and flavor)
  • 100g (3.5oz) vegan dark chocolate (70% cacao or higher), melted and cooled slightly
  • ⅓ cup (80ml) full-fat coconut cream (from the top of a chilled can)
  • ¼ cup (60ml) pure maple syrup (or agave, or to taste)
  • 2 tsp pure vanilla extract
  • ¼ tsp fine salt (enhances the chocolate — do not skip)
  • 1–2 tbsp plant milk (oat, almond, or soy) to thin if needed

For Serving

  • Flaky sea salt (a few flakes per glass — the contrast with the bittersweet chocolate is extraordinary)
  • Fresh raspberries or sliced strawberries
  • Coconut whipped cream (from a chilled can of full-fat coconut milk, whipped)
  • Shaved or grated vegan dark chocolate
  • Fresh mint leaves
  • Crushed toasted hazelnuts or almonds (optional, for crunch)

Instructions

  1. Prepare the avocados. Halve and pit the avocados and scoop the flesh into a food processor or high-speed blender. Ensure the avocados are fully ripe — a firm avocado will leave lumps in the finished mousse that no amount of blending will fully remove. The flesh should be smooth and bright green with no brown patches. Discard any discolored flesh.
  2. Melt the chocolate. Break the dark chocolate into pieces and melt using your preferred method — either in a heatproof bowl set over a pot of barely simmering water (bain-marie), stirring until smooth, or in a microwave in 30-second bursts on 50% power, stirring between each burst. Cool the melted chocolate for 3–4 minutes until it is no longer hot to the touch but still fluid. Adding very hot chocolate directly to the avocado can affect the texture.
  3. Blend until silky. Add the cocoa powder, melted dark chocolate, coconut cream, maple syrup, vanilla extract, and salt to the food processor with the avocado. Process on high for 2–3 minutes, scraping down the sides every 30–40 seconds, until the mousse is completely smooth, silky, and no green streaks of avocado remain. The finished mousse should be a deep, uniform chocolate brown with a glossy sheen. If the mousse is too thick to blend smoothly, add plant milk one tablespoon at a time until it loosens to the consistency of thick whipped cream. Taste and adjust — more maple syrup for sweetness, more cocoa for bitterness, more salt to amplify everything.
  4. Chill. Spoon or pipe the mousse into serving glasses or ramekins. Cover with plastic wrap pressed directly onto the surface of the mousse — this prevents a skin from forming. Refrigerate for at least 1 hour before serving. The mousse firms and sets in the refrigerator, and its flavor deepens considerably with the rest time as the chocolate and cocoa fully permeate the avocado base.
  5. Finish and serve. Remove from the refrigerator 5 minutes before serving to take the chill off slightly — the mousse’s flavor is more expressive at cool rather than cold. Top with coconut whipped cream, fresh berries, shaved chocolate, a few flakes of sea salt, and fresh mint. Serve immediately.

Pro Tips

  • Use fully ripe avocados — this is the non-negotiable of this recipe. An underripe avocado has a firm, slightly grainy texture that persists through blending and produces a mousse with detectable lumps and a vegetal aftertaste. A fully ripe avocado blends into a completely smooth, neutral-flavored base in under two minutes. Press the avocado gently — it should give under moderate pressure without feeling mushy. If it is firm, let it ripen at room temperature for another day or two.
  • Use Dutch-process cocoa powder — natural cocoa and Dutch-process cocoa are different ingredients with different flavor profiles. Dutch-process cocoa has been treated with alkali, which neutralizes its natural acidity, deepens its color, and smooths its flavor into something richer, darker, and less bitter. In this mousse, Dutch-process cocoa produces a deeper chocolate color and a more rounded, complex flavor. Use it where possible; natural cocoa works but produces a slightly different result.
  • Add salt — a quarter teaspoon of fine salt in this mousse is not optional seasoning; it is a flavor amplifier. Salt at low concentrations enhances the perception of sweetness and suppresses bitterness, which in a chocolate dessert means more chocolate flavor rather than a saltier taste. Omitting the salt produces a flatter, less expressive mousse. The flaky sea salt scattered on top works on the same principle and adds texture to complement it.
  • Blend longer than you think necessary — avocado mousse requires extended blending to fully emulsify the avocado fat into a smooth, uniform base. A 30-second blend will produce a mousse with green streaks and a slightly grainy texture. A 2–3 minute blend with regular scraping produces a completely smooth, silky, uniform mousse with a glossy sheen. Blend until it looks like chocolate ganache.

The Chemistry of Avocado as a Cream Substitute

The reason avocado works as a cream substitute in desserts — and works so well that most people cannot identify it — is almost entirely a matter of fat chemistry. Heavy cream is approximately 36% fat, primarily saturated butterfat, which when whipped incorporates air into a stable foam that holds its structure through a network of fat crystals and protein. Ripe avocado flesh is approximately 15% fat, primarily oleic acid (a monounsaturated fat), which when blended at high speed also emulsifies and incorporates air into a stable, smooth base — not a whipped foam exactly, but a thoroughly emulsified cream-like substance with exceptional body and a neutral flavor profile that accepts flavoring ingredients completely. What avocado cannot replicate is the aeration of whipped cream — the foam structure created by mechanical whipping — which is why this mousse, for all its creaminess, is denser than a classical egg-white-and-cream French mousse and closer in texture to a mousse au chocolat made with ganache rather than whipped cream. This is not a shortcoming; it is a different and equally valid expression of the mousse concept, and the density is a feature: each spoonful is more intensely chocolatey, more satisfying, and more complete than a lighter mousse can be. The avocado is not pretending to be cream. It is doing something cream cannot quite do, in its own way.


Flavor Variations

  • Espresso Chocolate Avocado Mousse: Add 1 teaspoon of instant espresso powder to the blender with the cocoa for a mocha version where the coffee deepens and intensifies the chocolate without announcing itself as a separate flavor — the espresso works the way salt does, amplifying what is already there.
  • Chilli Chocolate Avocado Mousse: Add ¼ teaspoon of cayenne pepper and ½ teaspoon of cinnamon to the mousse for a Mexican chocolate-inspired version where the gentle heat builds slowly at the back of the throat and the cinnamon adds a warm, complex sweetness that is unlike any other chocolate dessert you have made.
  • Mint Chocolate Avocado Mousse: Replace the vanilla extract with ½ teaspoon of pure peppermint extract (not mint — peppermint is cleaner and more direct) for a chocolate mint mousse that tastes like the finest after-dinner mint turned into something you can eat by the spoonful.

Nutritional Highlights (Per Serving)

CaloriesProteinCarbsFiberFat
~310 kcal5g28g9g22g

Storage

  • Refrigerator: Store covered with plastic wrap pressed directly onto the surface for up to 3 days. The mousse firms slightly on day two and three and its flavor deepens as the chocolate permeates the avocado base more fully — some people prefer it on day two.
  • Browning: Avocado oxidizes in contact with air, which can cause the surface of the mousse to darken slightly over time. This is purely aesthetic and does not affect flavor. Pressing plastic wrap directly onto the surface of the mousse prevents oxidation and keeps the mousse a deep, uniform chocolate brown for the full storage period.
  • Freezing: Not recommended — the mousse separates on thawing and the avocado’s texture changes irreversibly on freezing.

Frequently Asked Questions

Will I be able to taste the avocado?

No — when made with ripe avocados and sufficient cocoa and dark chocolate, the avocado flavor is completely undetectable in the finished mousse. Avocado has a mild, buttery, faintly grassy flavor that is overwhelmed entirely by the bitterness and complexity of good cocoa and dark chocolate. The avocado contributes texture and richness, not flavor. If you can taste avocado in your finished mousse, the avocados were either underripe or the cocoa and chocolate quantities were insufficient.

How ripe do the avocados need to be?

Fully ripe — dark-skinned (for Hass avocados), yielding gently to finger pressure, with flesh that is smooth and bright green throughout with no hard spots or brown patches. A firm avocado will leave lumps in the mousse that no amount of blending removes, and its flavor is slightly vegetal in a way that ripeness removes entirely. If in doubt, buy your avocados a day or two early and ripen at room temperature.

Can I make this without a food processor or blender?

A high-speed blender or food processor is strongly recommended for the silkiest result. A hand blender (immersion blender) in a deep bowl works adequately but may leave some texture. A fork produces a rustic, guacamole-like texture rather than a mousse — pleasant, but a very different dessert. For a true mousse texture, a machine that can blend at high speed for 2–3 minutes is essential.

Can I use cacao powder instead of cocoa powder?

Yes — raw cacao powder can be substituted for cocoa powder in equal measure. Raw cacao has a slightly more intense, complex flavor than processed cocoa with fruity and slightly acidic notes that some people prefer in chocolate desserts. It is not treated with alkali (unlike Dutch-process cocoa), so the mousse will be slightly lighter in color and the flavor slightly more astringent. Both work; use whichever you have.


Tried this recipe? Leave a comment below and let us know how it turned out! Tag us on Instagram and Facebook — we love seeing your plant-powered creations. Looking for more addictive vegan snack and appetizer recipes? Browse all recipes on Easy Vegan Recipes — new recipes posted every single week!
Vegan Double Chocolate Chunk Cookies — The Fudgiest Most Decadent Plant-Based Cookies You Will Make All Week

vegan double chocolate chunk cookies

There are chocolate cookies and then there are chocolate cookies like these Vegan Double Chocolate Chunk Cookies — the kind that come out of the oven so thick and so fudgy at the center and so deeply, almost aggressively chocolatey that you pull the tray from the oven and the smell is enough to make the whole household appear in the kitchen without announcement, and someone takes one before it has properly cooled — before the chocolate chunks have finished melting, before the center has fully set — and the look on their face when they bite through the barely-crisped edge into the fudgy, almost brownie-like center with its pools of molten dark chocolate is the look of someone whose expectations have just been dramatically exceeded. This is that cookie. The one that makes you understand why double chocolate exists as a concept — not chocolate flavor with chocolate chips mixed in, but chocolate as the entire foundation of the dough with chocolate as the principal event inside it, each component amplifying the other until the sum is something genuinely extraordinary. The one that makes people ask for the recipe before they have finished eating.

The secret is the brownie technique applied to cookie dough. Brownie batter — melted chocolate folded into the wet ingredients rather than cocoa powder stirred into flour — produces a dramatically fudgier, more intensely chocolatey base than a cocoa-powder cookie ever achieves, because melted chocolate contributes fat, sugar, and chocolate flavor simultaneously, and its fat content changes the texture of the finished cookie from crumbly or cakey to dense, fudgy, and almost molten at the center. In this recipe, both melted dark chocolate and Dutch-process cocoa powder are used in combination — the melted chocolate for body and fudginess, the cocoa for depth and color — producing a cookie dough that is so dark it is almost black and a finished cookie that is, texturally, exactly halfway between a fudge brownie and the best cookie you have ever eaten.

What makes this recipe so outstanding is the chocolate chunks — not chips, but rough, irregular pieces chopped from a bar of good-quality dark chocolate. Chips are designed to hold their shape in the oven, which is useful for some applications and a missed opportunity in this one. Chopped chocolate melts unevenly — some pieces melt completely into pools of liquid chocolate that become crisp chocolate pockets as the cookie cools; others melt partially and remain soft and gooey at the center of the cookie for hours after baking. The variety of textures and states of melted chocolate in a single cookie is what distinguishes a great double chocolate cookie from a good one.

This recipe is 100% vegan, ready in about 35 minutes plus chill time, and the kind of cookie that makes everyone who eats it immediately ask whether you made them yourself, because they do not taste like something that came from a box.


Recipe Information

Prep TimeCook TimeTotal TimeServingsCalories
15 mins11 mins26 mins + 30 min chill16 cookies~230 kcal

Ingredients

For the Cookie Dough

  • 1½ cups (190g) all-purpose flour
  • ½ cup (50g) Dutch-process cocoa powder
  • 1 tsp baking soda
  • ½ tsp baking powder
  • ¾ tsp fine salt
  • 115g (4oz) vegan dark chocolate (70% cacao), roughly chopped — for melting into the dough
  • ½ cup (115g) vegan butter, softened
  • ¾ cup (165g) packed light brown sugar
  • ¼ cup (50g) granulated sugar
  • 3 tbsp aquafaba (the liquid from a can of chickpeas) — binds and adds slight chew
  • 2 tsp pure vanilla extract
  • 1 tbsp plant milk if needed to bring the dough together

For the Chocolate Chunks

  • 150g (5oz) vegan dark chocolate (60–70% cacao), roughly chopped into irregular pieces — some large, some small; do not use chips

Instructions

  1. Melt the chocolate for the dough. Place 115g of the chopped dark chocolate in a heatproof bowl set over a pot of barely simmering water. Stir gently until completely melted and smooth. Alternatively, microwave in 30-second bursts at 50% power, stirring between each burst. Set aside to cool for 5–8 minutes until no longer hot but still fluid. The melted chocolate must be fluid when added; if it begins to firm up, briefly rewarm.
  2. Whisk the dry ingredients. In a medium bowl, whisk together the flour, cocoa powder, baking soda, baking powder, and salt until evenly combined. Set aside.
  3. Cream the butter and sugars. In a large bowl, beat the softened vegan butter with the brown sugar and granulated sugar using a hand mixer on medium speed for 2 minutes until light and fluffy. Add the aquafaba and vanilla extract and beat for a further 30 seconds until combined.
  4. Add the melted chocolate. Pour the cooled melted chocolate into the creamed butter and sugar mixture. Beat on low speed until fully incorporated — the mixture will turn very dark, almost black, and become extremely thick and fudgy.
  5. Add the dry ingredients. Add the flour mixture to the chocolate mixture and fold with a spatula until just combined. The dough will be very thick and dense — this is correct. If it seems too stiff to fold, add plant milk one tablespoon at a time. Do not overmix.
  6. Fold in the chocolate chunks. Reserve a small handful of the larger chocolate chunk pieces for pressing onto the tops of the cookies before baking. Fold the remaining chocolate chunks into the dough until evenly distributed.
  7. Chill the dough. Cover the bowl with plastic wrap and refrigerate for at least 30 minutes, up to 48 hours. Chilling is non-negotiable with this dough — the high fat content from the melted chocolate means room-temperature dough spreads too quickly in the oven, producing flat, thin cookies rather than thick, fudgy ones. Chilled dough bakes into cookies with height, density, and the fudgy center that defines this recipe.
  8. Preheat and bake. Preheat the oven to 350°F (175°C) and line two baking sheets with parchment paper. Using a cookie scoop or two spoons, portion the chilled dough into balls approximately 2 tablespoons in size. Roll briefly between your palms into smooth balls. Press the reserved large chocolate chunk pieces onto the top of each ball. Space 5cm apart on the prepared baking sheets.
  9. Bake precisely. Bake for 10–12 minutes. The cookies should look underdone at 11 minutes — the centers will be soft, slightly puffed, and barely set. This is correct. Do not bake until the centers look done; they will firm as they cool and will be exactly right at room temperature. Overbaked double chocolate cookies are dry, crumbly, and lose the fudgy quality that defines them.
  10. Bang the pan and cool. Immediately after removing from the oven, lift the baking sheet and drop it firmly onto the counter from a height of about 5cm — once or twice. This deliberate “bang” deflates the center of each cookie slightly, creating the crinkled, wrinkled surface and dense, compact interior of a bakery-style double chocolate cookie. Leave on the pan for 10 minutes before transferring to a wire rack.

Pro Tips

  • Use chopped chocolate, not chips — this is the technique that separates a great double chocolate cookie from a standard one. Chocolate chips are formulated with stabilizers that prevent them from fully melting in the oven, preserving their shape. Chopped chocolate has no such stabilizers and melts unevenly, producing some pieces that turn into crisp chocolate puddles as the cookie cools and others that remain soft and molten for hours. The variety of textures and temperatures of melted chocolate in a single cookie is irreplaceable.
  • Bang the pan after baking — dropping the hot baking sheet onto the counter immediately after the cookies come out of the oven is a technique borrowed from Japanese-style chewy cookies. The impact deflates the slightly puffed center, pushing the hot, unbaked interior downward and outward into a dense, compact disc and creating the crinkled surface that is the visual signature of a fudgy double chocolate cookie. It also, paradoxically, makes the cookie chewier: the deflation compacts the crumb structure into something denser and more resistant to the bite.
  • Use aquafaba, not a flax egg — aquafaba (the liquid from a can of chickpeas) is the preferred egg replacer in this recipe because it contributes a slight protein structure and a subtle binding quality that produces a chewier, more cohesive cookie than a flax egg, which adds a slight nuttiness and a slightly denser crumb. The flavor of aquafaba is completely undetectable in a dough this deeply flavored with chocolate.
  • Chill overnight for the deepest flavor — 30 minutes of chilling produces a good cookie. Overnight chilling produces an exceptional one. The rest time allows the sugars to begin dissolving into the dough, producing a more caramelized, complex flavor in the finished cookie, and the extended cold firms the fat completely, producing a cookie with maximum height and minimal spread. The dough keeps in the refrigerator for 48 hours and can be baked in batches.

The Brownie Cookie: A Technique and a Philosophy

The category of cookie that sits at the intersection of brownie and cookie — dense, fudgy, crinkled on top, crisp at the edges and molten at the center — is not a compromise between two things but a third thing in its own right, and it is entirely a product of technique. The brownie texture comes from the ratio of fat to flour: a standard cookie has a relatively high flour content that produces a crumbly, structured crumb; a brownie has a very high fat content and low flour content that produces a dense, fudgy, almost liquid-set interior. The brownie-cookie sits between these extremes by incorporating melted chocolate (fat and sugar in a single ingredient) into a dough that still has enough flour to hold a cookie shape but enough fat to produce a fudgy interior. The crinkled surface — the visual hallmark of this style — is a product of the bang technique: the outer crust sets quickly in the oven while the interior remains liquid; the bang collapses the interior, wrinkling the already-set outer crust into the characteristic ridges and valleys that maximize surface area, create additional textural contrast, and signal to anyone who sees the cookie that it is going to be extraordinary before they have even picked it up.


Flavor Variations

  • Sea Salt Dark Chocolate Chunk Cookies: Scatter a pinch of flaky Maldon sea salt over each cookie immediately after the pan-bang, before the chocolate resolidifies. The salt amplifies the bitterness of the dark chocolate and creates a sweet-salty contrast that is genuinely addictive and makes the cookies taste more sophisticated than anything sold in a bakery.
  • Espresso Double Chocolate Cookies: Add 2 teaspoons of instant espresso powder to the dry ingredients for a mocha version where the coffee deepens and intensifies the chocolate without adding a distinct coffee flavor — espresso in chocolate baking works the way salt does, as an amplifier rather than a separate note.
  • Mint Chocolate Chunk Cookies: Add ½ teaspoon of pure peppermint extract to the wet ingredients alongside the vanilla for a chocolate mint version that tastes like the finest after-dinner mint compressed into the world’s best cookie. Use white chocolate chunks alongside the dark for maximum visual and flavor contrast.

Nutritional Highlights (Per Cookie)

CaloriesProteinCarbsFiberFat
~230 kcal3g29g3g12g

Storage

  • Room temperature: Store in an airtight container at room temperature for up to 5 days. These cookies maintain their fudgy texture for longer than most cookies because of the high fat content from the melted chocolate. Place a slice of bread in the container to keep them moist.
  • Freezer (baked): Freeze individually wrapped baked cookies for up to 3 months. Thaw at room temperature for 30 minutes, or warm in a 300°F (150°C) oven for 6–8 minutes to restore the fudgy center.
  • Freezer (unbaked dough): Portion and roll into balls, press with chocolate chunks, and freeze on a sheet pan until solid. Transfer to a freezer bag and freeze for up to 3 months. Bake directly from frozen, adding 2–3 minutes to the baking time. Frozen dough baked fresh produces a cookie with even more fudginess and a crispier exterior than room-temperature chilled dough.

Frequently Asked Questions

Why are my cookies spreading too flat?

Three causes: the dough was not chilled sufficiently (refrigerate for at least 30 minutes, overnight for best results); the vegan butter was too soft or melted rather than softened; or the melted chocolate was too hot when added, melting the butter into a liquid state. Ensure the melted chocolate has cooled to room temperature before mixing, the butter is softened but not melted, and the dough is fully chilled before portioning and baking.

Can I use cocoa powder instead of melted chocolate in the dough?

The melted chocolate in the dough is what gives this cookie its fudgy, brownie-like texture and cannot be substituted with cocoa powder without significantly changing the result. Replacing the melted chocolate with cocoa powder and oil produces a darker, more intensely flavored cookie with a cakey rather than fudgy texture — still excellent, but a fundamentally different cookie. For the fudgy brownie-cookie texture, the melted chocolate is essential.

How do I know when these are done?

These cookies look underdone when they are done — this is the point. At 11 minutes, the edges should be set and the center should look soft, puffed, and barely cooked. The cookies firm dramatically as they cool; a cookie that looks done in the oven will be overbaked and dry at room temperature. Pull them when the edges are set and the center looks soft. Trust the process and the timing rather than the appearance.

Can I make these gluten-free?

Yes — replace the all-purpose flour with a 1:1 gluten-free baking flour blend (look for one that contains xanthan gum, which replaces the structural role of gluten). The texture will be slightly different — gluten-free flours absorb liquid differently — but the cookie will be excellent. Add an extra tablespoon of plant milk if the dough seems too stiff after the chill. Do not use almond flour or coconut flour as direct substitutes; they behave completely differently and require recipe reformulation.


Tried this recipe? Leave a comment below and let us know how it turned out! Tag us on Instagram and Facebook — we love seeing your plant-powered creations. Looking for more addictive vegan snack and appetizer recipes? Browse all recipes on Easy Vegan Recipes — new recipes posted every single week!

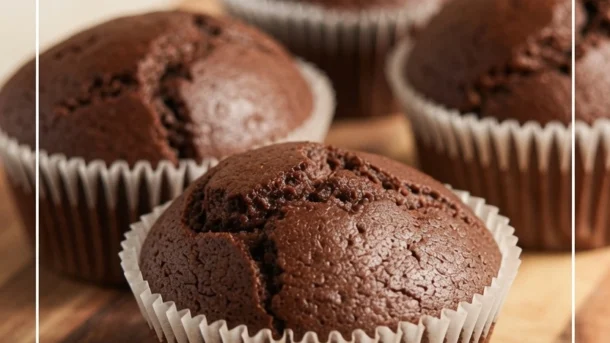
Vegan Flour-less Chocolate Muffins

vegan flour less chocolate muffins

There are muffins you bake because breakfast needs something sweet. And then there are muffins like these Vegan Flourless Chocolate Muffins — the kind that come out of the oven with a slightly cracked, deeply dark top and an interior so dense, so fudgy, and so intensely chocolatey that they taste far more like a brownie than anything that should reasonably be called a muffin. This is that muffin. The one that proves flourless baking is not a compromise but a genuinely different and in many ways superior category of chocolate treat. The one that is so rich and satisfying that a single muffin genuinely, completely satisfies a chocolate craving.

These muffins use almond flour and oat flour in place of all-purpose flour, with flax eggs and almond butter providing binding and richness in the absence of both gluten and eggs. The result is a deeply fudgy, dense, intensely chocolate muffin that is naturally gluten-free, higher in protein and fiber than a standard muffin, and somehow tastes more indulgent despite being made from ingredients that are genuinely more nourishing.

What makes these muffins so outstanding is the texture — the combination of melted dark chocolate, almond butter, and the two alternative flours produces a crumb that is fudgy and dense in a way that wheat flour simply cannot replicate, creating a muffin that is categorically different from a standard chocolate muffin in the best possible way.

This recipe is 100% vegan, naturally gluten-free, ready in just 30 minutes, and absolutely wonderful eaten slightly warm when the chocolate is still soft and the fudgy texture is at its most spectacular.


Recipe Information

Prep TimeCook TimeTotal TimeServingsCalories
10 mins20 mins30 mins10~210 kcal

Ingredients

For the Muffins

  • 150g vegan dark chocolate (70% cocoa), melted and cooled slightly
  • ½ cup (130g) natural almond butter
  • ½ cup (100g) cane sugar or coconut sugar
  • 2 flax eggs (2 tbsp flaxseed meal + 6 tbsp water — rest 5 minutes)
  • ⅓ cup (80ml) plant milk
  • 1 tsp pure vanilla extract
  • ½ cup (50g) almond flour
  • ¼ cup (25g) oat flour (certified gluten-free if needed)
  • 2 tbsp cocoa powder
  • 1 tsp baking powder
  • ¼ tsp fine salt

Optional Add-ins

  • ½ cup (85g) vegan chocolate chips folded through for extra indulgence
  • ¼ tsp espresso powder to intensify the chocolate flavor
  • A pinch of flaky sea salt pressed onto each muffin before baking
  • ¼ cup (30g) chopped toasted walnuts or pecans folded through

Instructions

  1. Preheat the oven. Preheat the oven to 350°F (175°C). Line a 10-hole muffin tin with paper liners.
  2. Make the flax eggs. Combine the flaxseed meal and water, stir, and let rest for 5 minutes until gel-like.
  3. Melt the chocolate. Melt the dark chocolate in a heatproof bowl over a pot of gently simmering water, stirring until smooth. Let cool for 5 minutes.
  4. Combine wet ingredients. In a large bowl whisk together the melted chocolate, almond butter, sugar, prepared flax eggs, plant milk, and vanilla extract until smooth and well combined.
  5. Add dry ingredients. Add the almond flour, oat flour, cocoa powder, baking powder, and salt to the wet mixture. Fold until just combined — the batter will be thick and dense. Fold in any optional add-ins.
  6. Fill and bake. Divide the batter evenly between the 10 lined muffin holes — it will be considerably thicker than standard muffin batter. Smooth the tops slightly. Bake for 18–22 minutes until the tops are set and a slight crack has formed on the surface. The centers will seem underdone — this is correct. They firm up to a fudgy consistency as they cool.
  7. Cool before eating. Let cool in the tin for 10 minutes before transferring to a wire rack. These muffins are good warm but genuinely spectacular once fully cooled, when the fudgy center texture has fully set.

Pro Tips

  • Do not overbake — flourless chocolate muffins firm up considerably during cooling and should be removed from the oven when they still look underdone in the center.
  • Allow the melted chocolate to cool slightly before adding to the other wet ingredients — hot chocolate can begin to cook the flax eggs.
  • Use good quality dark chocolate with at least 70% cocoa — the chocolate is the dominant flavor in this recipe and its quality is directly reflected in the finished muffin.
  • Let the muffins cool fully before eating for the best fudgy texture — eating them warm produces a slightly gooey, almost molten center that is also delicious but different in character.

Why Flourless Chocolate Baking Works

Removing wheat flour from a chocolate muffin does not produce a lesser version — it produces a fundamentally different product with its own distinct appeal. Without the gluten network that wheat flour creates, flourless chocolate muffins cannot trap as much air and therefore cannot rise to a light, cakey texture. Instead they set around their fat, chocolate, and nut flour base into a dense, fudgy, concentrated mass that delivers more chocolate flavor per bite than a conventional muffin, with a texture that is closer to a ganache or truffle than a standard baked good.

This is not a compromise. It is a different category.


Flavor Variations

  • Peanut Butter Chocolate Muffins: Replace the almond butter with natural peanut butter for a classic peanut butter and chocolate combination.
  • Mocha Chocolate Muffins: Add 1 teaspoon of espresso powder to the batter for a deep coffee-chocolate mocha character.
  • Orange Chocolate Muffins: Add the zest of an orange to the batter for a chocolate-orange version that is particularly spectacular for the holiday season.

Nutritional Highlights (Per Muffin)

CaloriesProteinCarbsFiberFat
~210 kcal6g20g4g13g

Storage

  • Room temperature: Store in an airtight container for up to 3 days. The texture improves during storage as the fudgy center sets further.
  • Refrigerator: Keeps for up to 6 days. Bring to room temperature or warm briefly before eating.
  • Freezer: Freeze individually wrapped muffins for up to 2 months. Thaw at room temperature or microwave for 30 seconds.

Frequently Asked Questions

Can I use a different nut butter instead of almond butter?

Yes — peanut butter produces a slightly stronger flavor, cashew butter produces a milder result, and tahini produces a more neutral, slightly sesame-flavored version. All work well with the same quantities.

Why are my muffins falling apart?

Flourless muffins are more fragile than conventional muffins, especially when warm. Let them cool fully in the tin before removing and handling. They firm up considerably once completely cool.

Can I make these without oat flour?

Yes — replace the oat flour with additional almond flour in the same quantity for a fully nut-flour-based muffin with a slightly richer, more tender result.


Tried this recipe? Leave a comment below and let us know how it turned out! Tag us on Instagram and Facebook — we love seeing your plant-powered creations. Looking for more indulgent vegan chocolate and gluten-free dessert recipes? Browse all recipes on Easy Vegan Recipes — new recipes posted every single week!

Vegan Apple Pie Bread Pudding — The Most Comforting Most Deeply Flavored Plant-Based Dessert You Will Make All Season

vegan apple pie bread pudding

There are autumn desserts and then there are autumn desserts like this Vegan Apple Pie Bread Pudding — the kind that comes out of the oven so golden and so puffed and so fragrant with cinnamon and nutmeg and brown sugar and caramelized apple and vanilla that the kitchen becomes a place everyone wants to be for the hour it spends in the oven, and when you spoon it into bowls while it is still warm and the custard-soaked bread gives way and the soft, cinnamon-spiced apple pieces fall through and the caramel sauce pools around everything and you take the first bite — warm and custardy and faintly crisp at the edges where the bread poked above the custard and caught the oven heat — you realize that you have managed to put apple pie and bread pudding in the same dish simultaneously and the result is better than either thing on its own. This is that dessert. The one that tastes like autumn in every spoonful. The one that makes everyone at the table go quiet because the eating is more urgent than the talking. The one that tastes like it came from a restaurant kitchen and was made, in reality, with a loaf of stale bread and six apples.

The secret is the day-old bread. Fresh bread, used in bread pudding, produces a texture that is too soft and too uniform — it absorbs the custard completely and collapses into a homogenous, slightly gummy mass without the textural contrast that makes bread pudding great. Day-old or slightly stale bread — ideally a thick-cut white sandwich loaf, brioche-style bread, or sourdough — has dried out sufficiently that it absorbs the custard from the outside in, creating pieces that are soaked through at the center while remaining slightly chewy at the edges and developing a crisp, golden exterior wherever they protrude above the custard level. The contrast between the custardy interior, the chewy mid-point, and the slightly crisp top is the texture of a perfect bread pudding, and it only exists when the bread has had time to dry.

What makes this recipe so outstanding is the spiced apple layer — sliced apples cooked briefly in vegan butter, brown sugar, cinnamon, and a splash of apple cider before being folded into the custard-soaked bread. The brief cooking concentrates the apples’ flavor, softens them just enough that they are tender throughout the bake without disappearing, and coats them in a caramelized brown sugar syrup that becomes the sauce of the finished pudding. These are not raw apple pieces that steam in the oven and release their water into the custard. These are properly cooked, deeply flavored apple pieces that taste like the inside of the best apple pie you have ever eaten, distributed through every spoonful of a warm, custardy bread pudding.

This recipe is 100% vegan, naturally dairy-free, ready in about 55 minutes, and the most requested autumn dessert you will add to your repertoire.


Recipe Information

Prep TimeCook TimeTotal TimeServingsCalories
20 mins35 mins55 mins8~380 kcal

Ingredients

For the Bread Base

  • 400g (about 12–14 slices) day-old white bread, brioche-style bread, or sourdough — cut into 3–4cm cubes (see Pro Tips)
  • 2 tbsp vegan butter, melted (for greasing the dish and drizzling over the top)

For the Vegan Custard

  • 2 cups (480ml) full-fat oat milk (or soy milk — both produce the creamiest result)
  • 1 cup (240ml) full-fat coconut cream (from the top of a chilled can)
  • 3 tbsp cornstarch (cornflour) — acts as the setting agent in place of eggs
  • ⅓ cup (70g) granulated sugar
  • ¼ cup (55g) packed light brown sugar
  • 2 tsp pure vanilla extract
  • 1½ tsp ground cinnamon
  • ¼ tsp ground nutmeg
  • ¼ tsp ground cardamom (optional — adds a subtle floral warmth)
  • Pinch of fine salt

For the Spiced Apple Layer

  • 4 medium apples (Granny Smith, Honeycrisp, or a mix), peeled, cored, and cut into 1.5cm slices
  • 2 tbsp vegan butter
  • 3 tbsp packed light brown sugar
  • 1 tsp ground cinnamon
  • ¼ tsp ground nutmeg
  • 2 tbsp apple cider or apple juice
  • 1 tsp lemon juice
  • Pinch of salt

For the Brown Sugar Crumble Topping

  • 3 tbsp vegan butter, softened
  • 3 tbsp packed light brown sugar
  • 3 tbsp all-purpose flour
  • ½ tsp cinnamon
  • Pinch of salt

For Serving

  • Vegan vanilla ice cream or coconut whipped cream
  • A drizzle of maple syrup or vegan caramel sauce
  • Extra ground cinnamon for dusting

Instructions

  1. Dry the bread if needed. If the bread is fresh rather than day-old, spread the cubes on a baking sheet and bake at 300°F (150°C) for 15 minutes until dried out and very lightly toasted. This step ensures the bread can absorb the custard without becoming gummy. Skip this step if the bread is already stale and slightly dry.
  2. Make the spiced apples. Melt the vegan butter in a large skillet over medium heat. Add the apple slices and cook for 2 minutes, stirring gently. Add the brown sugar, cinnamon, nutmeg, apple cider, lemon juice, and salt. Stir to coat and cook for a further 4–5 minutes until the apples are just beginning to soften and the liquid has reduced to a thick, fragrant caramel syrup. The apples should be tender but still holding their shape — not fully cooked through, as they will continue in the oven. Remove from the heat and set aside.
  3. Make the custard. In a large bowl, whisk together the oat milk, coconut cream, cornstarch, granulated sugar, brown sugar, vanilla extract, cinnamon, nutmeg, cardamom, and salt until the cornstarch and sugars are fully dissolved and the custard is smooth and uniform. The cornstarch acts as the binder that sets the custard in the oven — whisk until no lumps remain.
  4. Soak the bread. Add the bread cubes to the custard and press them down gently to submerge. Leave to soak for 15 minutes, pressing the bread down every 5 minutes. The bread should absorb most of the custard and swell noticeably — it should feel heavy and saturated when lifted, not light and dry. This soaking step is what produces the creamy, custardy interior of a great bread pudding.
  5. Make the crumble topping. In a small bowl, combine the softened vegan butter, brown sugar, flour, cinnamon, and salt. Use your fingers to work the mixture into coarse, sandy crumbles. Set aside.
  6. Assemble. Preheat the oven to 350°F (175°C). Grease a 9×13 inch baking dish or equivalent generously with vegan butter. Spoon half the custard-soaked bread into the prepared dish and spread in an even layer. Distribute half the spiced apple slices over the bread layer, along with any syrup from the pan. Add the remaining soaked bread over the apple layer and press down gently. Arrange the remaining apple slices decoratively on top. Scatter the brown sugar crumble topping over the entire surface. Drizzle with the melted vegan butter.
  7. Bake. Bake for 30–35 minutes until the top is deeply golden, the crumble is crisp, and the custard is set — a knife inserted into the center should come out with just a slight wobble, like a just-set flan. The top should be golden-brown and the edges where the bread meets the dish should be slightly caramelized. If the top is browning too quickly, tent loosely with foil for the final 10 minutes.
  8. Rest and serve. Leave to rest for 10 minutes before serving — the custard sets further as it cools and the pudding becomes easier to portion cleanly. Serve warm in deep bowls with vegan vanilla ice cream or coconut whipped cream, a drizzle of maple syrup or caramel sauce, and a dusting of cinnamon.

Pro Tips

  • Use day-old bread — stale bread is not a compromise in this recipe; it is the correct ingredient. Fresh bread over-absorbs the custard during soaking and collapses into a gummy, uniform mass during baking. Day-old bread absorbs the custard from the outside in, creating a spectrum of textures from creamy interior to slightly chewy mid-section to golden, crisp top. If all you have is fresh bread, dry it in the oven at 300°F for 15 minutes before using.
  • Cook the apples before baking — raw apple pieces in bread pudding release their water during the bake, diluting the custard and producing soggy apple pieces with a raw, underdeveloped flavor. A 5-minute pre-cook in butter, brown sugar, and spices concentrates the apple flavor, coats the pieces in a caramel syrup, and ensures they are perfectly tender in the finished pudding without disintegrating. This is the apple pie technique applied to bread pudding, and it makes an enormous difference.
  • Soak the bread long enough — 15 minutes of soaking is the minimum; 30 minutes produces an even creamier result. Press the bread down regularly during soaking to ensure every piece is saturated. Under-soaked bread produces a dry, bready pudding; properly soaked bread produces the custardy, almost pudding-like interior that makes bread pudding extraordinary.
  • Don’t overbake — bread pudding should wobble slightly in the center when removed from the oven. The residual heat from the dish continues to cook the custard as the pudding rests. An overbaked bread pudding is dry, rubbery, and has lost the silky, custardy quality that defines it. Pull it at the first sign of a slight wobble and let it finish in the dish.

Bread Pudding: A History of Thrift and Transformation

Bread pudding is one of the oldest and most universal examples of the culinary art of transformation — the process by which something ordinary and about to be wasted is converted, through technique and additional ingredients, into something better than its constituent parts. The basic concept — stale bread soaked in a liquid, usually custard or milk, and baked until set — appears in various forms across European, American, and Middle Eastern culinary traditions stretching back at least to the eleventh century, when medieval English cooks described a dish called “pain perdu” (lost bread) made from stale bread soaked in eggs and milk. New Orleans became the bread pudding’s spiritual home in America through the cuisine of the French Quarter, where the city’s abundance of stale French bread was transformed into a dessert so beloved that it became a fixture on every restaurant menu in the city and spawned an entire tradition of elaborate bread pudding variations with whiskey sauces, praline sauces, and fillings that would make the medieval English unrecognizable to themselves. The apple pie bread pudding sits in this tradition of transformation and abundance: apple pie’s spiced, caramelized filling — itself one of the great American dessert traditions — combined with the custardy richness of New Orleans-style bread pudding, producing something that honors both traditions while belonging entirely to itself.


Flavor Variations

  • Bourbon-Spiced Apple Bread Pudding (Vegan): Add 2 tablespoons of bourbon or dark rum to the spiced apple filling for a grown-up version with a deep, caramel-forward warmth that makes the dessert even more complex. The alcohol cooks off completely in the oven, leaving only the flavor.
  • Pear and Ginger Bread Pudding: Replace the apples with ripe but firm pears and add 1 tablespoon of fresh grated ginger to the pear cooking step for a more delicate, aromatic version where the pear’s sweetness and the ginger’s heat produce a lighter, more floral pudding.
  • Chocolate Chip Apple Bread Pudding: Scatter ½ cup of vegan dark chocolate chips through the bread layers before baking for a chocolate-apple combination that is simultaneously more indulgent and more complex — the chocolate’s bitterness against the sweet, cinnamon-spiced apple produces a contrast that makes every spoonful more interesting.

Nutritional Highlights (Per Serving)

CaloriesProteinCarbsFiberFat
~380 kcal6g58g4g15g

Storage

  • Refrigerator: Store leftovers covered in the baking dish or in an airtight container for up to 4 days. The bread pudding firms considerably on refrigeration and the flavors deepen as the custard and apple fully permeate the bread.
  • Reheating: Reheat individual portions in a 325°F (165°C) oven for 10–12 minutes until warmed through, or microwave for 60–90 seconds. Add a splash of oat milk before reheating if the pudding has dried out significantly. Do not overheat — the custard can become rubbery at high temperatures.
  • Freezing: Freeze fully cooled portions in sealed containers for up to 2 months. Thaw overnight in the refrigerator and reheat as above. The texture softens slightly on freezing and thawing but remains very pleasant, especially when topped with fresh vegan ice cream.

Frequently Asked Questions

What bread works best for bread pudding?

Day-old white sandwich bread, brioche-style bread, challah (check for vegan ingredients), or sourdough all work excellently. Brioche-style bread produces the richest, most indulgent result because of its higher fat content. Sourdough produces a pudding with a slight tang that works beautifully against the sweet apple and custard. Avoid very dense whole-grain breads, which do not absorb custard as effectively and can produce a heavy, gummy result.

Can I make this ahead?

Yes — assemble the full pudding up to 24 hours ahead, cover and refrigerate without the crumble topping, and bake directly from the refrigerator, adding 5–8 minutes to the baking time. Add the crumble topping just before baking. The extended soaking time actually improves the pudding, as the bread absorbs the custard completely overnight.

What apples work best?

A mix of tart and sweet apples produces the best flavor complexity. Granny Smith (tart, firm) and Honeycrisp or Fuji (sweet, firm) is an excellent combination. Avoid very soft apples like McIntosh, which will break down completely during the pre-cook and leave no texture in the finished pudding. The apples should hold their shape through the pre-cook and maintain some texture in the baked pudding.

Can I use regular plant milk instead of oat milk?

Yes — any full-fat plant milk (oat, soy, almond, cashew) works in this custard. Full-fat oat milk and soy milk produce the creamiest, richest result because of their higher protein and fat content. Light or reduced-fat plant milks produce a thinner custard with less body. The coconut cream is non-negotiable for richness — do not replace it with coconut milk, which is too thin to produce the custardy texture this pudding is known for.


Tried this recipe? Leave a comment below and let us know how it turned out! Tag us on Instagram and Facebook — we love seeing your plant-powered creations. Looking for more addictive vegan snack and appetizer recipes? Browse all recipes on Easy Vegan Recipes — new recipes posted every single week!

Vegan Blueberry Yogurt Ice Cream — The Creamiest Most Vibrantly Flavored Plant-Based Frozen Dessert You Will Make All Summer

vegan blueberry yogurt ice cream

There are frozen desserts and then there are frozen desserts like this Vegan Blueberry Yogurt Ice Cream — the kind that comes out of the freezer so deeply purple and so vivid and so intensely blueberry that you scoop it into bowls and it looks like something from a high-end ice cream shop, and when you take the first spoonful it is simultaneously cold and creamy and tangy and sweet and so completely and purely blueberry that you stop for a moment because it tastes more like blueberry than actual blueberries do — concentrated and bright and clean all at once — and the texture is scoopable and smooth and rich without being heavy, and the tanginess of the yogurt sits underneath everything like a low note that makes the sweetness of the blueberry more interesting than it would be without it. This is that ice cream. The one with the color that makes everyone reach for their phone before their spoon. The one that tastes like summer distilled into a single bowl. The one that is so simple it seems implausible — five ingredients, no ice cream machine required, ready in 10 minutes of active work — and yet the result is better than most things sold in a tub.

The secret is the roast-and-reduce technique. Most blueberry ice cream recipes use raw blueberries — blended directly into the base — and the result is a frozen dessert that tastes pleasant but not extraordinary, because raw blueberries contain a significant proportion of water that dilutes the flavor and, once frozen, creates ice crystals that disrupt the smooth, creamy texture. Roasting the blueberries changes everything. Ten to twelve minutes in a 400°F oven concentrates the blueberry juice by evaporating most of its water content, caramelizes the natural sugars into a deeper, more complex sweetness, and breaks down the berry’s cellular structure so that the resulting purée is thick, intensely flavored, and almost jam-like in its concentration. This concentrated purée, blended into the yogurt base, produces an ice cream with a blueberry flavor of extraordinary intensity — more concentrated than any fresh-fruit ice cream can achieve — and a texture that is silky and smooth because the reduced water content means fewer ice crystals form during freezing.

What makes this recipe so outstanding is the yogurt base itself. Full-fat coconut yogurt or thick soy yogurt acts simultaneously as the cream and the culture in this ice cream, contributing the lactic tang that makes frozen yogurt distinct from regular ice cream, a fat content high enough to produce genuine creaminess, and a body that churns into a smooth, scoopable texture with or without an ice cream machine. The tang of the yogurt against the sweetness and acidity of the roasted blueberry is the flavor combination that makes this ice cream genuinely special — not blueberry ice cream, not blueberry frozen yogurt, but something that exists in its own category.

This recipe is 100% vegan, naturally dairy-free, no ice cream machine required, ready in 10 minutes of active time plus freezing, and the most beautiful thing you will put in your freezer this season.


Recipe Information

Prep TimeCook TimeTotal TimeServingsCalories
10 mins12 mins22 mins + 4–6 hrs freeze6~195 kcal

Ingredients

For the Roasted Blueberry Purée

  • 3 cups (450g) fresh or frozen blueberries
  • 2 tbsp pure maple syrup
  • 1 tsp lemon juice
  • ½ tsp pure vanilla extract

For the Yogurt Ice Cream Base

  • 2 cups (480g) full-fat coconut yogurt or thick unsweetened soy yogurt (see Pro Tips)
  • ¼ cup (60ml) full-fat coconut cream (from the top of a chilled can)
  • 3 tbsp pure maple syrup (adjust to taste — blueberries vary in sweetness)
  • 1 tsp pure vanilla extract
  • Pinch of fine salt (enhances and brightens every other flavor)

For Serving

  • Fresh blueberries
  • A drizzle of maple syrup or blueberry compote
  • Crushed graham crackers or granola (for crunch)
  • Fresh mint

Instructions

  1. Roast the blueberries. Preheat the oven to 400°F (200°C). Spread the blueberries on a rimmed baking sheet in a single layer. Drizzle with the maple syrup and lemon juice and toss to coat. Roast for 10–12 minutes until the berries have burst, released their juice, and the juice has reduced and thickened around them on the pan — it should look like a thick, glossy compote rather than a pool of thin purple liquid. The blueberries should be completely collapsed and very fragrant. Watch the pan in the last 2 minutes — the juice can caramelize quickly.
  2. Cool and blend the purée. Scrape the roasted blueberries and all their reduced juice from the baking sheet into a blender or food processor. Add the vanilla extract. Blend on high for 60–90 seconds until completely smooth and glossy. The purée should be thick, very dark purple, and intensely fragrant — far more concentrated in color and flavor than raw blended blueberries. Set aside to cool to room temperature (about 20 minutes), or speed this up by placing the blender jar in a bowl of ice water.
  3. Make the yogurt base. In a large bowl, whisk together the coconut yogurt, coconut cream, maple syrup, vanilla extract, and salt until completely smooth and uniform. Taste — the base should be tangy, lightly sweet, and creamy. Adjust the maple syrup to taste.
  4. Combine. Pour the cooled blueberry purée into the yogurt base and fold together until fully combined and the mixture is a deep, uniform violet-purple with no streaks. Taste one final time and adjust sweetness — the mixture should taste slightly sweeter than you want the finished ice cream to be, as freezing mutes sweetness.
  5. Freeze. Pour the mixture into a freezer-safe container — a loaf pan works perfectly. Cover with plastic wrap pressed directly onto the surface of the mixture (this prevents ice crystals forming on the surface). Freeze for 2 hours, then remove and stir vigorously with a fork, breaking up any ice crystals that have begun to form at the edges. Return to the freezer and repeat this stir-and-freeze process every hour for 2 more cycles — 3 stirs total over 4 hours produces a significantly smoother result than a single freeze. After the third stir, freeze for a final 2 hours until fully set.
  6. Scoop and serve. Remove the ice cream from the freezer 5–8 minutes before serving — this brief temper makes it scoopable without being soft. Scoop into chilled bowls, top with fresh blueberries, a drizzle of maple syrup, and a scattering of granola or crushed graham crackers if desired.

Pro Tips

  • Roast the blueberries — do not skip this step in favor of raw blended berries. Raw blueberries are approximately 84% water, which, when frozen in an ice cream base, forms large ice crystals that make the texture grainy and icy rather than smooth and creamy. Roasting removes most of this water, concentrating the flavor and dramatically improving the texture of the finished ice cream. The roasting takes 12 minutes and makes the difference between a good blueberry ice cream and a genuinely exceptional one.
  • Use full-fat yogurt — the fat content of the yogurt is what produces the creamy texture of this ice cream. Low-fat or non-fat yogurt, or thin coconut yogurt from a carton rather than a jar, does not have sufficient fat content to produce the smooth, creamy result that full-fat yields. Look for coconut yogurt or soy yogurt that is thick enough to hold a spoon upright — Greek-style plant yogurt is ideal. The extra coconut cream in the base adds additional fat insurance.
  • Stir during freezing — the stir-and-freeze method is the no-churn ice cream technique that produces the smoothest result without an ice cream machine. The machine works by continuously churning the ice cream as it freezes, breaking up ice crystals as they form. The stir-and-freeze method replicates this by interrupting the crystal formation every hour and breaking up any developing ice crystals manually. Three stirs over four hours produces a texture that is genuinely comparable to a machine-churned result.
  • Temper before scooping — no-churn ice cream without an ice cream machine freezes harder than commercial or machine-churned ice cream because it lacks the incorporated air that commercial products contain. Five to eight minutes on the counter before scooping allows the exterior to soften just enough to scoop cleanly while the interior remains frozen solid. Do not rush this — a tub pulled straight from the freezer and hacked at will produce uneven, broken scoops rather than clean rounds.

The Science of Frozen Yogurt: Cultures, Fat, and the Flavor of Tang

Frozen yogurt as a commercial product was introduced to the American market in the 1970s — originally as a health food alternative to ice cream, marketed on the basis of its lower fat content and the presence of live bacterial cultures. The first commercial frozen yogurt products were little more than ice milk with yogurt flavoring, and their flavor bore only a distant relationship to actual yogurt. The genuine article — frozen yogurt made with real yogurt as its base — is a fundamentally different product: the live cultures in real yogurt produce lactic acid during fermentation, which is what gives yogurt its characteristic tang, and that tang survives freezing and becomes the defining flavor note of a genuinely yogurt-based frozen dessert. The fat content of full-fat yogurt — primarily from the milk fat in dairy yogurt, or from coconut fat in vegan versions — is what enables the smooth, creamy texture that distinguishes frozen yogurt from flavored ice. In this recipe, the fat from full-fat coconut yogurt and additional coconut cream performs the same emulsifying role that dairy fat performs in conventional ice cream: it coats the water molecules in the base, slows the formation of large ice crystals during freezing, and produces a texture that is genuinely smooth and creamy rather than granular and icy. The blueberry, roasted to concentrate its flavor and reduce its water content, does the same work: less water in the base means smaller ice crystals, and smaller ice crystals mean a silkier texture. The science here is simple and the technique is accessible, and the result is a frozen dessert that behaves like something made by a professional.


Flavor Variations

  • Blueberry Lavender Yogurt Ice Cream: Add ½ teaspoon of culinary-grade dried lavender to the blueberries before roasting for a floral, fragrant version where the lavender adds an aromatic complexity that makes the blueberry taste simultaneously more sophisticated and more interesting. Strain out the lavender before blending if a smoother texture is preferred.
  • Blueberry Lemon Yogurt Ice Cream: Add the zest of 1 large lemon and 2 tablespoons of fresh lemon juice to the yogurt base for a sharper, more citrus-forward version where the lemon amplifies the blueberry’s natural acidity and makes the whole ice cream taste brighter and more vibrant.
  • Blueberry Cheesecake Yogurt Ice Cream: Add 100g of softened vegan cream cheese to the yogurt base and blend until completely smooth before combining with the blueberry purée for a richer, denser frozen dessert that tastes like a blueberry cheesecake in ice cream form — the cream cheese adds a dense, creamy richness and a subtle tang that is completely irresistible.

Nutritional Highlights (Per Serving)

CaloriesProteinCarbsFiberFat
~195 kcal3g32g3g7g

Storage

  • Freezer: Store covered with plastic wrap pressed directly onto the surface in a sealed freezer container for up to 6 weeks. After the first week, the texture may firm considerably — temper for 8–10 minutes before scooping rather than the usual 5.
  • Preventing freezer burn: Press plastic wrap directly onto the surface of the ice cream before sealing the container lid. Air contact is what causes freezer burn and the flavor deterioration that comes with it. The plastic wrap barrier prevents this entirely.
  • Re-softening: If the ice cream has frozen very hard after several days in the freezer, microwave the container (without the lid) for 15–20 seconds, just long enough to soften the edges. Stir briefly and return to the freezer for 20 minutes before scooping for a much improved texture.

Frequently Asked Questions

Do I need an ice cream machine?

No — this recipe is specifically designed to be made without one, using the stir-and-freeze method. The three stirs over four hours break up the ice crystals as they form, replicating the churning action of a machine well enough to produce a smooth, creamy result. An ice cream machine will produce a slightly smoother result and can be used if you have one — churn the combined mixture according to your machine’s instructions, then freeze until firm.

Why is my ice cream icy rather than creamy?

Three causes: the yogurt was too low in fat (use full-fat only); the blueberries were not roasted sufficiently (they should reduce to a thick, jam-like consistency — if the purée is thin and watery, it needs more roasting time); or the mixture was not stirred during freezing (the stir-and-freeze process is essential for texture without a machine). All three factors contribute to the presence of large ice crystals, which produce an icy texture.

Can I use other berries?

Yes — strawberries (hulled and halved), raspberries, blackberries, and mixed berries all work beautifully with the roast-and-reduce technique. Each produces a different flavor, color, and level of natural sweetness. Raspberries and blackberries are more acidic than blueberries and may need an extra tablespoon of maple syrup in the purée. Strawberries roast quickly — check them at 8 minutes. Mixed berries produce a stunning deep red-purple and a complex, layered flavor.

Can I make this without coconut products?

Yes — replace the coconut cream with extra thick yogurt and use soy-based yogurt as the base. The result will be slightly less rich but still very good. Oat-based yogurt can also work but tends to be thinner, so reduce the vanilla extract slightly and ensure the blueberry purée is very thick before combining.


Tried this recipe? Leave a comment below and let us know how it turned out! Tag us on Instagram and Facebook — we love seeing your plant-powered creations. Looking for more addictive vegan snack and appetizer recipes? Browse all recipes on Easy Vegan Recipes — new recipes posted every single week!

Vegan Strawberry Pudding Cake — The Most Magical Plant-Based Dessert You Will Make All Summer

vegan strawberry pudding cake

There are desserts that look ordinary going into the oven and come out as something genuinely surprising. And then there are desserts like this Vegan Strawberry Pudding Cake — the kind that bakes into a single dish that separates all by itself into a soft, cakey top layer and a warm, luscious strawberry pudding sauce beneath it, with no effort or technique beyond simply pouring the batter into a dish and letting the oven do something almost magical. This is that dessert. The one that makes people ask how you got two distinct layers from one pour. The one that comes out bubbling with jammy strawberry sauce beneath a tender, golden sponge and tastes like the best summer dessert imaginable.

A pudding cake is one of the most wonderfully deceptive preparations in baking — a single batter, poured into a dish with boiling water poured over the top, that separates during baking into a cakey layer above and a glossy, saucy pudding below. This strawberry version builds on that technique with fresh or frozen strawberries, a light vanilla sponge batter, and a strawberry sugar layer that dissolves into the sauce as the cake bakes.

What makes this pudding cake so outstanding is the textural contrast between the layers — a slightly crisp, cakey top giving way to the soft interior of the sponge, and then the warm, glossy, intensely strawberry sauce beneath that pools in the spoon when served and turns a simple bowl of cake into something genuinely special.

This recipe is 100% vegan, ready in just 45 minutes, and absolutely magnificent served warm with a scoop of vegan vanilla ice cream that melts into the hot strawberry sauce in the most extraordinary way.


Recipe Information

Prep TimeCook TimeTotal TimeServingsCalories
15 mins30 mins45 mins6~290 kcal

Ingredients

For the Cake Batter

  • 1 cup (120g) all-purpose flour
  • ½ cup (100g) cane sugar
  • 1½ tsp baking powder
  • ¼ tsp fine salt
  • ½ cup (120ml) plant milk
  • 3 tbsp melted coconut oil or neutral vegetable oil
  • 1 tsp pure vanilla extract
  • 1 cup (150g) fresh or frozen strawberries, hulled and halved

For the Pudding Layer

  • ½ cup (100g) cane sugar
  • 1 tbsp cornstarch
  • 1 cup (240ml) boiling water
  • 1 tbsp strawberry jam or preserves

To Serve

  • Vegan vanilla ice cream
  • Extra fresh strawberries
  • A dusting of powdered sugar

Instructions

  1. Preheat the oven. Preheat the oven to 350°F (175°C). Lightly grease a deep 20cm (8-inch) square or round baking dish.
  2. Arrange the strawberries. Scatter the halved strawberries evenly across the base of the prepared baking dish.
  3. Make the cake batter. In a bowl whisk together the flour, sugar, baking powder, and salt. Add the plant milk, melted oil, and vanilla extract and stir until just combined into a smooth batter. Pour the batter evenly over the strawberries in the baking dish.
  4. Make the pudding layer. In a small bowl combine the sugar and cornstarch. Scatter this mixture evenly over the top of the batter — do not stir. Dot the strawberry jam over the surface. Then carefully pour the boiling water evenly over the entire surface — again, do not stir. This is the step that looks wrong but is correct.
  5. Bake. Place in the preheated oven and bake for 28–32 minutes until the top is set and lightly golden and the sauce is visibly bubbling around the edges.
  6. Rest and serve. Let rest for 5 minutes before serving. Spoon into bowls ensuring each serving gets both the cakey top and the strawberry pudding sauce from beneath. Serve warm with vegan vanilla ice cream.

Pro Tips

  • Do not stir after adding the boiling water — the separation into two distinct layers depends entirely on leaving the layers undisturbed so they can separate properly during baking.
  • Use ripe, sweet strawberries for the most vibrant sauce — if your strawberries are slightly tart, increase the pudding layer sugar by a tablespoon.
  • Serve immediately after the brief rest, as the pudding sauce is at its most fluid and abundant while hot — it absorbs more into the cake layer as it cools.
  • A deep dish is important — the pudding layer bubbles vigorously during baking and needs room to expand without overflowing.

The Science Behind the Magic

The “magic” of a pudding cake is actually a straightforward application of density and heat. The boiling water dissolves the sugar layer on top and creates a liquid that sinks through the batter during baking because it is denser than the unbaked sponge. Meanwhile the batter, which contains baking powder, rises upward and sets into the cakey layer as it bakes. The result is a self-separating dessert that looks effortful and produces two genuinely different textures from a single preparation.


Flavor Variations

  • Blueberry Pudding Cake: Replace the strawberries with fresh or frozen blueberries and add a pinch of cinnamon to the batter.
  • Lemon Strawberry Pudding Cake: Add the zest of a lemon to the batter and a tablespoon of lemon juice to the boiling water for a brighter, citrus-forward version.
  • Mixed Berry Pudding Cake: Use a mixture of strawberries, raspberries, and blackberries for a more complex, layered berry flavor.

Nutritional Highlights (Per Serving)

CaloriesProteinCarbsFiberFat
~290 kcal3g52g2g7g

Storage

  • Best fresh: This dessert is at its best served warm, straight from the oven, when the pudding sauce is at its most fluid and abundant.
  • Refrigerator: Store covered for up to 3 days. Reheat individual portions in the microwave for 60–90 seconds before serving; the pudding sauce will loosen again when warmed.
  • Freezer: Not recommended, as the pudding layer does not freeze and thaw well.

Frequently Asked Questions

Why didn’t my cake separate into two layers?

This is almost always caused by stirring after adding the boiling water, using a dish that is too shallow, or underbaking. Do not stir at any point after adding the water, use a deep dish, and bake until the top is properly set and the edges are visibly bubbling.

Can I use frozen strawberries?

Yes — add directly from frozen without thawing. The cake may need an extra 3–5 minutes of baking time since the frozen fruit releases more liquid.

Can I make this gluten-free?

Yes — use a 1:1 gluten-free flour blend in the batter. The pudding layer is already gluten-free.


Tried this recipe? Leave a comment below and let us know how it turned out! Tag us on Instagram and Facebook — we love seeing your plant-powered creations. Looking for more magical vegan dessert recipes? Browse all recipes on Easy Vegan Recipes — new recipes posted every single week!

Vegan Matcha Pound Cake — The Most Tender Most Elegantly Flavored Plant-Based Cake You Will Bake All Season

vegan matcha pound cake

There are cakes and then there are cakes like this Vegan Matcha Pound Cake — the kind that comes out of the loaf pan so perfectly domed and so deeply, vividly green and so fragrant with the grassy, slightly sweet, faintly bitter aroma of ceremonial-grade matcha that you set it on the rack to cool and people come into the kitchen just to ask what is baking, and when you slice it the interior is so uniformly and brilliantly jade-green and so impossibly dense and moist and tender — the texture of a perfect pound cake, that fine, tight, buttery crumb that yields to the knife cleanly and holds its shape on the plate — that the first bite is genuinely surprising, because the flavor is so concentrated and so sophisticated and so distinctly itself that it tastes less like a simple baked good and more like something that belongs in a Japanese patisserie window. The matcha is present in every single bite — not as a background note, not as a tint, but as the full, layered flavor of the tea itself: the grassiness, the slight bitterness, the natural sweetness, the umami depth that good matcha carries and that is almost impossible to describe to someone who has never tasted it and immediately recognizable to someone who has. This is that cake. The one that makes matcha lovers quietly ecstatic and matcha skeptics into converts. The one that is as beautiful as it is delicious, and as suitable for a dessert plate as for an afternoon tea.

The secret is the reverse creaming technique. Standard pound cake is made by creaming fat and sugar until light and fluffy, then incorporating the eggs and flour — a method that builds air into the batter and produces a tender, slightly open crumb. The reverse creaming technique — developed and popularized by American baker Rose Levy Beranbaum in her landmark book The Cake Bible — begins instead with the dry ingredients, into which the softened fat is beaten until the mixture resembles coarse sand, before the liquid is added. This approach coats the flour particles in fat before any liquid is introduced, which limits gluten development and produces a cake with a significantly finer, more velvety, more uniformly dense crumb than the standard creaming method. For a matcha pound cake, this matters enormously: the reverse creaming method produces a crumb so fine and so tight that the matcha color is completely uniform throughout — no pale streaks, no uneven distribution — and the texture is the precise dense-yet-tender quality that defines a classic pound cake and that no lighter, fluffier method can replicate.

What makes this recipe so outstanding is the matcha bloom step — dissolving the matcha powder in a small quantity of hot (not boiling) oat milk before incorporating it into the batter, which hydrates the matcha fully and distributes it as a liquid suspension rather than as a dry powder. Dry matcha added directly to a batter tends to clump and distribute unevenly, producing streaks of intense green alongside paler areas. Bloomed matcha disperses completely into the batter at the molecular level and produces the uniformly vivid color and completely even flavor that distinguishes a professional matcha cake from a home version.

This recipe is 100% vegan, made without eggs or dairy, and produces a pound cake that is so structurally faithful to the classic that you would not know it was vegan unless you were told.


Recipe Information

Prep TimeCook TimeTotal TimeServingsCalories
20 mins55 mins75 mins10 slices~310 kcal

Ingredients

For the Matcha Bloom

  • 2 tbsp ceremonial-grade or high-quality culinary-grade matcha powder (see Pro Tips — quality matters enormously here)
  • 3 tbsp oat milk or soy milk, heated to 70°C (160°F) — hot but not boiling

For the Vegan Pound Cake Batter

  • 1¾ cups (220g) all-purpose flour
  • 1 cup (200g) granulated sugar
  • 1½ tsp baking powder
  • ½ tsp fine salt
  • 115g (½ cup) vegan butter, softened to room temperature (not melted — it must be soft enough to leave an indent when pressed but not shiny or greasy)
  • ½ cup (120ml) full-fat oat milk or soy milk, at room temperature
  • ½ cup (120g) unsweetened vegan yogurt (oat or soy — provides moisture, fat, and acts as the egg replacer)
  • 1 tsp pure vanilla extract
  • 1 tsp apple cider vinegar
  • All of the bloomed matcha (from above)

For the Matcha Glaze (Optional but Recommended)

  • 1 cup (120g) powdered sugar, sifted
  • 1½ tsp matcha powder
  • 3–4 tbsp oat milk (to thin to a drizzle consistency)
  • Pinch of fine salt

Instructions

  1. Bloom the matcha. In a small bowl, sift the matcha powder to remove any lumps. Add the hot oat milk in a thin stream while whisking constantly with a small whisk or fork until the matcha is completely dissolved and the mixture is a smooth, vivid green liquid with no dry lumps. Set aside to cool to room temperature. If the milk is too hot (above 80°C / 175°F), it will degrade the matcha’s flavor compounds; if too cool, the matcha will not dissolve fully. The bloomed matcha should be the color of concentrated jade.
  2. Preheat and prepare the pan. Preheat the oven to 325°F (165°C) — slightly lower than a standard cake temperature to allow the dense pound cake batter to bake through evenly without over-browning the exterior before the center is cooked. Grease a 23 × 13cm (9 × 5 inch) loaf pan generously with vegan butter or oil spray, then dust lightly with flour, tapping out the excess. Line the bottom with a strip of parchment paper with overhanging ends for easy lifting.
  3. Combine the liquids. In a measuring jug, whisk together the room-temperature oat milk, vegan yogurt, vanilla extract, apple cider vinegar, and the cooled bloomed matcha until evenly combined. The mixture will be a uniform green. Set aside.
  4. Reverse cream the dry ingredients. In the bowl of a stand mixer fitted with the paddle attachment (or a large bowl with a hand mixer), combine the flour, sugar, baking powder, and salt. Mix on low speed for 30 seconds to combine. Add the softened vegan butter in pieces and mix on low speed until the butter is incorporated and the mixture resembles coarse, slightly damp sand — about 2 minutes. There should be no dry patches of flour and no large lumps of butter. This is the reverse creaming step.
  5. Add the liquid in two additions. With the mixer on low speed, add half of the green liquid mixture to the flour-butter mixture. Mix on low for 30 seconds until just incorporated, then increase to medium speed and mix for 90 seconds — the batter will become smooth and slightly aerated. Scrape down the bowl. Add the remaining liquid and mix on low to incorporate, then medium for another 60 seconds until the batter is smooth, very green, and has the consistency of a thick, flowing cream. Do not overmix; the batter should be smooth but not whipped.
  6. Bake. Pour and scrape the batter into the prepared loaf pan and smooth the top with a spatula. Use a wet finger or the back of a wet spoon to draw a shallow channel down the center length of the batter — this deliberate score directs the natural split of the pound cake during baking and produces a clean, even dome rather than an irregular crack. Bake at 325°F (165°C) for 50–60 minutes until the top is set and a skewer inserted into the center comes out with just a few moist crumbs (not wet batter). The internal temperature should read 96°C (205°F). The cake will be deeply green on top — this is correct; it will not turn brown the way a standard vanilla pound cake does.
  7. Cool completely. Leave the cake in the pan on a wire rack for 15 minutes, then lift out using the parchment overhang and leave to cool completely on the rack — at least 1 hour. Do not cut the cake while warm; the crumb needs time to set, and a warm pound cake will compress and tear rather than slicing cleanly.
  8. Make the matcha glaze. Sift the powdered sugar and matcha powder together into a bowl. Add 3 tablespoons of oat milk and the pinch of salt and whisk until smooth. The glaze should be thick but pourable — it should fall from a spoon in a slow, ribbon-like stream and hold a slight shape on the surface before settling. Add the remaining tablespoon of milk if needed to reach this consistency.
  9. Glaze and serve. Place the completely cooled cake on a rack set over a parchment-lined tray to catch drips. Pour the matcha glaze slowly along the center of the top of the cake, allowing it to drip naturally down the sides. Leave to set for 15 minutes before slicing. Slice with a sharp, thin-bladed knife wiped clean between cuts for the cleanest presentation.

Pro Tips

  • Use high-quality matcha — matcha quality determines everything about this cake: the color, the flavor, and the aroma. Ceremonial-grade matcha (the highest quality, intended for drinking as tea) produces the most vivid green color and the most layered, complex flavor — grassy, sweet, slightly umami, with the characteristic mild bitterness of good matcha. Low-grade culinary matcha often produces a dull, olive-colored cake with a harsh, bitter, one-dimensional flavor. For this cake, where matcha is the primary flavor, buy the best matcha your budget allows. Ippodo, Encha, Matchaful, and Jade Leaf all produce excellent ceremonial-grade matcha suitable for baking.
  • Temperature of the butter matters — the reverse creaming technique requires butter that is soft but not warm. Butter that is too soft (shiny, greasy, slumping) will not coat the flour particles in the fine, dry film that produces a tender crumb; it will instead produce a batter that is too wet from the start, developing gluten unevenly. Perfectly softened vegan butter should hold its shape but yield readily to pressure — leave it at room temperature for 30–45 minutes before baking, less in a warm kitchen.
  • Do not skip the matcha bloom — dry matcha added directly to a batter, even one that is sifted thoroughly, produces uneven color and occasional bitter pockets of concentrated matcha. Blooming in hot milk takes 2 minutes and produces a completely smooth, evenly distributed matcha base that ensures every bite has the same flavor intensity and the same vivid green color.
  • Cool completely before slicing — the dense, moist crumb of a pound cake needs a full hour to set after baking. Slicing warm produces compressed, messy slices that show none of the cake’s beautiful crumb structure. The matcha color also deepens and becomes more vivid as the cake cools — a freshly baked matcha pound cake straight from the oven is greener than it was in the batter, and cooled it is more vivid still.

Matcha: The Ceremonial Tea That Became the World’s Most Elegant Flavoring

Matcha — the finely ground powder of specially grown and processed green tea leaves — has been central to Japanese culture for nearly a thousand years, introduced from China to Japan by the Buddhist monk Eisai in the twelfth century and cultivated into one of the most refined and ritualized food practices in the world through the Japanese tea ceremony (chado or chanoyu). The cultivation of matcha tea is itself an act of deliberate artistry: the tea plants are shade-grown for the final three to four weeks before harvest, a process that increases the chlorophyll content of the leaves (producing the vivid green color) and drives the production of L-theanine, the amino acid responsible for matcha’s characteristic calm alertness and its umami depth. The shaded leaves are harvested by hand, briefly steamed to prevent oxidation, dried, and ground on traditional granite stone mills at a rate of approximately 30 grams per hour — the extreme slowness of the grinding prevents the heat generated by friction from degrading the tea’s flavor compounds and color. The resulting powder is among the most labor-intensive food products in the world, which accounts for its price and its status. Matcha entered Western pastry kitchens seriously in the early 2000s, first through Japanese bakeries in cities with significant Japanese immigrant communities, then through the global wave of Japanese culinary culture that produced the worldwide success of Japanese matcha lattes, matcha ice cream, and the matcha croissant. Its properties as a flavoring — the intensity of color, the complexity of flavor, the ability to function both as a bittersweet counterpoint to sweet bases and as a savory note in more complex preparations — have made it one of the most versatile and most beloved specialty ingredients in contemporary pastry worldwide.


Flavor Variations

  • Matcha White Chocolate Pound Cake: Fold ½ cup of vegan white chocolate chips into the batter after the final mix, and replace the matcha glaze with a plain white chocolate drizzle (melted vegan white chocolate thinned with a teaspoon of coconut oil). The sweetness of the white chocolate balances the bitterness of the matcha in a combination that is one of the great classic pairings of Japanese dessert culture.
  • Matcha Lemon Pound Cake: Add the zest of 2 lemons to the batter alongside the vanilla, and replace the matcha glaze with a sharp lemon glaze (1 cup powdered sugar + 3 tablespoons fresh lemon juice + ½ teaspoon matcha for color). The citrus lifts the earthy matcha and produces a brighter, more refreshing cake that is exceptional in spring and summer.
  • Matcha Black Sesame Swirl Pound Cake: Prepare a separate black sesame paste (¼ cup toasted black sesame seeds blended with 2 tablespoons maple syrup and 2 tablespoons oat milk until smooth) and layer it through the matcha batter in the loaf pan using a skewer to create a dramatic swirl. The nutty, slightly bitter sesame and the grassy matcha create a flavor combination that is deeply rooted in Japanese confectionery tradition.

Nutritional Highlights (Per Slice)

CaloriesProteinCarbsFiberFat
~310 kcal4g46g1g12g

Storage

  • Room temperature: Store the unglazed cake wrapped tightly in plastic wrap or in an airtight container at room temperature for up to 3 days. Pound cake actually improves on day two as the crumb tightens and the matcha flavor deepens and mellows.
  • Glazed cake: A glazed cake is best stored uncovered at room temperature for the first few hours while the glaze sets, then loosely covered. The glaze softens slightly in an airtight container but remains excellent.
  • Refrigerator: The cake can be refrigerated for up to 5 days — the cold produces a slightly denser texture, which many people find even more satisfying. Bring individual slices to room temperature for 20 minutes before serving, or eat cold.
  • Freezer: Freeze unglazed slices individually wrapped in plastic wrap and stored in a sealed bag for up to 2 months. Thaw at room temperature for 1–2 hours. Glaze after thawing. The matcha color and flavor are well-preserved by freezing.

Frequently Asked Questions

Can I use a different egg replacer?

The combination of vegan yogurt and apple cider vinegar in this recipe functions as a complete egg replacement — the yogurt provides fat, moisture, and binding; the vinegar reacts with the baking powder for lift and tenderizes the gluten. Other options: ¼ cup of unsweetened applesauce (produces a very slightly denser cake with a hint of sweetness) or 2 tablespoons of aquafaba per egg replaced (produces a slightly lighter, more open crumb). The yogurt version produces the most authentic pound cake texture.

My cake is very dense and didn’t rise much — what went wrong?

Three possible causes: the baking powder may be old and have lost its leavening power (test by dropping a teaspoon into hot water — it should bubble); the butter was too warm and created a greasy batter that could not hold the leavening bubbles; or the batter was overmixed after the liquid was added, developing too much gluten for the leavening to lift. Pound cake is naturally denser than other cakes, but it should still have a visible dome and spring back when lightly pressed in the center.

Can I make this gluten-free?

Yes — replace the all-purpose flour with a 1:1 gluten-free baking flour blend containing xanthan gum. The reverse creaming technique works identically with GF flour. The crumb will be slightly more fragile and the cake should be handled more gently when removing from the pan. Allow an extra 5 minutes of baking time and cool completely before slicing.

How do I know when the cake is fully baked?

A pound cake baked at low temperature takes longer than a standard cake and can be difficult to judge by color alone because the matcha keeps the exterior green rather than the usual golden-brown. The most reliable test is a skewer: inserted into the very center of the cake, it should come out with a few moist crumbs attached but no wet batter. A thermometer reading of 96°C (205°F) in the center is the most reliable indicator of a fully baked, moist pound cake.


Tried this recipe? Leave a comment below and let us know how it turned out! Tag us on Instagram and Facebook — we love seeing your plant-powered creations. Looking for more addictive vegan snack and appetizer recipes? Browse all recipes on Easy Vegan Recipes — new recipes posted every single week!

Vegan Carrot Cake Roll — The Most Impressive Most Showstopping Plant-Based Dessert You Will Make All Season

vegan carrot cake roll

There are desserts and then there are desserts like this Vegan Carrot Cake Roll — the kind that you set on the table and the conversation stops, because the spiral of spiced carrot cake and cream cheese filling revealed when you slice it is so graphic and so beautiful and so clearly the product of skill that no one believes you made it at home, and then they taste it and the disbelief doubles, because the cake is so moist and so warmly spiced — cinnamon, ginger, nutmeg, a whisper of cardamom — and the vegan cream cheese filling is so cool and so tangy and so sweet against the warmth of the spiced cake that the combination is better than any carrot cake you have ever had in a restaurant or a bakery, and the spiral means that every single slice has the exact same ratio of cake to filling from the outermost edge to the center, which is a thing you cannot say about any layered cake. This is that dessert. The one that looks like it requires professional training and requires only patience and a kitchen towel. The one that is the most impressive thing you will bring to Thanksgiving or Easter or a dinner party all year. The one that proves that vegan dessert is not a compromise but an upgrade.

The secret is the hot-roll technique. A cake roll — a Swiss roll, a roulade, a jelly roll — fails when the cake cracks during rolling, and cake cracks during rolling when it cools flat and the gluten structure sets in an open, horizontal position before the baker attempts to curve it into a spiral. The fix is to roll the cake while it is still hot — within 2 minutes of coming out of the oven — using a parchment-lined kitchen towel dusted with powdered sugar. The hot cake is flexible and plastic; it rolls around the towel without cracking and then cools in the rolled position, which means the gluten structure sets in the curved form. When the cooled cake is unrolled, filled, and re-rolled without the towel, it follows the curve it has already set into and rolls smoothly and cleanly without a single crack. This technique is the difference between a roll that works every time and a roll that shatters every time, and once you understand it, a cake roll becomes one of the most reliable impressive desserts in the repertoire.

What makes this recipe so outstanding is the filling — a vegan cream cheese base whipped with powdered sugar, vanilla, a pinch of cinnamon, and freshly grated orange zest into a thick, smooth, cloud-like spread that is tangy from the cream cheese, bright from the orange, and sweet without being cloying. The orange zest is the detail that elevates this filling from merely very good to genuinely extraordinary: the citrus oil in the zest cuts through the richness of the cream cheese, brightens the warming spices in the cake, and adds an aromatic dimension that makes every bite taste more complex and more complete than the sum of its parts. This is the cream cheese frosting for people who find standard cream cheese frosting too sweet and too one-dimensional — it has depth.

This recipe is 100% vegan, requires no special equipment beyond a rimmed baking sheet and a kitchen towel, and produces a dessert that is worth every moment of the process.


Recipe Information

Prep TimeCook TimeTotal TimeServingsCalories
30 mins13 mins43 mins + 1 hr chill10 slices~295 kcal

Ingredients

For the Carrot Cake

  • ¾ cup (95g) all-purpose flour
  • 1 tsp baking powder
  • ½ tsp baking soda
  • 1½ tsp ground cinnamon
  • ¾ tsp ground ginger
  • ¼ tsp ground nutmeg
  • ⅛ tsp ground cardamom
  • ¼ tsp fine salt
  • ½ cup (100g) light brown sugar, packed
  • ¼ cup (50g) granulated sugar
  • ¼ cup (60ml) neutral oil (sunflower, avocado, or light olive oil)
  • ¼ cup (60g) unsweetened vegan yogurt (oat or soy — acts as the egg replacer and adds moisture)
  • 3 tbsp aquafaba (liquid from a can of chickpeas — whisked briefly before measuring)
  • 1 tsp pure vanilla extract
  • 1 tsp apple cider vinegar
  • 1½ cups (150g) finely grated carrot (about 2 medium carrots — grate on the fine side of a box grater, not the coarse side)

For the Vegan Cream Cheese Filling

  • 225g (8oz) vegan cream cheese, cold from the refrigerator (Violife, Kite Hill, or Miyoko’s — must be cold and firm)
  • 1¼ cups (150g) powdered sugar, sifted
  • 1 tsp pure vanilla extract
  • Zest of 1 large orange (the zest is essential — do not substitute orange juice)
  • ¼ tsp ground cinnamon
  • Pinch of fine salt

For Rolling and Finishing

  • 3 tbsp powdered sugar (for dusting the kitchen towel and the finished roll)
  • 1 clean, lint-free kitchen towel or tea towel (larger than the baking sheet)
  • Optional: chopped toasted walnuts or pecans, candied orange peel, extra powdered sugar for garnish

Instructions

  1. Preheat and prepare the pan. Preheat the oven to 375°F (190°C). Line a 25 × 38cm (10 × 15 inch) rimmed baking sheet (a standard jelly roll pan) with parchment paper, pressing the paper into the corners and allowing a slight overhang on all sides. Grease the parchment lightly with oil spray or vegan butter.
  2. Prepare the rolling towel. Lay the kitchen towel flat on a large, clean work surface. Dust generously and evenly with the powdered sugar — the powdered sugar prevents the hot cake from sticking to the towel during the first roll. The towel should be dusted across an area slightly larger than the baking sheet.
  3. Mix the dry ingredients. In a large bowl, whisk together the flour, baking powder, baking soda, cinnamon, ginger, nutmeg, cardamom, and salt until evenly combined.
  4. Mix the wet ingredients. In a separate bowl or large measuring jug, whisk together the brown sugar, granulated sugar, oil, vegan yogurt, aquafaba, vanilla extract, and apple cider vinegar until smooth and well combined. Add the finely grated carrot and stir to incorporate — the batter will be thick with carrot at this stage.
  5. Combine wet and dry. Pour the wet ingredients into the dry ingredients and fold together with a spatula until just combined — about 15–20 folds. Do not overmix; a few small streaks of flour are fine and will incorporate during spreading. Overmixing develops gluten and produces a cake that is tough and more likely to crack when rolled.
  6. Spread and bake. Pour the batter onto the prepared baking sheet and use an offset spatula or the back of a large spoon to spread it in an even layer all the way to the edges and into the corners — the layer should be uniformly thin, about 6mm (¼ inch) thick. Uneven spreading produces uneven baking and makes rolling more difficult. Bake for 11–13 minutes until the surface is set, the edges are beginning to pull away from the sides, and the cake springs back when lightly pressed in the center. Do not overbake — a dry cake cracks; a slightly underdone cake rolls.
  7. Hot-roll immediately. As soon as the cake comes out of the oven, work quickly. Run a knife around any edges that have adhered to the pan. Invert the hot cake directly onto the powdered-sugar-dusted kitchen towel. Peel away the parchment carefully — it should come away cleanly. Starting from one short end, roll the cake and the towel together into a tight cylinder. The cake is hot and completely pliable; it will roll without cracking. Place the rolled cake-in-towel seam-side down on a wire rack and leave to cool completely to room temperature — at least 45 minutes. Do not rush this step; the cake must be completely cool before it is unrolled and filled.
  8. Make the cream cheese filling. While the cake cools, beat the cold vegan cream cheese in a stand mixer or with a hand mixer on medium speed for 60 seconds until smooth. Add the sifted powdered sugar, vanilla extract, orange zest, cinnamon, and salt. Beat on low to incorporate, then increase to medium-high and beat for 2 minutes until the filling is light, fluffy, and holds soft peaks. The filling must be thick enough to spread without running when the cake is rolled — if it seems loose, refrigerate for 20 minutes before using.
  9. Unroll, fill, and re-roll. Once the cake is completely cool, gently unroll it on the kitchen towel — it will naturally want to stay slightly curved, which is correct. Spread the cream cheese filling evenly across the entire surface of the cake, leaving a 1cm (½ inch) border at the far short edge to allow for slight spread when rolling. Starting from the same short end you began with, re-roll the cake tightly around the filling, using the towel to help guide and compress the roll without touching the filling. The cake follows its set curve and rolls without cracking.
  10. Chill and serve. Wrap the finished roll tightly in plastic wrap, twisting the ends like a cracker, and refrigerate for at least 1 hour — ideally 2 hours. The chill firms the filling and makes the roll much easier to slice cleanly. To serve, unwrap and dust generously with powdered sugar. Slice with a sharp, thin-bladed knife using a single smooth stroke (not a sawing motion) for the cleanest spiral presentation. Wipe the knife clean between cuts.

Pro Tips

  • Roll the cake hot — this is the single technique that determines whether a cake roll succeeds or shatters. Hot cake is plastic and rolls willingly into any shape; cool cake is brittle and cracks the moment it is forced to curve. The window for rolling is about 2 minutes after the pan comes out of the oven. Have the dusted towel ready before the cake goes in the oven so you are not scrambling when the timer rings.
  • Grate the carrot finely — the carrot in a cake roll must be grated on the fine side of a box grater, not the coarse side. Coarse carrot shreds create an uneven surface in the thin batter that translates into an uneven baked layer that cracks along the carrot shreds when rolled. Fine carrot integrates completely into the batter and produces a smooth, uniform layer that rolls perfectly.
  • Keep the filling cold and thick — vegan cream cheese filling that is too warm or too thin will squirt out of the ends of the roll when it is sliced. Make the filling while the cake cools and refrigerate if it softens. The filling should be stiff enough that when you spread it and then press the surface with the back of a spoon, it holds the indentation rather than flowing back into a flat surface.
  • Chill before slicing — the minimum chill time of 1 hour is not optional. A cake roll sliced before the filling has firmed will compress under the knife and distort the spiral. After 1–2 hours in the refrigerator, the roll slices cleanly and the spiral is perfectly defined. For the cleanest possible presentation, freeze the roll for 20 minutes before slicing.

The Cake Roll: A History of the Swiss Roll and the Roulade

The cake roll — a thin, flexible sponge wrapped around a filling and sliced to reveal a spiral cross-section — is one of the most internationally widespread of all pastry forms, appearing in versions across Europe, Asia, and Latin America under names that reflect the enthusiasm with which different cultures adopted and adapted the same basic idea. The Swiss roll (known in Britain as a Swiss roll, in the United States as a jelly roll, in Germany as Biskuitrolle, in Japan as roru keki, and in South America as pionono) does not originate in Switzerland — the name appears to be a nineteenth-century marketing attribution in the British baking trade that was never corrected — but its origins lie in the sponge cake tradition of the seventeenth and eighteenth centuries, when European bakers discovered that beaten eggs could produce a batter light and stable enough to bake into a thin sheet that could be rolled without cracking. The addition of the cream cheese filling to the carrot cake roll is a uniquely American invention, rooted in the post-war American love of cream cheese as a dessert filling and the emergence of the carrot cake itself as an American classic in the 1960s and 70s. The carrot cake roll combines the carrot cake’s characteristic warmth and spice with the visual drama and structural elegance of the European roulade, and the result is one of those desserts that is both deeply familiar — everyone has tasted carrot cake and cream cheese frosting — and immediately surprising, because the form is completely different from what anyone expects carrot cake to look like.


Flavor Variations

  • Vegan Carrot Cake Roll with Ginger Cream Cheese: Add 1 tablespoon of finely grated fresh ginger to the cream cheese filling in place of the cinnamon for a version where the heat and brightness of fresh ginger amplifies the warming spices in the cake and produces a filling with a sharper, more complex edge than the cinnamon version.
  • Vegan Pumpkin Roll: Replace the grated carrot with ½ cup of pumpkin purée (canned, not fresh — fresh pumpkin is too watery) and increase the cinnamon to 2 teaspoons for a seasonal autumn variation that follows the identical hot-roll technique and produces a dessert that is the definition of fall on a plate.
  • Vegan Carrot Cake Roll with Candied Walnut Filling: Fold ½ cup of roughly chopped candied walnuts into the cream cheese filling before spreading for a version that adds crunch and caramel sweetness to every bite of the spiral — the walnuts toast slightly during baking of the roll and add texture that makes an already impressive dessert genuinely exceptional.

Nutritional Highlights (Per Slice)

CaloriesProteinCarbsFiberFat
~295 kcal3g42g1g12g

Storage

  • Refrigerator: Store the finished roll wrapped tightly in plastic wrap or in an airtight container in the refrigerator for up to 4 days. The roll is best on day 1 and 2, when the filling is freshest and the cake retains its moisture. By day 3–4 the cake is still excellent but slightly denser.
  • Serving from cold: The roll can be served directly from the refrigerator — the cool filling is part of what makes it so good. Remove from the refrigerator 15 minutes before serving if you prefer the cake at room temperature.
  • Freezer: The finished, unwrapped roll can be frozen whole or pre-sliced for up to 2 months. Wrap in plastic wrap and then foil to prevent freezer burn. Thaw overnight in the refrigerator. The spiral remains perfectly intact after thawing and the flavors are well-preserved.
  • Do not freeze unbaked batter: The aquafaba in the batter does not freeze and thaw reliably in its uncooked state. Bake the cake before freezing.

Frequently Asked Questions

My cake cracked when I rolled it — what do I do?

If the crack is small, the filling and re-rolling will cover it and the finished roll will look perfect. If the crack is large, press the two sides of the cracked cake gently together and continue rolling — the cream cheese filling acts as a structural adhesive and will hold even a significantly cracked cake together once chilled. A heavy dusting of powdered sugar over the finished roll hides any surface imperfections beautifully. The most important prevention is to roll the cake immediately while it is still hot.

Can I use a different size baking sheet?

A 25 × 38cm (10 × 15 inch) jelly roll pan is the standard size for this recipe and produces a roll of the ideal diameter. A larger sheet pan (such as a half sheet pan) produces a thinner cake that rolls too tightly; a smaller pan produces a thicker cake that is harder to roll. If only a different size is available, adjust the baking time: a thinner cake bakes in 9–10 minutes; a thicker cake in 14–16 minutes.

Can I make this without aquafaba?

Yes — replace the aquafaba with 3 tablespoons of additional vegan yogurt or with 2 tablespoons of flax egg (1 tablespoon ground flaxseed mixed with 3 tablespoons water, rested 5 minutes). The flax egg produces a slightly denser, more earthy cake; the additional yogurt produces a more tender crumb. Both work well. The aquafaba is used in this recipe for its slight aerating quality — it adds a small amount of lift that the aquafaba achieves by partially whipping.

Can I make the roll ahead of time?

Yes — the roll is actually better made the day before serving. The overnight rest in the refrigerator allows the filling to firm completely, the cake to absorb moisture from the filling (producing an even moister crumb), and the spices in the cake to deepen and meld. Make the roll up to 24 hours before serving, wrap tightly, refrigerate, and dust with powdered sugar just before serving.


Tried this recipe? Leave a comment below and let us know how it turned out! Tag us on Instagram and Facebook — we love seeing your plant-powered creations. Looking for more addictive vegan snack and appetizer recipes? Browse all recipes on Easy Vegan Recipes — new recipes posted every single week!